Qt编程之Qt样例表(QSS)
For a long time, Qt has allowed you to decorate your GUIs with CSS’ish style sheets. Inspired by the web, stylesheets are a great way to stylize your Qt GUI, but it seems that few people use them. In this tutorial, we’ll create an example dialog in Qt using Designer and stylesheets. This tutorial assumes that you can get around in Qt Designer, and that you understand a little about Qt layouts.
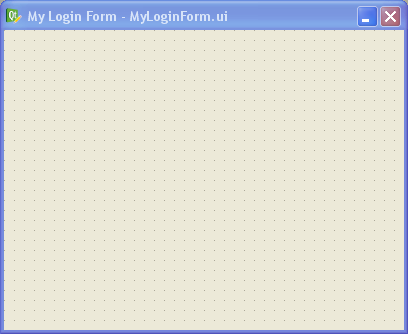
Step 1 Create a new empty form, named MyLoginForm.
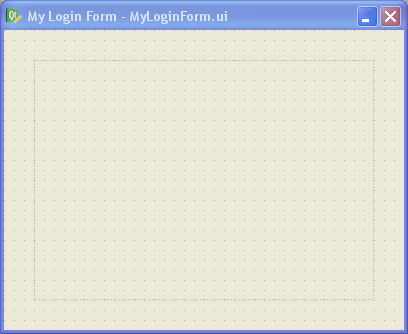
Step 2 Add a QFrame to your form, and apply a vertical layout to your form (any layout will work actually: vertical, horizontal or grid). Give your form about 30 pixels of layout margin around its perimeter. Name the QFrame “mainFrame”. When dealing with stylesheets, it’s convenient to name your widgets in Designer, even if you don’t plan to use them by name in your code (we won’t be writing any code besides CSS in this tutorial).
Step 3 In Designer’s object inspector, right-click on the top-level entry in the tree (called “MyLoginForm”), and select “Change styleSheet…” from the menu. You’ll get a little editor dialog like this:
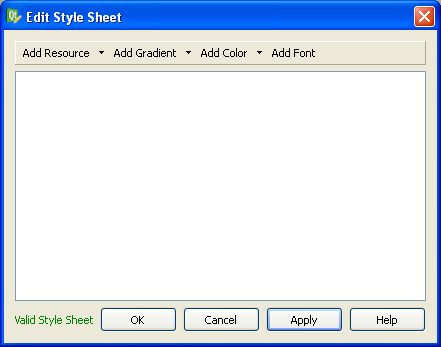
This is where we specify the style sheet for our form. You can put a style sheet on any widget in your form, but I prefer to do all my stylizing at the parent widget (“MyLoginForm” in this case). I prefer to do it this way because you’ll never have to go hunting to find your style sheet — it’s all in one place in your form. Since stylesheets cascade down to the child widgets, you can stylize any widget in your form from this point.
Let’s type in some CSS into the style sheet editor, like this:
#MyLoginForm {
background: gray;
}
#mainFrame {
border: 3px solid gray;
border-radius: 40px;
background: white;
}
After clicking OK on the editor dialog, you should see this:
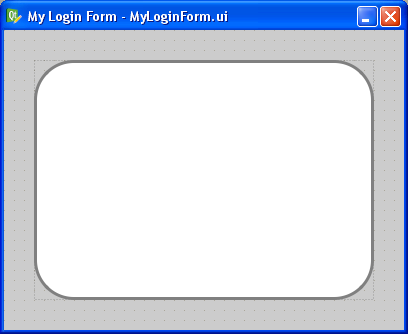
If your’s doesn’t look like this, you may have forgotten to change the parent widget’s name to “MyLoginForm” or the QFrame’s name to “mainFrame” (yes, capitalization does matter — Qt stylesheets are case sensitive). Or you may have mistyped something into the CSS dialog.
One cool feature is that you get to preview the style changes right as you make them. You don’t have to compile, save, or run anything. Designer does a very good job of showing your stylesheet changes live (WYSIWYG for you old-timers).
Let me explain what we just did. In CSS, a pound sign, ‘#’, in front of a name is how we stylize an individual widget by that name. In our example, #MyLoginForm identifies the parent widget (i.e., the background area). All we did there is give it a gray background with background: gray;.
For #mainFrame, we gave it a thick gray border, a white background, and rounded corners.
Step 4 Let’s add some widgets to make this dialog actually do something. Drag and drop a pair of QLineEdits, QLabels, and a single QPushButton on the form inside “mainFrame” and arrange them roughly like this:
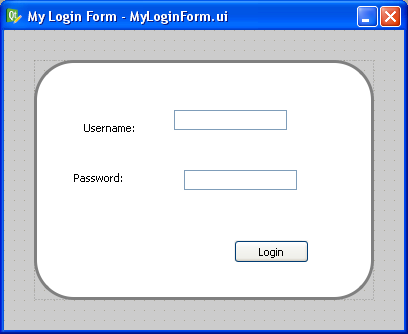
Step 5 Now apply a grid layout to “mainFrame”. Just select “mainFrame” by clicking on it (taking care not to accidentally select one of the QLineEdits or QLabels instead). Then click the grid layout button in Designer’s toolbar (optionally, you can go to the menu bar and click “Form” -> “Lay Out in a Grid”, or just press Ctrl+5 for you keyboard hackers).
Then give your layout some margin. I used 50 pixels of margin and 15 pixels for both vertical and horizontal spacing.
This is what you should have now:
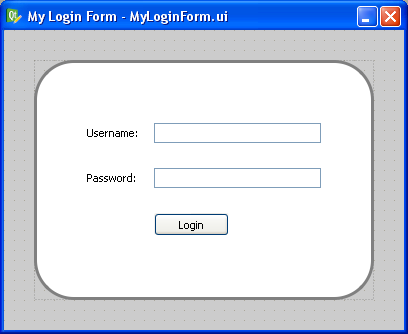
Step 6 Let’s stylize those boring QPushButton and QLineEdits. Add this to the style sheet for MyLoginForm:
QLineEdit {
padding: 1px;
border-style: solid;
border: 2px solid gray;
border-radius: 8px;
}
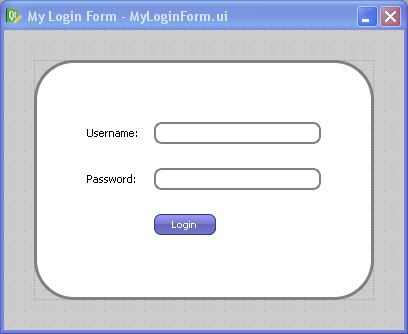
QPushButton {
color: white;
border-width: 1px;
border-color: #339;
border-style: solid;
border-radius: 7;
padding: 3px;
font-size: 10px;
padding-left: 5px;
padding-right: 5px;
min-width: 50px;
max-width: 50px;
min-height: 13px;
max-height: 13px;
}
Notice that we didn’t use the pound sign this time. When you omit the pound sign, you are specifying a “class” of widgets to stylize instead of a single widget by name. So in this case, we stylized all widgets of type “QLineEdit” and “QPushButton” (and any widget that may inherit from those widgets too).
That gives the QPushButton a cool gradient look and rounds the edges of the QLineEdits, like this:
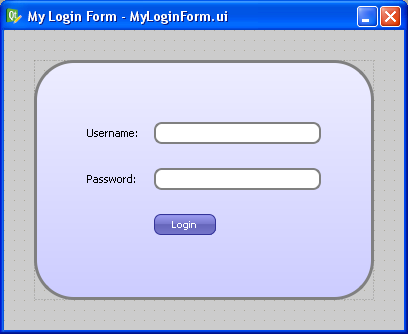
Step 7 Now let’s make that boring white background a gradient instead. Replace the “background: white;” line in the “#mainFrame” section with this instead:
background: QLinearGradient(x1: 0, y1: 0, x2: 0, y2: 1, stop: 0 #eef, stop: 1 #ccf);
Now you should see this:
Step 8 Since stylizing is all about detail and little tweaks, let’s mess a bit with the label font and the background color by changing the background for “#MyLoginForm” to “background: white”, and adding this:
QLabel {
font-weight: bold;
font-size: 15px;
}
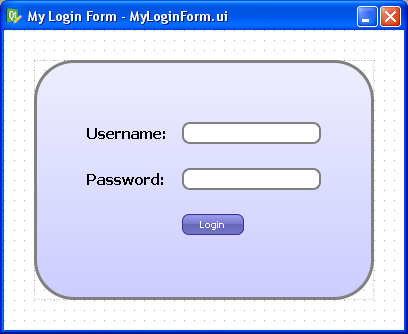
Now we get our finished product:
Isn’t it great how much you can do in Designer with style sheets? There are even things you can do with style sheets that can’t be done without writing lots of yucky C++ code. For example, you can change the border style of just a single side of a QFrame.
Oddities
There is one gotcha to keep in mind when using style sheets: Once you use a style sheet, it will often override other properties, like the “font” property or the “frameStyle” property. Keep this in mind when Designer changes properties you didn’t expect.
The other oddity with style sheets is that there’s no way to “include” external style sheet files into your widget’s style sheet. This means that you can’t have a common style sheet that gets applied to your entire application like you can in the web. I have a Qt patch that allows you to do this, but so far the Trolls haven’t done anything with it (to my knowledge). This would be immensely useful.
Cross Platform Note
A style sheet tutorial wouldn’t be complete without a comment on cross-platform issues. The dialog we just designed will look exactly the same on Linux, Windows, and Mac OS X because we stylized it so aggressively. If you want your widgets to look native on each platform, you should generally use style sheets sparingly, but if your goal is to have a consistent look across all platforms, style sheets are your best friend.
Conclusion
Now that I have discovered the power of style sheets in Qt, I use them whenever possible. What cool things have you done with Qt style sheets?
references:
http://doc.qt.io/qt-4.8/stylesheet-examples.html
http://www.cnblogs.com/cy568searchx/p/3645388.html
http://www.cnblogs.com/davesla/archive/2011/01/30/1947928.html
http://blog.csdn.net/playstudy/article/details/8027892
Qt编程之Qt样例表(QSS)的更多相关文章
- QT核心编程之Qt线程 (c)
QT核心编程之Qt线程是本节要介绍的内容,QT核心编程我们要分几个部分来介绍,想参考更多内容,请看末尾的编辑推荐进行详细阅读,先来看本篇内容. Qt对线程提供了支持,它引入了一些基本与平台无关的线程类 ...
- 《MySQL必知必会》学习笔记——附录B 样例表
附录B 样例表 本附录简要描述本书中所用的表及它们的用途. 编写SQL语句需要对基础数据库的设计有良好的理解.不知道什么信息存储在什么表中,表之间如何关联以及行内数据如何分解,是不可能编写出高效的SQ ...
- 界面编程之QT的事件20180727
/*******************************************************************************************/ 一.事件 1 ...
- 界面编程之QT的数据库操作20180801
/*******************************************************************************************/ 一.数据库连 ...
- 界面编程之QT窗口系统20180726
/*******************************************************************************************/ 一.坐标系统 ...
- Qt编程之qrc文件的链接
在Qt里面,.qrc文件是一种类似XML结构的文件,用结构化数据描述应用程序所需要的资源位置,例如图片,应用程序的图标文件等.它最终是与.ui文件类似都被通过Qt提供的命令行工具生成对应的qrc_XX ...
- Qt编程之UI与控件布局
当然,大家都知道UI界面可以用Qt Designer在约束环境下设置编辑.ui文件,再将.ui文件转换成对应的ui_XXX.h文件,这头文件中的内容是:用C++语言实现真正的界面布局.uic -o & ...
- Qt编程之d指针与q指针
我们在Qt中可以看到两个宏Q_D和Q_Q这两个红分别是取得d指针和q指针的,d指针指向封装的私有类,q指针指向公共的类.(我的理解类似于回调,回指的意思). 为什么Qt要这样实现呢?下面几个链接中的文 ...
- Qt编程之QtScript
需求是这样的: 需要给一个硬件接口测试些东西,用js来调用,js做成不同的独立模块分别测试不同的硬件接口,包括DMD内存,PCIE带宽等等.需要用一个exe来载入这些js文件分别调用测试模块.exe用 ...
随机推荐
- linux关闭防火墙及selinux
RHEL6.5 查看linux防护墙状态: service iptables status 关闭linux防火墙: 1)永久关闭,重启后生效 开启: chkconfig iptables on 关闭: ...
- (转)Maven实战(七)settings.xml相关配置
一.简介 settings.xml对于maven来说相当于全局性的配置,用于所有的项目,当Maven运行过程中的各种配置,例如pom.xml,不想绑定到一个固定的project或者要分配给用户时,我们 ...
- Object -C @property -- 笔记
避免函数名和字段重复: 代码:
- struts2,hibernate,spring整合笔记(1)
今天终于配置好了ssh框架的整合,记录下过程供参考 环境:window8.1,jdk1.7 ,带有javaee的eclipse,也就是说要能发布web项目,TOMCAT服务器,tomcat配置涉及到环 ...
- 一个简单的Verilog计数器模型
一个简单的Verilog计数器模型 功能说明: 向上计数 向下计数 预装载值 一.代码 1.counter代码(counter.v) module counter( input clk, input ...
- 逆拓扑排序 HDU2647Reward
这个题如果用邻接矩阵的话,由于n比较大,会超内存,所以选用邻接表的形式.还有就是这个题有那个等级的问题,一级比一级的福利高,所以不能直接拓扑排序,而是反过来,计算出度,找出度为0的顶点,然后更新出度数 ...
- SpringMVC02静态资源的访问
<%@ page language="java" import="java.util.*" pageEncoding="UTF-8"% ...
- C#总结项目《影院售票系统》编写总结二
昨天发布了总结项目的第一篇,需求分析以及类的搭建,今天继续更新,动态绘制控件.票类型的切换以及数据在窗体中的展现. 先从简单的开始,票类型的切换. 分析: 1.当点击普通票时 学生折扣和赠送者是禁用的 ...
- URI、URL、URN
URI.URL.URN URI(Uniform Resource Identifie):统一资源标识符 URL(Uniform Resource Locator):统一资源定位符 URN(Unifor ...
- Android开发手记(11) 滑动条SeekBar
安卓滑动条的操作特别简单,通过getProgress()可以获得SeekBar的位置,通过setProgress(int progress)可以设置SeekBar的位置.要想动态获取用户对SeekBa ...