
如何在Eclipse中开发并调试自己的插件(或者说如何将自己的代码插件化)
Setting up Eclipse to create and debug plugins for ImageJ
最近在做一个关于卫星遥感全链路仿真的项目,由于项目是基于ImageJ开发,而ImageJ提供了强大的插件机制,所以特来写一个东西说明如何将自己的代码转化为ImageJ的插件。
- Alt-File –> New
- Select the Java Project wizard and click Next

- Project name: IJ. Check Create separate folders for sources and class files. Click Next
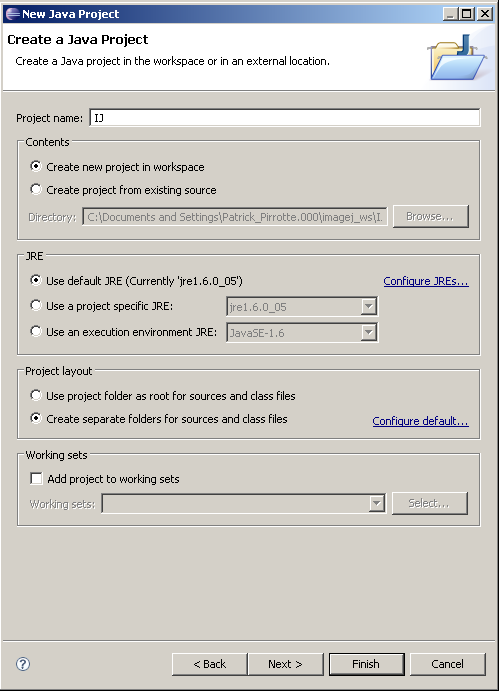
- On the following panel, select Source tab and check if Default output folder is set to IJ/bin
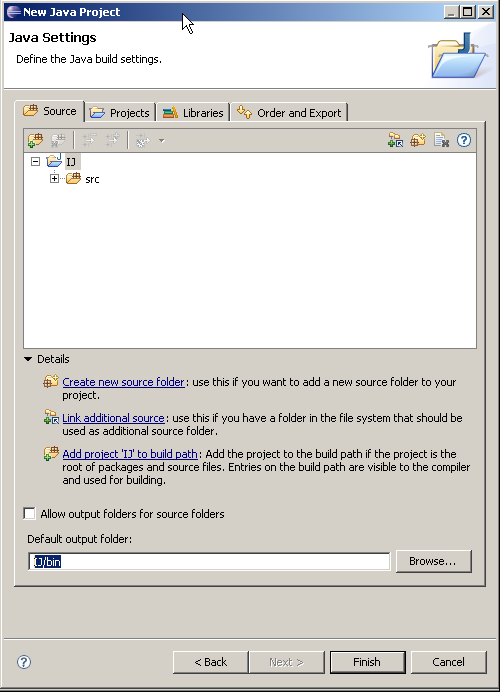
- On the Libraries tab click on Add external JARs, browse to your Java SDK library folder , select tools.jar, click Ok and click on Finish to create the project.
(on my computer the Java SDK library folder is located at C:\Program Files\Java\jdk1.6.0_02\lib)

- Finally, get the latest copy of ij here, extract the zip
- Copy the ij folder and its subfolders into the source folder
- Copy the images, macros and plugins folder and only IJ_Props.txt to the IJ project root.
- Click on F5 to tell Eclipse to refresh its Package list

Create a new plugin (or import your previously developed plugins).
- Alt-File –> New
- Select the Java Project wizard and click Next

- Give your plugin a name (don't forget to add an underscore if you want it to appear in the ImageJ menu!)

- On the Source tab, check that the output folder is set TestPlugin_/bin

- On the Project tab, click Add… and select your previously created IJ project containing the ImageJ source.
- Click Finish

- Create your Java plugin files. In our example, I created a sample TESTPlugin_.java with the following content:
import ij.IJ;
import ij.plugin.PlugIn;
public class TestPlugin_ implements PlugIn {
public void run(String arg) {
IJ.error("Hello world!");
}
}

- Create a file called build.xml in the project root folder. A sample build.xml file follows, which you should adapt to your needs.
<project name="TESTPlugin_" default="" basedir=".">
<description>
TESTPlugin_ build file
</description>
<property name="src" location="src" />
<property name="build" location="bin" />
<property name="dist" location="dist" />
<property name="pluginsDir" location="$basedir/../../IJ/plugins/" />
<property name="user.name" value="Patrick Pirrotte" />
<target name="main" depends="compress" description="Main target">
<echo>
Building the .jar file.
</echo>
</target>
<target name="compress" depends="" description="generate the distribution">
<jar jarfile="TESTPlugin_.jar">
<fileset dir="." includes="plugins.config" />
<fileset dir="${build}" includes="**/*.*" />
<manifest>
<attribute name="Built-By" value="${user.name}"/>
</manifest>
</jar>
<copy file="TESTPlugin_.jar" toDir="${pluginsDir}" />
</target>
</project>

- In the Package Explorer, right click on the TESTPlugin_ project, click on Properties, select Builders, click New… and select Ant Builder

- In the Main Tab, click Browse workspace and select the build.xml from your TESTPlugin_ project.

- In the Targets tab, click Set Targets for both After clean and Auto build targets, and select both main and compress.
- Click Ok twice to keep your changes.

- Goto Run→ Debug Configurations and create a new Java Application Debug Configuration. Fill in IJ In the field Project, and ij.ImageJ in the field Main class.

- Select the Source tab, then in the Source lookup path, Add→Add Java Project. Select the TestPlugin_ project. This step is crucial if you want to step into your plugin source during the debug phase. Apply the changes.

- If you select Debug, ImageJ will start and your TESTPlugin_ will show up in the Plugins menu…
- Set breakpoints in plugins or in the ImageJ source, the debugger should break accordingly.

后注:当然上文只是其中一种方法,也还有其他方法可以实现!!!
如何在Eclipse中开发并调试自己的插件(或者说如何将自己的代码插件化)的更多相关文章
- 老李分享:Eclipse中开发性能测试loadrunner脚本
老李分享:Eclipse中开发性能测试loadrunner脚本 前篇我分享了如何用loadrunner搭建javauser的性能测试脚本环境,本次我来告诉大家如何在eclipse开发loadrunne ...
- 如何在Eclipse中写Processing的sketch
有时候人们需要写更复杂的sketch,此时Processing提供的IDE就略显单薄,下面将介绍如何在eclipse中开发Processing. 一共分4步: 一.搭建环境:安装JRE.JDK.Ecl ...
- 在Eclipse中开发C/C++项目
摘要:通过本文你将获得如何在Eclipse平台上开发C/C++项目的总体认识.虽然Eclipse主要被用来开发Java项目,但它的框架使得它很容易实现对其他开发语言的支持.在这篇文章里,你将学会如何使 ...
- 【Eclipse】如何在Eclipse中使用命令行?
如何在Eclipse中使用命令行? 虽然我们已经有了像 Eclipse 这样高级的 IDE,但是我们有时候也是需要在开发的时候使用 Windows 的命令行,来运行一些独立的程序.在两个程序中切换来切 ...
- 如何在Eclipse中设置默认的JSP文件头部编码
如何在Eclipse中设置默认的JSP文件头部编码 一般,我们为了以后在导入和导出程序的时候(特别是项目较大,文件多)一般都默认文件编码格式为UTF-8 如果你通常都是通过Eclipse来编写程序,那 ...
- 如何在Eclipse中添加Tomcat的jar包
原文:如何在Eclipse中添加Tomcat的jar包 右键项目工程,点击Java Build Path 点击Add Library,选择Server Runtime 选择Tomcat版本 此时就看到 ...
- 如何在eclipse中安装Jess
如何在eclipse中安装Jess 浏览:49 | 更新:2014-05-12 16:39 这个文章帮了不少忙,感谢! 但经我实践,还要把插件那些文件向/dropins/sdk下也放一份,才能成功. ...
- 如何在Eclipse中配置Tomcat(免安装版)
如何在Eclipse中配置Tomcat(免安装版) 2013-10-09 23:19wgelgrsh | 分类:JAVA相关 | 浏览642次 分享到: 2013-10-10 17:10提问者采纳 ...
- 如何在Eclipse中添加Servlet-api.jar的方法
方法一: 点击窗口->首选项->java->构建路径->类路径变量->新建:将你的tomcat目录下的common/lib/servlet.jar加进来.如果你建立了一个 ...
随机推荐
- WIN7 以下创建cocos2d-x3.0+lua项目
用命令行生成和执行项目 无需打开VS 配置完环境 CMD执行 cocos new helloWold -p com.test -l lua -d E:\cocos2dx 来创建项目 cocos ...
- 视频编解码学习之路(H264)
学习视频编解码技术很难吗?视频编解码技术的未来是什么? 明了的说,无论是软件还是硬件设计,视频编解码技术有很多难点,都需要很长一段时间积累才行. 从一开始接触MPEG-2到最新的H.264标准,可算走 ...
- Linq 中的Select事例
---恢复内容开始--- 1.对查询结果进行转换. string[] names={"ADE","Jerry","Steves"}; var ...
- SQL Server DML(SELECT)常见用法(二)
1 引言 上篇讲到SQL Server中DML的基本使用方法,其中SELECT语句是最常用的语句,其功能强大,结构复杂,下面通过例子,具体介绍其使用方法. 2 SELECT查询语句 SELECT语 ...
- asp.net页面压缩
http压缩方法(IIS 6.0 与IIS 7.0的详解) 在网上看了有关这方面的博客,再加上自己的实践,整理了一下,希望对大家有所帮助 本片文章采用两种压缩方法:一种是在IIS上开启GZIP压缩 ...
- iOS设计模式解析(四)组合模式
组合模式:将对象组合成树形结构以表示"部分-整体"的层次结构.组合是的用户对单个对象和组合对象的使用具有一致 Cocoa Touch中组合模式使用:Cocoa Touch框架中,U ...
- 【Tomcat】项目自动部署的链接重置错误
在服务器中装好的tomcat7 ,(服务器是的window server 2008) 在tomcat bin目录运行的 service.bat install 安装服务.然后,设置服务项(服务项名称: ...
- Ugly Number,Ugly Number II,Super Ugly Number
一.Ugly Number Write a program to check whether a given number is an ugly number. Ugly numbers are po ...
- pycharm的激活
——————转———— Pycharm5注册方式 0x1 ,安装 0x2 , 调整时间到2038年. 0x3 ,申请30天试用 0x4, 退出pycharm 0x5, 时间调整回来. ##注册方法 ...
- 稠密图(邻接矩阵),并查集,最短路径(Dijkstra,spfa),最小生成树(kruskal,prim)
全部函数通过杭电 1142,1162,1198,1213等题目测试. #include<iostream> #include<vector> #include<queue ...