在WPF程序中使用摄像头兼谈如何使用AForge.NET控件(转)
前言:
AForge.NET 是用C#写的一个关于计算机视觉和人工智能领域的框架,它包括图像处理、神经网络、遗传算法和机器学习等。在C#程序中使用摄像头,我习惯性使用AForge.NET提供的类库。本文讲解如何在WPF程序中调用AForge.NET控件实现视频和抓拍功能。
AForge.NET控件下载地址:http://code.google.com/p/aforge/
WPF与WinForm控件交互:
要实现视频功能,需要使用AForge.Controls命名空间中的VideoSourcePlayer控件。这是一个WinForm控件,要在WPF程序中使用,我们需要做如下4步:
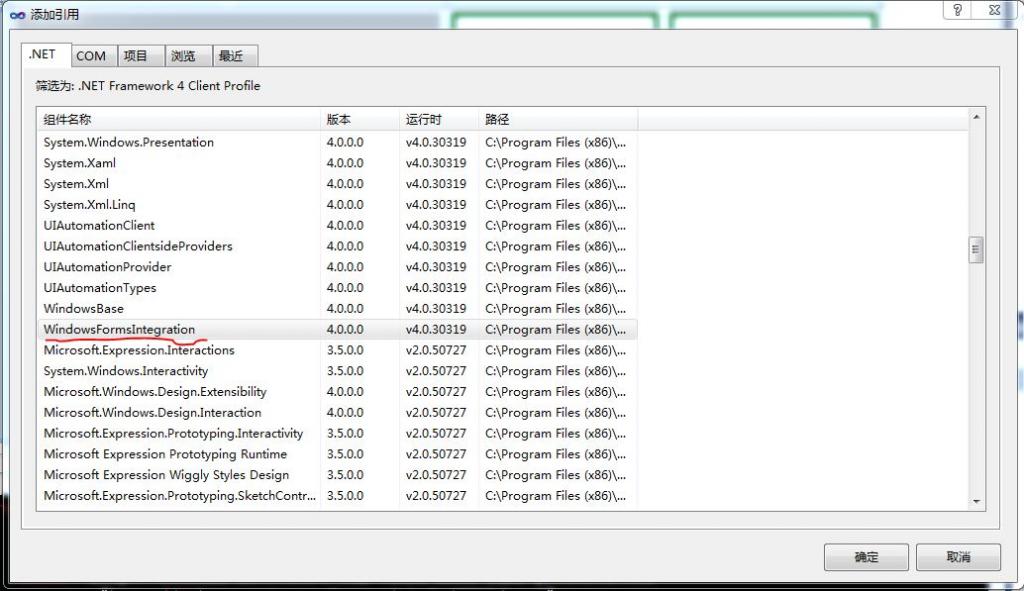
添加引用:
在.NET选项卡中选择WindowsFormsIntegration
在浏览选项卡中添加3个AForge.NET类库
AForge.Controls.dll
AForge.Video.dll
AForge.Video.DirectShow.dll
在XAML中添加System.Windows.Forms.Integration命名空间
[html] view plaincopyprint?
- xmlns:wfi ="clr-namespace:System.Windows.Forms.Integration;assembly=WindowsFormsIntegration"
xmlns:wfi ="clr-namespace:System.Windows.Forms.Integration;assembly=WindowsFormsIntegration"在XAML中添加AForge.Controls命名空间
[html] view plaincopyprint?
- xmlns:aforge ="clr-namespace:AForge.Controls;assembly=AForge.Controls"
xmlns:aforge ="clr-namespace:AForge.Controls;assembly=AForge.Controls"在XAML中加入VideoSourcePlayer可视控件
[html] view plaincopyprint?
- <wfi:WindowsFormsHost Grid.Row="0" Margin="5">
- <aforge:VideoSourcePlayer x:Name="sourcePlayer" Width="300" Height="360">
- </aforge:VideoSourcePlayer>
- </wfi:WindowsFormsHost>
<wfi:WindowsFormsHost Grid.Row="0" Margin="5">

    <aforge:VideoSourcePlayer x:Name="sourcePlayer" Width="300" Height="360">

    </aforge:VideoSourcePlayer>

</wfi:WindowsFormsHost>
演示程序界面:

开发工具:
Visual Studio v2010
.NET Framework 4 Client Profile
工程文件下载:
源程序:
MainWindow.xaml
<Window x:Class="FaceCapture.MainWindow"
xmlns:wfi ="clr-namespace:System.Windows.Forms.Integration;assembly=WindowsFormsIntegration"
xmlns:aforge ="clr-namespace:AForge.Controls;assembly=AForge.Controls"
xmlns="http://schemas.microsoft.com/winfx/2006/xaml/presentation"
xmlns:x="http://schemas.microsoft.com/winfx/2006/xaml"
xmlns:my="clr-namespace:Splash;assembly=FingerPictureBox"
Title="FaceCapture(WPF)" mc:Ignorable="d" xmlns:d="http://schemas.microsoft.com/expression/blend/2008" xmlns:mc="http://schemas.openxmlformats.org/markup-compatibility/2006" d:DesignHeight="480" d:DesignWidth="902" SizeToContent="WidthAndHeight" WindowStartupLocation="CenterScreen" ResizeMode="CanMinimize" AllowDrop="True" Closing="Window_Closing">
<Grid AllowDrop="True">
<Grid.ColumnDefinitions>
<ColumnDefinition />
<ColumnDefinition />
</Grid.ColumnDefinitions>
<Grid Grid.Column="0" AllowDrop="False">
<Grid.RowDefinitions>
<RowDefinition />
<RowDefinition />
</Grid.RowDefinitions>
<wfi:WindowsFormsHost Grid.Row="0" Margin="5">
<aforge:VideoSourcePlayer x:Name="sourcePlayer" Width="300" Height="360">
</aforge:VideoSourcePlayer>
</wfi:WindowsFormsHost>
<StackPanel Grid.Row="1" Orientation="Horizontal" Height="60" HorizontalAlignment="Stretch" >
<Button Name="button_Play" Height="40" Width="120" Margin="40,10,20,10" Click="button_Play_Click">
<StackPanel Orientation="Horizontal" VerticalAlignment="Center">
<Image Name="image_Play" Width="32" Height="32" />
<Label Name="label_Play" Content="开启摄像头" VerticalContentAlignment="Center" FontSize="14" />
</StackPanel>
</Button>
<Button Name="button_Capture" Height="40" Width="120" Margin="40,10,40,10" Click="button_Capture_Click">
<StackPanel Orientation="Horizontal" VerticalAlignment="Center">
<Image Name="image_Capture" Width="32" Height="32" />
<Label Content="抓拍图像" VerticalContentAlignment="Center" FontSize="14" />
</StackPanel>
</Button>
</StackPanel>
</Grid>
<Grid Grid.Column="1">
<Grid.RowDefinitions>
<RowDefinition />
<RowDefinition />
</Grid.RowDefinitions>
<StackPanel Grid.Row="0" Orientation="Horizontal">
<my:FingerPictureBox Height="210" Name="fingerPictureBox1" Width="210" BorderThickness="5" BorderBrush="DarkGreen" Margin="5" />
<my:FingerPictureBox Height="210" Name="fingerPictureBox2" Width="210" BorderThickness="5" BorderBrush="DarkGreen" Margin="5" />
</StackPanel>
<StackPanel Grid.Row="1" Orientation="Horizontal">
<my:FingerPictureBox Height="210" Name="fingerPictureBox3" Width="210" BorderThickness="5" BorderBrush="DarkGreen" Margin="5" />
<my:FingerPictureBox Height="210" Name="fingerPictureBox4" Width="210" BorderThickness="5" BorderBrush="DarkGreen" Margin="5" />
</StackPanel>
</Grid>
</Grid>
</Window>
MainWindow.xaml.cs
using System;
using System.Windows;
using System.Windows.Media.Imaging;
using AForge.Video.DirectShow;
using Splash;
namespace FaceCapture
{
/// <summary>
/// MainWindow.xaml 的交互逻辑
/// </summary>
public partial class MainWindow : Window
{
BitmapSource ImagePlay;
BitmapSource ImageStop;
public MainWindow()
{
InitializeComponent();
// 设置窗体图标
this.Icon = System.Windows.Interop.Imaging.CreateBitmapSourceFromHIcon(
Properties.Resources.FingerPictureBox.Handle,
Int32Rect.Empty,
BitmapSizeOptions.FromEmptyOptions());
// 图像源初始化
ImagePlay = System.Windows.Interop.Imaging.CreateBitmapSourceFromHBitmap(
Properties.Resources.Button_Play_icon2.GetHbitmap(),
IntPtr.Zero,
Int32Rect.Empty,
BitmapSizeOptions.FromEmptyOptions());
ImageStop = System.Windows.Interop.Imaging.CreateBitmapSourceFromHBitmap(
Properties.Resources.Button_Stop_icon.GetHbitmap(),
IntPtr.Zero,
Int32Rect.Empty,
BitmapSizeOptions.FromEmptyOptions());
// 设置按钮图像
image_Play.Source = ImagePlay;
image_Capture.Source = System.Windows.Interop.Imaging.CreateBitmapSourceFromHBitmap(
Properties.Resources.capture.GetHbitmap(),
IntPtr.Zero,
Int32Rect.Empty,
BitmapSizeOptions.FromEmptyOptions());
// 设置窗体装载后事件处理器
this.Loaded += new RoutedEventHandler(MainWindow_Loaded);
}
private void MainWindow_Loaded(object sender, RoutedEventArgs e)
{
// 设定初始视频设备
FilterInfoCollection videoDevices = new FilterInfoCollection(FilterCategory.VideoInputDevice);
if (videoDevices.Count > 0)
{ // 默认设备
sourcePlayer.VideoSource = new VideoCaptureDevice(videoDevices[0].MonikerString);
}
else
{
button_Play.IsEnabled = false;
button_Capture.IsEnabled = false;
}
// 设置图片框初始图像
BitmapSource bs = System.Windows.Interop.Imaging.CreateBitmapSourceFromHBitmap(
Properties.Resources.noimage.GetHbitmap(),
IntPtr.Zero,
Int32Rect.Empty,
BitmapSizeOptions.FromEmptyOptions());
fingerPictureBox1.InitialImage = bs;
fingerPictureBox2.InitialImage = bs;
fingerPictureBox3.InitialImage = bs;
fingerPictureBox4.InitialImage = bs;
}
private void button_Play_Click(object sender, RoutedEventArgs e)
{
if (image_Play.Source == ImagePlay)
{ // 开启视频
sourcePlayer.Start();
if (sourcePlayer.IsRunning)
{
// 改变按钮为“停止”状态
image_Play.Source = ImageStop;
label_Play.Content = "停止";
// 允许拍照
button_Capture.IsEnabled = true;
}
}
else
{
if (sourcePlayer.IsRunning)
{ // 停止视频
sourcePlayer.SignalToStop();
sourcePlayer.WaitForStop();
// 改变按钮为“开始”状态
image_Play.Source = ImagePlay;
label_Play.Content = "开启摄像头"; ;
// 关闭拍照
button_Capture.IsEnabled = false;
}
}
}
private void button_Capture_Click(object sender, RoutedEventArgs e)
{
// 判断视频设备是否开启
if (sourcePlayer.IsRunning)
{ // 进行拍照
for (Int32 i = 1; i <= 4; i++)
{
object box = this.FindName("fingerPictureBox" + i);
if(box is FingerPictureBox)
{
if ((box as FingerPictureBox).ActiveImage == (box as FingerPictureBox).InitialImage)
{ // 更新图像
(box as FingerPictureBox).ActiveImage = System.Windows.Interop.Imaging.CreateBitmapSourceFromHBitmap(
sourcePlayer.GetCurrentVideoFrame().GetHbitmap(),
IntPtr.Zero,
Int32Rect.Empty,
BitmapSizeOptions.FromEmptyOptions());
break;
}
}
}
}
}
private void Window_Closing(object sender, System.ComponentModel.CancelEventArgs e)
{
if (sourcePlayer.IsRunning)
{ // 停止视频
sourcePlayer.SignalToStop();
sourcePlayer.WaitForStop();
}
}
}
}
在WPF程序中使用摄像头兼谈如何使用AForge.NET控件(转)的更多相关文章
- WPF 程序中启动和关闭外部.exe程序
当需要在WPF程序启动时,启动另一外部程序(.exe程序)时,可以按照下面的例子来: C#后台代码如下: using System; using System.Collections.Generic; ...
- 如何在WPF程序中使用ArcGIS Engine的控件
原文 http://www.gisall.com/html/47/122747-4038.html WPF(Windows Presentation Foundation)是美国微软公司推出.NET ...
- WPF程序中App.Config文件的读与写
WPF程序中的App.Config文件是我们应用程序中经常使用的一种配置文件,System.Configuration.dll文件中提供了大量的读写的配置,所以它是一种高效的程序配置方式,那么今天我就 ...
- 如何追踪 WPF 程序中当前获得键盘焦点的元素并显示出来
原文:如何追踪 WPF 程序中当前获得键盘焦点的元素并显示出来 title: "如何追踪 WPF 程序中当前获得键盘焦点的元素并显示出来" publishDate: 2019-06 ...
- 在 WPF 程序中应用 Windows 10 真?亚克力效果
原文:在 WPF 程序中应用 Windows 10 真?亚克力效果 从 Windows 10 (1803) 开始,Win32 应用也可以有 API 来实现原生的亚克力效果了.不过相比于 UWP 来说, ...
- 解决WPF程序中ListBox ItemsSource变化时不重置ScrollBar的问题
解决WPF程序中ListBox ItemsSource变化时不重置ScrollBar的问题 当我们改变ListBox的ItemsSource时,会发现这样一个问题:数据源变化时,虽然控件中的内容会跟着 ...
- 【WPF学习】第六十五章 创建无外观控件
用户控件的目标是提供增补控件模板的设计表面,提供一种定义控件的快速方法,代价是失去了将来的灵活性.如果喜欢用户控件的功能,但需要修改使其可视化外观,使用这种方法就有问题了.例如,设想希望使用相同的颜色 ...
- WPF学习笔记(四):AvalonEdit 代码高亮编辑控件专题
AvalonEdit 是一个基于 WPF 的文本编辑器组件.它是由 Daniel Grunwald 为 SharpDevelop 编写的.从 5.0 版开始,AvalonEdit 根据MIT许可证发布 ...
- C# WPF 低仿网易云音乐(PC)Banner动画控件
原文:C# WPF 低仿网易云音乐(PC)Banner动画控件 由于技术有限没能做到一模一样的动画,只是粗略地做了一下.动画有点生硬,还有就是没做出网易云音乐的立体感.代码非常简单粗暴,而且我也写有很 ...
随机推荐
- Linux初识(转)
文件系统是linux的一个十分基础的知识,同时也是学习linux的必备知识. 本文将站在一个较高的视图来了解linux的文件系统,主要包括了linux磁盘分区和目录.挂载基本原理.文件存储结构.软链接 ...
- 【转】Xcode添加静态库以及编译选项配置常见问题
原文网址:http://www.cnblogs.com/Quains/p/3276425.html 一,Xcode编译出现Link错误,出现"duplicate symbols for ar ...
- unity, 在保持场景根节点Transform不变且Hierarchy结构不变的前提下整体旋转场景
比如我们摆出下面结构: 其Hierarchy如下: 其中根节点road的Transform是如下干净的原始状态: 现在想保持road的Hierarchy和Transform都不变的情况下将road旋转 ...
- Java把长整型时间转成字符串日期
数据库里存放的是timestamp格式,前端取得后是这种:1436255550710长整型时间截转换成"2015-07-07"这种格式呢? import java.io.IOExc ...
- Android学习随笔--ListView的分页功能
第一次写博客,可能格式,排版什么的会非常不美观,不过我主要是为了记录自己的Android学习之路,为了以后能有些东西回顾.既然是为了学习,那我肯定会吸收各位大大们的知道经验,有不足的地方请指出. 通过 ...
- CXF之九 WS-Security
Webservice 的安全 Webservice为作为方便的服务被用广大领域使用的同时,也成为了黑客们的美食.在这里,本文将就目前对Webservice安全所能做的改进做简单介绍.在Webservi ...
- Selenium2Library系列 keywords 之 _SelectElementKeywords
# 公有方法 (1)get_list_items(self, locator) 返回labels集合 _get_select_list_options(self, select_list_or_lo ...
- VC6.0到VS2013全部版本下载地址
Microsoft Visual Studio 6.0 下载:英文版360云盘下载: http://l11.yunpan.cn/lk/sVeBLC3bhumrI英文版115网盘下载: http://1 ...
- 性能测试-ApacheBench
基本简介 ApacheBench 是一个指令列程式,专门用来执行网站服务器的运行效能,特别是针对Apache 网站服务器.这原本是用来检测 Apache 网站服务器能够提供的效能,特别是可以看出Apa ...
- C++的引用类型的变量到底占不占用内存空间?
——by karottc 分析一下 C++ 里面的引用类型(例如: int &r = a; )中的 r 变量是否占用内存空间呢?是否和 int *p = &a; 中的 p 变量 ...