
windows 环境下nginx + tomcat群 + redis 实现session共享
nginx作为负载均衡根据定义将不同的用户请求分发到不同的服务器,同时也解决了因单点部署服务器故障导致的整个应用不能访问的问题
在加入nginx之后,如果多个服务器中的一个或多个(不是全部)发生故障,均不影响用户的正常使用,会将用户请求分发到可以提供服务的服务器上
本节实例仅实现 一个nginx + 2个tomcat + redis实现java web应用的自由切换,并保持用户会话信息,对前端用户完全不可见。
会话的共享是为了保证用户在首次登录系统后已经后续的会话不会因为nginx重新分发到其他服务器而再次登录,达到会话信息共享
本例在windows下采用的是
nginx 1.9.13
tomcat 7.0.64
redis 2.8
操作步骤:
① 准备两个tomcat,并修改端口,修改tomcat/webapps/ROOT中index.jsp内容为:
<%@ page language="java" contentType="text/html; charset=UTF-8"

    pageEncoding="UTF-8"%>

<%

    String username = request.getParameter("username");

    System.out.println("username:"+username);

    if(username!=null){

        session.setAttribute("userSession", username);

        System.out.println("value in session is :" + session.getAttribute("userSession"));

    }

%>

<!DOCTYPE html PUBLIC "-//W3C//DTD HTML 4.01 Transitional//EN" "http://www.w3.org/TR/html4/loose.dtd">

<html>

<head>

<meta http-equiv="Content-Type" content="text/html; charset=UTF-8">

<title>ngix+tomcat+redis session共享验证</title>

</head>

<body>

<form action="index.jsp">

     <input type="text" name="username" value=""/>

     <br/>

     <input type="submit" value="保存信息到session"/>

</form>

<hr/>

<!-- 不同tomcat请使用不同mark 以便识别  -->

你访问的tomcat 端口为:8898   tomcat001

<br/>

session值为: <%=session.getAttribute("userSession") %>

</body>

</html>
并保证两个tomcat都能正常启动,并能正常访问
② 下载ngix并修改conf文件如下
#Nginx所用用户和组

#user  niumd niumd;

#工作的子进程数量(通常等于CPU数量或者2倍于CPU)

worker_processes  1;

#错误日志存放路径

#error_log  logs/error.log;

#error_log  logs/error.log  notice;

error_log  logs/error.log  info;

#指定pid存放文件

pid        logs/nginx.pid;

events {

        #使用网络IO模型linux建议epoll,FreeBSD建议采用kqueue

    #use epoll;

    #允许最大连接数

    worker_connections  1024;

}

http {

    include       mime.types;

    default_type  application/octet-stream;

        #定义日志格式

    #log_format  main  '$remote_addr - $remote_user [$time_local] $request '

    #                  '"$status" $body_bytes_sent "$http_referer" '

    #                  '"$http_user_agent" "$http_x_forwarded_for"';

    #access_log  off;

    access_log  logs/access.log;

    client_header_timeout  3m;

    client_body_timeout    3m;

    send_timeout           3m;

    client_header_buffer_size    1k;

    large_client_header_buffers  4 4k;

    sendfile        on;

    tcp_nopush      on;

    tcp_nodelay     on;

    #keepalive_timeout  75 20;

    include    gzip.conf;

       upstream localhost {

         #ip_hash

      #ip_hash; #测试时请不要打开ip_hash 否则不会在不同server间跳转,第一次访问的哪一个就会一直访问哪一个server

      #下面为配置的server列表,weight表示权重,值越大分配到的请求就越多,默认为1.

      server localhost:8898 weight=1;

      server localhost:8899 weight=1;

     }

    server {

            listen       8888; #8888为监听的端口,所以访问时就要通过 ip:8888来访问

            server_name  localhost;

            location / {

                    proxy_connect_timeout   3;

                    proxy_send_timeout      30;

                    proxy_read_timeout      30;

                    proxy_pass http://localhost; #这里的名字要和上面upstream后面跟的名字一致

            }

   }

}
2016-06-06增加静态资源缓存设置和获取真实客户端
#Nginx所用用户和组

#user  niumd niumd;

#工作的子进程数量(通常等于CPU数量或者2倍于CPU)

worker_processes  1;

#错误日志存放路径

#error_log  logs/error.log;

#error_log  logs/error.log  notice;

error_log  logs/error.log  info;

#指定pid存放文件

pid        logs/nginx.pid;

events {

    #使用网络IO模型linux建议epoll,FreeBSD建议采用kqueue

    #use epoll;

    #允许最大连接数

    worker_connections  1024;

}

http {

    include       mime.types;

    default_type  application/octet-stream;

        #定义日志格式

    #log_format  main  '$remote_addr - $remote_user [$time_local] $request '

    #                  '"$status" $body_bytes_sent "$http_referer" '

    #                  '"$http_user_agent" "$http_x_forwarded_for"';

    #access_log  off;

    access_log  logs/access.log;

    client_header_timeout  3m;

    client_body_timeout    3m;

    send_timeout           3m;

    client_header_buffer_size    1k;

    large_client_header_buffers  4 4k;

    sendfile        on;

    tcp_nopush      on;

    tcp_nodelay     on;

    #keepalive_timeout  75 20;

    include    gzip.conf;

       upstream localhost {

         #ip_hash

      #ip_hash; #测试时请不要打开ip_hash 否则不会在不同server间跳转,第一次访问的哪一个就会一直访问哪一个server

      #下面为配置的server列表,weight表示权重,值越大分配到的请求就越多,默认为1.

      server localhost:8898 weight=1;

      server localhost:8899 weight=1;

     }

    server {

            listen       8888; #8888为监听的端口,所以访问时就要通过 ip:8888来访问

            server_name  localhost;

            #charset koi8-r;

            #access_log  logs/host.access.log  main;

            location / {

                    proxy_connect_timeout   3;

                    proxy_send_timeout      30;

                    proxy_read_timeout      30;

                    proxy_pass http://localhost; #这里的名字要和上面upstream后面跟的名字一致

                    root   html;

                    index  index.aspx index.html index.htm;

                    #设置主机头和客户端真实地址,以便服务器获取客户端真实IP

                    proxy_set_header   Host             $host;

                    proxy_set_header   X-Real-IP        $remote_addr;

                    proxy_set_header   X-Forwarded-For  $proxy_add_x_forwarded_for;

            }

            #静态资源缓存设置

            location ~ \.(jpg|png|jpeg|bmp|gif|swf|css)$

            {

                expires 30d;

                root /nginx-1.9.3/html;#root:

                break;

            }

            #error_page  404              /404.html;

            # redirect server error pages to the static page /50x.html

            #

            error_page   500 502 503 504  /50x.html;

            location = /50x.html {

                root   html;

            }

   }

}
③ cmd窗口中启动nginx 停止用nginx -s stop命令
④下载redis并在cmd中执行server.exe启动,可根据需要修改redis.conf中的端口 port 6379 ,默认端口为6379 停止使用 redis-cli shutdown
⑤ 新建maven工程并选择和本地java_home版本一致的jdk,将https://github.com/jcoleman/tomcat-redis-session-manager 代码加入依赖并打包(打好的jar包在文章末尾有下载地址)
⑥ 修改tomcat/conf下context.xml为
<?xml version='1.0' encoding='utf-8'?>

<!--

  Licensed to the Apache Software Foundation (ASF) under one or more

  contributor license agreements.  See the NOTICE file distributed with

  this work for additional information regarding copyright ownership.

  The ASF licenses this file to You under the Apache License, Version 2.0

  (the "License"); you may not use this file except in compliance with

  the License.  You may obtain a copy of the License at

      http://www.apache.org/licenses/LICENSE-2.0

  Unless required by applicable law or agreed to in writing, software

  distributed under the License is distributed on an "AS IS" BASIS,

  WITHOUT WARRANTIES OR CONDITIONS OF ANY KIND, either express or implied.

  See the License for the specific language governing permissions and

  limitations under the License.

-->

<!-- The contents of this file will be loaded for each web application -->

<Context>

    <!-- Default set of monitored resources -->

    <WatchedResource>WEB-INF/web.xml</WatchedResource>

    <!-- Uncomment this to disable session persistence across Tomcat restarts -->

    <!--

    <Manager pathname="" />

    -->

    <!-- Uncomment this to enable Comet connection tacking (provides events

         on session expiration as well as webapp lifecycle) -->

    <!--

    <Valve className="org.apache.catalina.valves.CometConnectionManagerValve" />

    -->

    <Valve className="com.orangefunction.tomcat.redissessions.RedisSessionHandlerValve" />

        <Manager className="com.orangefunction.tomcat.redissessions.RedisSessionManager"

         host="localhost"

         port="6379"

         database="0"

         maxInactiveInterval="60" />

</Context>
⑦修改tomcat/conf/server.xml中engine信息 增加jvmRoute 标示
<Engine name="Catalina" defaultHost="localhost" jvmRoute="jvm8899">
⑧ 拷贝第⑤步打好的jar包以及依赖的jedis-2.7.2.jar commons-pool2-2.4.1.jar到每个tomcat的lib目录下
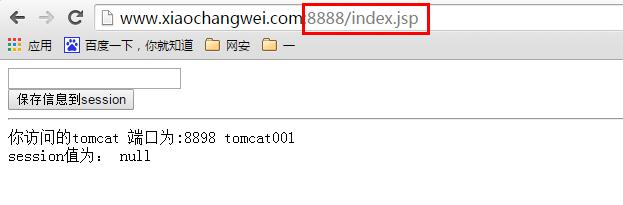
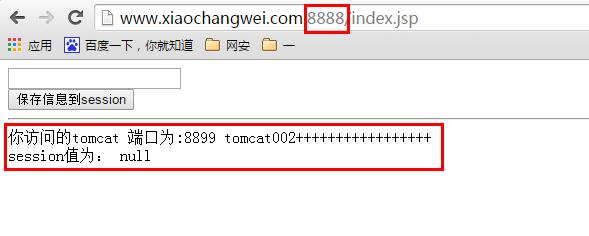
⑨ 先启动redis,再启动所有tomcat,最后启动nginx 输入nginx监听的端口进行访问,结果如下:
最开始没有输入session信息时,多次刷新将显示访问到了两个不同的tomcat
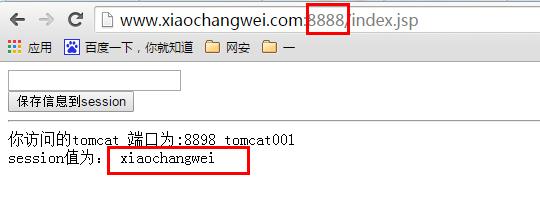
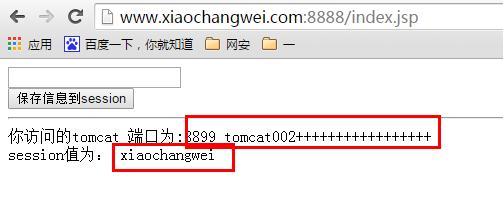
在输入框中输入信息并保存,再不断刷新
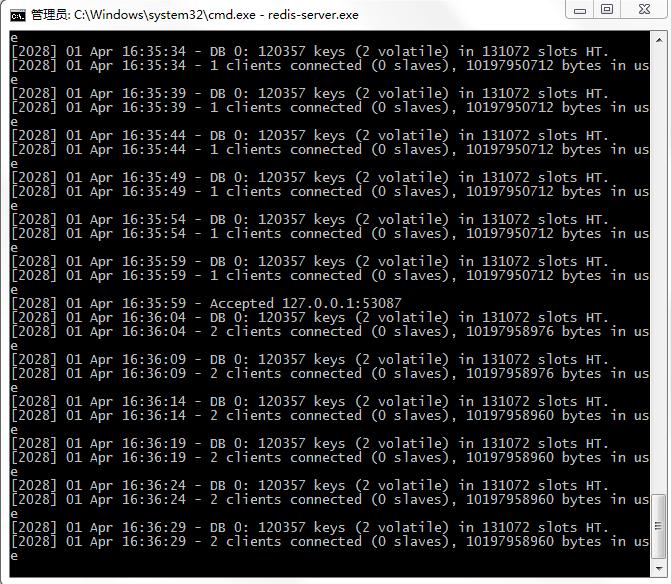
在执行过程中,也会看见redis控制台不停的有相应信息输出
后期我会将所有的实例代码及配置文件全部放到我的网盘,欢迎下载验证,相互交流
下载地址: http://pan.baidu.com/s/1pK7GIbp
下一篇文章我将以具体demo方式展示在linux环境下,采用keepalived+mysql主主双活, 在某个mysql遇见故障不能提供服务时进行mysql自动切换
mysql主从同步请参考我之前的文章:http://www.cnblogs.com/xiaochangwei/p/4824355.html
windows 环境下nginx + tomcat群 + redis 实现session共享的更多相关文章
- 搭建windows环境下(nginx+mysql+php)开发环境
搭建windows环境下(nginx+mysql+php)开发环境 1. 所需准备应用程序包 1.1 nginx 程序包nginx-1.0.4.zip或其他版本(下载地址: http ...
- Windows环境下部署Tomcat服务器图文教程
Tomcat是一个免费的开放源代码的Web 应用服务器,属于轻量级应用服务器,在中小型系统和并发访问用户不是很多的场合下被普遍使用,是开发和调试JSP程序的首选. 本文将详细介绍在Windows环境下 ...
- JavaWeb入门——在Windows环境下安装Tomcat服务器
JavaWeb入门——在Windows环境下安装Tomcat服务器 摘要:本文主要学习如何在Windows环境中下载并安装Tomcat服务器. 下载 获取安装包 推荐去官网上下载Tomcat: htt ...
- 【数据库开发】windows环境下通过c++使用redis
1.Windows下Redis的安装使用 Redis是一个key-value存储系统.Redis的出现,很大程度补偿了memcached这类key/value存储的不足,在部 分场合可以对关系数据库起 ...
- Tomcat通过Redis实现session共享的完整部署记录
对于生产环境有了一定规模的tomcat集群业务来说,要实现session会话共享,比较稳妥的方式就是使用数据库持久化session.为什么要持久化session(共享session)呢?因为在客户端每 ...
- windows环境下配置php和redis
Redis 是完全开源免费的,遵守BSD协议,是一个高性能的key-value数据库. 一.Window 下安装 下载地址:https://github.com/dmajkic/redis/downl ...
- nginx+tomcat集群+redis(memcache)session共享!
常用保持session的方式: 1.一些代理(比如nginxIP_hash) 1.使用数据库来存储Session 2.使用Cookie来存储Session ...
- windows环境下nginx的启动、停止
Windows下Nginx的启动.停止等命令 在Windows下使用Nginx,我们需要掌握一些基本的操作命令,比如:启动.停止Nginx服务,重新载入Nginx等,下面我就进行一些简单的介绍.1.启 ...
- 在windows环境下 nginx + .net core 3.1 实现反向代理和负载均衡
一.创建.net core web 应用 1.首先打开vs2019创建好.net core web应用,简单的注入IConfiguration 便于打印端口号展示效果. 1 private reado ...
随机推荐
- jQuery实践-网页版2048小游戏
▓▓▓▓▓▓ 大致介绍 看了一个实现网页版2048小游戏的视频,觉得能做出自己以前喜欢玩的小游戏很有意思便自己动手试了试,真正的验证了这句话-不要以为你以为的就是你以为的,看视频时觉得看懂了,会写了, ...
- Ubuntu 16.10 安装byzanz截取动态效果图工具
1.了解byzanz截取动态效果图工具 byzanz能制作文件小,清晰的GIF动态效果图,不足就是,目前只能通过输入命令方式来录制. byzanz主要的参数选项有: -d, --duration=SE ...
- Matlab 高斯_拉普拉斯滤波器处理医学图像
前言:本程序是我去年实现论文算法时所做.主要功能为标记切割肝脏区域.时间有点久,很多细节已经模糊加上代码做了很多注释,因此在博客中不再详述. NOTE: 程序分几大段功能模块,仔细阅读,对解决医学图像 ...
- js获取给定月份的N个月后的日期
1.在讲js获取给定月份的N个月后的日期之前,小颖先给大家讲下getFullYear().getYear()的区别. ①getYear() var d = new Date() console.log ...
- SDWebImage源码解读之SDWebImageCache(下)
第六篇 前言 我们在SDWebImageCache(上)中了解了这个缓存类大概的功能是什么?那么接下来就要看看这些功能是如何实现的? 再次强调,不管是图片的缓存还是其他各种不同形式的缓存,在原理上都极 ...
- 简记用ArcGIS处理某项目需求中数据的步骤
文章版权由作者李晓晖和博客园共有,若转载请于明显处标明出处:http://www.cnblogs.com/naaoveGIS/ 1. 背景 项目需求涉及如下几个步骤: a.矢量化 b.获取范围内要素 ...
- 数据的双向绑定 Angular JS
接触AngularJS许了,时常问自己一些问题,如果是我实现它,会在哪些方面选择跟它相同的道路,哪些方面不同.为此,记录了一些思考,给自己回顾,也供他人参考. 初步大致有以下几个方面: 数据双向绑定 ...
- C语言动态走迷宫
曾经用C语言做过的动态走迷宫程序,先分享代码如下: 代码如下: //头文件 #include<stdio.h> #include<windows.h>//Sleep(500)函 ...
- 基于注解的bean配置
基于注解的bean配置,主要是进行applicationContext.xml配置.DAO层类注解.Service层类注解. 1.在applicationContext.xml文件中配置信息如下 &l ...
- 【微信小程序开发】之如何获取免费ssl证书【图文步骤】
微信小程序要求所有网络请求都走ssl加密,因此我们开发服务端接口需要配置为https 这篇文章介绍一下如何 在 startssl 申请一个免费的ca证书. 1. 打开网站 https://www.s ...