实验八. urllib模块、requests模块+BeautifulSoup模块使用、Feapder框架
一、实验目标:
熟悉模块的的用法,练习编写爬虫
二、实验要求:
编写代码,完成功能
三、实验内容:
(1)使用urllib模块或request模块读取网页内容,并利用BeautifulSoup模块进行内容解析,编写爬虫从http://www.cae.cn/cae/html/main/col48/column_48_1.html爬取中国工程院院士信息
- 模块导入:
import requests

from bs4 import BeautifulSoup
- 伪造请求头:
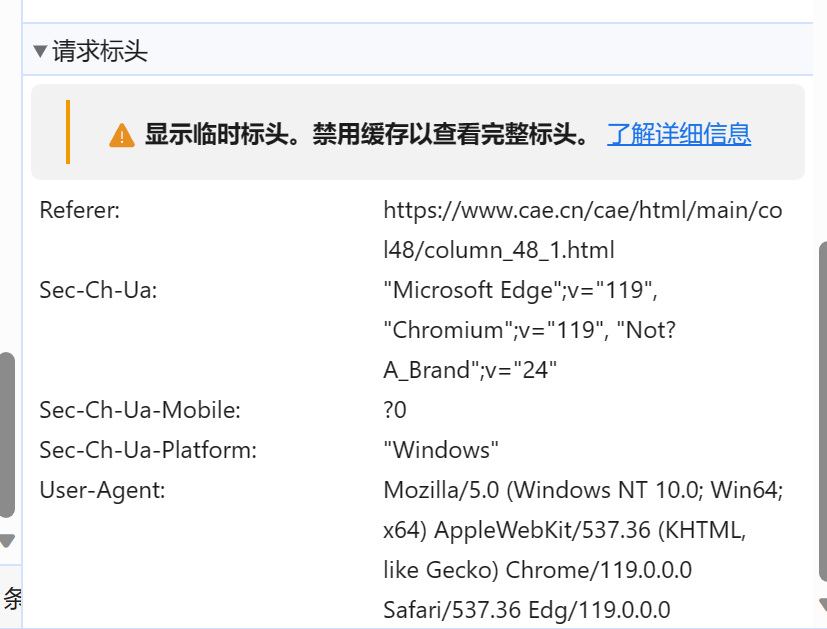
headers = {

    "User-Agent": "Mozilla/5.0 (Windows NT 10.0; Win64; x64) AppleWebKit/537.36 (KHTML, like Gecko) Chrome/119.0.0.0 Safari/537.36 Edg/119.0.0.0"

}
- 爬取信息:
import requests

from bs4 import BeautifulSoup

headers = {

    "User-Agent": "Mozilla/5.0 (Windows NT 10.0; Win64; x64) AppleWebKit/537.36 (KHTML, like Gecko) Chrome/119.0.0.0 Safari/537.36 Edg/119.0.0.0"

}

response1 = requests.get("http://www.cae.cn/cae/html/main/col48/column_48_1.html",headers=headers)

content = response1.text

soup = BeautifulSoup(content, "html.parser")

names_lists = soup.find_all("li", attrs={"class": "name_list"})

for name in names_lists:

    li = BeautifulSoup(str(name), "html.parser")

    Name = li.find_all('a')

    link = Name[0].get('href')

    Link = "http://www.cae.cn"+link

    Content = requests.get(Link,headers=headers).text

    Soup = BeautifulSoup(Content,"html.parser")

    Intro = Soup.find_all("div",attrs={"class":"intro"})

    intro = BeautifulSoup(str(Intro[0]),"html.parser")

    text = intro.find_all("p")

    Text=''

    for i in text:

        Text=Text+i.text

    with open(r"C:\Users\86135\Desktop\院士名单.txt", 'a', encoding='utf-8') as f:#写入文件

        f.write(Name[0].string+'\n')

        f.write(Text+'\n')

        f.write('\n')
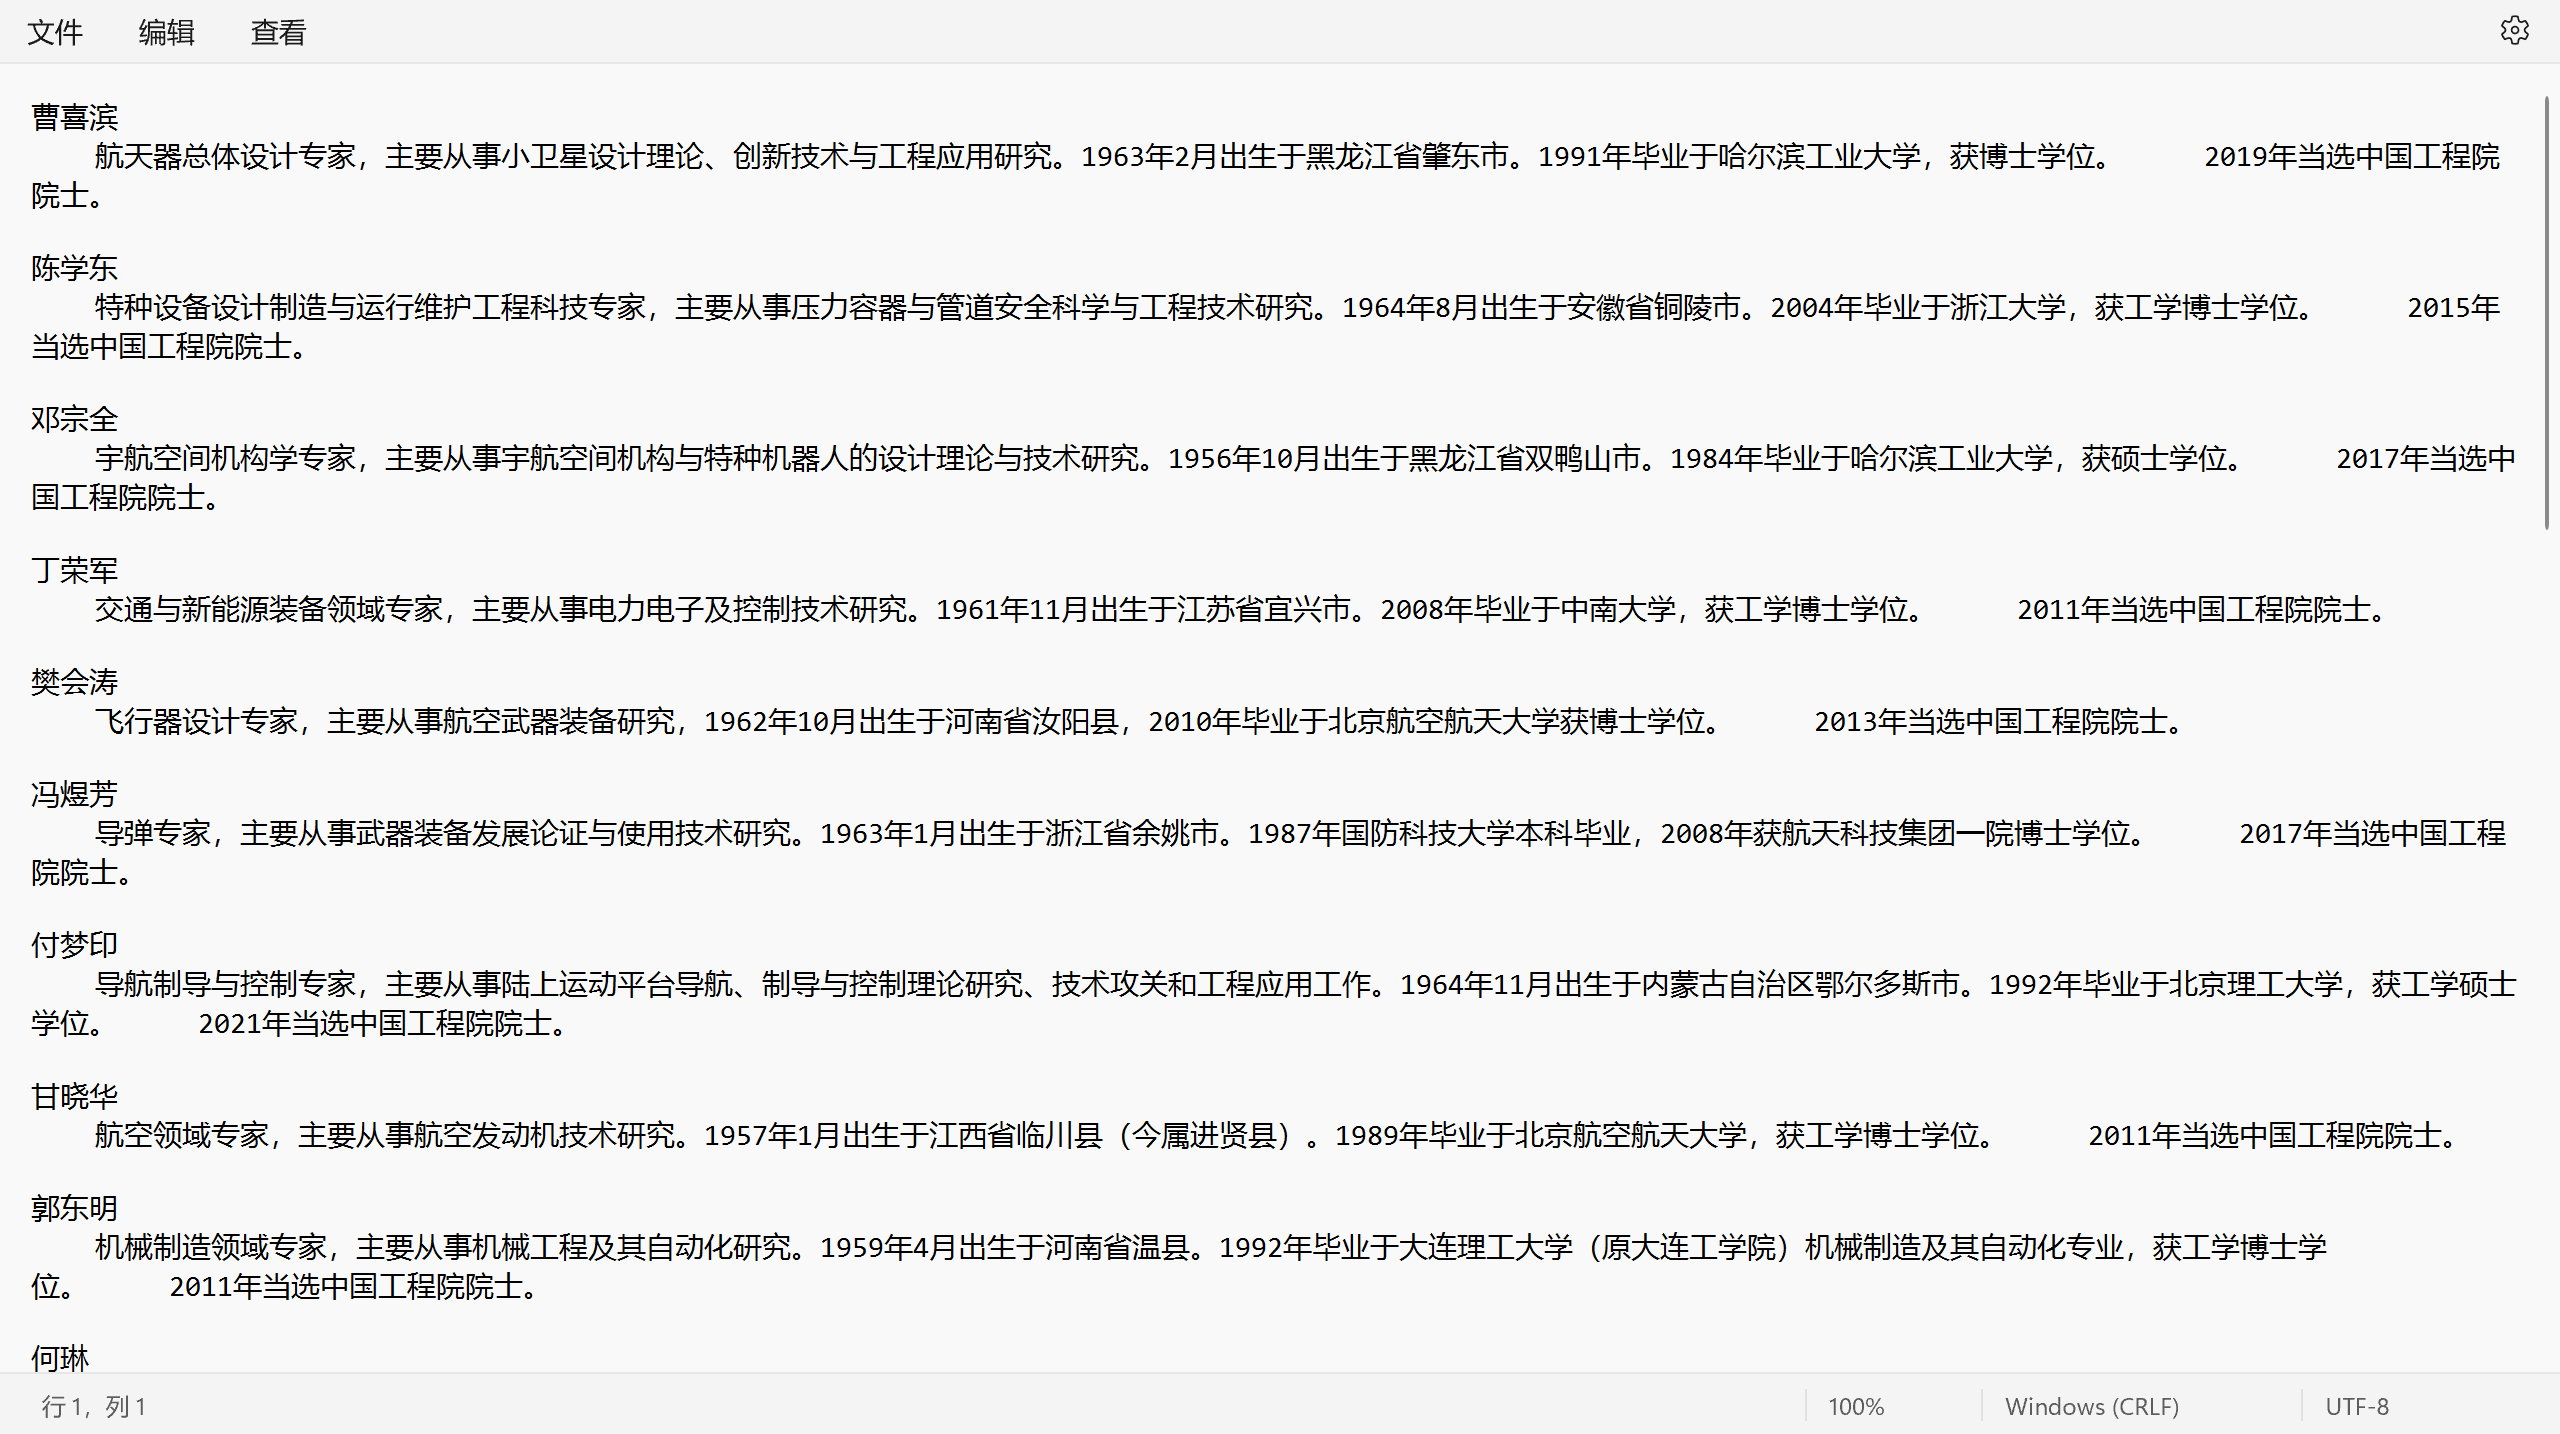
- 爬取结果:
(2)使用urllib模块或request模块读取网页内容,并利用BeautifulSoup模块进行内容解析,编写爬虫从https://www.biqukan.com/2_2671爬取小说《余罪》的内容。要求最终爬取的内容从第一章开始,且不存在大量空格等非必要字符。
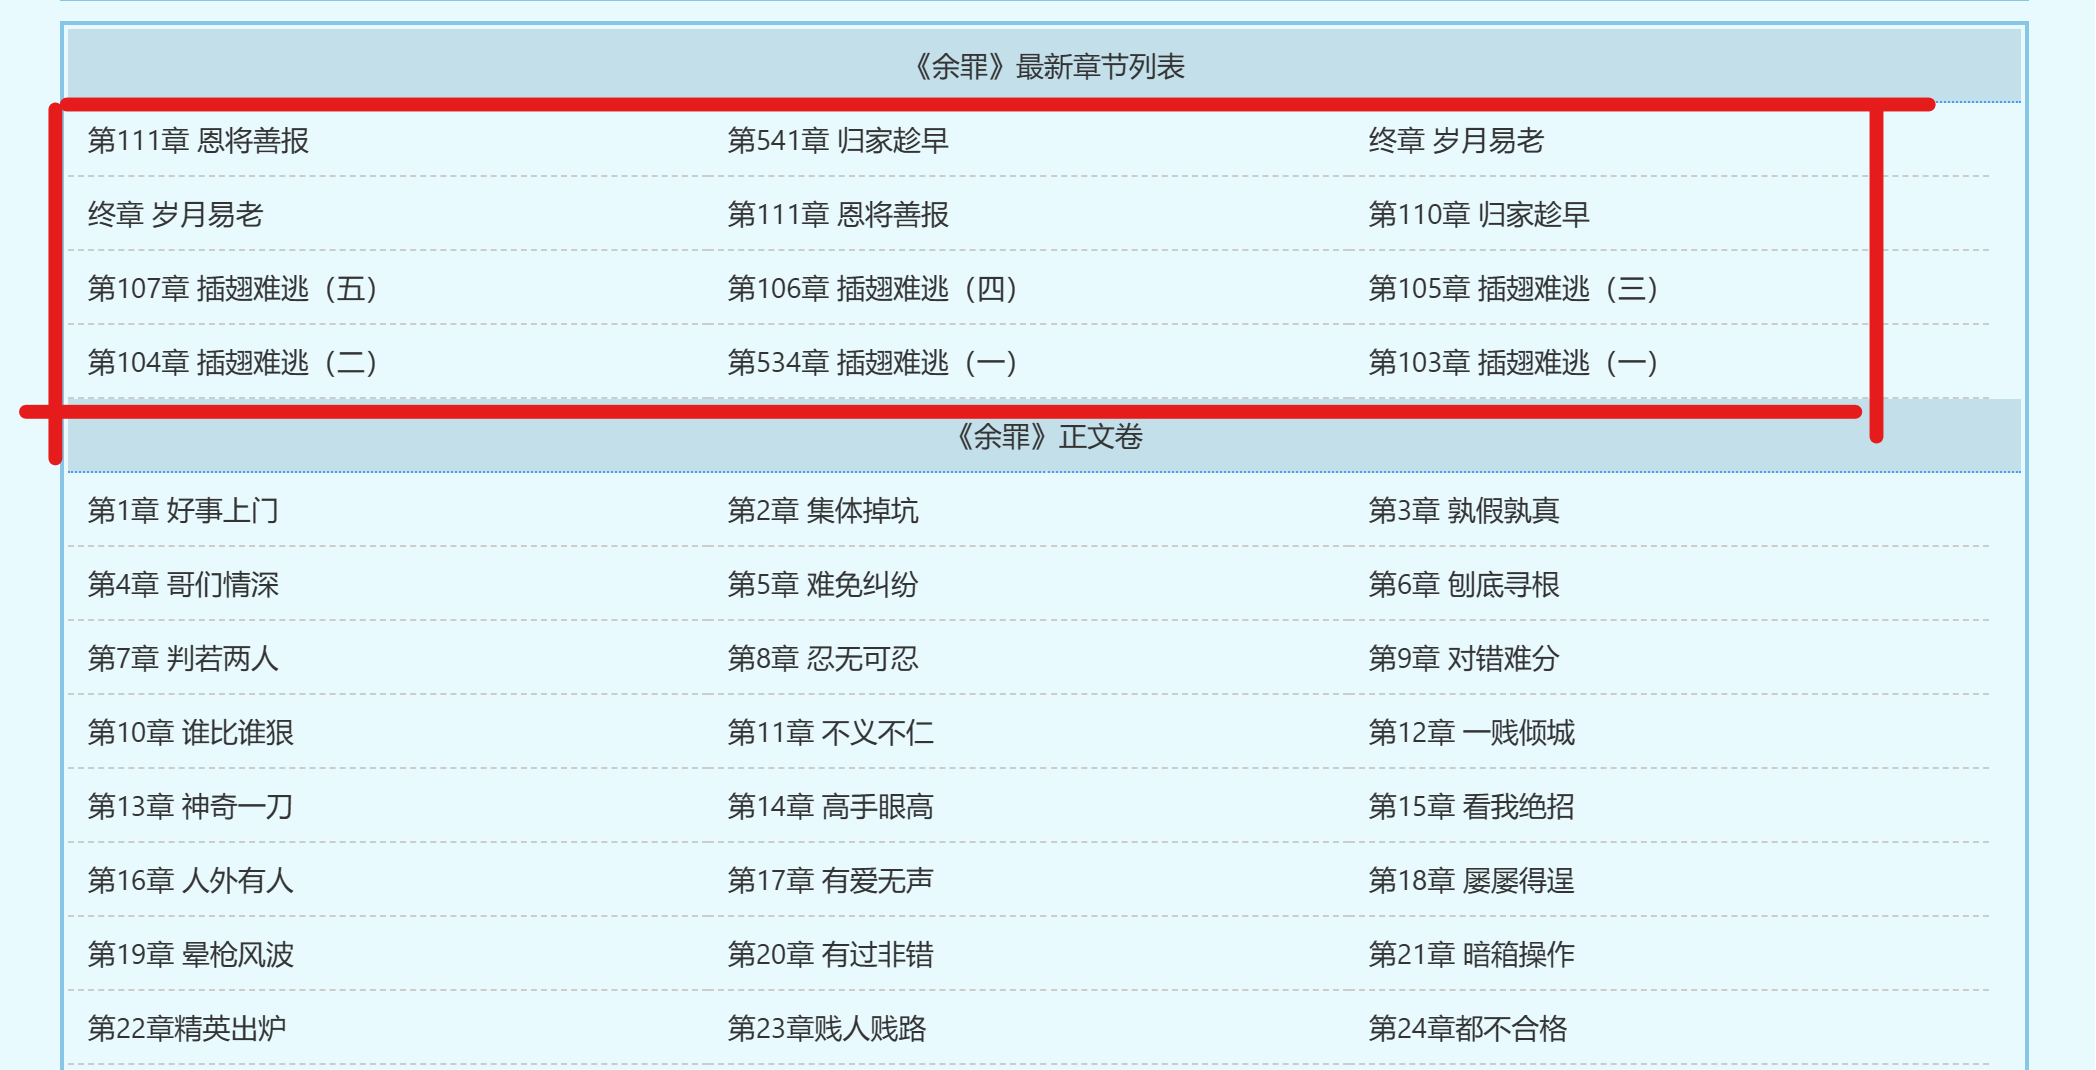
由于小说首页不是从第一章开始,我们需要确定第一章的起始位置和最后一章的终止位置
headers = {

    "User-Agent": "Mozilla/5.0 (Windows NT 10.0; Win64; x64) AppleWebKit/537.36 (KHTML, like Gecko) Chrome/119.0.0.0 Safari/537.36 Edg/119.0.0.0"

}

content = requests.get("https://www.biqukan8.cc/2_2671",headers=headers).text

soup = BeautifulSoup(content,"html.parser")

titles = soup.find_all('a')

num = 0

global start , end

for title in titles:

    num = num + 1

    if title.string == '第1章 好事上门':

        start = num

    if title.string == "都市之战神之王陈锋林雨欣":

        end = num
然后处理html中的a标签中的href元素得到每一章跳转的url
for i in range(start-1,end-1):

    link = BeautifulSoup(str(titles[i]),"html.parser")

    Li = link.find("a")

    Link = "https://www.biqukan8.cc/"+Li["href"]
然后爬取每一个Link中的特征为div,class为showtxt,id为content的小说正文,并将标题和正文写入文件
for i in range(start-1,end-1):

    link = BeautifulSoup(str(titles[i]),"html.parser")

    Li = link.find("a")

    Link = "https://www.biqukan8.cc/"+Li["href"]

    content = requests.get(Link,headers=headers).text

    Soup = BeautifulSoup(content,"html.parser")

    novel_content = Soup.find('div', {'class': 'showtxt', 'id': 'content'})

    novel_text = novel_content.get_text(separator="\n")

    with open(r"C:\Users\86135\Desktop\余罪.txt", 'a', encoding='utf-8') as f:

        f.write(titles[i].string+'\n')

        f.write(novel_text+'\n')

        f.write('\n')
最后添加一个可以实时显示进度的功能,完整代码如下:
import requests

import sys

from bs4 import BeautifulSoup

headers = {

    "User-Agent": "Mozilla/5.0 (Windows NT 10.0; Win64; x64) AppleWebKit/537.36 (KHTML, like Gecko) Chrome/119.0.0.0 Safari/537.36 Edg/119.0.0.0"

}

content = requests.get("https://www.biqukan8.cc/2_2671",headers=headers).text

soup = BeautifulSoup(content,"html.parser")

titles = soup.find_all('a')

num = 0

global start , end

for title in titles:

    num = num + 1

    if title.string == '第1章 好事上门':

        start = num

    if title.string == "都市之战神之王陈锋林雨欣":

        end = num

for i in range(start-1,end-1):

    link = BeautifulSoup(str(titles[i]),"html.parser")

    Li = link.find("a")

    Link = "https://www.biqukan8.cc/"+Li["href"]

    content = requests.get(Link,headers=headers).text

    Soup = BeautifulSoup(content,"html.parser")

    novel_content = Soup.find('div', {'class': 'showtxt', 'id': 'content'})

    novel_text = novel_content.get_text(separator="\n")

    with open(r"C:\Users\86135\Desktop\余罪.txt", 'a', encoding='utf-8') as f:

        f.write(titles[i].string+'\n')

        f.write(novel_text+'\n')

        f.write('\n')

    if (i + 1) % 10 == 0:

        # 将下载进度输出到控制台,实时变动

        sys.stdout.write("  已下载:%.3f%%" % float((i + 1) * 100 / (end-start+2)) + '\r')

        # 刷新缓存区

        sys.stdout.flush()

print('下载完成')

print("————————END————————")
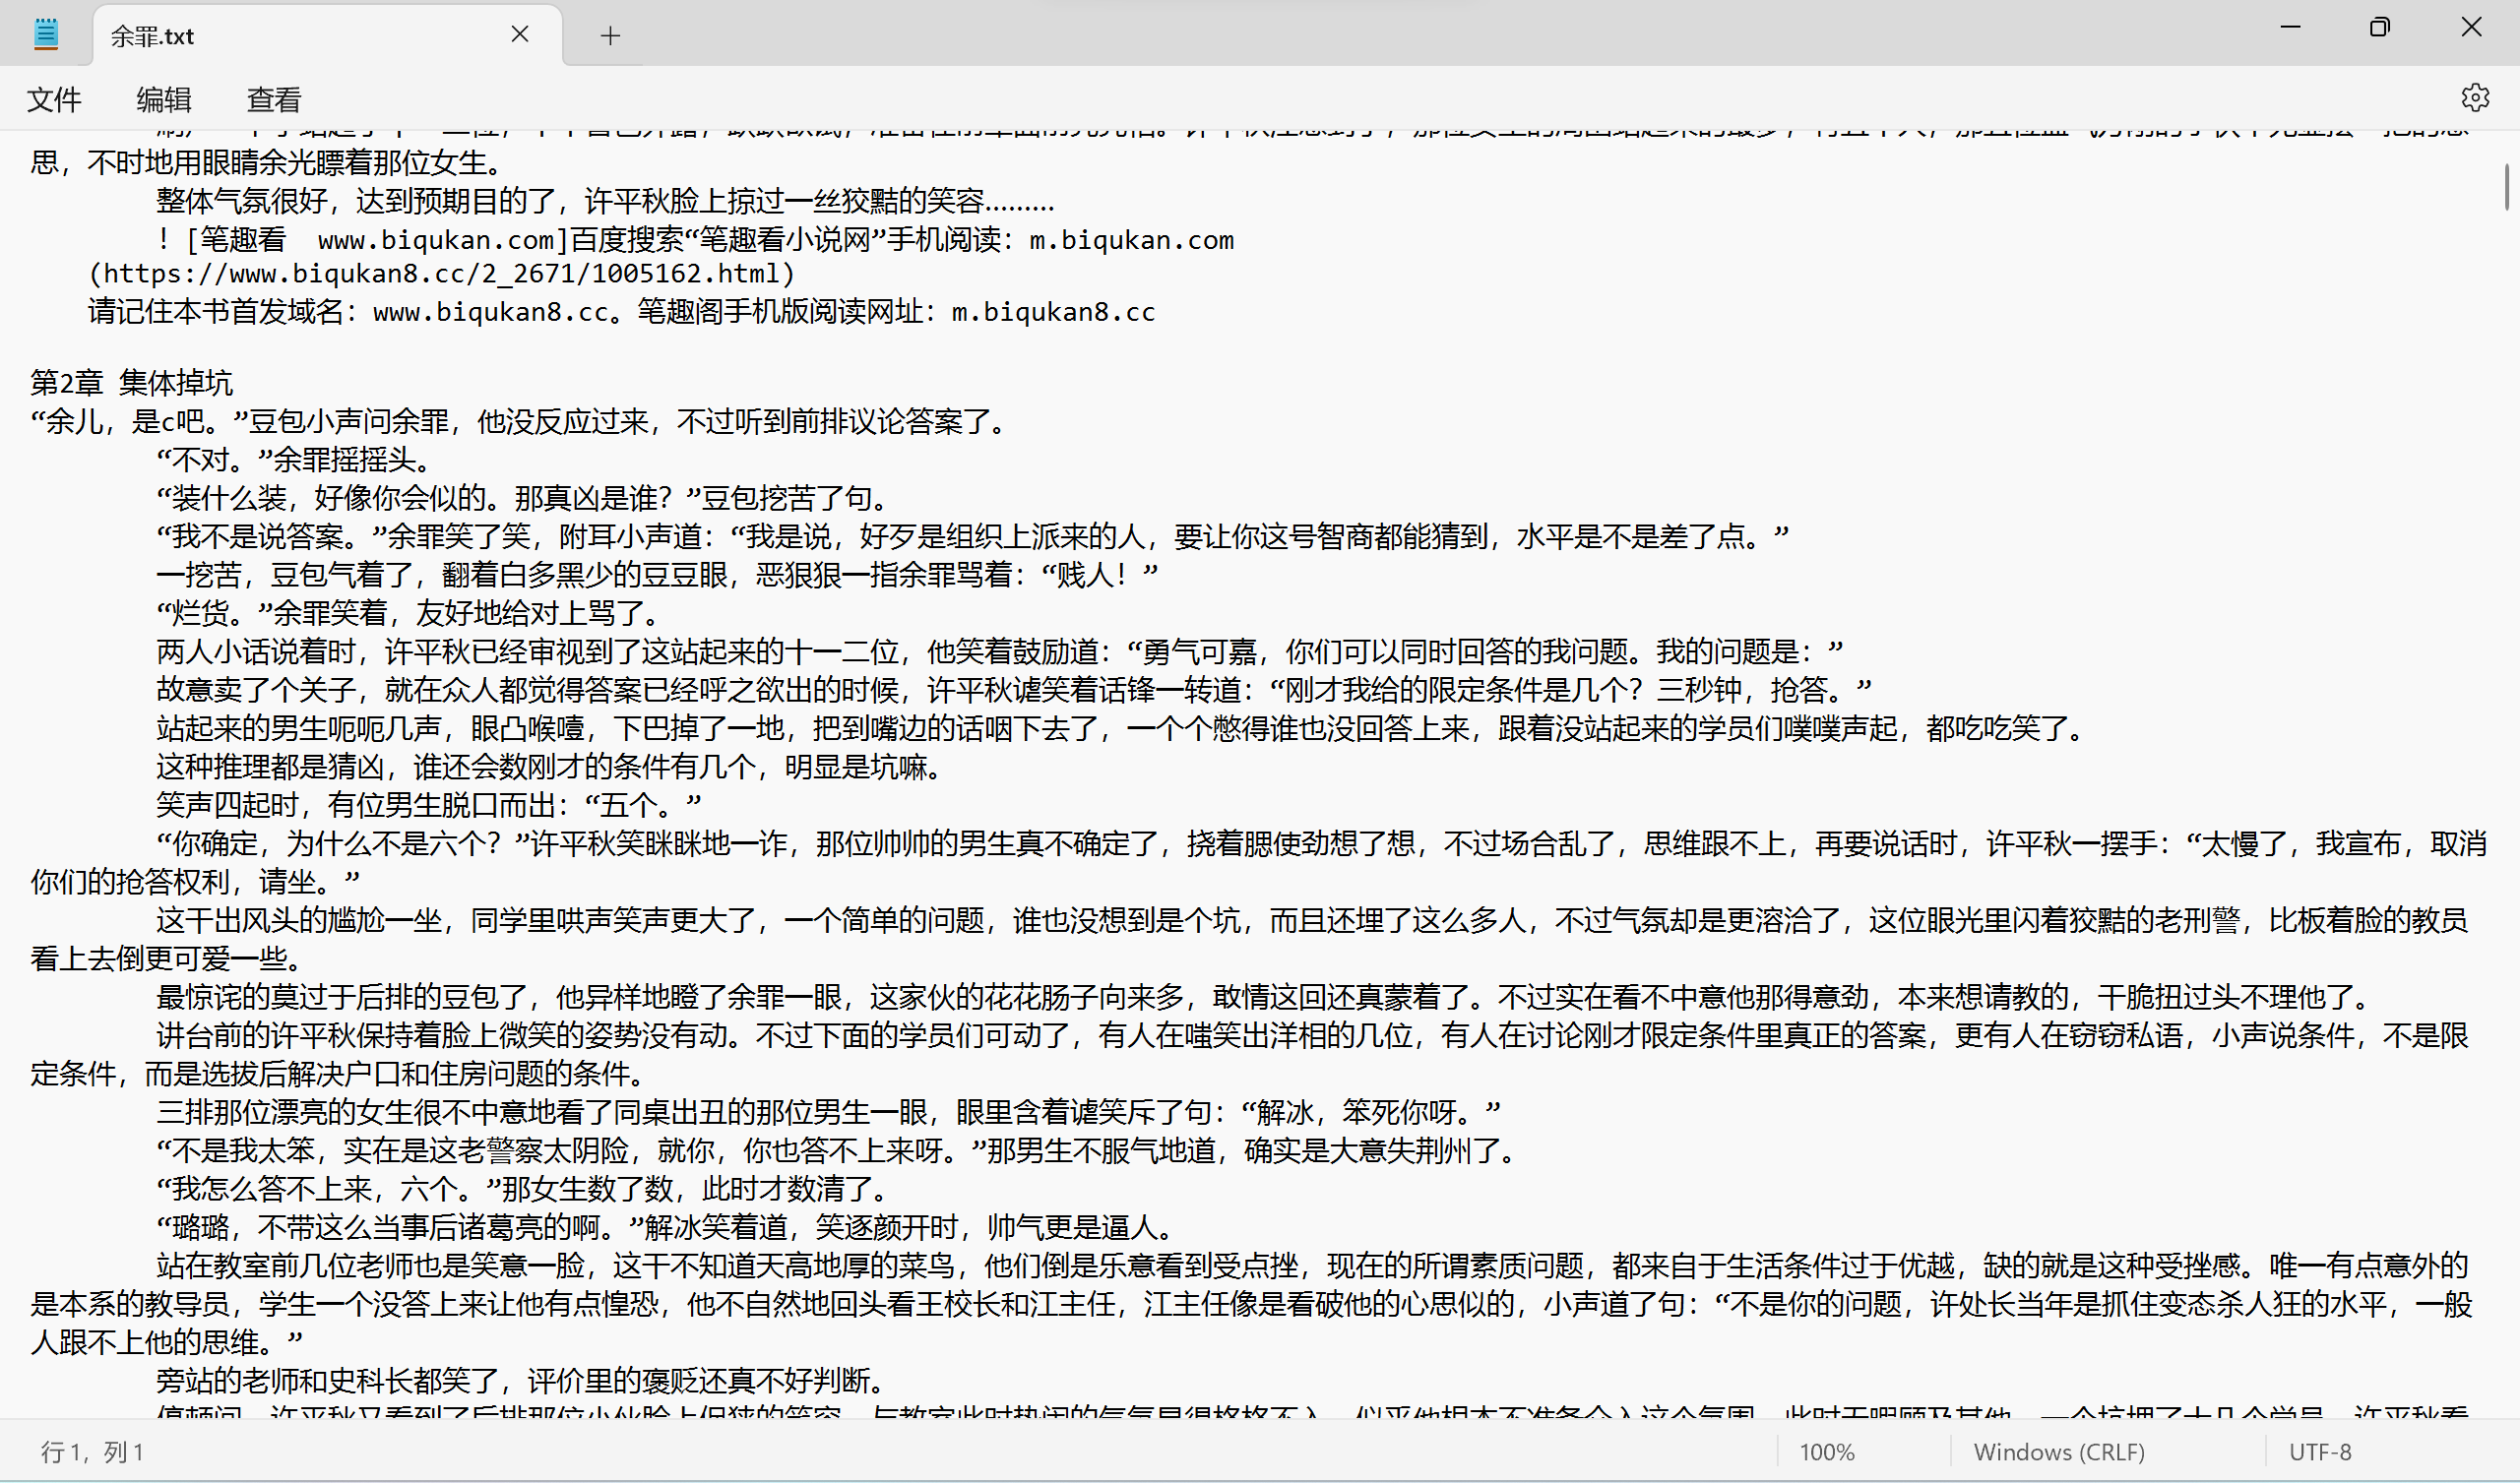
- 爬取结果:
(3)学习使用Feapder框架,编写爬虫,爬取中国工程院院士信息。
import feapder

class TophubSpider(feapder.AirSpider):

    def start_requests(self):

        yield feapder.Request("http://www.cae.cn/cae/html/main/col48/column_48_1.html")

    def parse(self, request, response):

        # 提取网站title

        print(response.xpath("//title/text()").extract_first())

        # 提取网站描述

        print(response.xpath("//meta[@name='description']/@content").extract_first())

        print("网站地址: ", response.url)

        # 提取所有class为name_list的li元素下的a元素的href和文本内容

        items = response.xpath("//li[@class='name_list']//a")

        for item in items:

            href = item.xpath("@href").extract_first()

            person_name = item.xpath("string(.)").extract_first()

            print("Found href:", href)

            # Follow the link and parse the information from the 'intro' div

            yield feapder.Request(url=href, callback=self.parse_intro, meta={'person_name': person_name})

    def parse_intro(self, request, response):

        # Extract information from the 'intro' div

        intro_text = response.xpath("//div[@class='intro']//p/text()").extract()

        # Concatenate the text and remove extra spaces

        formatted_text = " ".join(map(str.strip, intro_text))

        # Extract person_name from meta

        person_name = request.meta['person_name']

        # Write person_name and information to the file

        with open(r"C:\Users\86135\Desktop\院士信息.txt", "a", encoding="utf-8") as file:

            file.write(person_name + "\n")

            file.write(formatted_text + "\n")

        print(f"Information for {person_name} has been saved to 工程院士信息.txt")

if __name__ == "__main__":

    TophubSpider().start()
四、实验总结:
本次实验对python的BeautifulSoup+request模块的使用有了更深刻的理解,对Feapder框架的使用有了进一步的了解。
实验八. urllib模块、requests模块+BeautifulSoup模块使用、Feapder框架的更多相关文章
- Python使用urllib,urllib3,requests库+beautifulsoup爬取网页
Python使用urllib/urllib3/requests库+beautifulsoup爬取网页 urllib urllib3 requests 笔者在爬取时遇到的问题 1.结果不全 2.'抓取失 ...
- requests和BeautifulSoup模块的使用
用python写爬虫时,有两个很好用第三方模块requests库和beautifulsoup库,简单学习了下模块用法: 1,requests模块 Python标准库中提供了:urllib.urllib ...
- python 跨语言数据交互、json、pickle(序列化)、urllib、requests(爬虫模块)、XML。
Python中用于序列化的两个模块 json 用于[字符串]和 [python基本数据类型] 间进行转换 pickle 用于[python特有的类型] 和 [python基本数据类型]间进 ...
- Python 网络请求模块 urllib 、requests
Python 给人的印象是抓取网页非常方便,提供这种生产力的,主要依靠的就是 urllib.requests这两个模块. urlib 介绍 urllib.request 提供了一个 urlopen 函 ...
- 【黑金原创教程】【FPGA那些事儿-驱动篇I 】实验八:PS/2模块② — 键盘与组合键
实验八:PS/2模块② — 键盘与组合键 实验七之际,我们学习如何读取PS/2键盘发送过来的通码与断码,不过实验内容也是一键按下然后释放,简单按键行为而已.然而,实验八的实验内容却是学习组合键的按键行 ...
- 3.10-通过requests、BeautifulSoup、webbrowser模块的相关方法,爬取网页数据示例程序(一)
import requests,bs4res=requests.get('https://www.hao123.com/')print('res对象的类型:',type(res))res.raise_ ...
- centos6装python3,并安装requests, lxml和beautifulsoup模块
一. 安装python3并设为默认版本,与python2共存 1.下载Python3.4安装包 wget https://www.python.org/ftp/python/3.4.4/Pytho ...
- bs4——BeautifulSoup模块:解析网页
解析由requests模块请求到的网页 import requests from bs4 import BeautifulSoup headers = {'User-Agent': 'Mozilla/ ...
- Python 爬虫三 beautifulsoup模块
beautifulsoup模块 BeautifulSoup模块 BeautifulSoup是一个模块,该模块用于接收一个HTML或XML字符串,然后将其进行格式化,之后遍可以使用他提供的方法进行快速查 ...
- requsets模块和beautifulsoup模块
2.requests模块方法 requests是基于Python开发的HTTP库,使用Requests可以轻而易举的完成浏览器可有的任何操作. request.get() request.post() ...
随机推荐
- Ai大模型推理-未完善
环境 安装Conda 最低要求 CUDA 版本为 11.3 #获取安装脚本 wget -c 'https://repo.anaconda.com/archive/Anaconda3-2024.06-1 ...
- Android UsbDeviceManager 代码分析
USBDeviceManager是一个Android系统中用于管理USB设备的类,它是系统服务之一.其主要功能是控制USB设备的连接和断开,以及管理USB设备的权限和状态.下面是对USBDeviceM ...
- C# 根据主键ID查询数据库的数据 反射和泛型实现
// 引入命名空间 using Zhu.ADO.NET.DBProxy; using Zhu.ADO.NET.Models.models; Console.WriteLine("====== ...
- webpack中 ,有哪些常见的Loader?他们是解决什么问题的?
1. css-loader 翻译css ,可以把sass / less 代码翻译成 css 代码 : 2. imgage-loader 加载并压缩图片文件 3. source-map-loader 加 ...
- NOI 2024
Day1 T1 集合(set) 容易发现两个序列等价当且仅当,所有数字在序列中出现位置的集合构成集族相等. 考虑哈希,对于一个集合 \(S\),令它的哈希值为 \(f(S) = (\sum\limit ...
- 云原生周刊:Kubernetes Grafana 看板更新 | 2024.5.13
开源项目推荐 Chart Testing Chart Testing 是用于测试 Helm 图表的工具.它旨在用于对拉取请求进行 lint 和测试.它会自动检测针对目标分支更改的图表. Cluster ...
- 快来考试拿证书!KubeSphere 个人技能专业考试认证上线啦!
以容器技术和容器编排为基础的云原生应用,被越来越多的企业用户接受和使用,并且在生产环境中使用容器技术的比例逐年增加.Kubernetes 无疑已经成为容器编排的事实基础,而依托于 Kubernetes ...
- windows涉及所有协议及默认端口
名称 协议 端口 说明 echo tcp/udp 7 echo服务 discard tcp/udp 9 用于连接测试的空服务 systat tcp/udp 11 链接端口系统状态 daytime tc ...
- Re:从零开始的pwn学习(栈溢出篇)
写在前面:本文旨在帮助刚接触pwn题的小伙伴少走一些弯路,快速上手pwn题,内容较为基础,大佬轻喷.本文默认读者明白最基础的汇编指令的含义,并且已经配置好linux64位环境,明白基础的Linux指令 ...
- NES 名词解释
本文介绍了 NES(FC.红白机.小霸王)中一些名词或者术语,主要与 PPU 有关. Tile 8x8 像素图像.每像素 2 比特, 共 16 字节大小.每个像素可以使用 4 种颜色. Sprite ...