MCC(MPLAB® Code Configurator)开发文档
MCC(MPLAB Code Configurator)开发文档
https://microchipdeveloper.com/xwiki/bin/view/software-tools/mcc/
Getting Started with MCC
The MCC GUI(Graphical User Interface):
- setup the configuration and all the peripherals;
- **generates driver code control the peripherals on PIC microcontrollers;
- configure and generate libraries, which allows you to configure and generate code for software libraries and off-chip peripherals;
- **The generated drivers or libraries can be used in any PIC device application program.
- The GUI provides an easy means for setting up the configuration of the peripherals.
The MCC requires an MPLAB X IDE project to be created, or an existing project opened, before launching the MCC plugin.
This is necessary as the MCC needs to know the device used in the project to have access to device-specific information,
like registers, bits, and configurations and to set up the MCC GUI.
The MCC generates source and header files based on selections made in the GUI.
The generated files are added to the active project of MPLAB X IDE.

Getting Started with MCC
The first step of any project is to use the MPLAB X IDE wizard tool to create a project.
The wizard will walk through selecting:
- the microcontroller,
- the development programmer/debugger
- and the compiler to use.
This should be done before launching the MCC.
The MCC tool, once installed, can be launched from:
"MPLAB X IDE menu" -> "Tools" -> "Embedded" -> "MPLAB Code Configurator v?: Open/Close"
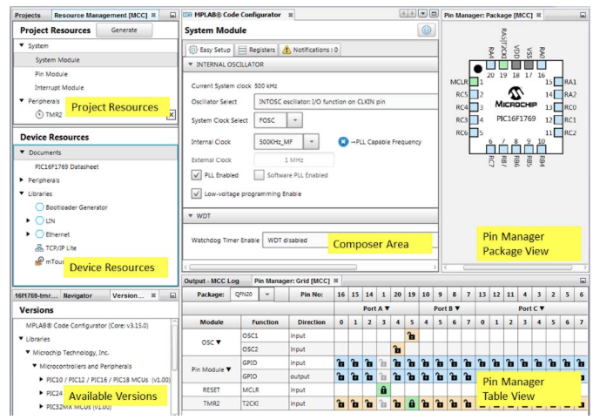
MCC Sections Layout:
We will refer to these MCC sections by name throughout this training page(are shown in the image below).
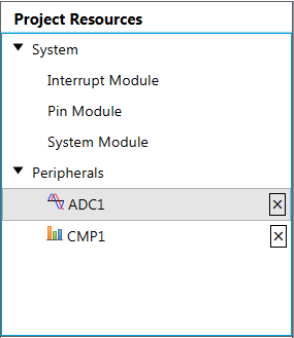
- Project Resources: shows the current using peripherals in the project.
- Device Resources: shows the peripherals available on the device
- Available Versions:
- Composer Area
- Pin Manager - Package View
- Pin Manager - Table View
This highlight can be enabled over the MCC at any time by clicking on the information icon Info icon.
Using MCC to Select and Setup Peripherals
Select the Peripherals
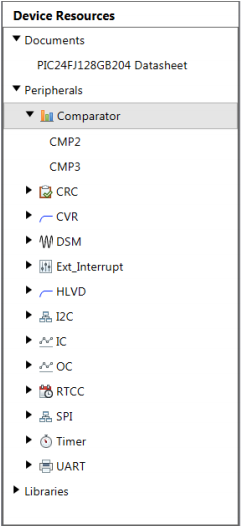
The Device Resources shows the peripherals available on the device.
![]()
By clicking on the name of the peripheral, a list of associated options including multiple versions of the peripheral will appear.
There may be multiple comparators on the device so the submenu will show the list of all available options.Clicking on the specific peripheral will add that peripheral to the Project Resources.
![]()
Setup the Peripherals
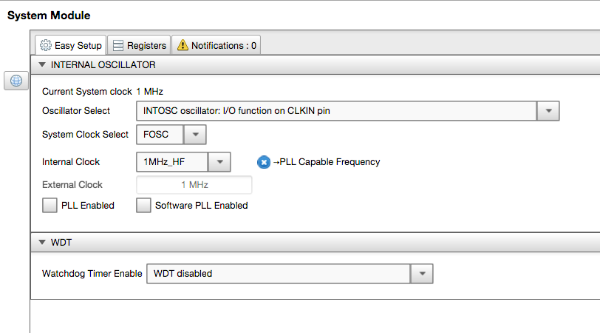
The **central Composer Area **is where the peripherals are set up.
When the peripheral is selected in the Project Resources, the corresponding configuration GUI is displayed in the central composer area.
There are three tabs: Easy Setup, Registers, and Notifications.:- Peripheral Setup: is where you select the settings for the peripheral through a variety of drop-down selections and checkboxes.
The example shown is for the System Peripheral setup.
![]()
- Register View: The Registers tab shows the various registers for the particular peripheral. The configuration settings can also be viewed and modified under this tab.
- Notifications: Any conflicts or recommendations that a setup would require will show up under the Notifications tab. This may be as simple as an I/O pin being set to analog and is recommended to be set to digital for the peripheral setting selected.
- Peripheral Setup: is where you select the settings for the peripheral through a variety of drop-down selections and checkboxes.
Using MCC to Select I/O Pin Configuration
MCC allows you to set up the I/O pin configurations using a graphical interface in the Pin Manager.
The first step is to select the device package type to use then a representation of the device will appear.
Then click on the accompanying chart to select the arrangement.
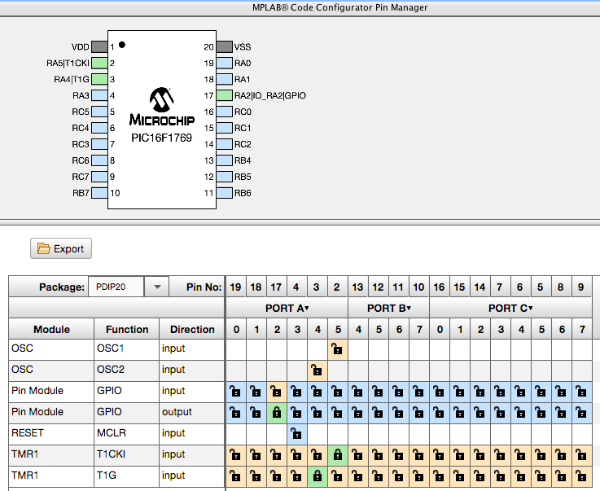
- A blue pin is unconnected;
- A green pin is connected to a peripheral or designated as a digital I/O pin.
The menu of peripherals to connect the pin to,
can be positioned on the top (horizontal) or on the left side (vertical),
by clicking on the horizontal or vertical selection.
The pin(s) associated with the peripheral will show up in the row or column of the peripheral name.
This way it can be easily determined which pins to select for that particular peripheral.
Once the pin is selected, the color will change to green and the lock symbol will close,
indicating the pin is locked into that arrangement.
Clicking on the green lock will reset it back to a blue, unused state.
There are several other colors that will appear as described below:
- Gray-colored pin: indicates that the pin is not usable in the selected configuration,
and that there is no enabled module which has any functionality on that pin.
There are also grayed-out locks on a white background that indicate pins that are locked out by selected system functions. - Blue-colored pin: indicates pins that are available to be allocated to a module.
- Green-colored pin (with a lock): this combination indicates that the pin has been allocated and selected for a module.
The name that appears on the pin is either the name of the pin in the module’s context or a custom name entered. - Green-colored pin (with chain link): this combination indicates that the pin is shared between multiple functions.
- Yellow-colored pin: indicates a possible alternate pin for an already allocated pin function.
- Grayed-out locks on a white background: indicate pins that are locked out by selected system functions.
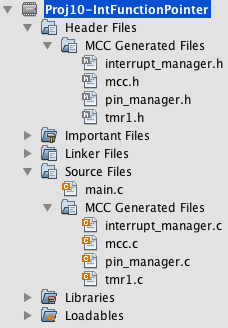
Generating Code
MCC has a separate setup screen for each peripheral selected.
After each peripheral is set up along with the configuration and I/O,
then just click on the Generate Code button Generate button to have the MCC:
- create all the peripheral driver code for the project.
- a main.c file will also be produced if it is a new project.
- it will only produce the peripheral driver files, If the project already has a main.c.
- The generated code will be placed into the project automatically.
- The code will show up in the project area of MPLAB X IDE.
- The code produced is used as a base and modified for the project's needs.
This also makes a great way to start a new project so initially,
a set of peripheral driver code with functions for each peripheral is automatically developed.
MCC(MPLAB® Code Configurator)开发文档的更多相关文章
- Mego开发文档 - 索引
Mego 开发文档 Mego 快速概述 主要特性 获取Mego 使用流程 模型 查询 保存数据 入门 Mego 快速开始 创建项目 安装Nuget包 创建连接字符串 创建模型及数据上下文(添加引用) ...
- iOS开发-开发文档安装
iOS开发肯定离不开开发文档,苹果有在线帮助文档,xCode其实可以下载模拟器文档和iOS8.1文档的,不过下载的速度实在不敢恭维,而且比较头疼的是不显示下载进度条的,苹果的开发文档都是放在)/应用程 ...
- jssip中文开发文档(完整版)
jsSip开发文档 (官网地址:http://www.jssip.net/) 完整案例demo下载地址: http://download.csdn.net/download/qq_39421580/1 ...
- Web图片编辑控件开发文档-Xproer.ImageEditor
版权所有 2009-2014 荆门泽优软件有限公司 保留所有权利 官方网站:http://www.ncmem.com 产品首页:http://www.ncmem.com/webplug/image-e ...
- 【原创】Odoo开发文档学习之:构建接口扩展(Building Interface Extensions)(边Google翻译边学习)
构建接口扩展(Building Interface Extensions) 本指南是关于为Odoo的web客户创建模块. 要创建有Odoo的网站,请参见建立网站;要添加业务功能或扩展Odoo的现有业务 ...
- Android官方开发文档Training系列课程中文版:目录
Android官方开发文档Training系列课程中文版:目录 引言 在翻译了一篇安卓的官方文档之后,我觉得应该做一件事情,就是把安卓的整篇训练课程全部翻译成英文,供国内的开发者使用,尤其是入门开 ...
- linux UART串口驱动开发文档
转:http://www.360doc.com/content/10/0417/18/829197_23519037.shtml linux UART串口驱动开发文档时间:2010-01-09 14: ...
- [翻译]开发文档:android Bitmap的高效使用
内容概述 本文内容来自开发文档"Traning > Displaying Bitmaps Efficiently",包括大尺寸Bitmap的高效加载,图片的异步加载和数据缓存 ...
- Net通用进销存管理系统 + 开发文档+ 使用说明
通用进销存管理系统 + 开发文档+ 使用说明Net源码下载 包括下面的模块基础资料模块采购管理模块库存管理模块商务管理模块营业管理模块维修管理模块会员管理模块财务管理模块 Net通用进销存管理系统 + ...
- C#微信开发文档
C#微信开发文档 开发前准备 微信公众平台链接: https://mp.weixin.qq.com/cgi-bin/home?t=home/index&lang=zh_CN 开发初期我们使用测 ...
随机推荐
- 安装MVN出现 Error: JAVA_HOME is set to an invalid directory.的解决方法
出现 Error: JAVA_HOME is set to an invalid directory.的解决方法 解决: 将JAVA_HOME = "D:/Java/jdk1.6.0_12/ ...
- vue3 基础-列表渲染
本篇讲列表渲染, 主要是对 v-on 指令配合 v-if 和一些数组相关的方法来体验 vue 的模板渲染方法. 数组元素的渲染 <!DOCTYPE html> <html lang= ...
- SpringBoot3 使用 SolonMCP 开发 MCP
之前发了个 "<SpringBoot2 可以使用 SolonMCP 开发 MCP(江湖救急)>".然后,有人问:SpringBoot3 能不能用 SolonMCP? 其 ...
- Kafka怎么配置SASL用户名密码认证
服务端配置(server.properties): # 开启SASL认证 security.protocol=SASL_PLAINTEXT sasl.mechanism=PLAIN # 配置JAAS文 ...
- 玩转代码:深入GitHub,高效管理我们的“shou学”平台源代码
玩转代码:深入GitHub,高效管理我们的"shou学"平台源代码 在当今快节奏的开发世界中,有效地管理代码不仅仅是一种良好实践,更是一种必需.无论您是独立开发者还是大型团队的一员 ...
- 基于Scikit-learn与Flask的医疗AI糖尿病预测系统开发实战
引言 在精准医疗时代,人工智能技术正在重塑临床决策流程.本文将深入解析如何基于MIMIC-III医疗大数据集,使用Python生态构建符合医疗AI开发规范的糖尿病预测系统.项目涵盖从数据治理到模型部署 ...
- TenantLineInnerInterceptor源码解读
一.引言 TenantLineInnerInterceptor是MyBatis-Plus中的一个拦截器类,位于com.baomidou.mybatisplus.extension.plugins.in ...
- WindowsPE文件格式入门08.导出表
https://bpsend.net/thread-377-1-1.html 通过cff , depends灯等软件可以看到dll,导出函数的信息,因为dll中本身就存了这些信息,存了dll中有哪些导 ...
- 【FAQ】HarmonyOS SDK 闭源开放能力 —Account Kit(4)
1.问题描述: LoginWithHuaweiIDButton不支持深色模式下定制文字和loading样式? 解决方案: LoginWithHuaweiIDButtonParams 中的有个suppo ...
- 做自己的第一个网站(Bootscrapt、odoo14作、JQuery)
今天发布自己的第一个网站,网站内容是关于自己家乡的美景,效果图如下:网站地址是:http://hxmelon.com/ 二.技术篇 1.在这里网站用的是Bootscrapt框架作为网站开发模板.前端语 ...