CentOS 7.x升级内核
第一种针对当前内核版本的小版本升级可以采用如下方法:
[root@localhost ~]# uname -r

3.10.-.el7

[root@localhost ~]# yum list kernel

[root@localhost ~]# yum update -y kernel

[root@localhost ~]# uname -r

3.10.-862.14..el7

[root@localhost ~]# grub2-editenv list

saved_entry=CentOS Linux (3.10.-862.14..el7.x86_64)  (Core)  #升级完成小版本之后,系统会将升级后的小版本内核设置为默认启动内核

#执行完上述命令之后,使用uname -r对比可以看出已经升级了小版本

[root@localhost ~]# yum list kernel

Loaded plugins: fastestmirror, langpacks

Loading mirror speeds from cached hostfile

 * base: ftp.sjtu.edu.cn

 * elrepo: mirrors.tuna.tsinghua.edu.cn

 * extras: mirrors.shu.edu.cn

 * updates: ftp.sjtu.edu.cn

elrepo                                                      | 2.9 kB  ::

elrepo/primary_db                                           |  kB  ::

Installed Packages

kernel.x86_64                     3.10.-.el7                          @anaconda

kernel.x86_64                     3.10.-862.14..el7                     @updates
第二种升级大版本
首先了解下这个网站

https://www.elrepo.org

.导入公钥

[root@localhost ~]# rpm --import https://www.elrepo.org/RPM-GPG-KEY-elrepo.org

.安装ELRepo

[root@localhost ~]# rpm -Uvh https://www.elrepo.org/elrepo-release-7.0-3.el7.elrepo.noarch.rpm

.禁用其他的repo源,启用ELRepo源

[root@localhost ~]# yum --disablerepo=\* --enablerepo=elrepo-kernel repolist

Loaded plugins: fastestmirror, langpacks

Loading mirror speeds from cached hostfile

 * elrepo-kernel: mirrors.tuna.tsinghua.edu.cn

repo id       repo name                                                      status

elrepo-kernel ELRepo.org Community Enterprise Linux Kernel Repository - el7

repolist:

.查看ELRepo可用的软件包

[root@localhost ~]# yum --disablerepo=\* --enablerepo=elrepo-kernel list kernel*

Loaded plugins: fastestmirror, langpacks

Loading mirror speeds from cached hostfile

 * elrepo-kernel: mirrors.tuna.tsinghua.edu.cn

Installed Packages

kernel.x86_64                            3.10.-.el7              @anaconda

kernel.x86_64                            3.10.-862.14..el7         @updates

kernel-ml.x86_64                         4.18.-.el7.elrepo        @elrepo-kernel

kernel-tools.x86_64                      3.10.-.el7              @anaconda

kernel-tools-libs.x86_64                 3.10.-.el7              @anaconda

Available Packages

kernel-lt.x86_64                         4.4.-.el7.elrepo        elrepo-kernel

kernel-lt-devel.x86_64                   4.4.-.el7.elrepo        elrepo-kernel

kernel-lt-doc.noarch                     4.4.-.el7.elrepo        elrepo-kernel

kernel-lt-headers.x86_64                 4.4.-.el7.elrepo        elrepo-kernel

kernel-lt-tools.x86_64                   4.4.-.el7.elrepo        elrepo-kernel

kernel-lt-tools-libs.x86_64              4.4.-.el7.elrepo        elrepo-kernel

kernel-lt-tools-libs-devel.x86_64        4.4.-.el7.elrepo        elrepo-kernel

kernel-ml-devel.x86_64                   4.18.-.el7.elrepo        elrepo-kernel

kernel-ml-doc.noarch                     4.18.-.el7.elrepo        elrepo-kernel

kernel-ml-headers.x86_64                 4.18.-.el7.elrepo        elrepo-kernel

kernel-ml-tools.x86_64                   4.18.-.el7.elrepo        elrepo-kernel

kernel-ml-tools-libs.x86_64              4.18.-.el7.elrepo        elrepo-kernel

kernel-ml-tools-libs-devel.x86_64        4.18.-.el7.elrepo        elrepo-kernel

.安装最新的kernel版本

[root@localhost ~]# yum --disablerepo=\* --enablerepo=elrepo-kernel install kernel-ml.x86_64

.此时还不能直接安装新版本内核的工具包,需要先卸载旧版本内核的工具包

查看老版本

[root@localhost ~]# yum list installed | grep kernel-tools*

kernel-tools.x86_64                     3.10.-.el7                 @anaconda

kernel-tools-libs.x86_64                3.10.-.el7                 @anaconda

卸载老版本

[root@localhost ~]# yum remove -y kernel-tools*

.安装最新版本的内核工具包

[root@localhost ~]# yum --disablerepo=\* --enablerepo=elrepo-kernel install -y kernel-ml-tools.x86_64

到此,内核大版本升级虽然已完成,但是系统当前版本依然是:

[root@localhost ~]# uname -r

3.10.-862.14..el7.x86_64
!注意:重启开机界面,默认的内核版本是之前升级的小版本,并不是大版本号
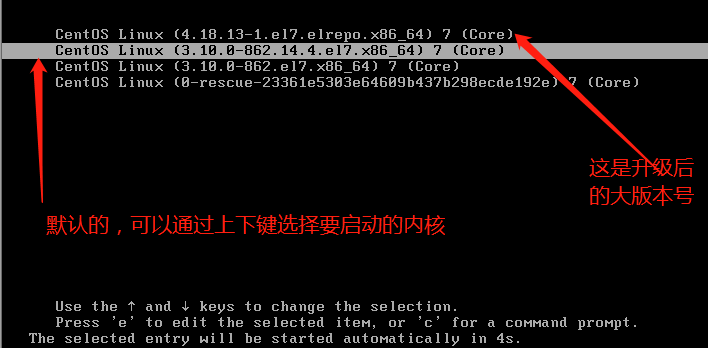
可以手动选择升级后的大版本号,也可以进入系统修改默认启动内核:
[root@localhost ~]# cat /boot/grub2/grub.cfg | grep menuentry

if [ x"${feature_menuentry_id}" = xy ]; then

  menuentry_id_option="--id"

  menuentry_id_option=""

export menuentry_id_option

menuentry 'CentOS Linux (4.18.13-1.el7.elrepo.x86_64) 7 (Core)' --class centos --class gnu-linux --class gnu --class os --unrestricted $menuentry_id_option 'gnulinux-3.10.0-862.el7.x86_64-advanced-665da203-11f4-4366-92ce-5021231ee154' {

menuentry 'CentOS Linux (3.10.0-862.14.4.el7.x86_64) 7 (Core)' --class centos --class gnu-linux --class gnu --class os --unrestricted $menuentry_id_option 'gnulinux-3.10.0-862.el7.x86_64-advanced-665da203-11f4-4366-92ce-5021231ee154' {

menuentry 'CentOS Linux (3.10.0-862.el7.x86_64) 7 (Core)' --class centos --class gnu-linux --class gnu --class os --unrestricted $menuentry_id_option 'gnulinux-3.10.0-862.el7.x86_64-advanced-665da203-11f4-4366-92ce-5021231ee154' {

menuentry 'CentOS Linux (0-rescue-23361e5303e64609b437b298ecde192e) 7 (Core)' --class centos --class gnu-linux --class gnu --class os --unrestricted $menuentry_id_option 'gnulinux-0-rescue-23361e5303e64609b437b298ecde192e-advanced-665da203-11f4-4366-92ce-5021231ee154' {

[root@localhost ~]# grub2-set-default 'CentOS Linux (4.18.13-1.el7.elrepo.x86_64) 7 (Core)'

[root@localhost ~]# grub2-editenv list

saved_entry=CentOS Linux (4.18.-.el7.elrepo.x86_64)  (Core)

重启系统,查看

[root@localhost ~]# uname -r

4.18.-.el7.elrepo.x86_64

如果不需要旧版本的内核软件包,可以使用yum卸载掉
第三种升级内核的方式:
了解下这个网站

https://www.kernel.org/

可以在这里下载最新版本的内核tar包,然后确保系统装了gcc,cmake等工具,然后跟其他软件的tar安装方式一样,解压,编译,安装即可。
附:
kernel-ml 中的ml是英文【mainline stable】的缩写,elrepo-kernel中罗列出来的是最新的稳定主线版本。
kernel-lt 中的lt是英文【long term support】的缩写,elrepo-kernel中罗列出来的长期支持版本。
参考原文:https://blog.csdn.net/breeze915/article/details/79243673
CentOS 7.x升级内核的更多相关文章
- centos 6.5 升级内核 linux 3.12.17 (笔记 实测)
环境: 系统硬件:vmware vsphere (CPU:2*4核,内存2G) 系统版本:Linux centos 2.6.32-431.el6.x86_64(Centos-6.5-x86_64-mi ...
- centos 6.5 升级内核 linux 3.12.17
环境: 系统硬件:vmware vsphere (CPU:2*4核,内存2G) 系统版本:Linux centos 2.6.32-431.el6.x86_64(Centos-6.5-x86_64-mi ...
- CentOS 6.5 升级内核
Docker需要3.10以上内核支持,Centos6.5 默认内核为2.6.所以手动编译安装3.10内核. 查看当前系统内核版本 [root@gu ~]# uname -r2.6.32-431.el6 ...
- CentOS 6.5 升级内核到 3.10.28
本文适用于CentOS 6.4, CentOS 6.5,亲测可行,估计也适用于其他Linux发行版. 1. 准备工作 1.1 下载源码包 Linux内核版本有两种:稳定版和开发版 ,Linux内核版本 ...
- 在centos 7下升级内核
前言 今天读了一篇老外的文章,讲的是如何在linux环境下升级内核.比较暴力,比较简单,故做个记录. 文章中,作者先列出一个常识:linux是内核名,不是系统名.我们平时说的"lin ...
- CentOS 6.5 升级内核 kernel
本文适用于CentOS 6.5, CentOS 6.6,亲测可行,估计也适用于其他Linux发行版. 1. 准备工作 1.1 下载源码包 Linux内核版本有两种:稳定版和开发版 ,Linux内核版本 ...
- 【kernel】Centos 云上升级内核失败 如何处理【笔记记录转】
Centos7选定默认启动的内核版本 vim /etc/grub2.cfg 修改timeout =5 修改成30天 版权声明:本文为博主原创文章,遵循CC 4.0 BY-SA版权协议,转载请附 ...
- centos 6.5升级内核到3.1
1.查看本机内核版本 [root@localhost ~]# uname -r 2.6.32-358.el6.x86_64 2.安装含有内核软件的源 步骤一:导入证书 [root@localhost ...
- CentOS 6 - 升级内核
有的时候,需要升级Linux内核,今天我就是在CentOS 6中升级内核,在没有升级内核之前,我的CentOS 6只有2.6.32这一个内核,也是默认启动的内核.下面就开始一步步操作升级内核了! 一, ...
随机推荐
- Android高手应该精通哪些内容
很多Android开发者已经度过了初级.中级,如何成为一个Android高手呢? Android123就各个级别的程序员应该掌握哪些内容作为下面分类. 一.初级 1. 拥有娴熟的Java基础,理解设计 ...
- python:将字典转化为数据框
my_dict = {,,} import pandas as pd pd.Series(my_dict) fuck i you dtype: int64 一个key只有一个value的字典如果直接转 ...
- 【应用】图片翻转js
图片翻转:图片随着鼠标指针划过进行替换 <img src="example.gif" onmouseover="this.src='exampleTwo.gif'& ...
- HihoCoder 1502 : 最大子矩阵 (双指针)
描述 给定一个NxM的矩阵A和一个整数K,小Hi希望你能求出其中最大(元素数目最多)的子矩阵,并且该子矩阵中所有元素的和不超过K. 输入 第一行包含三个整数N.M和K. 以下N行每行包含M个整数,表示 ...
- HDU2546(01背包变形)
饭卡 Time Limit: 5000/1000 MS (Java/Others) Memory Limit: 32768/32768 K (Java/Others)Total Submissi ...
- TCP 错误代码 10013: 试图以其访问权限所禁止的方式访问套接字
大家遇到的问题可能是登录没反应,这时,大家要充分利用调试工具,调试工具可能会提示下面错误: 未能连接到 net.tcp://swk-pc:4502/chatservice.svc.连接尝试的持续时间为 ...
- Tomcat-redis-Nginx
环境:centos7, Tomcat7, redis-3.2,Nginx1.8,jdk-8u60-linux-x64 Nginx反向代理tomcat,redis作会话共享 一.Nginx安装 解决依赖 ...
- secureCRT访问centOS中文系统乱码问题
第一种修改linux和crt的编码方式为utf-8 第二种修改linux和crt的编码为GB2312, 重要!!!crt字体要改成新宋体,同时字符集要改为GB2312 加上最后一项后,成功解决了中文乱 ...
- 【Linux学习】Linux文件系统1--文件系统的目录结构
Linux文件系统1--文件系统的目录结构 一.linux文件系统的类型 LINUX有四种基本文件系统类型:普通文件.目录文件.连接文件和特殊文件,可用file命令来识别. 1.普通文件:如文本文件. ...
- HTML中 &emsp等空格的区别
HTML提供了5种空格实体(space entity),它们拥有不同的宽度,非断行空格( )是常规空格的宽度,可运行于所有主流浏览器.其他几种空格( )在不同浏览器中宽度各异. ...