
Spring Boot2.0之整合多数据源
一般公司分两个数据库:
一个放共同配置文件, 一个数据库垂直业务数据库
垂直拆分和水平拆分:
垂直是根据业务划分具体数据库
在一个项目中有多个数据源(不同库jdbc) 无限个的哈~ 根据包名 或者 注解方式 划分多个数据源
本博客讲解的是分包情况下的:
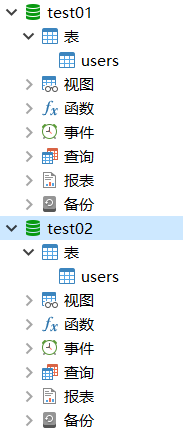
首先创建两个包

数据库也是如此:
当前的目录结构这样:
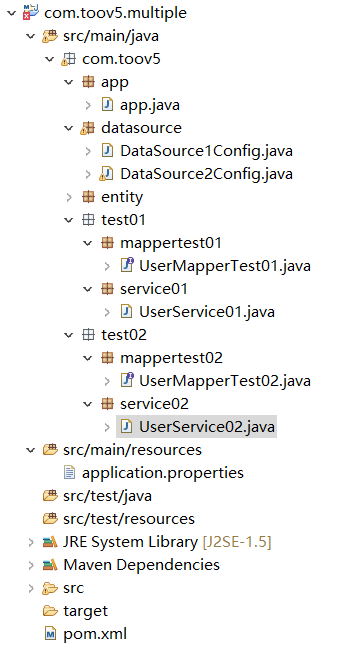
根据不同的包名字,连接不同的数据源
pom文件如下所示:
<project xmlns="http://maven.apache.org/POM/4.0.0" xmlns:xsi="http://www.w3.org/2001/XMLSchema-instance" xsi:schemaLocation="http://maven.apache.org/POM/4.0.0 http://maven.apache.org/xsd/maven-4.0.0.xsd">

  <modelVersion>4.0.0</modelVersion>

  <groupId>multipleDatasource</groupId>

  <artifactId>com.toov5.multiple</artifactId>

  <version>0.0.1-SNAPSHOT</version>

  <parent>

		<groupId>org.springframework.boot</groupId>

		<artifactId>spring-boot-starter-parent</artifactId>

		<version>2.0.0.RELEASE</version>

	</parent>

	<dependencies>

		<dependency>

			<groupId>org.springframework.boot</groupId>

			<artifactId>spring-boot-starter</artifactId>

		</dependency>

		<!-- 测试 -->

		<dependency>

			<groupId>org.springframework.boot</groupId>

			<artifactId>spring-boot-starter-test</artifactId>

			<scope>test</scope>

		</dependency>

		<dependency>

			<groupId>org.mybatis.spring.boot</groupId>

			<artifactId>mybatis-spring-boot-starter</artifactId>

			<version>1.1.1</version>

		</dependency>

		<!-- mysql 依赖 -->

		<dependency>

			<groupId>mysql</groupId>

			<artifactId>mysql-connector-java</artifactId>

		</dependency>

		<!-- springboot-web组件 -->

		<dependency>

			<groupId>org.springframework.boot</groupId>

			<artifactId>spring-boot-starter-web</artifactId>

		</dependency>

		      <dependency>

              <groupId>org.projectlombok</groupId>

               <artifactId>lombok</artifactId>

       </dependency>

	</dependencies>

</project>
数据源的配置文件:application.properties
###datasource1

spring.datasource.test1.driver-class-name = com.mysql.jdbc.Driver

spring.datasource.test1.jdbc-url = jdbc:mysql://localhost:3306/test01?useUnicode=true&characterEncoding=utf-8

spring.datasource.test1.username = root

spring.datasource.test1.password = root

###datasource2

spring.datasource.test2.driver-class-name = com.mysql.jdbc.Driver

spring.datasource.test2.jdbc-url = jdbc:mysql://localhost:3306/test02?useUnicode=true&characterEncoding=utf-8

spring.datasource.test2.username = root

spring.datasource.test2.password = root
datasource包下面的相关配置的Java代码:
package com.toov5.datasource;

import javax.sql.DataSource;

import org.apache.ibatis.session.SqlSessionFactory;

import org.mybatis.spring.SqlSessionFactoryBean;

import org.mybatis.spring.SqlSessionTemplate;

import org.mybatis.spring.annotation.MapperScan;

import org.springframework.beans.factory.annotation.Qualifier;

import org.springframework.boot.context.properties.ConfigurationProperties;

import org.springframework.boot.jdbc.DataSourceBuilder;

import org.springframework.context.annotation.Bean;

import org.springframework.context.annotation.Configuration;

import org.springframework.context.annotation.Primary;

import org.springframework.jdbc.datasource.DataSourceTransactionManager;

//DataSource01数据源的读取

@Configuration // 注册到springboot容器中

@MapperScan(basePackages = "com.toov5.test01", sqlSessionFactoryRef = "test1SqlSessionFactory")

//指向了下面的名为 test1SqlSessionFactory 的工厂

public class DataSource1Config {

    @Bean(name = "test1DataSource")  //表示注入到Spring 容器中去

    @ConfigurationProperties(prefix = "spring.datasource.test1")  //表以此为开头,去properties去读 ( 后面是写死的)

    @Primary

    public DataSource testDataSource() {

        return DataSourceBuilder.create().build();

    }

    @Bean(name = "test1SqlSessionFactory") //

    @Primary

    public SqlSessionFactory testSqlSessionFactory(@Qualifier("test1DataSource") DataSource dataSource)

            throws Exception {

        SqlSessionFactoryBean bean = new SqlSessionFactoryBean();

        bean.setDataSource(dataSource);

        // bean.setMapperLocations(

        // new

        // PathMatchingResourcePatternResolver().getResources("classpath:mybatis/mapper/test1/*.xml"));

        // 如果有一些mapper文件的话 可以把上面的注解放开

        return bean.getObject();

    }

    @Bean(name = "test1TransactionManager")  //配置事务

    @Primary

    public DataSourceTransactionManager testTransactionManager(@Qualifier("test1DataSource") DataSource dataSource) {

        return new DataSourceTransactionManager(dataSource);

    }

    @Bean(name = "test1SqlSessionTemplate")

    @Primary

    public SqlSessionTemplate testSqlSessionTemplate(

            @Qualifier("test1SqlSessionFactory") SqlSessionFactory sqlSessionFactory) throws Exception {

        return new SqlSessionTemplate(sqlSessionFactory);

    }

}
和
package com.toov5.datasource;

import javax.sql.DataSource;

import org.apache.ibatis.session.SqlSessionFactory;

import org.mybatis.spring.SqlSessionFactoryBean;

import org.mybatis.spring.SqlSessionTemplate;

import org.mybatis.spring.annotation.MapperScan;

import org.springframework.beans.factory.annotation.Qualifier;

import org.springframework.boot.context.properties.ConfigurationProperties;

import org.springframework.boot.jdbc.DataSourceBuilder;

import org.springframework.context.annotation.Bean;

import org.springframework.context.annotation.Configuration;

import org.springframework.context.annotation.Primary;

import org.springframework.jdbc.datasource.DataSourceTransactionManager;

 //DataSource2

@Configuration // 注册到springboot容器中

@MapperScan(basePackages = "com.toov5.test02", sqlSessionFactoryRef = "test2SqlSessionFactory")

public class DataSource2Config {

    @Bean(name = "test2DataSource")

    @ConfigurationProperties(prefix = "spring.datasource.test2")

    public DataSource testDataSource() {

        return DataSourceBuilder.create().build();

    }

    @Bean(name = "test2SqlSessionFactory")

    public SqlSessionFactory testSqlSessionFactory(@Qualifier("test2DataSource") DataSource dataSource)

            throws Exception {

        SqlSessionFactoryBean bean = new SqlSessionFactoryBean();

        bean.setDataSource(dataSource);

        // bean.setMapperLocations(

        // new

        // PathMatchingResourcePatternResolver().getResources("classpath:mybatis/mapper/test2/*.xml"));

        return bean.getObject();

    }

    @Bean(name = "test2TransactionManager")

    public DataSourceTransactionManager testTransactionManager(@Qualifier("test2DataSource") DataSource dataSource) {

        return new DataSourceTransactionManager(dataSource);

    }

    @Bean(name = "test2SqlSessionTemplate")

    public SqlSessionTemplate testSqlSessionTemplate(

            @Qualifier("test2SqlSessionFactory") SqlSessionFactory sqlSessionFactory) throws Exception {

        return new SqlSessionTemplate(sqlSessionFactory);

    }

}
然后相应的实体类代码:
package com.toov5.entity;

import lombok.Data;

@Data

public class User {

  private Integer age;

  private String name;

  private  Integer id;

}
mappertest01和mappertest02
package com.toov5.mappertest01;

import org.apache.ibatis.annotations.Insert;

import org.apache.ibatis.annotations.Param;

public interface UserMapperTest01 {

    @Insert("insert into users values(null,#{name},#{age});")

    public int insert(@Param("name") String name, @Param("age") Integer age);

}
和
package com.toov5.mappertest02;

import org.apache.ibatis.annotations.Insert;

import org.apache.ibatis.annotations.Param;

public interface UserMapperTest02 {

    @Insert("insert into users values(null,#{name},#{age});")

    public int insert(@Param("name") String name, @Param("age") Integer age);

}
service01和service02
package com.toov5.service01;

import org.springframework.beans.factory.annotation.Autowired;

import org.springframework.stereotype.Service;

import com.toov5.mappertest01.UserMapperTest01;

import lombok.extern.slf4j.Slf4j;

@Service

@Slf4j

public class UserService01 {

  @Autowired

  private UserMapperTest01 userMapperTest01;

  public int insertUser(String name, Integer age){

     int result = userMapperTest01.insert(name, age);

      log.info("####################",result);

      return result;

  }

}
和
package com.toov5.service02;

import org.springframework.beans.factory.annotation.Autowired;

import org.springframework.stereotype.Service;

import com.toov5.mappertest02.UserMapperTest02;

import lombok.extern.slf4j.Slf4j;

@Service

@Slf4j

public class UserService02 {

  @Autowired

  private UserMapperTest02 userMapperTest02;

  public int insertUser(String name, Integer age){

     int result = userMapperTest02.insert(name, age);

      log.info("####################",result);

      return result;

  }

}
controller类
package com.toov5.controller;

import org.springframework.beans.factory.annotation.Autowired;

import org.springframework.web.bind.annotation.RequestMapping;

import org.springframework.web.bind.annotation.RestController;

import com.toov5.test01.service01.UserService01;

@RestController

public class MultiplyController {

    @Autowired

    private UserService01 userService01;

    @Autowired

    private UserService01 userService02;

    @RequestMapping("/insertUser01")

    public Integer insertUser1(String name, Integer age){

        return userService01.insertUser(name, age);

    }

    @RequestMapping("/insertUser02")

    public Integer insertUser2(String name, Integer age){

        return userService02.insertUser(name, age);

    }

}
启动类:
package com.toov5.app;

import org.springframework.boot.SpringApplication;

import org.springframework.boot.autoconfigure.SpringBootApplication;

@SpringBootApplication(scanBasePackages={"com.toov5.*"})

public class app {

    public static void main(String[] args) {

        SpringApplication.run(app.class, args);

    }

}
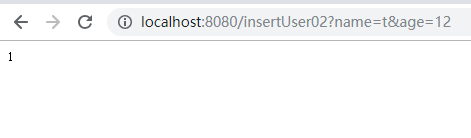
启动后访问:

数据库:

访问:
数据库结果:

注:spring1.5时候 默认只想数据源 会报错~ 2.0之后得到了修复
Spring Boot2.0之整合多数据源的更多相关文章
- Spring Boot2.0之整合事物管理
首先Spring 事务分类 1.声明事务 原理:基于编程事务的 2.编程事务 指定范围 扫包去解决 3.事务原理:AOP技术 通过环绕通知进行了拦截 使用Spring 事务注意事项: 不要tr ...
- Spring Boot2.0之整合JSP
首先不建议整合JSP哈,spring boot 对jsp的支持力度不大. 内置tomcat不支持jsp. 注意:在创建项目时候一定是war类型的,而不是跟之前那个freemarker那种jar类型. ...
- Spring Boot2.0之 整合XXL-Job
参考git上面的 springboot demo 创建maven工程: pom: <project xmlns="http://maven.apache.org/POM/4.0.0&q ...
- Spring Boot2.0之整合Mybatis
我在写这个教程时候,踩了个坑,一下子折腾到了凌晨两点半. 坑: Spring Boot对于Mysql8.1的驱动支持不好啊 我本地安装的是Mysql8.1版本,在开发时候.pom提示不需要输入驱动版本 ...
- Spring Boot2.0之 整合Zookeeper集群
普通的连接: pom: <project xmlns="http://maven.apache.org/POM/4.0.0" xmlns:xsi="http://w ...
- Spring Boot2.0之 整合Redis集群
项目目录结构: pom: <project xmlns="http://maven.apache.org/POM/4.0.0" xmlns:xsi="http:// ...
- Spring Boot2.0之 整合Redis事务
Redis事物 Redis 事务可以一次执行多个命令, 并且带有以下两个重要的保证: 事务是一个单独的隔离操作:事务中的所有命令都会序列化.按顺序地执行.事务在执行的过程中,不会被其他客户端发送来的命 ...
- Spring Boot2.0之整合Redis
需要的maven依赖 jar包,是对Jedis的封装 maven依赖: <project xmlns="http://maven.apache.org/POM/4.0.0" ...
- Spring Boot2.0之整合log4j
传统方式打印日志比较复杂, 每次打印需要定义全局变量 private static final Logger logger = LoggerFactory.getLogger(SjpControlle ...
随机推荐
- 「工具」Dubbo可视化测试工具的设计和实现
「工具」Dubbo可视化测试工具的设计和实现 学习了:https://blog.csdn.net/qq355667166/article/details/78914453
- C 命令行参数
C 命令行参数 执行程序时,可以从命令行传值给 C 程序.这些值被称为命令行参数,它们对程序很重要,特别是当您想从外部控制程序,而不是在代码内对这些值进行硬编码时,就显得尤为重要了. 命令行参数是使用 ...
- vs code编辑器
1.vs code配置 { "editor.tabSize": 2, "workbench.startupEditor": "newUntitledF ...
- Ubuntu下安装JDK图文解析
我们在64位的Ubuntu中安装JDK,选择的是jdk1.6.0_32版本号.安装文件名称为jdk-6u32-linux-x64.bin(这个是64位系统的),假设是32位系统的还须要去官网下载32位 ...
- 4pda.ru注冊验证的解码算法
代码源于看雪林版在我群里介绍注冊一个俄文安卓论坛.发出来了链接大家在測试注冊. http://4pda.ru/forum/index.php? 註册方式請参看: _https://forum.tuts ...
- mha安装报错 [error][/usr/share/perl5/vendor_perl/MHA/MasterMonitor.pm, ln361] None of slaves can be master. Check failover configuration file or log-bin settings in my.cnf
查找资料 参考 http://blog.51cto.com/16769017/1878451 解决方法: 在两个从库上开启二进制日志即可(花了 一天时间,找不到解决方法,最后还是靠自己的理解及测试解决 ...
- Javascript模式(三) 策略模式
var data = { "username" : "zhangsan", "password" : "12345690" ...
- 【转载】ASP.Net WebForm温故知新学习笔记:一、aspx与服务器控件探秘
开篇:毫无疑问,ASP.Net WebForm是微软推出的一个跨时代的Web开发模式,它将WinForm开发模式的快捷便利的优点移植到了Web开发上,我们只要学会三步:拖控件→设属性→绑事件,便可以行 ...
- 基于faro SDK 读取fls原始文件
#define _SCL_SECURE_NO_WARNINGS #define _CRT_SECURE_NO_WARNINGS #include <iostream> //#include ...
- 简单手机端头部设置 及css代码
<html> <head> <title>今日报表</title> <meta http-equiv="Content-Type&quo ...