spring boot +mysql + mybatis + druid的整理(一)——单数据源
一,使用spring boot脚手架搭建spring boot框架生成maven项目
如下图所示:
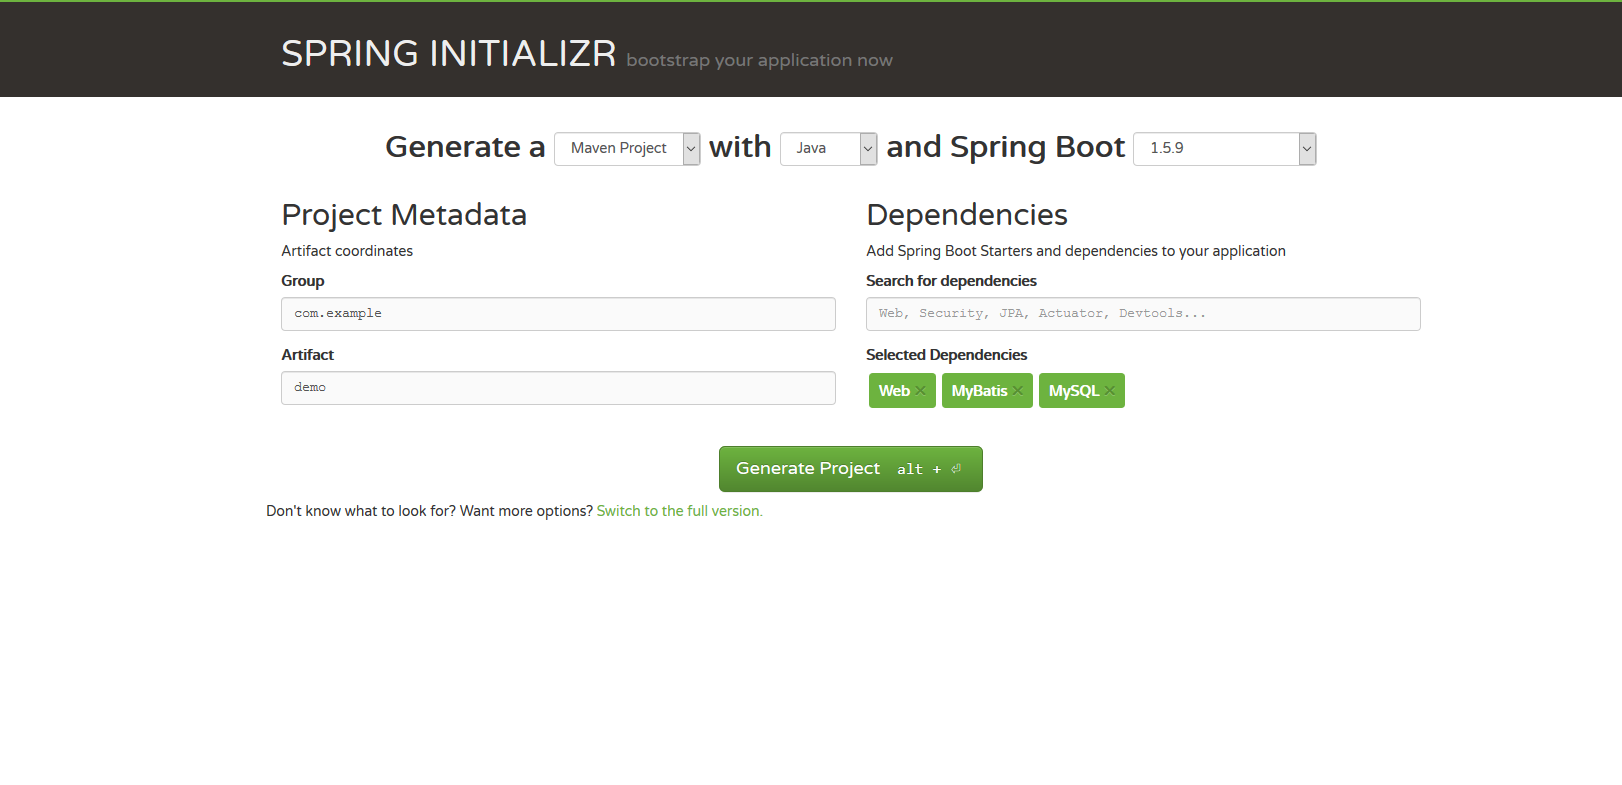
设置自定义的坐标,即左侧的Group和Artifact,右侧可以搜索添加一些依赖,搜索不到的可以在pom文件中手动添加,本文需要的依赖如下:
        <dependency>

            <groupId>org.mybatis.spring.boot</groupId>

            <artifactId>mybatis-spring-boot-starter</artifactId>

            <version>1.3.1</version>

        </dependency>

        <dependency>

            <groupId>mysql</groupId>

            <artifactId>mysql-connector-java</artifactId>

            <scope>runtime</scope>

        </dependency>

        <dependency>

            <groupId>com.alibaba</groupId>

            <artifactId>druid</artifactId>

            <version>1.0.25</version>

        </dependency>

        <!-- 分页插件 -->

        <dependency>

            <groupId>com.github.pagehelper</groupId>

            <artifactId>pagehelper</artifactId>

            <version>4.1.6</version>

        </dependency>
引入所需依赖jar包后,就可以开始集成mybatis和druid了。
二,集成druid
本文采用properties文件的形式进行配置,根据自己习惯,亦可选用yml文件进行相关配置。
1.在application.properties写入以下配置:
#主数据库的配置

#spring.datasource.name = test 多数据源时可配

#spring.datasource.type = com.alibaba.druid.pool.DruidDatasource

spring.datasource.driverClassName = com.mysql.jdbc.Driver

spring.datasource.url = jdbc:mysql://IP:port/数据库名称?useUnicode=true&characterEncoding=utf8&allowMultiQueries=true&autoReconnect=true

spring.datasource.username = ***

spring.datasource.password = ***

#连接池的补充设置

#初始化、最小、最大

spring.datasource.initialSize = 1

spring.datasource.minIdle = 1

spring.datasource.maxActive = 20

#获取连接等待超时的时间、毫秒(1m)

spring.datasource.maxWait = 60000

#检测关闭空闲连接的间隔时间、毫秒(1m),当空闲连接大于(minEvictableIdleTimeMillis),则关闭物理连接

spring.datasource.timeBetweenEvictionRunsMillis = 60000

#一个连接在池中最小的生存时间、毫秒(5m)

spring.datasource.minEvictableIdleTimeMillis = 300000

#监控统计拦截的filters,去掉后监控界面sql无法统计,'wall用于防火墙','log4j'用于日志

spring.datasource.druid.sys.filters = stat,wall,log4j

#用于检测连接是否有效的语句

spring.datasource.validationQuery=SELECT 'x'

#检测连接的超时时间、秒

spring.datasource.validationQueryTimeout = 3

#申请连接时,空闲时间大于(timeBetweenEvictionRunsMillis),则检测连接的有效性

spring.datasource.testWhileIdle = true

#申请连接时,检测连接的有效性(性能损耗)

spring.datasource.testOnBorrow = false

#归还连接时,检测连接的有效性(性能损耗)

spring.datasource.testOnReturn = false
有关druid的配置信息,可移步Druid查看,本文不再赘述。
2.编写DruidConfig,如下:
import java.util.Properties;

import javax.sql.DataSource;

import org.springframework.beans.factory.annotation.Autowired;

import org.springframework.context.annotation.Bean;

import org.springframework.context.annotation.Configuration;

import org.springframework.context.annotation.Primary;

import org.springframework.core.env.Environment;

import com.alibaba.druid.pool.DruidDataSourceFactory;

@Configuration

public class DruidConfig {

    //配置文件

    @Autowired

    private Environment env;

    @Bean

    //默认为主数据源

    @Primary

    public DataSource getDataSource() throws Exception{
     //此处不推荐使用实例化一个DruidDataSource的方式,进行数据源的配置,采用DruidDataSourceFactory的方式创建DataSource实例,原理分析可查看设计模式之工厂模式。

        Properties properties = new Properties();

        properties.put("driverClassName", env.getProperty("spring.datasource.driverClassName"));

        properties.put("url", env.getProperty("spring.datasource.url"));

        properties.put("username", env.getProperty("spring.datasource.username"));

        properties.put("password", env.getProperty("spring.datasource.password"));

        properties.put("initialSize", env.getProperty("spring.datasource.initialSize"));

        properties.put("minIdle", env.getProperty("spring.datasource.minIdle"));

        properties.put("maxActive", env.getProperty("spring.datasource.maxActive"));

        properties.put("maxWait", env.getProperty("spring.datasource.maxWait"));

        properties.put("timeBetweenEvictionRunsMillis", env.getProperty("spring.datasource.timeBetweenEvictionRunsMillis"));

        properties.put("minEvictableIdleTimeMillis", env.getProperty("spring.datasource.minEvictableIdleTimeMillis"));

        properties.put("validationQuery", env.getProperty("spring.datasource.validationQuery"));

        properties.put("filters", env.getProperty("spring.datasource.druid.sys.filters"));

        properties.put("validationQueryTimeout", env.getProperty("spring.datasource.validationQueryTimeout"));

        properties.put("testWhileIdle", env.getProperty("spring.datasource.testWhileIdle"));

        properties.put("testOnBorrow", env.getProperty("spring.datasource.testOnBorrow"));

        properties.put("testOnReturn", env.getProperty("spring.datasource.testOnReturn"));

        return DruidDataSourceFactory.createDataSource(properties);

    }

}
druid集成完毕。
三,集成mybatis
1.在application.properties中写入以下配置
# mybatis_config

# mapper.xml的文件地址

mybatis.mapperLocations=classpath:mybatis/mapper/*.xml

mybatis.typeAliasesPackage=****
2.编写MybatisConfig,如下:
import java.util.Properties;

import javax.sql.DataSource;

import org.apache.ibatis.plugin.Interceptor;

import org.apache.ibatis.session.SqlSessionFactory;

import org.mybatis.spring.SqlSessionFactoryBean;

import org.mybatis.spring.SqlSessionTemplate;

import org.mybatis.spring.annotation.MapperScan;

import org.springframework.beans.factory.annotation.Autowired;

import org.springframework.boot.autoconfigure.AutoConfigureAfter;

import org.springframework.context.annotation.Bean;

import org.springframework.context.annotation.Configuration;

import org.springframework.transaction.PlatformTransactionManager;

import org.springframework.transaction.annotation.EnableTransactionManagement;

import org.springframework.transaction.annotation.TransactionManagementConfigurer;

import org.springframework.core.env.Environment;

import org.springframework.core.io.Resource;

import org.springframework.core.io.support.PathMatchingResourcePatternResolver;

import org.springframework.jdbc.datasource.DataSourceTransactionManager;

import com.github.pagehelper.PageHelper;

@Configuration

@AutoConfigureAfter({DruidConfig.class})

//扫描dao层,basePackages 为dao层所在路径,支持通配符*,多个以,分隔

@MapperScan(basePackages = "")

@EnableTransactionManagement

public class MyBatisConfig implements TransactionManagementConfigurer{

    @Autowired

    //配置文件

    private Environment env;

    @Autowired

    //默认为配置文件中的数据源

    DataSource dataSource;

    //根据数据源创建sqlSessionFactory

    @Bean

    public SqlSessionFactoryBean sqlSessionFactoryBean() throws Exception{

        SqlSessionFactoryBean factoryBean = new SqlSessionFactoryBean();

        //指定数据源

        factoryBean.setDataSource(dataSource);

        //指定封装类所在包

        factoryBean.setTypeAliasesPackage(env.getProperty("mybatis.typeAliasesPackage"));

        //指定mapper.xml文件所在

        Resource[] resource = new PathMatchingResourcePatternResolver().getResources(env.getProperty("mybatis.mapperLocations"));

        factoryBean.setMapperLocations(resource);

        //添加分页插件

        PageHelper pageHelper = new PageHelper();

        Properties properties = new Properties();

        properties.setProperty("reasonable", "true");

        properties.setProperty("supportMethodsArguments", "true");

        properties.setProperty("returnPageInfo", "check");

        properties.setProperty("params", "count=countSql");

        pageHelper.setProperties(properties);

        factoryBean.setPlugins(new Interceptor[]{pageHelper});

        return factoryBean;

    }

    @Bean

    public SqlSessionTemplate sqlSessionTemplate(SqlSessionFactory sqlSessionFactory){

        return new SqlSessionTemplate(sqlSessionFactory);

    }

    @Bean

    @Override

    public PlatformTransactionManager annotationDrivenTransactionManager() {

        return new DataSourceTransactionManager(dataSource);

    }

}
至此,集成完毕。
spring boot +mysql + mybatis + druid的整理(一)——单数据源的更多相关文章
- 太妙了!Spring boot 整合 Mybatis Druid,还能配置监控?
Spring boot 整合 Mybatis Druid并配置监控 添加依赖 <!--druid--> <dependency> <groupId>com.alib ...
- Spring Boot系列(三):Spring Boot整合Mybatis源码解析
一.Mybatis回顾 1.MyBatis介绍 Mybatis是一个半ORM框架,它使用简单的 XML 或注解用于配置和原始映射,将接口和Java的POJOs(普通的Java 对象)映射成数据库中的记 ...
- Spring Boot 整合 Mybatis 实现 Druid 多数据源详解
摘要: 原创出处:www.bysocket.com 泥瓦匠BYSocket 希望转载,保留摘要,谢谢! “清醒时做事,糊涂时跑步,大怒时睡觉,独处时思考” 本文提纲一.多数据源的应用场景二.运行 sp ...
- Spring boot教程mybatis访问MySQL的尝试
Windows 10家庭中文版,Eclipse,Java 1.8,spring boot 2.1.0,mybatis-spring-boot-starter 1.3.2,com.github.page ...
- spring boot 整合 mybatis 以及原理
同上一篇文章一样,spring boot 整合 mybatis过程中没有看见SqlSessionFactory,sqlsession(sqlsessionTemplate),就连在spring框架整合 ...
- spring boot配置mybatis和事务管理
spring boot配置mybatis和事务管理 一.spring boot与mybatis的配置 1.首先,spring boot 配置mybatis需要的全部依赖如下: <!-- Spri ...
- Spring boot之MyBatis
文章目录1. 环境依赖2. 数据源2.1. 方案一 使用 Spring Boot 默认配置2.2. 方案二 手动创建3. 脚本初始化4. MyBatis整合4.1. 方案一 通过注解的方式4.1.1. ...
- spring boot集成mybatis(1)
Spring Boot 集成教程 Spring Boot 介绍 Spring Boot 开发环境搭建(Eclipse) Spring Boot Hello World (restful接口)例子 sp ...
- spring boot集成mybatis(2) - 使用pagehelper实现分页
Spring Boot 集成教程 Spring Boot 介绍 Spring Boot 开发环境搭建(Eclipse) Spring Boot Hello World (restful接口)例子 sp ...
随机推荐
- IntelliJ IDEA 设置Output (输出窗口)窗口字体大小
Settings-->Editor-->Colors&Fonts-->Console Font 如图: 字体调好了以后使用起来眼睛就轻松多了
- Mixed Reality-宁波市VR/AR技术应用高研班总结
年,全球AR与VR市场规模将达到1500亿美元,而根据市场研究机构BI Intelligence的统计,2020年仅头戴式VR硬件市场规模将达到28亿美元,未来5年复合增长率超过100%.本次培训从V ...
- git学习笔记5-撤销操作
git撤销有四种情况,一是没有commit,想恢复所有文件:二是没有commit,想恢复全部文件:三是已经commit了,想恢复某个版本:四是本地已经提交了,想从远程库恢复. 1. 没有commit, ...
- 《Spark大数据处理:技术、应用与性能优化》【PDF】 下载
内容简介 <Spark大数据处理:技术.应用与性能优化>根据最新技术版本,系统.全面.详细讲解Spark的各项功能使用.原理机制.技术细节.应用方法.性能优化,以及BDAS生态系统的相关技 ...
- 58、js扩展
作用域是JavaScript最重要的概念之一,想要学好JavaScript就需要理解JavaScript作用域和作用域链的工作原理. 一.js的作用域 任何程序设计语言都有作用域的概念,简单的说,作用 ...
- C 标准I/O库粗略实现
本文同时发表在 https://github.com/zhangyachen/zhangyachen.github.io/issues/123 写一下fopen/getc/putc等C库的粗略实现,参 ...
- 用Go校验下载文件之SHA256
用GO校验下载文件之SHA256 原来对计算机和网络使用安全这块不够重视,用了N多年盗版的操作系统和办公软件,为了破解使用过各种激活软件,也安装使用过很多别人破解过的软件:网络下载的文件从不校验.慢慢 ...
- Cleaner, more elegant, and wrong(翻译)
Cleaner,more elegant,and wrong 整洁,更优雅,但是错的 并不是因为你看不到错误的产生路径就意味着它不存在. 下面是C#编程书中的一个片段,摘自关于异常处理的章节. try ...
- Linux(CentOS7.1)修改默认yum源为国内的阿里云yum源
官方的yum源在国内访问效果不佳. 需要改为国内比较好的阿里云或者网易的yum源 修改方式: 下载wget yum install wget -y echo 备份当前的yum源 mv /etc/yum ...
- linux部署solr服务--小记
1.将solr压缩包上传到web项目-solr文件夹下 2.解压solr-5.5.4.zip到当前文件夹下 linux 解压zip文件到当前目录 unzip filename.zip 提示没有unzi ...