Xamarin.Forms学习系列之Android集成极光推送
一般App都会有消息推送的功能,如果是原生安卓或者IOS集成消息推送很容易,各大推送平台都有相关的Sample,但是关于Xamarin.Forms的消息推送集成的资料非常少,下面就说下Xamarin.Forms(Android)怎么集成极光推送
准备工作:
1、了解极光推送原理:https://docs.jiguang.cn/jpush/client/Android/android_sdk/
2、下载极光官方Android SDK :https://docs.jiguang.cn/jpush/resources//
3、注册极光账号,拿到AppKey和Master Secret
4、学习xamarin绑定jar包 :https://developer.xamarin.com/guides/android/advanced_topics/binding-a-java-library/binding-a-jar/
以上是准备工作,熟悉以上的内容之后,我们正式进入极光推送集成
一、把极光官方的jar包转换成Dll
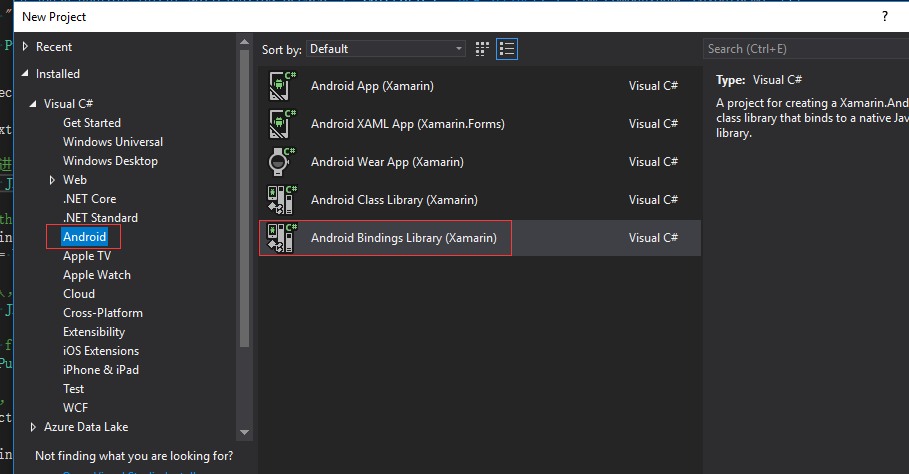
1、建立一个android Bindings Libary项目
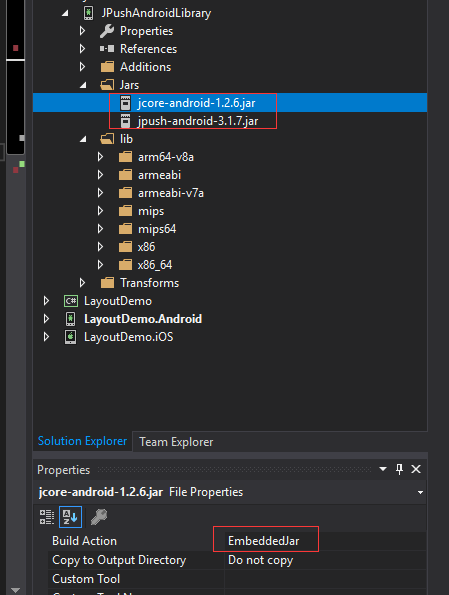
2、解压极光官方Android SDK,我下载的版本是3.1.7

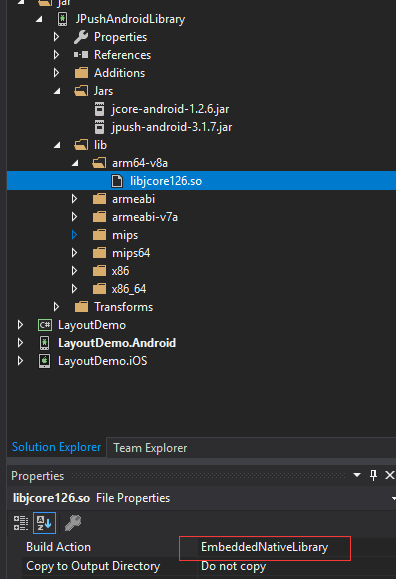
3、把jar包和so文件拷入对应文件夹下面,并设置Build Action,jar文件的Build Action设置为EmbeddedJar,so文件的Build Action设置为EmbeddedNativeLibrary,然后编译就OK了,我们可以在\bin\Debug目录看到dll了,可以用反编译工具检查下dll是否有效
二、修改AndroidManifest配置
我的配置并不是和极光官方Android SDK的AndroidManifest配置一样,我参考了网上的别人的代码,配置如下:
<?xml version="1.0" encoding="utf-8"?>

<manifest xmlns:android="http://schemas.android.com/apk/res/android" android:versionCode="" android:versionName="1.0" package="com.companyname.LayoutDemo">

  <uses-sdk android:minSdkVersion="" android:targetSdkVersion="" />

  <uses-permission android:name="android.permission.INTERNET" />

  <uses-permission android:name="android.permission.ACCESS_NETWORK_STATE" />

  <!--JPush Required-->

  <permission  android:name="com.companyname.LayoutDemo.permission.JPUSH_MESSAGE"  android:protectionLevel="signature" />

  <uses-permission android:name="com.companyname.LayoutDemo.permission.JPUSH_MESSAGE" />

  <uses-permission android:name="android.permission.RECEIVE_USER_PRESENT" />

  <uses-permission android:name="android.permission.INTERNET" />

  <uses-permission android:name="android.permission.WAKE_LOCK" />

  <uses-permission android:name="android.permission.READ_PHONE_STATE" />

  <uses-permission android:name="android.permission.WRITE_EXTERNAL_STORAGE" />

  <uses-permission android:name="android.permission.READ_EXTERNAL_STORAGE" />

  <uses-permission android:name="android.permission.VIBRATE" />

  <uses-permission android:name="android.permission.MOUNT_UNMOUNT_FILESYSTEMS" />

  <uses-permission android:name="android.permission.ACCESS_NETWORK_STATE" />

  <uses-permission android:name="android.permission.WRITE_SETTINGS" />

  <uses-permission android:name="android.permission.ACCESS_WIFI_STATE" />

  <application android:label="LayoutDemo" android:icon="@drawable/xamarin_logo">

    <!-- since 3.0. Required SDK-->

    <provider   android:authorities="com.companyname.LayoutDemo.DataProvider"   android:name="cn.jpush.android.service.DataProvider" android:exported="true"  />

    <!-- Required SDK 核心功能-->

    <!-- 可配置android:process参数将PushService放在其他进程中 -->

    <service   android:name="cn.jpush.android.service.PushService"     android:enabled="true"  android:exported="false" >

      <intent-filter>

        <action android:name="cn.jpush.android.intent.REGISTER" />

        <action android:name="cn.jpush.android.intent.REPORT" />

        <action android:name="cn.jpush.android.intent.PushService" />

        <action android:name="cn.jpush.android.intent.PUSH_TIME" />

      </intent-filter>

    </service>

    <!-- since 1.8. option 可选项。用于同一设备中不同应用的JPush服务相互拉起的功能。 -->

    <!-- 若不启用该功能可删除该组件,将不拉起其他应用也不能被其他应用拉起 -->

    <service

        android:name="cn.jpush.android.service.DaemonService"

        android:enabled="true"

        android:exported="true">

      <intent-filter >

        <action android:name="cn.jpush.android.intent.DaemonService" />

        <category android:name="com.companyname.LayoutDemo"/>

      </intent-filter>

    </service>

    <!-- Required SDK核心功能-->

    <receiver

        android:name="cn.jpush.android.service.PushReceiver"

        android:enabled="true" >

      <intent-filter android:priority="">

        <action android:name="cn.jpush.android.intent.NOTIFICATION_RECEIVED_PROXY" />

        <category android:name="com.companyname.LayoutDemo"/>

      </intent-filter>

      <intent-filter>

        <action android:name="android.intent.action.USER_PRESENT" />

        <action android:name="android.net.conn.CONNECTIVITY_CHANGE" />

      </intent-filter>

      <!-- Optional-->

      <intent-filter>

        <action android:name="android.intent.action.PACKAGE_ADDED" />

        <action android:name="android.intent.action.PACKAGE_REMOVED" />

        <data android:scheme="package" />

      </intent-filter>

    </receiver>

    <!-- Required SDK核心功能-->

    <activity

        android:name="cn.jpush.android.ui.PushActivity"

        android:configChanges="orientation|keyboardHidden"

        android:theme="@android:style/Theme.NoTitleBar"

        android:exported="false" >

      <intent-filter>

        <action android:name="cn.jpush.android.ui.PushActivity" />

        <category android:name="android.intent.category.DEFAULT" />

        <category android:name="com.companyname.LayoutDemo" />

      </intent-filter>

    </activity>

    <!-- SDK核心功能-->

    <activity

        android:name="cn.jpush.android.ui.PopWinActivity"

        android:configChanges="orientation|keyboardHidden"

        android:exported="false"

        android:theme="@android:style/Theme.NoTitleBar">

      <intent-filter>

        <category android:name="android.intent.category.DEFAULT" />

        <category android:name="com.companyname.LayoutDemo" />

      </intent-filter>

    </activity>

    <!-- Required SDK核心功能-->

    <service

        android:name="cn.jpush.android.service.DownloadService"

        android:enabled="true"

        android:exported="false" >

    </service>

    <!-- Required SDK核心功能-->

    <receiver android:name="cn.jpush.android.service.AlarmReceiver" />

    <!-- Required. For publish channel feature -->

    <!-- JPUSH_CHANNEL 是为了方便开发者统计APK分发渠道。-->

    <!-- 例如: -->

    <!-- 发到 Google Play 的APK可以设置为 google-play; -->

    <!-- 发到其他市场的 APK 可以设置为 xxx-market。 -->

    <!-- 目前这个渠道统计功能的报表还未开放。-->

    <meta-data android:name="JPUSH_CHANNEL" android:value="developer-default"/>

    <!-- Required. AppKey copied from Portal -->

    <meta-data android:name="JPUSH_APPKEY" android:value="替换成你的APPKEY"/>

  </application>

</manifest>
把配置中所有com.companyname.LayoutDemo替换成你自己的app包名,然后替换Appkey,就ok了
三、在Android 项目的MainActivity中初始化PushNotification
public class MainActivity : global::Xamarin.Forms.Platform.Android.FormsAppCompatActivity

    {

        protected override void OnCreate(Bundle savedInstanceState)

        {

            TabLayoutResource = Resource.Layout.Tabbar;

            ToolbarResource = Resource.Layout.Toolbar;

            base.OnCreate(savedInstanceState);

            initPushNotification();

            global::Xamarin.Forms.Forms.Init(this, savedInstanceState);

            LoadApplication(new App());

        }

        private void initPushNotification()

        {

            IntentFilter filter = new IntentFilter();

            filter.AddAction(JPushInterface.ActionNotificationOpened);

            filter.AddAction(JPushInterface.ActionNotificationReceived);

            filter.AddAction(JPushInterface.ActionMessageReceived);

            filter.AddAction(JPushInterface.ActionRegistrationId);

            filter.AddAction(JPushInterface.ActionConnectionChange);

            NotificationReceiver receiver = new NotificationReceiver();

            RegisterReceiver(receiver, filter);

            JPushInterface.SetDebugMode(true);

            JPushInterface.Init(this.ApplicationContext);

        }

    }
添加NotificationReceiver类,把配置中的IntentFilter放在了代码中,这里和官方sample有点不一样,这里也需要替换包名com.companyname.LayoutDemo
[BroadcastReceiver]

    [IntentFilter(new string[] { "cn.jpush.android.intent.REGISTRATION" }, Categories = new string[] { "com.companyname.LayoutDemo" })]

    [IntentFilter(new string[] { "cn.jpush.android.intent.MESSAGE_RECEIVED" }, Categories = new string[] { "com.companyname.LayoutDemo" })]

    [IntentFilter(new string[] { "cn.jpush.android.intent.NOTIFICATION_RECEIVED" }, Categories = new string[] { "com.companyname.LayoutDemo" })]

    [IntentFilter(new string[] { "cn.jpush.android.intent.NOTIFICATION_OPENED" }, Categories = new string[] { "com.companyname.LayoutDemo" })]

    [IntentFilter(new string[] { "cn.jpush.android.intent.CONNECTION" }, Categories = new string[] { "com.companyname.LayoutDemo" })]

    class NotificationReceiver : PushReceiver

    {

        public override void OnReceive(Context context, Intent intent)

        {

            base.OnReceive(context, intent);

            //当点击消息时进入,进入对应的页面

            if (intent.Action == JPushInterface.ActionNotificationOpened)

            {

                //When user tap the notification on notification center

                Bundle bundle = intent.Extras;

                string jsonData = bundle.GetString(JPushInterface.ExtraExtra);

            }

            //第一次安装app时进入,会拿到registrationID,保存registrationID,当用户登录之后把用户id和registrationID关联,方便之后一对一发送消息

            if (intent.Action == JPushInterface.ActionRegistrationId)

            {

                //Only call when first launch, get the registrationID

                string regID = JPushInterface.GetRegistrationID(context);

            }

            //当接收到信息时进入,弹出消息框

            if (JPushInterface.ActionMessageReceived.Equals(intent.Action))

            {

            }

 //当接收到信息时进入,弹出消息框

            if (JPushInterface.ActionNotificationReceived.Equals(intent.Action))

           {

            }

            if (JPushInterface.ActionNotificationReceived.Equals(intent.Action))

            {

            }

        }

    }
四、在极光推送网站注册,并测试发送
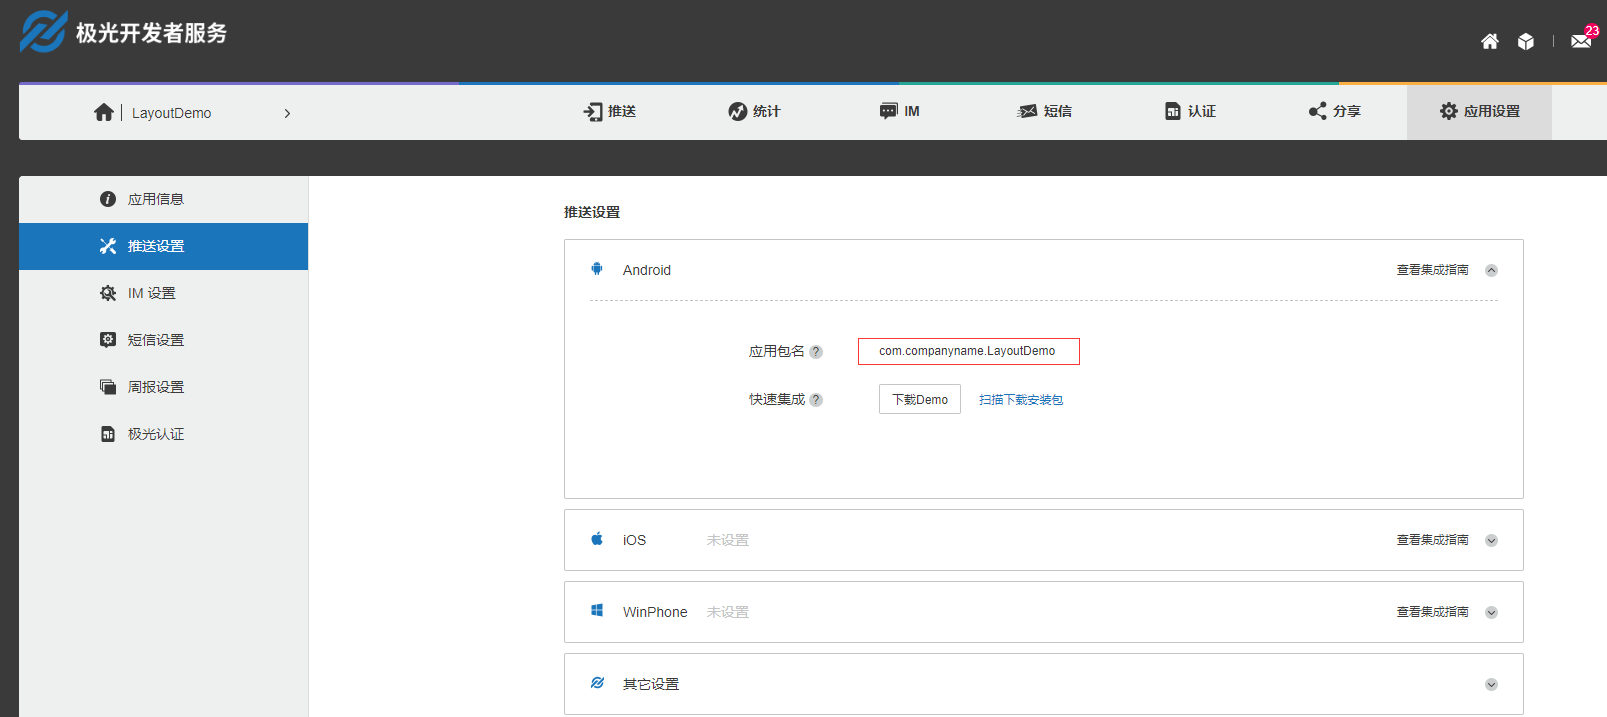
注意把所有的com.companyname.LayoutDemo替换成你自己的应用包名,应用包名必须和配置文件保持一致,极光推送根据应用包名和AppKey进行识别,这两个参数必须正确。
如果是真机测试,必须开启软件的通知权限。
坑:
项目在调试模式时,可以调用Jpush推送,但是打包APK之后发现消息推送接收不到,错误日志显示缺少libjcore126.so文件。
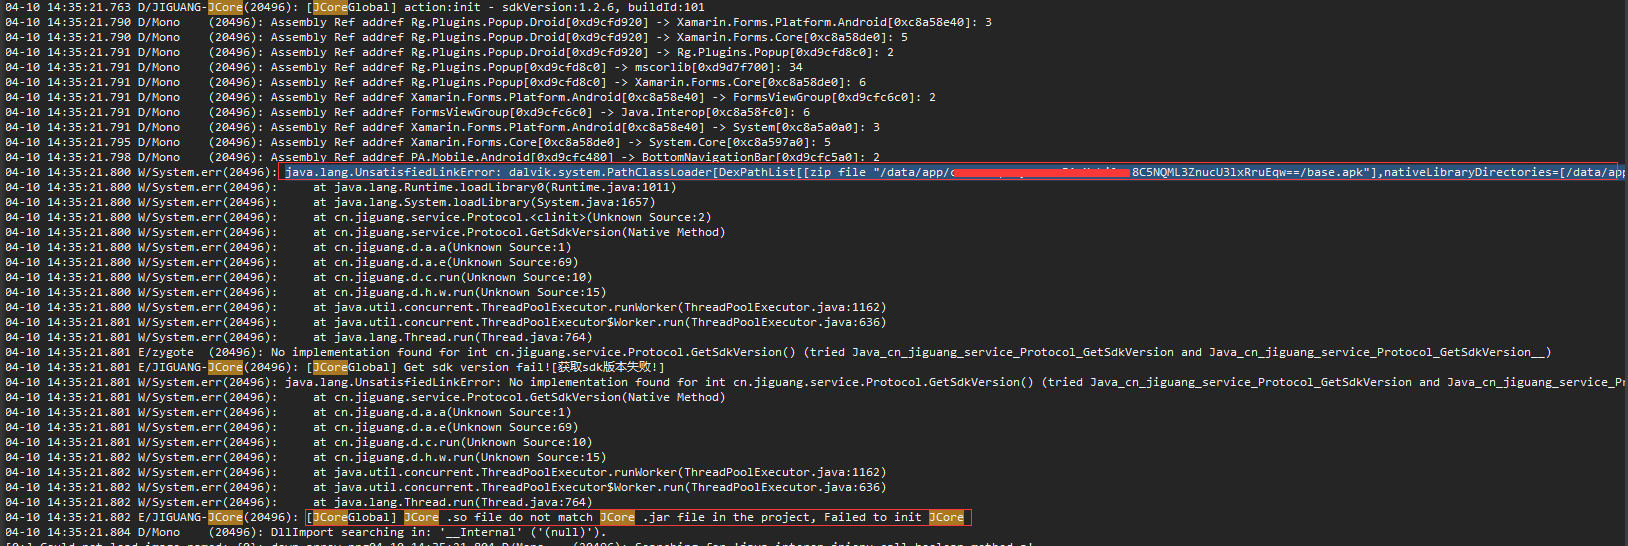

解决办法:在Android项目Assets文件夹下面加入libjcore126.so文件,并设置为AndroidNativeLibrary。 奇怪的是我新建一个项目,按照上述操作进行,无论调试模式还是打包APK都是OK的,不知道什么原因引起的。

参考文章:
https://www.jianshu.com/p/5abe3924acab
https://github.com/JimmyPun610/XamarinAndroidJiGuangPushNotification
Xamarin.Forms学习系列之Android集成极光推送的更多相关文章
- Android集成极光推送
要说学习极光推送,个人感觉官方文档就非常好啦,但是没法,人太懒啦,为了下次能够快速的将极光推送集成到项目中,故结合之前开发的项目和官方文档记录下简单的Android集成极光推送,在这之前,先上一张简单 ...
- 1、Android Studio集成极光推送(Jpush) 报错 java.lang.UnsatisfiedLinkError: cn.jpush.android.service.PushProtoco
Android studio 集成极光推送(Jpush) (华为手机)报错, E/JPush: [JPushGlobal] Get sdk version fail![获取sdk版本失败!] W/Sy ...
- C#—ASP.NET:集成极光推送(Push API v3)
C#—ASP.NET:集成极光推送(Push API v3) 原文地址: https://blog.csdn.net/CXLLLK/article/details/86489994 1.极光推送官 ...
- 李洪强iOS之集成极光推送一iOS SDK概述
李洪强iOS之集成极光推送一iOS SDK概述 JPush iOS 从上图可以看出,JPush iOS Push 包括 2 个部分,APNs 推送(代理),与 JPush 应用内消息. 红色部分是 A ...
- ionic2集成极光推送
ionic2集成极光推送: ionic2api:https://ionicframework.com/docs/ 极光推送官网:https://www.jiguang.cn android-怎么注册极 ...
- Swift3集成极光推送
现在很多程序都开始使用Swift开发了,但是第三方库大多数都是用OC写的,所以我们要使用Swift和OC混编.今天的内容主要讲Swift3.0集成极光推送. 1.准备工作 集成指南,极光上说的 ...
- 李洪强iOS之集成极光推送三iOS集成指南
李洪强iOS之集成极光推送三iOS集成指南 SDK说明 适用版本 本文匹配的 SDK版本:r2.1.5 以后.查看最近更新了解最新的SDK更新情况.使用Xcode 6及以上版本可以使用新版Push S ...
- 李洪强iOS之集成极光推送二iOS 证书 设置指南
李洪强iOS之集成极光推送二iOS 证书 设置指南 创建应用程序ID 登陆 iOS Dev Center 选择进入iOS Provisioning Portal. 在 iOS Provisioning ...
- ThinkPHP 3.2.x 集成极光推送指北
3.2版本已经过了维护生命周期,官方已经不再维护,请及时更新至5.0版本 -- ThinkPHP 官方仓库 以上,如果有条件,请关闭这个页面,然后升级至 ThinkPHP 5,如果由于各种各样的原因无 ...
随机推荐
- css四种基本选择器
css选择器是什么? 要使用css对HTML页面中的元素实现一对一,一对多或者多对一的控制,这就需要用到CSS选择器. HTML页面中的元素就是通过CSS选择器进行控制的. CSS选择器:就是指定CS ...
- Spring为IOC容器注入Bean的五种方式
一 @Import导入组件,id默认是组件的全类名 //类中组件统一设置.满足当前条件,这个类中配置的所有bean注册才能生效: @Conditional({WindowsCondition.clas ...
- Spring Boot 2.X(十四):日志功能 Logback
Logback 简介 Logback 是由 SLF4J 作者开发的新一代日志框架,用于替代 log4j. 主要特点是效率更高,架构设计够通用,适用于不同的环境. Logback 分为三个模块:logb ...
- 第一篇:版本控制git之仓库管理
---恢复内容开始--- 再开始这个话题之前,让我想起了一件很痛苦的事情,在我大学写毕业论文的时候,我当时的文件是这样保存的 毕业论文_初稿.doc 毕业论文_修改1.doc 毕业论文_修改2.doc ...
- 论RSA算法的重要性 -RSA 简介
地球上最重要的算法 (这个说法似乎有点夸张了,但是当你了解了RSA算法后,就觉得不夸张了.) 如果没有 RSA 算法,现在的网络世界毫无安全可言,也不可能有现在的网上交易.上一篇文章 ssh 协议为什 ...
- 【重构】AndroidStudio中代码重构菜单Refactor功能详解
代码重构几乎是每个程序员在软件开发中必须要不断去做的事情,以此来不断提高代码的质量.Android Stido(以下简称AS)以其强大的功能,成为当下Android开发工程师最受欢迎的开发工具,也是A ...
- Kong05-Kong 的健康检查和监控
您可以让 Kong 代理的 API 使用 ring-balancer , 通过添加包含一个或多个目标实体的upstream 实体来配置,每个目标指向不同的IP地址(或主机名)和端口.ring-bala ...
- 口胡题fr
T1五种贡献恶心的要死.$1.grand$$2.father$$3.brother$$4.son$$5.grandson$我们选择维护三个量.1.儿子和,$sx$2.孙子和,$gsx$3.自己的值,$ ...
- 拎壶冲冲冲专业砸各种培训机构饭碗篇----python自学(一)
本人一直从事运维工程师,热爱运维,所以从自学的角度站我还是以python运维为主. 一.python自学,当然少不了从hello world开始,话不多说,直接上手练习 1.这个可以学会 print( ...
- C语言程序设计100例之(6):数字反转
例6 数字反转 题目描述 给定一个整数,请将该数各个位上数字反转得到一个新数.新数也应满足整数的常见形式,即除非给定的原数为零,否则反转后得到的新数的最高位数字不应为零(参见样例2). 输入格式 ...