JavaScript实例:运动的小球
本篇博文通过制作一个小球运动动画的实例,来学习在HTML5的画布上实现动画制作的方法,同时理解面向对象程序设计的基本思想。
1.绘制小球
先在HTML页面中设置一个画布。
<canvas id="myCanvas" width="400" height="300" style="border:3px double #996633;">
</canvas>
再将小球画在canvas(画布)上面。
可编写如下的HTML代码。
<!DOCTYPE html>
<head>
<title>运动的小球(一)</title>
</head>
<body>
<canvas id="myCanvas" width="400" height="300" style="border:3px double #996633;">
</canvas>
<script type="text/javascript">
var canvas = document.getElementById('myCanvas');
var context = canvas.getContext('2d');
var x=100, y=100,radius=25;
context.beginPath();
context.arc(x, y, radius, 0, Math.PI*2, true);
context.closePath();
context.fillStyle = "blue";
context.fill();
</script>
</body>
</html>
其中,变量x、y、radius分别是小球的圆心坐标(x,y)和半径radius。
将上述HTML代码保存到一个html文本文件中,再在浏览器中打开包含这段HTML代码的html文件,可以看到在浏览器窗口中出现一个蓝色的小球。这个小球没有什么特别的,实际上是一个简单的圆形,用arc()函数绘制出来的。
2.让小球动起来
添加一个animation函数,在函数中先用clearRect 清理掉画布里之前的小球圆形,然后重新绘制小球,之后修改小球的圆心坐标。再用window.requestAnimationFrame()控制动画。
设小球x坐标轴(水平方向)的移动速度为xspeed、y坐标轴(竖直方向)的移动速度为yspeed,则修改小球圆心坐标的方法为:x += xspeed; y +=yspeed; 。
重新编写的HTML代码如下。
<!DOCTYPE html>
<head>
<title>运动的小球(二)</title>
</head>
<body>
<canvas id="myCanvas" width="400" height="300" style="border:3px double #996633;">
</canvas>
<script type="text/javascript">
var canvas = document.getElementById('myCanvas');
var context = canvas.getContext('2d');
var x=100, y=100, xspeed=5, yspeed=1, radius=25;
function animation()
{
context.clearRect(0,0,canvas.width,canvas.height);
context.beginPath();
context.arc(x, y, radius, 0, Math.PI*2, true);
context.closePath();
context.fillStyle = "blue";
context.fill();
x += xspeed;
y += yspeed;
window.requestAnimationFrame(animation);
}
window.requestAnimationFrame(animation);
</script>
</body>
</html>
在浏览器中打开包含这段HTML代码的html文件,可以看到在浏览器窗口中出现一个蓝色的小球在运动。
3.边界碰撞处理
在浏览器中打开添加了animation函数的html文件,会发现小球很快会移出画布。这是由于animation函数中没有进行边界碰撞测试,因此,需要在修改小球圆心坐标后,判断小球按新的圆心坐标绘制时是否会超出画布的尺寸,并控制相应的速度量反转(增量变减量或者减量变增量)。修改后的animation函数如下:
function animation()
{
context.clearRect(0,0,canvas.width,canvas.height);
context.beginPath();
context.arc(x, y, radius, 0, Math.PI*2, true);
context.closePath();
context.fillStyle = "blue";
context.fill();
x += xspeed;
y += yspeed;
if (y+radius>=canvas.height || y-radius<=0)
yspeed = -yspeed;
if (x+ radius >= canvas.width || x-radius<= 0)
xspeed = -xspeed;
window.requestAnimationFrame(animation);
}
修改animation函数后,完整的HTML文件内容如下:
<!DOCTYPE html>
<head>
<title>运动的小球(三)</title>
</head>
<body>
<canvas id="myCanvas" width="400" height="300" style="border:3px double #996633;">
</canvas>
<script type="text/javascript">
var canvas = document.getElementById('myCanvas');
var context = canvas.getContext('2d');
var x=100, y=100, xspeed=5, yspeed=1, radius=25;
function animation()
{
context.clearRect(0,0,canvas.width,canvas.height);
context.beginPath();
context.arc(x, y, radius, 0, Math.PI*2, true);
context.closePath();
context.fillStyle = "blue";
context.fill();
x += xspeed;
y += yspeed;
if (y+radius>=canvas.height || y-radius<=0)
yspeed = -yspeed;
if (x+ radius >= canvas.width || x-radius<= 0)
xspeed = -xspeed;
window.requestAnimationFrame(animation);
}
window.requestAnimationFrame(animation);
</script>
</body>
</html>
在浏览器中打开包含这段HTML代码的html文件,可以看到在浏览器窗口中出现一个蓝色的小球在运动,并且小球在碰撞到边界后,会改变方向,这样小球继续在框中运动,不会出界。
4.再添加一个运动的小球
分别用 var x1=100, y1=100, xspeed1=5, yspeed1=1, radius1=25;
var x2=50, y2=50, xspeed2=3, yspeed2=1, radius2=15;来表示两个小球的数据。
然后将animation函数中有关小球的绘制和坐标修改语句复制一次并修改相应的变量名即可。
修改后的HTML代码如下。
<!DOCTYPE html>
<head>
<title>运动的小球(四)</title>
</head>
<body>
<canvas id="myCanvas" width="400" height="300" style="border:3px double #996633;">
</canvas>
<script type="text/javascript">
var canvas = document.getElementById('myCanvas');
var context = canvas.getContext('2d');
var x1=100, y1=100, xspeed1=5, yspeed1=1, radius1=25;
var x2=50, y2=50, xspeed2=3, yspeed2=1, radius2=15;
function animation()
{
context.clearRect(0,0,canvas.width,canvas.height);
context.beginPath();
context.arc(x1, y1, radius1, 0, Math.PI*2, true);
context.closePath();
context.fillStyle = "blue";
context.fill();
context.beginPath();
context.arc(x2, y2, radius2, 0, Math.PI*2, true);
context.closePath();
context.fillStyle = "red";
context.fill();
x1 += xspeed1;
y1 += yspeed1;
if (y1+radius1>=canvas.height || y1-radius1<=0)
yspeed1 = -yspeed1;
if (x1+ radius1 >= canvas.width || x1-radius1<= 0)
xspeed1 = -xspeed1;
x2 += xspeed2;
y2 += yspeed2;
if (y2+radius2>=canvas.height || y2-radius2<=0)
yspeed2 = -yspeed2;
if (x2+ radius2 >= canvas.width || x2-radius2<= 0)
xspeed2 = -xspeed2;
window.requestAnimationFrame(animation);
}
window.requestAnimationFrame(animation);
</script>
</body>
</html>
在浏览器中打开包含这段HTML代码的html文件,可以看到在浏览器窗口中出现一个蓝色和一个红色的小球在运动。
5.定义小球对象。
按上面的方法,如果再增加一个或多个小球,相应的代码会复制多次。实际上,小球是一个对象,它包括圆心坐标(x,y)、半径radius、水平方向的移动速度xspeed、竖直方向的移动速度yspeed和小球颜色等属性,以及绘制小球和小球移动一步(指圆心坐标变化)等操作。显然,将小球可以定义为一个对象更合适。
采用构造函数的方法定义小球对象的HTML代码如下。
<!DOCTYPE html>
<head>
<title>运动的小球(五)</title>
</head>
<body>
<canvas id="myCanvas" width="400" height="300" style="border:3px double #996633;"></canvas>
<script type="text/javascript">
var canvas = document.getElementById('myCanvas');
var context = canvas.getContext('2d');
// 定义小球对象
function Ball(x,y,xspeed,yspeed,radius,color){
this.x=x;
this.y=y;
this.xspeed=xspeed;
this.yspeed=yspeed;
this.radius=radius;
this.color=color;
this.draw=function()
{
context.beginPath();
context.arc(this.x,this.y,this.radius, 0, Math.PI*2, true);
context.closePath();
context.fillStyle =this.color;
context.fill();
}
this.step=function()
{
this.x += this.xspeed;
this.y += this.yspeed;
if (this.y+this.radius>=canvas.height || this.y-this.radius<=0)
this.yspeed = -this.yspeed;
if (this.x+ this.radius >= canvas.width || this.x-this.radius<= 0)
this.xspeed = -this.xspeed;
}
}
// 创建三个小球
var ball1=new Ball(100,100,5,3,25,"#0000FF");
var ball2=new Ball(50, 40,3,1,20,"#FF0000");
var ball3=new Ball(30, 30, 3, 2, 15,"#00FFFF");
function animation()
{
context.clearRect(0,0,canvas.width,canvas.height);
ball1.draw();
ball2.draw();
ball3.draw();
ball1.step();
ball2.step();
ball3.step();
window.requestAnimationFrame(animation);
}
window.requestAnimationFrame(animation);
</script>
</body>
</html>
在浏览器中打开包含这段HTML代码的html文件,可以看到在浏览器窗口中出现一个蓝色、一个红色和一个青色的三个小球在运动。
采用对象后,增加一个运动小球就很方便了,只需先创建一个小球对象
var ball4=new Ball(10, 20, 3, 2, 15,"#FFFF00");
再添加两条语句 ball4.draw();和 ball4.step();即可。
6.给小球一个长尾效果。
如果将animation函数中的语句 context.clearRect(0,0,canvas.width,canvas.height);改写为如下两条语句:
context.fillStyle = 'rgba(255,255,255,0.3)';
context.fillRect(0,0,canvas.width,canvas.height);
这样在清除前一帧动画时,由于是用一个半透明的fillRect函数填充画布,可以为每个小球增加一个长尾效果。
添加了长尾效果的小球运动动画HTML文档内容如下:
<!DOCTYPE html>
<head>
<title>运动的小球(六)</title>
</head>
<body>
<canvas id="myCanvas" width="400" height="300" style="border:3px double #996633;"></canvas>
<script type="text/javascript">
var canvas = document.getElementById('myCanvas');
var context = canvas.getContext('2d');
// 定义小球对象
function Ball(x,y,xspeed,yspeed,radius,color){
this.x=x;
this.y=y;
this.xspeed=xspeed;
this.yspeed=yspeed;
this.radius=radius;
this.color=color;
this.draw=function()
{
context.beginPath();
context.arc(this.x,this.y,this.radius, 0, Math.PI*2, true);
context.closePath();
context.fillStyle =this.color;
context.fill();
}
this.step=function()
{
this.x += this.xspeed;
this.y += this.yspeed;
if (this.y+this.radius>=canvas.height || this.y-this.radius<=0)
this.yspeed = -this.yspeed;
if (this.x+ this.radius >= canvas.width || this.x-this.radius<= 0)
this.xspeed = -this.xspeed;
}
}
// 创建三个小球
var ball1=new Ball(100,100,5,3,25,"#0000FF");
var ball2=new Ball(50, 40,3,1,20,"#FF0000");
var ball3=new Ball(30, 30, 3, 2, 15,"#00FFFF");
function animation()
{
context.fillStyle = 'rgba(255,255,255,0.3)';
context.fillRect(0,0,canvas.width,canvas.height);
ball1.draw();
ball2.draw();
ball3.draw();
ball1.step();
ball2.step();
ball3.step();
window.requestAnimationFrame(animation);
}
window.requestAnimationFrame(animation);
</script>
</body>
</html>
在浏览器中打开包含这段HTML代码的html文件,可以看到在浏览器窗口中出现一个蓝色、一个红色和一个青色的三个小球在运动,并且每个小球运动时带有长尾效果,如图1所示。
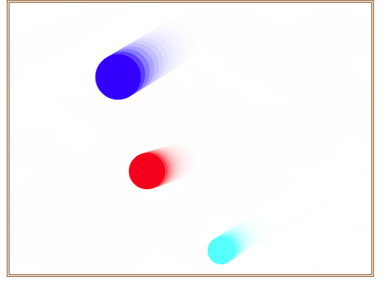
图1 带有长尾效果的运动小球
7.为画布中的动画添加开始和结束控制。
为了对小球运动的开始和结束进行控制,可以在页面中增加“开始”和“停止”两个按钮,单击相应的按钮产生相应的操作。
添加按钮操作后的HTML代码如下。
<!DOCTYPE html>
<head>
<title>运动的小球(七)</title>
</head>
<body>
<canvas id="myCanvas" width="400" height="300" style="border:3px double #996633;">
</canvas>
<br/><input id="start" type="button" value="开始">
<input id="stop" type="button" value="停止">
<script type="text/javascript">
var canvas = document.getElementById('myCanvas');
var context = canvas.getContext('2d');
var handle=0;
// 定义小球对象
function Ball(x,y,xspeed,yspeed,radius,color){
this.x=x;
this.y=y;
this.xspeed=xspeed;
this.yspeed=yspeed;
this.radius=radius;
this.color=color;
this.draw=function()
{
context.beginPath();
context.arc(this.x,this.y,this.radius, 0, Math.PI*2, true);
context.closePath();
context.fillStyle =this.color;
context.fill();
}
this.step=function()
{
this.x += this.xspeed;
this.y += this.yspeed;
if (this.y+this.radius>=canvas.height || this.y-this.radius<=0)
this.yspeed = -this.yspeed;
if (this.x+ this.radius >= canvas.width || this.x-this.radius<= 0)
this.xspeed = -this.xspeed;
}
}
// 创建三个小球
var ball1=new Ball(100,100,5,3,25,"#0000FF");
var ball2=new Ball(50, 50,3,1,20,"#FF0000");
var ball3=new Ball(20, 20, 3, 2, 15,"#00FFFF");
ball1.draw();
ball2.draw();
ball3.draw();
function animation()
{
context.fillStyle = 'rgba(255,255,255,0.3)';
context.fillRect(0,0,canvas.width,canvas.height);
ball1.draw();
ball2.draw();
ball3.draw();
ball1.step();
ball2.step();
ball3.step();
handle=window.requestAnimationFrame(animation);
}
var running=false;
var startBtn=document.getElementById('start');
var stopBtn=document.getElementById('stop');
startBtn.addEventListener('click', function () {
if (!running)
{
handle=requestAnimationFrame(animation);
running=true;
}
});
stopBtn.addEventListener('click', function () {
cancelAnimationFrame(handle);
handle=null;
running=false;
});
</script>
</body>
</html>
在浏览器中打开包含这段HTML代码的html文件,可以看到在浏览器窗口中出现一个蓝色、一个红色和一个青色的三个小球,这三个小球初始时静止。单击“开始”按钮后,小球开始运动,单击“停止”按钮,小球停止运动,在当前位置静止不动。再单击“开始”按钮,小球又开始运动。
JavaScript实例:运动的小球的更多相关文章
- 自定义View,随着手指运动的小球
这个实例是自定的view的初步介绍,要设计的是一个随着手指运动的小球.原理是随时获取手指的坐标,然后在这个坐标上面实时改变自定义view的坐标.这个view仅仅是画了一个圆形而已. 自定义的view ...
- JavaScript实例
<!DOCTYPE html PUBLIC "-//W3C//DTD XHTML 1.0 Strict//EN" "http://www.w3.org/TR/xht ...
- 每天一个JavaScript实例-从一个div元素删除一个段落
<!DOCTYPE html> <html> <head> <meta http-equiv="Content-Type" content ...
- 每天一个JavaScript实例-推断图片是否载入完毕
<!doctype html> <html lang="en"> <head> <meta charset="utf-8&quo ...
- 每天一个JavaScript实例-动态省份选择城市
<!DOCTYPE html> <html> <head> <meta http-equiv="Content-Type" content ...
- 每天一个JavaScript实例-递归实现反转数组字符串
<!DOCTYPE html> <html> <head> <meta http-equiv="Content-Type" content ...
- 每天一个JavaScript实例-html5拖拽
<!DOCTYPE html> <html> <head> <meta http-equiv="Content-Type" content ...
- 每天一个JavaScript实例-canvas绘图
<!DOCTYPE html> <html> <head> <meta http-equiv="Content-Type" content ...
- 一些有用的javascript实例分析(三)
原文:一些有用的javascript实例分析(三) 10 输入两个数字,比较大小 window.onload = function () { var aInput = document.getElem ...
随机推荐
- shell介绍、命令历史、命令补全和别名、通配符、输入输出重定向
第5周第5次课(4月20日) 课程内容: 8.1 shell介绍8.2 命令历史8.3 命令补全和别名8.4 通配符8.5 输入输出重定向 8.1 shell介绍 使用yum+管道方式查看zsh和ks ...
- Linux集群介绍、keepalived介绍及配置高可用集群
7月3日任务 18.1 集群介绍18.2 keepalived介绍18.3/18.4/18.5 用keepalived配置高可用集群扩展heartbeat和keepalived比较http://blo ...
- 谷歌地图 API 开发之获取坐标以及街道详情
自己的项目中有获取当前点击的坐标经纬度或者获取当前街道的信息的需求.估计这个对于新手来说,还是比较麻烦的,因为从官网上找这个也并不是很好找,要找好久的,运气好的可能会一下子找到. 献上自己写的测试案例 ...
- WebGPU学习(三):MSAA
大家好,本文学习MSAA以及在WebGPU中的实现. 上一篇博文 WebGPU学习(二): 学习"绘制一个三角形"示例 下一篇博文 WebGPU学习(四):Alpha To Cov ...
- PyCharm 2019.3发布,增加了哪些新功能呢?
Python的IDE(Integrated Development Environment 集成开发环境)非常多,如:VS Code.Sublime.NotePad.Python自带编辑器IDLE.J ...
- shell 点命令和source指令
1 shell脚本执行方法 有两种方法执行shell scripts,一种是新产生一个shell,然后执行相应的shell scripts:一种是在当前shell下执行,不再启用其他shell.新产生 ...
- php权重分配
假设有3个人 能力的权重 分别为 A=>1,B=>2,C=>3,那么当有6个案子的时候 A分配到1个,B分配到2个,C分配到3个,这很合理,但是当案子只有5个,或者有7个的时候, ...
- Win7 系统所有应用颜色调整
不知道按到哪个快捷键了,发现windows7系统桌面,浏览器,PDF阅读器和Eclipse的北京和菜单都编程淡黄色,下面是解决的过程. 方法一:在win7桌面右击 -> 个性化 -> 窗口 ...
- AQS系列(二)- ReentrantLock的释放锁
前言 在AQS系列(一)中我们一起看了ReentrantLock加锁的过程,今天我们看释放锁,看看老Lea那冷峻的思维是如何在代码中笔走龙蛇的. 正文 追踪unlock方法: public void ...
- DENEBOLA (See3CAM_CX3RDK) - CX3 Reference Design
Denebola (See3CAM_CX3RDK) is a USB3.0 USB video class (UVC) reference design kit (RDK) developed by ...