springboot整合netty的多种方式
netty作为一个高性能的io框架,是非好用的一个技术框架,
<?xml version="1.0" encoding="UTF-8"?>

<project xmlns="http://maven.apache.org/POM/4.0.0" xmlns:xsi="http://www.w3.org/2001/XMLSchema-instance"

         xsi:schemaLocation="http://maven.apache.org/POM/4.0.0 https://maven.apache.org/xsd/maven-4.0.0.xsd">

    <modelVersion>4.0.0</modelVersion>

    <parent>

        <groupId>org.springframework.boot</groupId>

        <artifactId>spring-boot-starter-parent</artifactId>

        <version>2.2.1.RELEASE</version>

        <relativePath/> <!-- lookup parent from repository -->

    </parent>

    <groupId>com.cxy</groupId>

    <artifactId>netty</artifactId>

    <version>0.0.1-SNAPSHOT</version>

    <name>netty</name>

    <description>Demo project for Spring Boot</description>

    <properties>

        <java.version>1.8</java.version>

    </properties>

    <dependencies>

        <dependency>

            <groupId>org.springframework.boot</groupId>

            <artifactId>spring-boot-starter-web</artifactId>

        </dependency>

        <dependency>

            <groupId>io.netty</groupId>

            <artifactId>netty-all</artifactId>

            <version>4.1.25.Final</version>

        </dependency>

        <dependency>

            <groupId>org.springframework.boot</groupId>

            <artifactId>spring-boot-starter-test</artifactId>

            <scope>test</scope>

            <exclusions>

                <exclusion>

                    <groupId>org.junit.vintage</groupId>

                    <artifactId>junit-vintage-engine</artifactId>

                </exclusion>

            </exclusions>

        </dependency>

    </dependencies>

    <build>

        <plugins>

            <plugin>

                <groupId>org.springframework.boot</groupId>

                <artifactId>spring-boot-maven-plugin</artifactId>

            </plugin>

        </plugins>

    </build>

</project>
package com.cxy.netty.controller;

import io.netty.buffer.ByteBuf;

import io.netty.channel.ChannelFutureListener;

import io.netty.channel.ChannelHandlerContext;

import io.netty.channel.ChannelInboundHandlerAdapter;

import io.netty.util.CharsetUtil;

public class EchoServerHandler extends ChannelInboundHandlerAdapter {

    @Override

    public void channelRead(ChannelHandlerContext ctx, Object msg){

        ByteBuf in = (ByteBuf) msg;

        System.out.println("Server received: " + in.toString(CharsetUtil.UTF_8));

        ctx.write(in);

    }

    @Override

    public void channelReadComplete(ChannelHandlerContext ctx){

        ctx.writeAndFlush(ChannelFutureListener.CLOSE);

    }

    @Override

    public void exceptionCaught(ChannelHandlerContext ctx, Throwable cause){

        cause.printStackTrace();

        ctx.close();

    }

}
这个handler是我从官网上copy下来的
package com.cxy.netty.controller;

import io.netty.bootstrap.ServerBootstrap;

import io.netty.channel.ChannelFuture;

import io.netty.channel.ChannelInitializer;

import io.netty.channel.EventLoopGroup;

import io.netty.channel.nio.NioEventLoopGroup;

import io.netty.channel.socket.SocketChannel;

import io.netty.channel.socket.nio.NioServerSocketChannel;

import org.slf4j.Logger;

import org.slf4j.LoggerFactory;

import org.springframework.boot.autoconfigure.web.ServerProperties;

import org.springframework.stereotype.Component;

import javax.annotation.PostConstruct;

import javax.annotation.PreDestroy;

import java.net.InetSocketAddress;

@Component

public class NettyServer {

    /*private  int port =8080;

    public int getPort() {

        return port;

    }

    public void setPort(int port) {

        this.port = port;

    }

    public NettyServer(int port) {

        this.port = port;

    }*/

    @PostConstruct

    public void start() throws Exception {

        System.out.println("启动记载netty");

        EventLoopGroup boss = new NioEventLoopGroup();

        EventLoopGroup work = new NioEventLoopGroup();

        ServerBootstrap b = new ServerBootstrap();

        b.group(boss,work)

                .channel(NioServerSocketChannel.class)

                .localAddress(new InetSocketAddress(8082))

                .childHandler(new ChannelInitializer<SocketChannel>() {

                    @Override

                    protected void initChannel(SocketChannel ch) throws Exception {

                        ch.pipeline().addLast(new EchoServerHandler());

                    }

                });

        System.out.println("启动加载netty2");

        ChannelFuture channelFuturef = b.bind().sync();

        if (channelFuturef.isSuccess()){

        System.out.println("启动成功");

        }

    }

}
点击启动:
看日志:
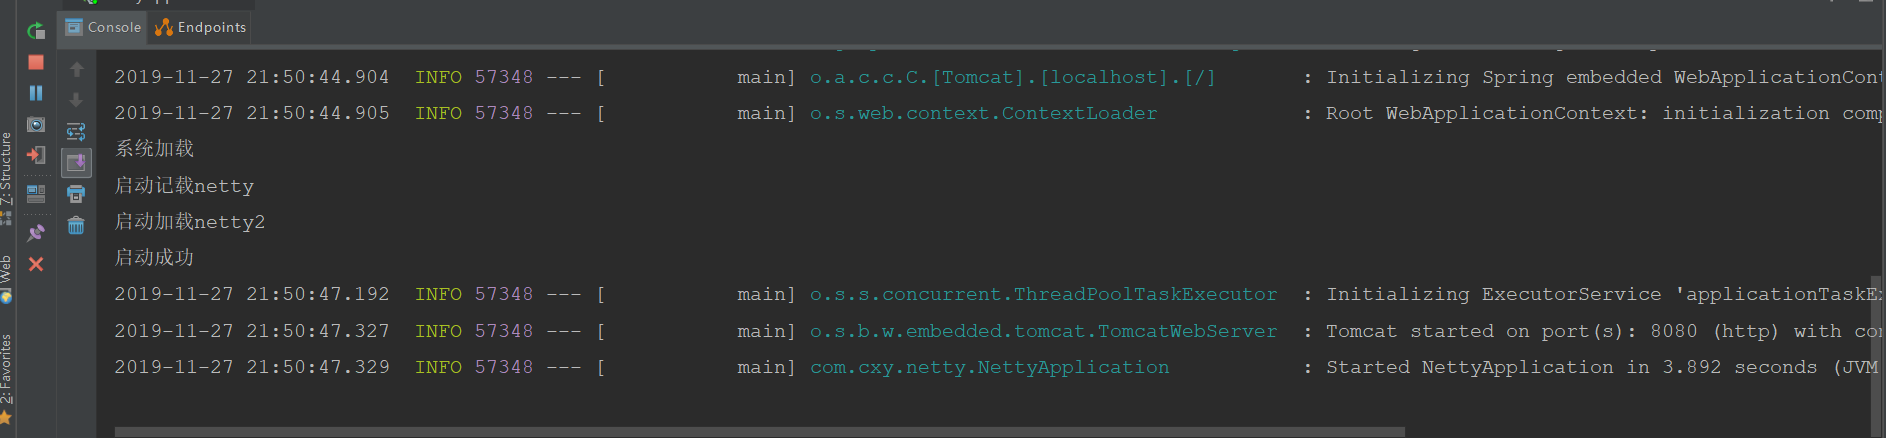
说明已经启动
那么这个注解为什么这么神奇呢:
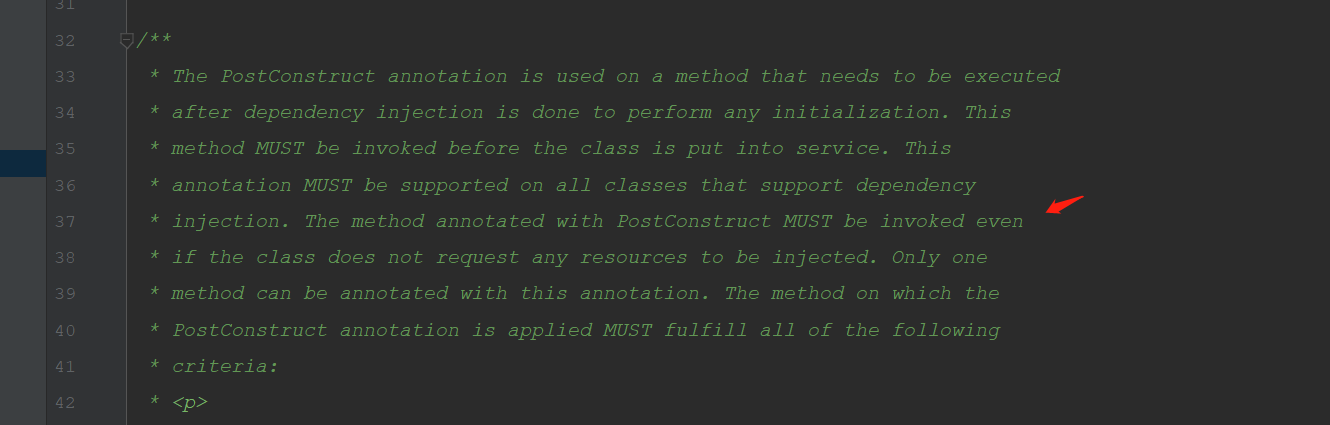
大概的意思,大家看下,意思就是这个方法会随着类的加载而加载,初始化加载的意思:
@Documented

@Retention (RUNTIME)

@Target(METHOD)

public @interface PostConstruct {

}
方式二:利用监听器启动:
package com.cxy.netty.controller;

import javax.servlet.ServletContextEvent;

import javax.servlet.ServletContextListener;

/**

 * 系统初始化监听器

 * @author Administrator

 *

 */

public class InitListener implements ServletContextListener {

    @Override

    public void contextInitialized(ServletContextEvent sce) {

        NettyServer nettyServer = new NettyServer(8081);

        try {

            nettyServer.start();

        } catch (Exception e) {

            e.printStackTrace();

        }

    }

    @Override

    public void contextDestroyed(ServletContextEvent sce) {

    }

}
启动类:
package com.cxy.netty;

import com.cxy.netty.controller.InitListener;

import com.cxy.netty.controller.NettyServer;

import org.springframework.boot.CommandLineRunner;

import org.springframework.boot.SpringApplication;

import org.springframework.boot.autoconfigure.SpringBootApplication;

import org.springframework.boot.web.servlet.ServletListenerRegistrationBean;

import org.springframework.context.annotation.Bean;

@SpringBootApplication

public class NettyApplication {

    /**

     * 注册监听器

     * @return

     */

    @SuppressWarnings({ "rawtypes", "unchecked" })

    @Bean

    public ServletListenerRegistrationBean servletListenerRegistrationBean() {

        ServletListenerRegistrationBean servletListenerRegistrationBean =

                new ServletListenerRegistrationBean();

        servletListenerRegistrationBean.setListener(new InitListener());

        return servletListenerRegistrationBean;

    }

    public static void main(String[] args) {

        SpringApplication.run(NettyApplication.class, args);

    }

}
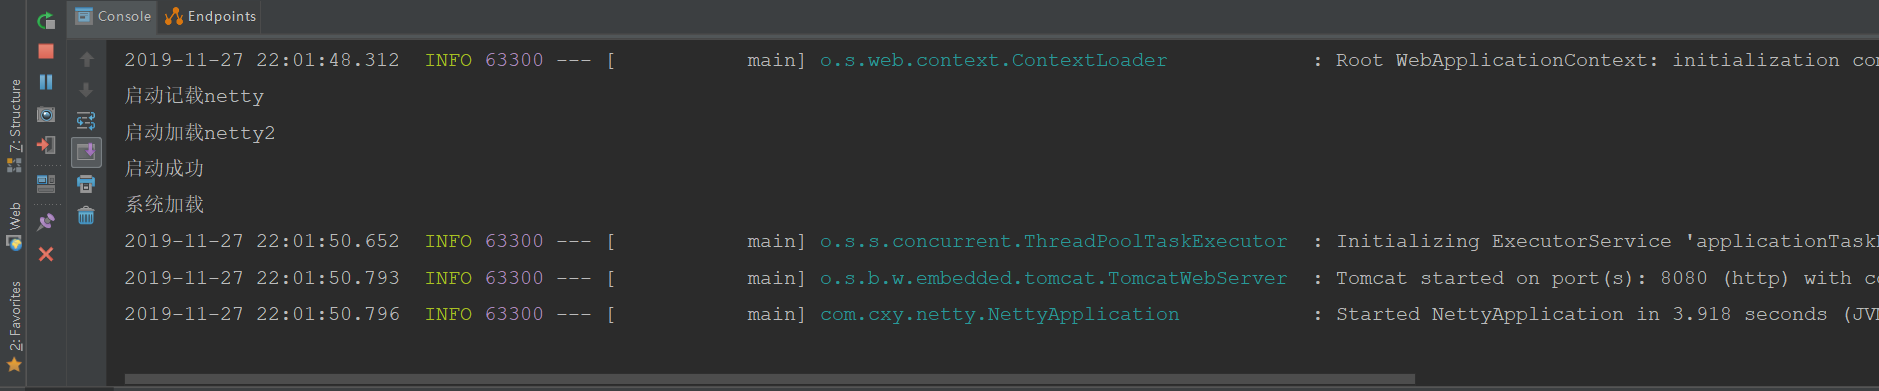
看日志:
三 :利用 ApplicationListener 上下文监听器
package com.cxy.netty.controller;

import com.cxy.netty.controller.NettyServer;

import org.springframework.context.ApplicationListener;

import org.springframework.context.event.ContextRefreshedEvent;

import org.springframework.stereotype.Component;

@Component

public class NettyBooter implements ApplicationListener<ContextRefreshedEvent> {

    @Override

    public void onApplicationEvent(ContextRefreshedEvent event) {

        NettyServer nettyServer = new NettyServer(8081);

        try {

            nettyServer.start();

        } catch (Exception e) {

            e.printStackTrace();

        }

    }

}
启动类:
package com.cxy.netty;

import com.cxy.netty.controller.NettyServer;

import org.springframework.boot.CommandLineRunner;

import org.springframework.boot.SpringApplication;

import org.springframework.boot.autoconfigure.SpringBootApplication;

import org.springframework.boot.web.servlet.ServletListenerRegistrationBean;

import org.springframework.context.annotation.Bean;

@SpringBootApplication

public class NettyApplication {

   /**

     * 注册监听器

     * @return

     */

   /* @SuppressWarnings({ "rawtypes", "unchecked" })

    @Bean

    public ServletListenerRegistrationBean servletListenerRegistrationBean() {

        ServletListenerRegistrationBean servletListenerRegistrationBean =

                new ServletListenerRegistrationBean();

        servletListenerRegistrationBean.setListener(new InitListener());

        return servletListenerRegistrationBean;

    }*/

    public static void main(String[] args) {

        SpringApplication.run(NettyApplication.class, args);

    }

}
看启动日志:

四:commiandLinerunner启动
package com.cxy.netty;

import com.cxy.netty.controller.NettyServer;

import org.springframework.boot.CommandLineRunner;

import org.springframework.boot.SpringApplication;

import org.springframework.boot.autoconfigure.SpringBootApplication;

import org.springframework.boot.web.servlet.ServletListenerRegistrationBean;

import org.springframework.context.annotation.Bean;

/*

@SpringBootApplication

public class NettyApplication {

   */

/**

     * 注册监听器

     * @return

     *//*

   */

/* @SuppressWarnings({ "rawtypes", "unchecked" })

    @Bean

    public ServletListenerRegistrationBean servletListenerRegistrationBean() {

        ServletListenerRegistrationBean servletListenerRegistrationBean =

                new ServletListenerRegistrationBean();

        servletListenerRegistrationBean.setListener(new InitListener());

        return servletListenerRegistrationBean;

    }*//*

    public static void main(String[] args) {

        SpringApplication.run(NettyApplication.class, args);

    }

}

*/

@SpringBootApplication

public class NettyApplication implements CommandLineRunner {

    public static void main(String[] args) {

        SpringApplication.run(NettyApplication.class, args);

    }

    @Override

    public void run(String... args) throws Exception {

        NettyServer echoServer = new NettyServer(8083);

        echoServer.start();

    }

}
看日志:

代表这四种都可以启动成功,下章接再分析后面三种为什么可以启动成功
springboot整合netty的多种方式的更多相关文章
- springboot整合netty,多种启动netty的方式,展现bean得多种启动方法
首先讲解下,spring中初始化加载问题: 很多时候,我们自己写的线程池,还有bean对象,还有其他的服务类,都可以通过,相关注解进行交给spring去管理,那么我们如何让nettyserver初始化 ...
- SpringBoot整合Netty并使用Protobuf进行数据传输(附工程)
前言 本篇文章主要介绍的是SpringBoot整合Netty以及使用Protobuf进行数据传输的相关内容.Protobuf会简单的介绍下用法,至于Netty在之前的文章中已经简单的介绍过了,这里就不 ...
- springboot整合netty(二)
目录 前言 正文 代码 1. 新建一个springboot项目,在pom文件中添加netty依赖: 2.新建netty服务 3.netty调用所需的服务类 4 springboot启动类 5.测试 我 ...
- SpringBoot整合Netty
总体来说只需要三个步骤,下面详细介绍 第一步 创建SpringBoot工程snetty 第二步 创建子模块也就是ModuleClient,Server,均为SpringBoot工程 第三步 将服务器端 ...
- 第6章 使用springboot整合netty搭建后台
我们不会去使用自增长的id,在现阶段的互联网开发过程中,自增长的id是已经不适用了.在未来随着系统版本的迭代,用户数量的递增,肯定会做分库分表,去做一些相应的切分.在这个时候我们就需要有一个唯一的id ...
- SpringBoot整合Netty实现socket通讯简单demo
依赖 <dependency> <groupId>io.netty</groupId> <artifactId>netty-all</artifa ...
- springboot整合mybatis之注解方式
1. 创建maven项目,工程目录如下图 2. 在pom.xml文件中添加mybatis依赖. 3. 创建实体类,并生成construct方法,getter和setter方法.同时在数据库中创建对应的 ...
- SpringBoot整合Swagger和Actuator
前言 本篇文章主要介绍的是SpringBoot整合Swagger(API文档生成框架)和SpringBoot整合Actuator(项目监控)使用教程. SpringBoot整合Swagger 说明:如 ...
- SpringBoot整合Redis使用Restful风格实现CRUD功能
前言 本篇文章主要介绍的是SpringBoot整合Redis,使用Restful风格实现的CRUD功能. Redis 介绍 Redis 是完全开源免费的,遵守BSD协议,是一个高性能的key-valu ...
随机推荐
- 针对工程实践项目的用例建模Use Case Modeling
一.什么是用例建模(Use Case Modeling) 1.用例(Use Case) (1)概念:用例是软件工程或系统工程中对系统如何反应外界请求的描述,是一种通过用户的使用场景来获取需求的技术. ...
- 【python3基础】命令行参数及 argparse
目录 命令行参数及 argparse 包 argparse 传递 bool 参数错误做法 argparse 传递 bool 参数正确做法 1 argparse 传递 bool 参数正确做法 2 Ref ...
- C语言存储类别和链接
目录 C语言存储类别和链接 存储类别 存储期 五种存储类别 C语言存储类别和链接 最近详细的复习C语言,看到存储类别的时候总感觉一些概念模糊不清,现在认真的梳理一下.C语言的优势之一能够让程序员恰 ...
- Google Tensorflow 迁移学习 Inception-v3
附上代码加数据地址 https://github.com/Liuyubao/transfer-learning ,欢迎参考. 一.Inception-V3模型 1.1 详细了解模型可参考以下论文: [ ...
- Flask:网页路由及请求方式的设定
1.Flask路由的实现 Flask的路由是由route装饰器来实现的 @app.route("/index/") def index(): return "hello ...
- 精心整理(含图版)|你要的全拿走!(R数据分析,可视化,生信实战)
本文首发于“生信补给站”公众号,https://mp.weixin.qq.com/s/ZEjaxDifNATeV8fO4krOIQ更多关于R语言,ggplot2绘图,生信分析的内容,敬请关注小号. 为 ...
- P4409 [ZJOI2006]皇帝的烦恼(20190922B)(乱搞)
考场历程十分艰辛啊... 第一题没切掉,还浪费了很长时间,就是一个裸的最小生成树,但是因为可恶的distance为关键字莫名其妙查错了10min.... 本题先乱搞了一下,过了样例 然后看第三题,可写 ...
- python——掌握sorted函数的用法
看本篇文章的前提是掌握 00函数的基本概念.01函数参数传递方式 可参考本人博客文章 sorted函数 是一个内建函数,接收一个可迭代对象,按照指定类型.指定顺序进行排序,特点是返回一个新的列表,不改 ...
- React第一次渲染为何容易出现TypeError: Cannot read property 'XX' of undefined
此题可能大家会不屑一顾,哎,错误都给你怼脸上了你还不会嘛,其实大家有没有认真思考过这其中的原因.先上一张错误图,剩余的全靠编.没兴趣看图的老铁们可以拉到最底下直接看结论 错误: 代码: 其次,我再把 ...
- redis集群节点重启后恢复
服务器重启后,集群报错: [root@SHH-HQ-NHS11S nhsuser]# redis-cli -c -h ip -p 7000ip:7000> set cc dd(error) CL ...