微信小程序一步一步获取UnionID,实现自动登录
思路:
1、小程序端获取用户ID,发送至后台
2、后台查询用户ID,如果找到了该用户,返回Token,没找到该用户,保存到数据库,并返回Token
小程序端如何获取用户ID:
小程序端 wx.getUserInfo() 可以获取到用户信息
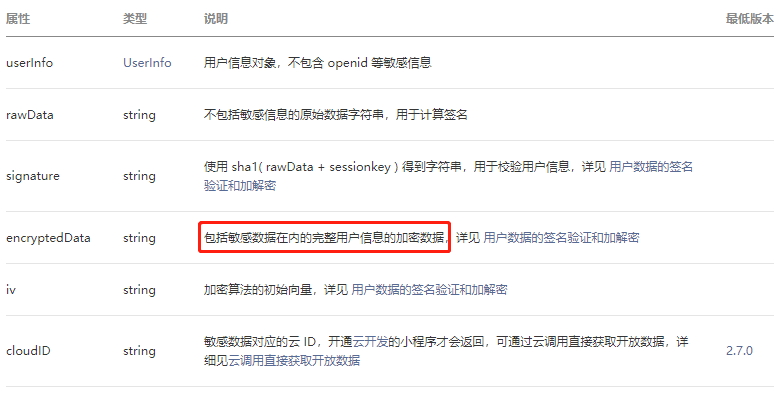
其中 encryptedData 解密之后可以得到微信 UnionID,那么如何解密 encryptedData
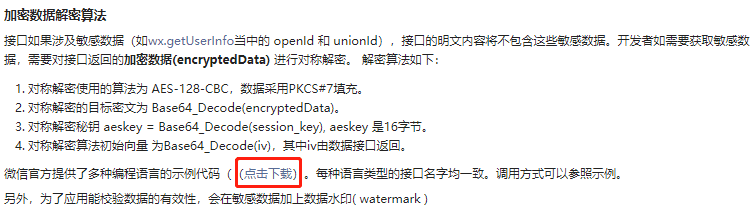
微信提供的解密 DEMO 包含4个版本:C++,Node,PHP,Python,Python需要安装pycryptodome。
解密 encryptedData 需要 iv 和 session_key,获取 session_key 需要访问 auth.code2Session 接口
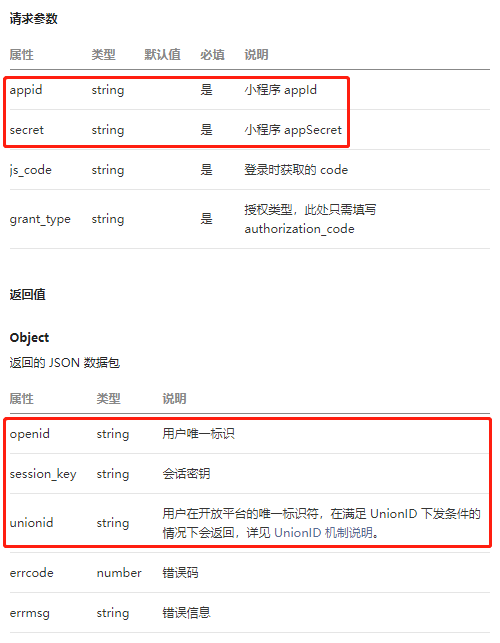
访问 auth.code2Session 接口需要 appid 和 appSecret,直接保存在前端无疑是非常危险的,正确的做法是:
1、小程序端调用 wx.login() 获取 code,调用 wx.getUserInfo() 获取 encryptedData 和 iv,发送 code、encryptedData 和 iv 到后台,
2、后台访问 auth.code2Session 接口,获取session_key, 使用 iv 和 session_key,解密 encryptedData 获取 UnionID,依据 UnionID 查询数据库
注意:调用 wx.getUserInfo() 需要用户授权
app.js
App({

  data: {

    canIUse: wx.canIUse('button.open-type.getUserInfo'), //版本兼容

    serverHost: 'http://localhost:8090/',

    token: null,

    userInfo: null,

  },

  onLaunch: function() {

    this.autoLogin();

  },

  //自动登录

  autoLogin: function() {

    var that = this;

    //查有没有缓存 token, 缓存可能被清空

    wx.getStorage({

      key: 'token',

      // 有token, 到后台检查 token 是否过期

      success(res) {

        console.log("token: " + res.data);

        that.checkToken(res.data);

      },

      // 没有缓存token, 需要登录

      fail(e) {

        console.log("not saved token, login...");

        that.userLogin();

      }

    })

  },

  //检查 token 是否过期

  checkToken: function(token) {

    var that = this;

    wx.request({

      url: that.data.serverHost + 'user/token/check',

      method: 'POST',

      data: {

        token: token,

      },

      header: {

        "Content-Type": "application/x-www-form-urlencoded"

      },

      success(res) {

        if (res.data.code == 10000) {

          console.log("token not expired");

        } else {

          console.log("token expired, refresh...");

          // 去后台刷新 token

          that.refreshToken();

        }

      },

      fail(e) {

        console.error(e);

        console.error("【check token failed, login...】");

        // 走登录流程

        that.userLogin();

      }

    })

  },

  //刷新 token

  refreshToken: function() {

    var that = this;

    //查有没有缓存 refreshtoken, 缓存可能被清空

    wx.getStorage({

      key: 'refreshtoken',

      // 有refreshtoken, 到后台刷新 token

      success(res) {

        console.log("refreshtoken: " + res.data);

        that.refreshToken2(res.data);

      },

      // 没有缓存refreshtoken, 需要登录

      fail(e) {

        console.log("not saved refreshtoken, login...");

        that.userLogin();

      }

    })

  },

  //去后台刷新 token

  refreshToken2: function(refreshtoken) {

    var that = this;

    wx.request({

      url: that.data.serverHost + 'user/token/refresh',

      method: 'POST',

      data: {

        refreshtoken: refreshtoken,

      },

      header: {

        "Content-Type": "application/x-www-form-urlencoded"

      },

      success(res) {

        if (res.data.code == 10000 && res.data.data.token) {

          console.log(res.data.data.token);

          that.saveToken(res.data.data.token)

        } else {

          console.log("refresh token failed, login...");

          that.userLogin();

        }

      },

      fail(e) {

        console.error(e);

        console.error("【refresh token failed, login...】");

        that.userLogin();

      }

    })

  },

  // wx.login 获取 code,

  // wx.getUserInfo 获取 encryptedData 和 iv

  // 去后台换取 token

  userLogin: function() {

    var that = this;

    // wx.login 获取 code,

    wx.login({

      success(res) {

        if (res.code) {

          console.log("code:" + res.code);

          that.userLogin2(res.code);

        } else {

          console.error("【wx login failed】");

        }

      },

      fail(e) {

        console.error(e);

        console.error("【wx login failed】");

      }

    })

  },

  // 检查授权, wx.getUserInfo

  userLogin2: function(code) {

    var that = this;

    // 检查是否授权

    wx.getSetting({

      success(res) {

        // 已经授权, 可以直接调用 getUserInfo 获取头像昵称

        if (res.authSetting['scope.userInfo']) {

          that.userLogin3(code);

        } else { //没有授权

          if (that.data.canIUse) {

            // 高版本, 需要转到授权页面

            wx.navigateTo({

              url: '/pages/auth/auth?code=' + code,

            });

          } else {

            //低版本, 调用 getUserInfo, 系统自动弹出授权对话框

            that.userLogin3(code);

          }

        }

      }

    })

  },

  // wx.getUserInfo

  userLogin3: function(code) {

    var that = this;

    wx.getUserInfo({

      success: function(res) {

        console.log(res);

        if (res.userInfo) {

          that.data.userInfo = res.userInfo;

        }

        if (code && res.encryptedData && res.iv) {

          that.userLogin4(code, res.encryptedData, res.iv);

        } else {

          console.error("【wx getUserInfo failed】");

        }

      },

      fail(e) {

        console.error(e);

        console.error("【wx getUserInfo failed】");

      }

    })

  },

  //去后台获取用户 token

  userLogin4: function(code, data, iv) {

    var that = this;

    wx.request({

      url: that.data.serverHost + 'user/wxlogin',

      method: 'POST',

      data: {

        code: code,

        data: data,

        iv: iv,

      },

      header: {

        "Content-Type": "application/x-www-form-urlencoded"

      },

      success(res) {

        console.log(res)

        if (res.data.code == 10000) {

          if (res.data.data.token) {

            console.log(res.data.data.token);

            that.saveToken(res.data.data.token);

          } else {

            console.error("【userLogin token failed】")

          }

          if (res.data.data.refreshtoken) {

            console.log(res.data.data.refreshtoken);

            wx.setStorage({

              key: "refreshtoken",

              data: res.data.data.refreshtoken

            });

          } else {

            console.error("【userLogin refreshtoken failed】")

          }

        } else {

          console.error("【userLogin failed】")

        }

      },

      fail(e) {

        console.error(e);

        console.error("【userLogin failed】");

      }

    })

  },

  // 保存 token

  saveToken: function(token) {

    this.data.token = token;

    wx.setStorage({

      key: "token",

      data: token

    });

  },

  getUserInfo: function(call) {

    var that = this

    if (this.data.userInfo) {

      call(this.data.userInfo);

    } else {

      // 先从缓存查 userInfo, 缓存可能被清空,

      wx.getStorage({

        key: 'userInfo',

        success(res) {

          console.log(res.data);

          call(res.data);

          that.setData({

            userInfo: res.data

          });

        },

        fail(res) {

          console.log("not save userInfo, wx getUserInfo...");

          wx.getUserInfo({

            success(res) {

              console.log(userInfo);

              if (res.userInfo) {

                call(res.userInfo);

                that.setData({

                  userInfo: res.userInfo

                });

              }

            }

          })

        }

      })

    }

  },

})
auth.js
const app = getApp()

Page({

  data: {

    userInfo: {

      avatarUrl: '/image/user_avarta.png',

      nickName: '昵称'

    },

  },

  onLoad: function(param) {

    this.data.code = param.code

  },

  getUserInfo: function(res) {

    console.log(res.detail)

    app.data.userInfo = res.detail.userInfo

    this.setData({

      userInfo: res.detail.userInfo,

    })

    if (this.data.code && res.detail.encryptedData && res.detail.iv) {

      app.userLogin4(this.data.code, res.detail.encryptedData, res.detail.iv)

    } else {

      console.error("【getUserInfo失败】");

    }

  }

})
授权页面:auth.wxml
<view class="container">

  <text class="prompt">授权登录</text>

  <view class="userinfo">

    <image class="userinfo-avatar" src="{{userInfo.avatarUrl}}" mode="cover"></image>

    <text class="userinfo-nickname">{{userInfo.nickName}}</text>

  </view>

  <button open-type="getUserInfo" bindgetuserinfo="getUserInfo" type="primary"> 授权登录 </button>

</view>
后端代码
后端使用Python + Django 框架实现:
安装 requests ,发送Http请求
安装 pycryptodome,解密
pip install requests

pip install pycryptodome
此处仅给出View的代码
import hashlib

import time

import json

import requests

from django.conf import settings

from django.http import JsonResponse

from django.views import View

from django_redis import get_redis_connection

from user.models import UserInfo

from utils.WXBizDataCrypt import WXBizDataCrypt

class WxLoginView(View):

    def post(self, request):

        post = request.POST

        code = post.get('code')

        if not code:

            return JsonResponse({'code': 10001, 'msg': 'missing parameter: code'})

        url = "https://api.weixin.qq.com/sns/jscode2session?appid={0}&secret={1}&js_code={2}&grant_type=authorization_code" \

            .format(settings.WX_APP_ID, settings.WX_APP_KEY, code)

        # 发送GET请求

        wx_res = requests.get(url)

        errcode = wx_res['errcode'] if 'errcode' in wx_res else None

        if errcode:

            return JsonResponse({'code': 13001, 'msg': 'wx_auth.code2Session:' + wx_res.errmsg})

        wx_session = json.loads(wx_res.text)

        unionid = wx_session['unionId'] if 'unionId' in wx_session else None

        decrypt = False

        user = None

        if not unionid:

            decrypt = True

        else:

            user = UserInfo.objects.get(wx_unionid=unionid)

            # 判断用户是否第一次登录

            if not user:

                decrypt = True

        # 解密 encryptedData

        if decrypt:

            encrypted_data = post.get('data')

            iv = post.get('iv')

            if not all([encrypted_data, iv]):

                return JsonResponse({'code': 10001, 'msg': 'missing parameter: data,iv'})

            session_key = wx_session['session_key'] if 'session_key' in wx_session else None

            if not session_key:

                return JsonResponse({'code': 13001, 'msg': 'wx_auth.code2Session:' + 'no session_key'})

            pc = WXBizDataCrypt(settings.WX_APP_ID, session_key)

            wx_user = pc.decrypt(encrypted_data, iv)

            unionid = wx_user['unionId']

            user = UserInfo.objects.get(wx_unionid=unionid)

            # 判断用户是否第一次登录

            if not user:

                # 微信用户第一次登录,创建用户

                username = 'wx_' + unionid

                nickname = wx_user['nickName']

                avatar = wx_user['avatarUrl']

                gender = wx_user['gender']

                country = wx_user['country']

                province = wx_user['province']

                city = wx_user['city']

                language = wx_user['language']

                user = UserInfo.objects.create(username=username,

                                               wx_unionid=unionid,

                                               nickname=nickname,

                                               avatar=avatar,

                                               gender=gender,

                                               country=country,

                                               province=province,

                                               city=city,

                                               language=language,

                                               )

        # 生成 token

        md5 = hashlib.md5()

        bstr = (unionid + str(time.time())).encode(encoding='utf-8')

        md5.update(bstr)

        token = md5.hexdigest()

        bstr = ("refresh" + unionid + str(time.time())).encode(encoding='utf-8')

        md5.update(bstr)

        refreshtoken = md5.hexdigest()

        # 存入Redis

        conn = get_redis_connection('default')

        conn.set(token, unionid)

        conn.expire(token, 5)

        conn.set(refreshtoken, unionid)

        conn.expire(refreshtoken, 3600 * 24 * 7)

        data = {'token': token, 'expire': 3600, 'refreshtoken': refreshtoken}

        return JsonResponse({'code': 10000, 'msg': 'ok', 'data': data})

class TokenCheckView(View):

    def post(self, request):

        post = request.POST

        token = post.get('token')

        if not token:

            return JsonResponse({'code': 10001, 'msg': 'missing parameter: token'})

        conn = get_redis_connection('default')

        exist = conn.ttl(token)

        if exist < 0:

            return JsonResponse({'code': 10200, 'msg': 'token expired'})

        else:

            return JsonResponse({'code': 10000, 'msg': 'ok'})

class TokenRefreshView(View):

    def post(self, request):

        post = request.POST

        refreshtoken = post.get('refreshtoken')

        if not refreshtoken:

            return JsonResponse({'code': 10001, 'msg': 'missing parameter: refreshtoken'})

        conn = get_redis_connection('default')

        unionid = conn.get(refreshtoken)

        if not unionid:

            return JsonResponse({'code': 10200, 'msg': 'refreshtoken expired'})

        # 生成 token

        md5 = hashlib.md5()

        bstr = unionid + str(time.time()).encode(encoding='utf-8')

        md5.update(bstr)

        token = md5.hexdigest()

        conn.set(token, unionid)

        conn.expire(token, 5)

        data = {'token': token}

        return JsonResponse({'code': 10000, 'msg': 'ok', 'data': data})
注意:
如果解压之后,没有获取到 UnionID ,请登录 微信开放平台 => 管理中心 => 绑定小程序
源码下载
微信小程序一步一步获取UnionID,实现自动登录的更多相关文章
- 【微信小程序开发】之如何获取免费ssl证书【图文步骤】
微信小程序要求所有网络请求都走ssl加密,因此我们开发服务端接口需要配置为https 这篇文章介绍一下如何 在 startssl 申请一个免费的ca证书. 1. 打开网站 https://www.s ...
- 微信小程序开发之如何哪获取微信小程序的APP ID
微信小程序的开发工具,在新建项目的时候,默认提示填写APP ID,如果不填写AppID 也是可以本地测试和开发的,但是无法通过手机调试,只能在开发工具里查看 如果需要真机调试微信小程序,需要安装微信6 ...
- 微信小程序开发——点击按钮获取用户授权没反应或反应很慢的解决方法
异常描述: 点击按钮获取用户手机号码,有的时候会出现点击无反应或很久之后才弹出用户授权获取手机号码的弹窗,这种情况下,也会出现点击穿透的问题(详见:微信小程序开发——连续快速点击按钮调用小程序api返 ...
- [转]微信小程序开发之从相册获取图片 使用相机拍照 本地图片上传
本文转自:http://blog.csdn.net/qq_31383345/article/details/53014610 今天遇到微信小程序的用户头像设置功能,做笔记. 先上gif: 再上代码: ...
- 检测微信小程序是否被反编译获取源码
众所周知,微信小程序的代码安全性很弱,很容易被别人反编译获取源码.我自己的小程序也被别人反编译拿到源码还上线了,非常无语. 既然客户端不好防范,服务端还是可以做点手脚的. 小程序的Referer是不可 ...
- 微信小程序实现城市定位:获取当前所在的国家城市信息
微信小程序中,我们可以通过调用wx.getLocation()获取到设备当前的地理位置信息,这个信息是当前位置的经纬度.如果我们想获取当前位置是处于哪个国家,哪个城市等信息,该如何实现呢? 微信小程序 ...
- 微信小程序中使用云开发获取openid
微信小程序获取openid 新建一个微信小程序项目 注意要注册一个自己的小程序账号,并有属于自己的appid 点击云开发按钮,自行填入开发环境名称 打开app.js,找到依赖环境 修改为刚才设置的环境 ...
- 关于微信小程序生产环境体验版获取不到openId的问题(大坑)
原文转载自「刘悦的技术博客」https://v3u.cn/a_id_119 我们知道openid是微信用户验证的重要标识,支付功能严重依赖这个东西,之前我们做微信支付的时候是通过在微信客户端直接调用官 ...
- 微信小程序中使用 <web-view> 内嵌 H5 时,登录问题的处理方法
在微信小程序的开发中,经常遇到需要使用 <web-view></web-view> 内嵌 H5 的需求.在这种需求中比较棘手的问题应该就是登录状态的判断了,小程序中的登录状态怎 ...
- HBuilderX无法启动微信小程序?仅三步
1.复制微信开发者工具启动路径 : "C:\Program Files (x86)\Tencent\微信web开发者工具\微信web开发者工具.exe" 不要后面的 "微 ...
随机推荐
- Oracle_InstantClient 及PL/SQL Developer工具的安装
一.下载 InstantClient 地址: http://www.oracle.com/technology/software/tech/oci/instantclient/index.html i ...
- Django配置MySQL数据库
一.在settings.py中配置 DATABASES = { 'default': { 'ENGINE': 'django.db.backends.mysql', # 数据库引擎 'NAME': ' ...
- v-text,v-html等区别
首先我们知道vue中有很多自定义指令,以v- 开头,例如:v-text,v-bind,v-model, v-if,等 在这些指令中,部分指令之间是很容易被混淆,所以今天决定自己总结一下以下几个相似指令 ...
- Redis进阶应用:Redis+Lua脚本实现复合操作
一.引言 Redis是高性能的key-value数据库,在很大程度克服了memcached这类key/value存储的不足,在部分场景下,是对关系数据库的良好补充.得益于超高性能和丰富的数据结构,Re ...
- Kalman Filter、Extended Kalman Filter以及Unscented Kalman Filter介绍
模型定义 如上图所示,卡尔曼滤波(Kalman Filter)的基本模型和隐马尔可夫模型类似,不同的是隐马尔科夫模型考虑离散的状态空间,而卡尔曼滤波的状态空间以及观测空间都是连续的,并且都属于高斯分布 ...
- [TCP/IP]DNS解析
DNS解析主机的IP地址 host -t A www.baidu.com
- Ubuntu 10.04下实现双网卡负载均衡
摘要:本文主要介绍和配置 在Ubuntu下 实现 bonding,双网卡负载,bonding模式为0,好处是负载平衡,另一网卡断了,也能工作. 什么是bonding Linux bonding 驱动提 ...
- spring-boot-starter-quartz集群实践
[**前情提要**]由于项目需要,需要一个定时任务集群,故此有了这个spring-boot-starter-quartz集群的实践.springboot的版本为:2.1.6.RELEASE:quart ...
- java并发编程(二十六)----ThreadLocal的使用
其实ThreadLocal很多接触过多线程的同学都可能会很陌生,他不像current包里面那些耳熟能详的api一样在我们面前经常出现,更多的他作为一个本地类出现在系统设计里面.我们可以说一下Sprin ...
- [转载]使用Java操作Mongodb
HelloWorld程序 学习任何程序的第一步,都是编写HelloWorld程序,我们也不例外,看下如何通过Java编写一个HelloWorld的程序. 首先,要通过Java操作Mongodb,必须先 ...