resnet代码分析
1.
先导入使用的包,并声明可用的网络和预训练好的模型
import torch.nn as nn

import torch.utils.model_zoo as model_zoo

#声明可调用的网络

__all__ = ['ResNet', 'resnet18', 'resnet34', 'resnet50', 'resnet101',

           'resnet152']

#用于加载的预训练好的模型

model_urls = {

    'resnet18': 'https://download.pytorch.org/models/resnet18-5c106cde.pth',

    'resnet34': 'https://download.pytorch.org/models/resnet34-333f7ec4.pth',

    'resnet50': 'https://download.pytorch.org/models/resnet50-19c8e357.pth',

    'resnet101': 'https://download.pytorch.org/models/resnet101-5d3b4d8f.pth',

    'resnet152': 'https://download.pytorch.org/models/resnet152-b121ed2d.pth',

}
2.
定义要使用到的1*1和3*3的卷积层
#卷积核为3*,padding=,stride=1(默认,根据实际传入参数设定),dilation=,groups=,bias=False的二维卷积

def conv3x3(in_planes, out_planes, stride=):

    """3x3 convolution with padding"""

    return nn.Conv2d(in_planes, out_planes, kernel_size=, stride=stride,

                     padding=, bias=False)

#卷积核为1*,padding=,stride=1(默认,根据实际传入参数设定),dilation=,groups=,bias=False的二维卷积

def conv1x1(in_planes, out_planes, stride=):

    """1x1 convolution"""

    return nn.Conv2d(in_planes, out_planes, kernel_size=, stride=stride, bias=False)
注意:这里bias设置为False,原因是:
下面使用了Batch Normalization,而其对隐藏层 有去均值的操作,所以这里的常数项
可以消去
因为Batch Normalization有一个操作,所以上面
的数值效果是能由
所替代的
因此我们在使用Batch Norm的时候,可以忽略各隐藏层的常数项 。
这样在使用梯度下降算法时,只用对 ,
和
进行迭代更新
3.
实现两层的残差块
比如:

#这个实现的是两层的残差块,用于resnet18/

class BasicBlock(nn.Module):

    expansion =

    def __init__(self, inplanes, planes, stride=, downsample=None):

        super(BasicBlock, self).__init__()

        self.conv1 = conv3x3(inplanes, planes, stride)

        self.bn1 = nn.BatchNorm2d(planes)

        self.relu = nn.ReLU(inplace=True)

        self.conv2 = conv3x3(planes, planes)

        self.bn2 = nn.BatchNorm2d(planes)

        self.downsample = downsample

        self.stride = stride

    def forward(self, x):

        identity = x

        out = self.conv1(x)

        out = self.bn1(out)

        out = self.relu(out)

        out = self.conv2(out)

        out = self.bn2(out)

        if self.downsample is not None: #当连接的维度不同时,使用1*1的卷积核将低维转成高维,然后才能进行相加

            identity = self.downsample(x)

        out += identity #实现H(x)=F(x)+x或H(x)=F(x)+Wx

        out = self.relu(out)

        return out
4.实现3层的残差块
如图:
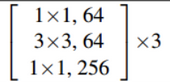
#这个实现的是三层的残差块,用于resnet50//

class Bottleneck(nn.Module):

    expansion =

    def __init__(self, inplanes, planes, stride=, downsample=None):

        super(Bottleneck, self).__init__()

        self.conv1 = conv1x1(inplanes, planes)

        self.bn1 = nn.BatchNorm2d(planes)

        self.conv2 = conv3x3(planes, planes, stride)

        self.bn2 = nn.BatchNorm2d(planes)

        self.conv3 = conv1x1(planes, planes * self.expansion)

        self.bn3 = nn.BatchNorm2d(planes * self.expansion)

        self.relu = nn.ReLU(inplace=True)

        self.downsample = downsample

        self.stride = stride

    def forward(self, x):

        identity = x

        out = self.conv1(x)

        out = self.bn1(out)

        out = self.relu(out)

        out = self.conv2(out)

        out = self.bn2(out)

        out = self.relu(out)

        out = self.conv3(out)

        out = self.bn3(out)

        if self.downsample is not None:

            identity = self.downsample(x) #当连接的维度不同时,使用1*1的卷积核将低维转成高维,然后才能进行相加

        out += identity #实现H(x)=F(x)+x或H(x)=F(x)+Wx

        out = self.relu(out)

        return out
5.整个网络实现
class ResNet(nn.Module):

    #参数block指明残差块是两层或三层,参数layers指明每个卷积层需要的残差块数量,num_classes指明分类数,zero_init_residual是否初始化为0

    def __init__(self, block, layers, num_classes=, zero_init_residual=False):

        super(ResNet, self).__init__()

        self.inplanes =  #一开始先使用64**7的卷积核,stride=, padding=

        self.conv1 = nn.Conv2d(, , kernel_size=, stride=, padding=,

                               bias=False) #3通道的输入RGB图像数据变为64通道的数据

        self.bn1 = nn.BatchNorm2d()

        self.relu = nn.ReLU(inplace=True) #以上是第一层卷积--

        self.maxpool = nn.MaxPool2d(kernel_size=, stride=, padding=) #然后进行最大值池化操作--

        self.layer1 = self._make_layer(block, , layers[])#下面就是所有的卷积层的设置--

        self.layer2 = self._make_layer(block, , layers[], stride=)

        self.layer3 = self._make_layer(block, , layers[], stride=)

        self.layer4 = self._make_layer(block, , layers[], stride=)

        self.avgpool = nn.AdaptiveAvgPool2d((, )) #进行自适应平均池化--

        self.fc = nn.Linear( * block.expansion, num_classes)#全连接层--

        for m in self.modules():

            if isinstance(m, nn.Conv2d):

                #kaiming高斯初始化,目的是使得Conv2d卷积层反向传播的输出的方差都为1

                nn.init.kaiming_normal_(m.weight, mode='fan_out', nonlinearity='relu')

            elif isinstance(m, nn.BatchNorm2d):

                #初始化m.weight,即gamma的值为1;m.bias即beta的值为0

                nn.init.constant_(m.weight, )

                nn.init.constant_(m.bias, )

        # 在每个残差分支中初始化最后一个BN,即BatchNorm2d

        # 以便残差分支以零开始,并且每个残差块的行为类似于一个恒等式。

        # This improves the model by 0.2~0.3% according to https://arxiv.org/abs/1706.02677

        if zero_init_residual:

            for m in self.modules():

                if isinstance(m, Bottleneck):#Bottleneck的最后一个BN是m.bn3

                    nn.init.constant_(m.bn3.weight, )

                elif isinstance(m, BasicBlock):#BasicBlock的最后一个BN是m.bn2

                    nn.init.constant_(m.bn2.weight, )

    #实现一层卷积,block参数指定是两层残差块或三层残差块,planes参数为输入的channel数,blocks说明该卷积有几个残差块

    def _make_layer(self, block, planes, blocks, stride=):

        downsample = None

        #即如果该层的输入的channel数inplanes和其输出的channel数planes * block.expansion不同,

        #那要使用1*1的卷积核将输入x低维转成高维,然后才能进行相加

        if stride !=  or self.inplanes != planes * block.expansion:

            downsample = nn.Sequential(

                conv1x1(self.inplanes, planes * block.expansion, stride),

                nn.BatchNorm2d(planes * block.expansion),

            )

        layers = []

        #只有卷积和卷积直接的连接需要低维转高维

        layers.append(block(self.inplanes, planes, stride, downsample))

        self.inplanes = planes * block.expansion

        for _ in range(, blocks):

            layers.append(block(self.inplanes, planes))

        return nn.Sequential(*layers)

    def forward(self, x):

        x = self.conv1(x)

        x = self.bn1(x)

        x = self.relu(x)

        x = self.maxpool(x)

        x = self.layer1(x)

        x = self.layer2(x)

        x = self.layer3(x)

        x = self.layer4(x)

        x = self.avgpool(x)

        x = x.view(x.size(), -)

        x = self.fc(x)

        return x
6.不同层次网络实现
#18层的resnet

def resnet18(pretrained=False, **kwargs):

    """Constructs a ResNet-18 model.

    Args:

        pretrained (bool): If True, returns a model pre-trained on ImageNet

    """

    model = ResNet(BasicBlock, [, , , ], **kwargs)

    if pretrained:#是否使用已经训练好的预训练模型,在此基础上继续训练

        model.load_state_dict(model_zoo.load_url(model_urls['resnet18']))

    return model

#34层的resnet

def resnet34(pretrained=False, **kwargs):

    """Constructs a ResNet-34 model.

    Args:

        pretrained (bool): If True, returns a model pre-trained on ImageNet

    """

    model = ResNet(BasicBlock, [, , , ], **kwargs)

    if pretrained:#是否使用已经训练好的预训练模型,在此基础上继续训练

        model.load_state_dict(model_zoo.load_url(model_urls['resnet34']))

    return model

#50层的resnet

def resnet50(pretrained=False, **kwargs):

    """Constructs a ResNet-50 model.

    Args:

        pretrained (bool): If True, returns a model pre-trained on ImageNet

    """

    model = ResNet(Bottleneck, [, , , ], **kwargs)

    if pretrained:#是否使用已经训练好的预训练模型,在此基础上继续训练

        model.load_state_dict(model_zoo.load_url(model_urls['resnet50']))

    return model

#101层的resnet

def resnet101(pretrained=False, **kwargs):

    """Constructs a ResNet-101 model.

    Args:

        pretrained (bool): If True, returns a model pre-trained on ImageNet

    """

    model = ResNet(Bottleneck, [, , , ], **kwargs)

    if pretrained:#是否使用已经训练好的预训练模型,在此基础上继续训练

        model.load_state_dict(model_zoo.load_url(model_urls['resnet101']))

    return model

#152层的resnet

def resnet152(pretrained=False, **kwargs):

    """Constructs a ResNet-152 model.

    Args:

        pretrained (bool): If True, returns a model pre-trained on ImageNet

    """

    model = ResNet(Bottleneck, [, , , ], **kwargs)

    if pretrained:#是否使用已经训练好的预训练模型,在此基础上继续训练

        model.load_state_dict(model_zoo.load_url(model_urls['resnet152']))

    return model
resnet代码分析的更多相关文章
- Android代码分析工具lint学习
1 lint简介 1.1 概述 lint是随Android SDK自带的一个静态代码分析工具.它用来对Android工程的源文件进行检查,找出在正确性.安全.性能.可使用性.可访问性及国际化等方面可能 ...
- pmd静态代码分析
在正式进入测试之前,进行一定的静态代码分析及code review对代码质量及系统提高是有帮助的,以上为数据证明 Pmd 它是一个基于静态规则集的Java源码分析器,它可以识别出潜在的如下问题:– 可 ...
- [Asp.net 5] DependencyInjection项目代码分析-目录
微软DI文章系列如下所示: [Asp.net 5] DependencyInjection项目代码分析 [Asp.net 5] DependencyInjection项目代码分析2-Autofac [ ...
- [Asp.net 5] DependencyInjection项目代码分析4-微软的实现(5)(IEnumerable<>补充)
Asp.net 5的依赖注入注入系列可以参考链接: [Asp.net 5] DependencyInjection项目代码分析-目录 我们在之前讲微软的实现时,对于OpenIEnumerableSer ...
- 完整全面的Java资源库(包括构建、操作、代码分析、编译器、数据库、社区等等)
构建 这里搜集了用来构建应用程序的工具. Apache Maven:Maven使用声明进行构建并进行依赖管理,偏向于使用约定而不是配置进行构建.Maven优于Apache Ant.后者采用了一种过程化 ...
- STM32启动代码分析 IAR 比较好
stm32启动代码分析 (2012-06-12 09:43:31) 转载▼ 最近开始使用ST的stm32w108芯片(也是一款zigbee芯片).开始看他的启动代码看的晕晕呼呼呼的. 还好在c ...
- 常用 Java 静态代码分析工具的分析与比较
常用 Java 静态代码分析工具的分析与比较 简介: 本文首先介绍了静态代码分析的基 本概念及主要技术,随后分别介绍了现有 4 种主流 Java 静态代码分析工具 (Checkstyle,FindBu ...
- SonarQube-5.6.3 代码分析平台搭建使用
python代码分析 官网主页: http://docs.sonarqube.org/display/PLUG/Python+Plugin Windows下安装使用: 快速使用: 1.下载jdk ht ...
- angular代码分析之异常日志设计
angular代码分析之异常日志设计 错误异常是面向对象开发中的记录提示程序执行问题的一种重要机制,在程序执行发生问题的条件下,异常会在中断程序执行,同时会沿着代码的执行路径一步一步的向上抛出异常,最 ...
随机推荐
- Linux命令大全汇总,让你工作更有效率!
基础命令 useradd:用户名 -m:创建新用户 passwd 用户名:为用户设置密码(当创建新用户后,就需要设置密码) whoami:查看当前用户名 exit :退出当前用户,返回之前切换过来的用 ...
- 轻量级数据库Sqlite的使用
SqLite是什么? SQLite是一个进程内的库,实现了自给自足的.无服务器的.零配置的.事务性的 SQL 数据库引擎.它是一个零配置的数据库,这意味着与其他数据库一样,您不需要在系统中配置. 就像 ...
- .NET Core微服务之开源项目CAP的初步使用
Tip: 此篇已加入.NET Core微服务基础系列文章索引 一.CAP简介 下面的文字来自CAP的Wiki文档:https://github.com/dotnetcore/CAP/wiki CAP ...
- KnockoutJS-快速入门
虽然在WPF中接触过MVVM模式,可是刚开始在Web中接触到Knockout.JS让我大吃一惊,简化了好多工作量,原来可能需要一大堆的JS脚本完成的工作量,被释放许多.接触KnockoutJS一年多了 ...
- Python 包构建教程
目录 setuptools 和 setup.py 你所需要做的事 & 一些概念 基础概念 关于源码分发文件和二进制分发文件 示例和分发选择 pure python module package ...
- 图像检索(3):BoW实现
在上一篇文章中图像检索(2):均值聚类-构建BoF中,简略的介绍了基于sift特征点的BoW模型的构建,以及基于轻量级开源库vlfeat的一个简单实现. 本文重新梳理了一下BoW模型,并给出不同的实现 ...
- python基于函数替换的热更新原理介绍
热更新即在不重启进程或者不离开Python interpreter的情况下使得被编辑之后的python源码能够直接生效并按照预期被执行新代码.平常开发中,热更能极大提高程序开发和调试的效率,在修复线上 ...
- 1.Memcached 中文文档 - 概论(译官方文档)
原文地址:memcached手册 https://github.com/memcached/memcached/wiki/Overview 简介 Free & open source, ...
- windows环境设置mysql自动备份(测试成功)
00.背景介绍 最近做了个小程序,使用的是mysql数据库,涉及到将程序数据备份的事:虽然大部分数据库客户端工具都具有备份功能,但并不能做到定期自动备份:在Windows环境下,手工备份MySQL是很 ...
- vue学习记录③(路由)
上篇文章我们用vue-cli脚手架工具做了个简单的hello world页面,但是我们破坏了原来的流程,而正常的访问页面应该是通过路由来实现的. 那么什么是路由呢? 路由就是通过不同的url来访问不同 ...