Asp.Net Core 2.0 项目实战(10) 基于cookie登录授权认证并实现前台会员、后台管理员同时登录
Asp.Net Core 2.0 项目实战(1) NCMVC开源下载了
Asp.Net Core 2.0 项目实战(2)NCMVC一个基于Net Core2.0搭建的角色权限管理开发框架
Asp.Net Core 2.0 项目实战(3)NCMVC角色权限管理前端UI预览及下载
Asp.Net Core 2.0 项目实战(4)ADO.NET操作数据库封装、 EF Core操作及实例
Asp.Net Core 2.0 项目实战(5)Memcached踩坑,基于EnyimMemcachedCore整理MemcachedHelper帮助类。
Asp.Net Core 2.0 项目实战(6)Redis配置、封装帮助类RedisHelper及使用实例
Asp.Net Core 2.0 项目实战(7)MD5加密、AES&DES对称加解密
Asp.Net Core 2.0 项目实战(8)Core下缓存操作、序列化操作、JSON操作等Helper集合类
Asp.Net Core 2.0 项目实战(9) 日志记录,基于Nlog或Microsoft.Extensions.Logging的实现及调用实例
Asp.Net Core 2.0 项目实战(10) 基于cookie登录授权认证并实现前台会员、后台管理员同时登录
Asp.Net Core 2.0 项目实战(11) 基于OnActionExecuting全局过滤器,页面操作权限过滤控制到按钮级
1.登录的实现
登录功能实现起来有哪些常用的方式,大家首先想到的肯定是cookie或session或cookie+session,当然还有其他模式,今天主要探讨一下在Asp.net core 2.0下实现以cookie登录授权,与net freamwork框架下常用的开发方式有所不同的是以前开发不管是webform还是mvc模式,大多数开发者会封装成第三方操作类,方便项目全局调用;在net core 2.0 下的登录方式发生了点变化,大概流程是先通过依赖注入相关配置,再通过Action登录授权,然后Authentication相关属性认证,具体怎么实现让我们一起一步步操作一下。
2.Cookie开发回顾
进行net core 2.0 cookie编程前,首先回顾一下原来做asp.net项目开发常用的操作cookie封装的一些封装。封装好的cookiehelper类库,可以很方便的在项目中调用,如写入cookie的时候直接调用CookieHelper.WriteCookie(名称,值)这样key/value形式写入cookie,读取cookie的时候直接使用CookieHelper.GetCookie(名称)就可以获取到cookie值。
using System;

using System.Collections.Generic;

using System.Text;

using System.Text.RegularExpressions;

using System.IO;

using System.Net;

using System.Configuration;

using System.Web;

using System.Security.Cryptography;

namespace ZZ.Common

{

    public class CookieHelper

    {

/// <summary>

        /// 写cookie值

        /// </summary>

        /// <param name="strName">名称</param>

        /// <param name="strValue">值</param>

        public static void WriteCookie(string strName, string strValue)

        {

            HttpCookie cookie = HttpContext.Current.Request.Cookies[strName];

            if (cookie == null)

            {

                cookie = new HttpCookie(strName);

            }

            cookie.Value = UrlEncode(strValue);

            HttpContext.Current.Response.AppendCookie(cookie);

        }

        /// <summary>

        /// 写cookie值

        /// </summary>

        /// <param name="strName">名称</param>

        /// <param name="strValue">值</param>

        public static void WriteCookie(string strName, string key, string strValue)

        {

            HttpCookie cookie = HttpContext.Current.Request.Cookies[strName];

            if (cookie == null)

            {

                cookie = new HttpCookie(strName);

            }

            cookie[key] = UrlEncode(strValue);

            HttpContext.Current.Response.AppendCookie(cookie);

        }

        /// <summary>

        /// 写cookie值

        /// </summary>

        /// <param name="strName">名称</param>

        /// <param name="strValue">值</param>

        public static void WriteCookie(string strName, string key, string strValue, int expires)

        {

            HttpCookie cookie = HttpContext.Current.Request.Cookies[strName];

            if (cookie == null)

            {

                cookie = new HttpCookie(strName);

            }

            cookie[key] = UrlEncode(strValue);

            cookie.Expires = DateTime.Now.AddMinutes(expires);

            HttpContext.Current.Response.AppendCookie(cookie);

        }

        /// <summary>

        /// 写cookie值

        /// </summary>

        /// <param name="strName">名称</param>

        /// <param name="strValue">值</param>

        /// <param name="strValue">过期时间(分钟)</param>

        public static void WriteCookie(string strName, string strValue, int expires)

        {

            HttpCookie cookie = HttpContext.Current.Request.Cookies[strName];

            if (cookie == null)

            {

                cookie = new HttpCookie(strName);

            }

            cookie.Value = UrlEncode(strValue);

            cookie.Expires = DateTime.Now.AddMinutes(expires);

            HttpContext.Current.Response.AppendCookie(cookie);

        }

        /// <summary>

        /// 读cookie值

        /// </summary>

        /// <param name="strName">名称</param>

        /// <returns>cookie值</returns>

        public static string GetCookie(string strName)

        {

            if (HttpContext.Current.Request.Cookies != null && HttpContext.Current.Request.Cookies[strName] != null)

                return UrlDecode(HttpContext.Current.Request.Cookies[strName].Value.ToString());

            return "";

        }

        /// <summary>

        /// 读cookie值

        /// </summary>

        /// <param name="strName">名称</param>

        /// <returns>cookie值</returns>

        public static string GetCookie(string strName, string key)

        {

            if (HttpContext.Current.Request.Cookies != null && HttpContext.Current.Request.Cookies[strName] != null && HttpContext.Current.Request.Cookies[strName][key] != null)

                return UrlDecode(HttpContext.Current.Request.Cookies[strName][key].ToString());

            return "";

        }

    }

}
CookieHelper
3.NET Core2.0 下Cookie的使用
3.1添加Nuget相关依赖
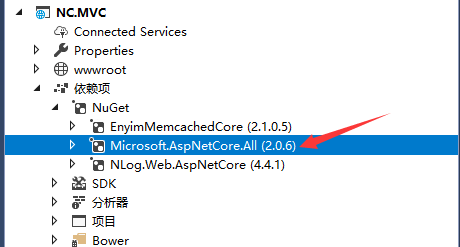
我这里使用 Microsoft.AspNetCore.All大而全的,逐项引用这里不做过多探讨,适合自己的就是最好的。
参照搜狐网上看到的一段话:
Microsoft.AspNetCore.All包,它是一个元数据包,包含了大量的东西,其中包括:Authorization, Authentication, Identity, CORS, Localization, Logging, Razor, Kestrel 等,除了这些它还附加了 EntityFramework, SqlServer, Sqlite 等包。有些同学可能会觉得这样会引用了很多项目中使用不到的程序集,导致发布后的程序变得很庞大,不过我要告诉你不必担心,发布后的程序集不但不会变得很大,反而会小很多,因为 Microsoft 把所有的这些依赖全部都集成到了sdk中,也就是说当你安装sdk的之后,MVC相关的包就已经安装到了你的系统上。
3.2配置
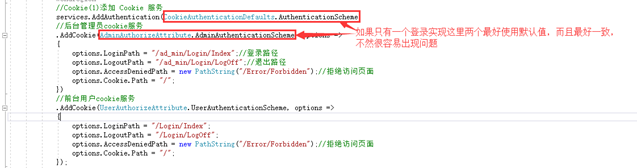
3.2.1首先在Startup.cs中ConfigureServices添加Cookie中间件,使用自定义Scheme
    //Cookie(1)添加 Cookie 服务

    services.AddAuthentication(CookieAuthenticationDefaults.AuthenticationScheme)

            //后台管理员cookie服务

            .AddCookie(AdminAuthorizeAttribute.AdminAuthenticationScheme, options =>

            {

                options.LoginPath = "/admin/Login/Index";//登录路径

                options.LogoutPath = "/admin/Login/LogOff";//退出路径

                options.AccessDeniedPath = new PathString("/Error/Forbidden");//拒绝访问页面

                options.Cookie.Path = "/";

            })

            //前台用户cookie服务

            .AddCookie(UserAuthorizeAttribute.UserAuthenticationScheme, options =>

            {

                options.LoginPath = "/Login/Index";

                options.LogoutPath = "/Login/LogOff";

                options.AccessDeniedPath = new PathString("/Error/Forbidden");//拒绝访问页面

                options.Cookie.Path = "/";

            });
在ConfigureServices方法中添加授权支持,并添加使用Cookie的方式,配置登录页面、登出页面和没有权限时的跳转页面。AdminAuthorizeAttribute、UserAuthorizeAttribute为自定义AuthorizeAttribute类,两个登录方案,同时类中实现虚方法OnAuthorization过滤,如果系统中只有一个登录授权全部使用默认即可。
      //Cookie(1)添加 Cookie 服务
      services.AddAuthentication(CookieAuthenticationDefaults.AuthenticationScheme)

            //后台管理员cookie服务

            .AddCookie(CookieAuthenticationDefaults.AuthenticationScheme, options =>

            {

                options.LoginPath = "/admin/Login/Index";//登录路径

                options.LogoutPath = "/admin/Login/LogOff";//退出路径

                options.AccessDeniedPath = new PathString("/Error/Forbidden");//拒绝访问页面

                options.Cookie.Path = "/";

            });
3.2.2在Configure使用Cookie中间件
public void Configure(IApplicationBuilder app, IHostingEnvironment env, ILoggerFactory loggerFactory)

{

            //Cookie(2)使用Cookie的中间件

            app.UseAuthentication();

}
3.3[自定义AuthorizeAttribute]特性
添加一个登录方案(Scheme)
CookieAuthenticationDefaults.AuthenticationScheme,这是系统已经定义好的一个默认的登录方案,添加一个新的来实现一个不同的身份登录。代码如下:
using Microsoft.AspNetCore.Authentication;

using Microsoft.AspNetCore.Authorization;

using Microsoft.AspNetCore.Http;

using Microsoft.AspNetCore.Mvc;

using Microsoft.AspNetCore.Mvc.Abstractions;

using Microsoft.AspNetCore.Mvc.Filters;

using System;

using System.Collections.Generic;

using System.Linq;

using System.Threading.Tasks;

namespace NC.MVC

{

    /// <summary>

    /// 跳过检查属性

    /// </summary>

    [AttributeUsage(AttributeTargets.Class | AttributeTargets.Method, AllowMultiple = false, Inherited = true)]

    public sealed class SkipUserAuthorizeAttribute : Attribute, IFilterMetadata

    {

    }

    /// <summary>

    /// 前台登录验证

    /// </summary>

    [AttributeUsage(AttributeTargets.Class | AttributeTargets.Method, Inherited = true, AllowMultiple = true)]

    public class UserAuthorizeAttribute : AuthorizeAttribute, IAuthorizationFilter

    {

        public const string UserAuthenticationScheme = "UserAuthenticationScheme";//自定义一个默认的登录方案

        public UserAuthorizeAttribute()

        {

            this.AuthenticationSchemes = UserAuthenticationScheme;

        }

        public virtual void OnAuthorization(AuthorizationFilterContext filterContext)

        {

            //获取对应Scheme方案的登录用户呢?使用HttpContext.AuthenticateAsync

            var authenticate = filterContext.HttpContext.AuthenticateAsync(UserAuthorizeAttribute.UserAuthenticationScheme);

            //authenticate.Wait();

            if (authenticate.Result.Succeeded || this.SkipUserAuthorize(filterContext.ActionDescriptor))

            {

                return;

            }

            //如果是默认Scheme可以使用

            //if (filterContext.HttpContext.User.Identity.IsAuthenticated || this.SkipUserAuthorize(filterContext.ActionDescriptor))

            //{

            //    return;

            //}

              HttpRequest httpRequest = filterContext.HttpContext.Request;

            string url = filterContext.HttpContext.Content("~/login");

                url = string.Concat(url, "?returnUrl=", httpRequest.Path);

                RedirectResult redirectResult = new RedirectResult(url);

                filterContext.Result = redirectResult;

                return;

        }

        protected virtual bool SkipUserAuthorize(ActionDescriptor actionDescriptor)

        {

            bool skipAuthorize = actionDescriptor.FilterDescriptors.Where(a => a.Filter is SkipUserAuthorizeAttribute).Any();

            if (skipAuthorize)

            {

                return true;

            }

            return false;

        }

    }

}
这里有一个点需要注意登录多个用户,filterContext.HttpContext.User.Identity这里会默认AddAuthentication(Scheme)中的Scheme, 网上看到“如果你的Controller或者Action上有使用AuthorizeAttribute,那这个Attribute使用的登录方案是哪个,则这个HttpContext.User对应的就是那个方案的登录用户。如果没有使用,则AddAuthentication()方法默认指它的方案(Scheme)所登录的用户,就是这个HttpContext.User”这里跟我实际测试的有所不同,大家可以多测试一下。
所以获取对应方案的登录用户,这里用的是
var authenticate = filterContext.HttpContext.AuthenticateAsync(UserAuthorizeAttribute.UserAuthenticationScheme);
if (authenticate.Result.Succeeded){return;}
如果您有更好的方案请留言告知!
3.4登录授权实现
配置文件中处理完成之后,接下来就是在登录Action中实现登录。添加一个Controller,如LoginController,再添加一个Action,如 Login,所配置的路由,要与上面的配置对应,不然跳转登录时会跳错页面。
下面展示前台会员登录类:
using System;

using System.Collections.Generic;

using System.Linq;

using System.Security.Claims;

using System.Threading.Tasks;

using Microsoft.AspNetCore.Authentication;

using Microsoft.AspNetCore.Authentication.Cookies;

using Microsoft.AspNetCore.Mvc;

namespace NC.MVC.Controllers

{

    public class LoginController : Controller

    {

        public IActionResult Index()

        {

            return View();

        }

        /// <summary>

        /// 用户登录

        /// </summary>

        /// <param name="userName">用户ID</param>

        /// <param name="passWord">用户密码</param>

        /// <param name="rememberMe">是否记住密码</param>

        /// <returns></returns>

        [HttpPost]

        public IActionResult Login(string userName, string passWord, string rememberMe, string txtCode)

        {

            var user = new ClaimsPrincipal(

             new ClaimsIdentity(new[]

             {

                        new Claim("UserName","UserNameValue"),

                        new Claim("UserPwd","UserPwdValue"),

             }, UserAuthorizeAttribute.UserAuthenticationScheme)

            );

            HttpContext.SignInAsync(UserAuthorizeAttribute.UserAuthenticationScheme, user, new AuthenticationProperties

            {

                ExpiresUtc = DateTime.UtcNow.AddMinutes(),// 有效时间

                //ExpiresUtc = DateTimeOffset.Now.Add(TimeSpan.FromDays(7)), // 有效时间

                IsPersistent = true,

                AllowRefresh = false

            });

            return new RedirectResult("~/Home/Index");//登录成功

        }

    }

}
这里要注意的是HttpContext.SignInAsync(AuthenticationType,…) 所设置的Scheme一定要与前面的配置一样,这样对应的登录授权才会生效。
3.5认证验证
登录完成后,进入需要授权才能进入的管理页面,在做限制的Controller上加上[自定义AuthorizeAttribute]特性来做限制。这里我们自定义了两个AuthorizeAttribute;UserAuthorizeAttribute和AdminAuthorizeAttribute,结合3.3的实现,我们使用UserAuthorizeAttribute在Contoller或Action上加特性。这里我们先在HomeController上加上[UserAuthorize]
using Microsoft.AspNetCore.Mvc;

using System.Data;

using Microsoft.Extensions.Logging;

using Microsoft.AspNetCore.Authorization;

namespace NC.MVC.Controllers

{

    [UserAuthorize]

    public class HomeController : Controller

  {

        public IActionResult Index()

        {

           return View();

     }

  }

}
3.6退出登录
如果是多用户登录的系统,退出的时候需要指定方案退出。
public async Task Logout(string returnurl)

{

    await HttpContext.SignOutAsync(UserAuthorizeAttribute.UserAuthenticationScheme);

    return Redirect(returnurl ?? "~/");

}
4.总结
以上就是我对net core 2.0 cookie授权登录实际编程测试遇到的坑点以及编程过程中用到的部分代码,后端管理员登录相关代码以及AdminAuthorizeAttribute和前端会员UserAuthorizeAttribute代码基本一致,这里限于时间及篇幅不做过多处理,自己动手是学习技术最快的方式,没有之一。
在进行netcore2.0编程或者学习的时候,一定要抛却固有的一些编程形式、思维。新的事物总会对旧有规则,旧有思维产生一定的冲击,一定要学会适应,提醒大家同时警醒自己。Net core 开源跨平台总的来说是属于是良性的变化,变得更方便,更容易扩展,NET阵营需要我们大家共同去努力。
感谢ace chloe core开源、zkea cms core开源,在学习Asp.Net Core 2.0开发的时候网上资料相对较少,找了很多资料,有很多大牛的文章代码对我帮助很大,写博的时候很多创意、文章忘记出处,以后会留意。整理此篇备忘,希望对你有些许帮助。
Asp.Net Core 2.0 项目实战(10) 基于cookie登录授权认证并实现前台会员、后台管理员同时登录的更多相关文章
- Asp.Net Core 2.0 项目实战(11) 基于OnActionExecuting全局过滤器,页面操作权限过滤控制到按钮级
1.权限管理 权限管理的基本定义:百度百科. 基于<Asp.Net Core 2.0 项目实战(10) 基于cookie登录授权认证并实现前台会员.后台管理员同时登录>我们做过了登录认证, ...
- Asp.Net Core 2.0 项目实战(9) 日志记录,基于Nlog或Microsoft.Extensions.Logging的实现及调用实例
本文目录 1. Net下日志记录 2. NLog的使用 2.1 添加nuget引用NLog.Web.AspNetCore 2.2 配置文件设置 2.3 依赖配置及调用 ...
- Asp.Net Core 2.0 项目实战(8)Core下缓存操作、序列化操作、JSON操作等Helper集合类
本文目录 1. 前沿 2.CacheHelper基于Microsoft.Extensions.Caching.Memory封装 3.XmlHelper快速操作xml文档 4.Serializatio ...
- Asp.Net Core 2.0 项目实战(7)MD5加密、AES&DES对称加解密
本文目录 1. 摘要 2. MD5加密封装 3. AES的加密.解密 4. DES加密/解密 5. 总结 1. 摘要 C#中常用的一些加密和解密方案,如:md5加密.RSA加密与解密和DES加密等, ...
- Asp.Net Core 2.0 项目实战(6)Redis配置、封装帮助类RedisHelper及使用实例
本文目录 1. 摘要 2. Redis配置 3. RedisHelper 4.使用实例 5. 总结 1. 摘要 由于內存存取速度远高于磁盘读取的特性,为了程序效率提高性能,通常会把常用的不常变动的数 ...
- Asp.Net Core 2.0 项目实战(4)ADO.NET操作数据库封装、 EF Core操作及实例
Asp.Net Core 2.0 项目实战(1) NCMVC开源下载了 Asp.Net Core 2.0 项目实战(2)NCMVC一个基于Net Core2.0搭建的角色权限管理开发框架 Asp.Ne ...
- Asp.Net Core 2.0 项目实战(1) NCMVC开源下载了
Asp.Net Core 2.0 项目实战(1) NCMVC开源下载了 Asp.Net Core 2.0 项目实战(2)NCMVC一个基于Net Core2.0搭建的角色权限管理开发框架 Asp.Ne ...
- Asp.Net Core 2.0 项目实战(2)NCMVC一个基于Net Core2.0搭建的角色权限管理开发框架
Asp.Net Core 2.0 项目实战(1) NCMVC开源下载了 Asp.Net Core 2.0 项目实战(2)NCMVC一个基于Net Core2.0搭建的角色权限管理开发框架 Asp.Ne ...
- Asp.Net Core 2.0 项目实战(3)NCMVC角色权限管理前端UI预览及下载
Asp.Net Core 2.0 项目实战(1) NCMVC开源下载了 Asp.Net Core 2.0 项目实战(2)NCMVC一个基于Net Core2.0搭建的角色权限管理开发框架 Asp.Ne ...
随机推荐
- 使用org.apache.commons.logging打日志注意事项
使用方法:例如,protected final Log logger = LogFactory.getLog(getClass());if (logger.isDebugEnabled()) { lo ...
- MYSQL,触发器,实现两个表共用ID不重复
前后台没有分开,为了区分前后台用户,所以分表,但是ID不能重复,因为关联了权限表. 这里实现后台用户表使用奇数ID 前台用户表使用偶数ID MYSQL 没有sequence SET @@auto_in ...
- duilib界面库学习(仿PC微信界面,有服务器,有数据库,可以网络通信)
客户端代码:https://github.com/TTGuoying/duilib_ChatClient 服务器代码:https://github.com/TTGuoying/duilib_ChatS ...
- java编程思想第四版第二章要点总结
1. 基本类型 基本类型 二进制位数 包装器类 boolean - Boolean byte 8 Byte char 16 Character short 16 Short int 32 Intege ...
- mysql数据库导入导出 查询 修改表记录
mysql数据导入导出: 导入: 把系统的文件的内容,保存到数据库的表里 导入数据的基本格式:mysql> load data infile "文件名" into table ...
- Vue项目搭建及原理二
p.p1 { margin: 0.0px 0.0px 0.0px 0.0px; text-align: justify; font: 10.5px "Trebuchet MS"; ...
- linux驱动---用I/O命令访问PCI总线设备配置空间
PCI总线推出以来,以其独有的特性受到众多厂商的青睐,已经成为计算机扩展总线的主流.目前,国内的许多技术人员已经具备开发PCI总线接口设备的能 力.但是PCI总线的编程技术,也就是对PCI总线设备的操 ...
- 【mysql】phpMyadmin上传文件限制
在使用phpMyadmin导入数据库的时候,因为脚本在上传的时候响应时间过长,导致大于2M的数据偶尔会导入失败.而且大多数默认设置,只能导入2M的数据. 遇到这种情况, 我们可以修改php.ini以及 ...
- eclipse中添加Java代码注释模板
eclipse中添加Java代码注释模板 1.Window->Preference->Java->Code Style->Code Template,进入注释编辑界面 2.文件 ...
- stm32开发之使用Keil MDK以及标准外设库创建STM32工程
‑6 MDK详细版本信息 ‑8保存路径的选择 ‑9选择芯片型号 ‑10拷贝启动代码选择 ‑11选择 Manage Comoonents ‑12编辑组并添加对应文件 ‑13工程管理文件列表 ‑14选择进 ...