
Spring Boot + LayUI 批量修改数据 数据包含着对象
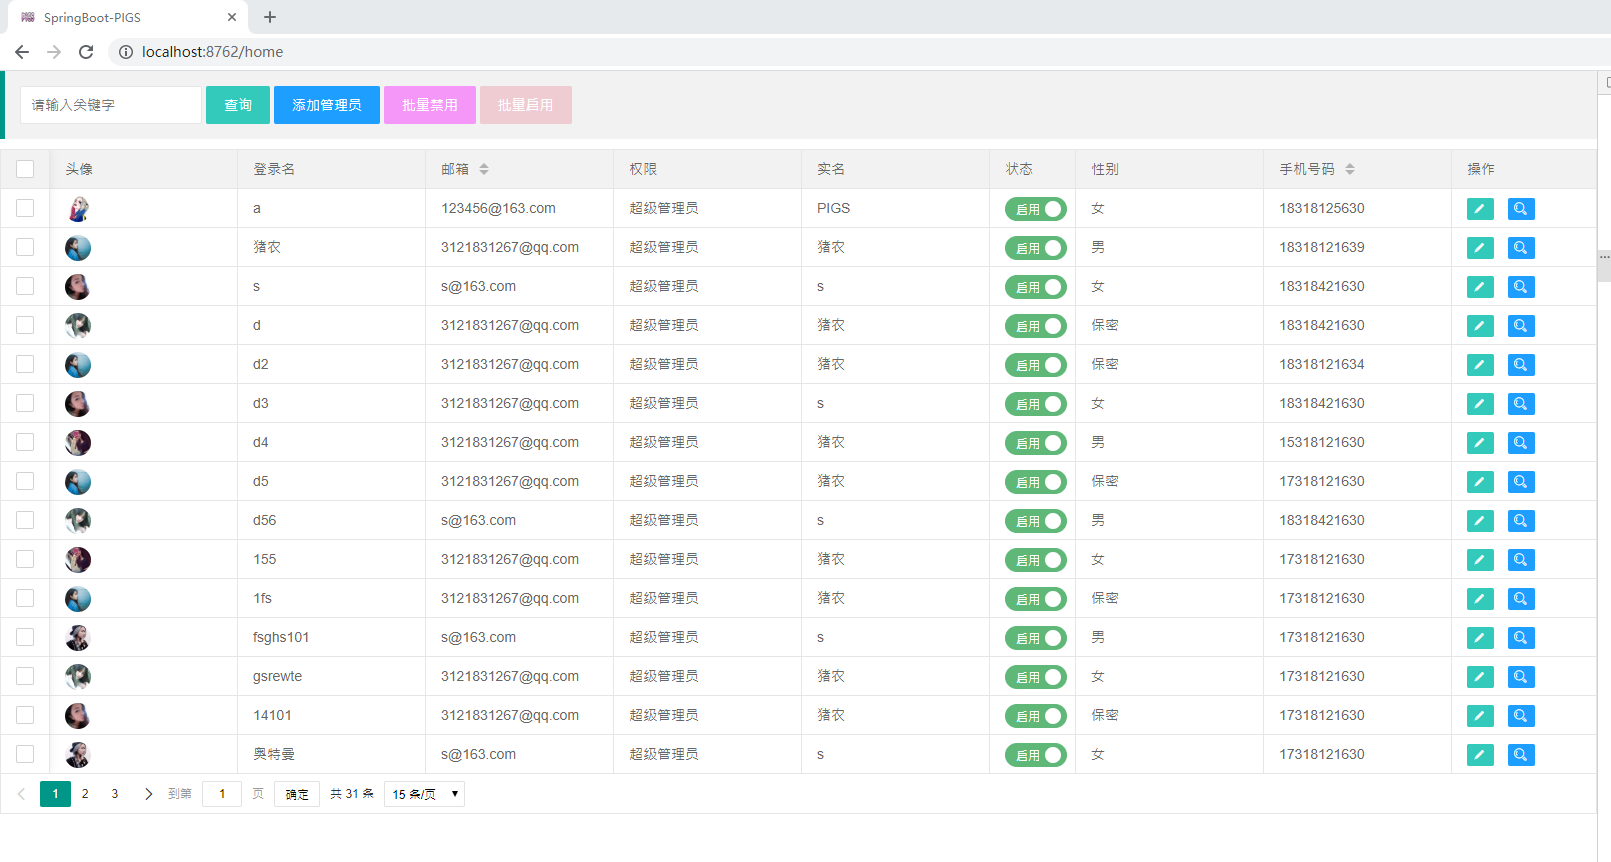
页面展示
HTML 代码
<blockquote class="layui-elem-quote demoTable">
<div class="layui-inline">
<div class="layui-input-inline">
<input type="text" value="" placeholder="请输入关键字" class="layui-input search_input">
</div>
<a class="layui-btn search_btn" href="javascript:;">查询</a>
</div> <div class="layui-inline">
<a class="layui-btn layui-btn-normal newsAdd_btn" href="adminSave.html">添加管理员</a>
</div> <div class="layui-inline" >
<a class="layui-btn closeBtn" data-type="closeBtn" href="javascript:;" style="background-color: #f81eff6e;">批量禁用</a>
</div> <div class="layui-inline" >
<a class="layui-btn startBtn" data-type="startBtn" href="javascript:;" style="background-color: rgba(232,154,166,0.43);">批量启用</a>
</div>
</blockquote> <!-- layui 渲染 数据 -->
<table class="layui-hide" id="adminInfoList" lay-filter="demo"></table> <script type="text/html" id="barDemo">
<a class="layui-btn layui-btn-xs" lay-event="edit" title="修改管理员信息"> <i class="layui-icon"></i></a>
<a class="layui-btn layui-btn-normal layui-btn-xs" lay-event="queryLog" title="查看管理员信息"> <i class="layui-icon"></i></a>
</script>
JS 代码
layui.config({
    base: "js/"
}).use(['table', 'layer', 'form', 'jquery'], function () {
    var table = layui.table,
        form = layui.form,
        layer = parent.layer === undefined ? layui.layer : parent.layer,
        $ = layui.jquery;
/***
 *
 * 显示全部管理员信息
 *
 */
table.render({
    elem: '#adminInfoList'
    , url: '/queryAdminAll'
    , cols: [[
        {type: 'checkbox', fixed: 'left', value: 'adminId'},
        {
            field: 'adminInfoEntity', title: '头像',
            templet: function (data) {
                return '<img class="layui-circle adminImage" width="26" height="26" src=../../' + data.adminInfoEntity.adminInfoImage + '>'
            }
        }
        , {field: 'adminAccount', title: '登录名'}
        , {
            field: 'adminInfoEntity', title: '邮箱', sort: true,
            templet: function (data) {
                return '<span>' + data.adminInfoEntity.adminInfoEmail + '</span>'
            }
        }
        , {
            field: 'adminInfoEntity', title: '权限',
            templet: function (data) {
                if (data.adminInfoEntity.adminInfoClass == 0) {
                    return '<span>' + "普通管理员" + '</span>'
                }
                if (data.adminInfoEntity.adminInfoClass == 1) {
                    return '<span>' + "超级管理员" + '</span>'
                }

            }
        }
        , {
            field: 'adminInfoName', title: '实名',
            templet: function (data) {
                return '<span>' + data.adminInfoEntity.adminInfoName + '</span>'
            }
        }
        , {
            field: 'adminInfoEntity', title: '状态', width: 85, templet: function (data) {
                if (data.adminInfoEntity.adminInfoCode == 1) {

                    return '<div> <input type="checkbox" checked="" name="codeSwitch" lay-skin="switch" id="open" lay-filter="switchTest" switchId=' + data.adminInfoEntity.adminInfoId + '' +
                        ' lay-text="启用|禁用"  value=' + data.adminInfoEntity.adminInfoCode + '></div>'
                } else {
                    return '<div> <input type="checkbox" lay-skin="switch" name="codeSwitch"  switchId=' + data.adminInfoEntity.adminInfoId + ' lay-filter="switchTest"' +
                        'lay-text="启用|禁用" value=' + data.adminInfoEntity.adminInfoCode + '></div>'
                }
            }
        }
        , {
            field: 'adminInfoEntity', title: '性别',
            templet: function (data) {
                if (data.adminInfoEntity.adminInfoSex == 2) {
                    return '<span>' + '男' + '</span>'
                }
                if (data.adminInfoEntity.adminInfoSex == 0) {
                    return '<span>' + '保密' + '</span>'
                }
                if (data.adminInfoEntity.adminInfoSex == 1) {
                    return '<span>' + '女' + '</span>'
                }

            }
        }
        , {
            field: 'adminInfoEntity', title: '手机号码', sort: true,
            templet: function (data) {
                return '<span>' + data.adminInfoEntity.adminInfoPhone + '</span>'
            }
        }
        , {fixed: 'right', title: '操作', toolbar: '#barDemo', width: 140}
    ]]
    , limit: 15
    , limits: [15, 20, 25, 50, 100]
    , parseData: function (data) {
        /**
         * 打印数据
         *
         */
        console.log(data)
    }
    /**
     * 开启分页
     */
    , page: true
    , id: 'idTest'
});
  /**
    * 批量关闭 管理员状态
    *
    * */
var $ = layui.$, active = {
        closeBtn: function () {
            var $checkbox = $('table input[type="checkbox"][name="layTableCheckbox"]');
            var $checked = $('table input[type="checkbox"][name="layTableCheckbox"]:checked');

            if ($checkbox.is(":checked")) {
                var checkStatusId = table.checkStatus('idTest'),
                    data = checkStatusId.data,
                    adminInfoId = [];
                for (var i in data) {
                    adminInfoId.push(data[i].adminInfoEntity.adminInfoId)
                }

                layer.confirm('确定禁用?', {icon: 3, title: '提示信息'}, function (index) {
                    var index = layer.msg('禁用中,请稍候', {icon: 16, time: false, shade: 0.8});

                    $.ajax({
                        url: '../admin/updateAdminInfoCodeClose',
                        data: {
                            adminInfoCode: 0,
                            adminInfoId: adminInfoId
                        },
                        type: 'post',
                        success: function (data) {

                            layer.msg("禁用成功", {offset: 'rb', shift: 6})
                            setTimeout(function () {
                                window.location.href = window.location.href;
                            }, 3000);

                        }, error: function (data) {
                            layer.msg("稍等一会..", {offset: 'rb', shift: 6})
                        }

                    })

                    layer.close(index);

                })
            } else {
                layer.msg("请选择需要禁用的管理员", {offset: 'rb', shift: 6});
            }

        }
/**
 *  必须要要加上 通过什么来点击
 */
$('.demoTable .layui-btn').on('click', function () {
    var type = $(this).data('type');
    active[type] ? active[type].call(this) : '';
});
});
Java 后台代码
/**
 * 批量禁用管理员
 *
 * @param adminInfoCode
 * @param adminInfoId
 * @return
 */
@RequestMapping("admin/updateAdminInfoCodeClose")
public ResultFormat updateAdminInfoCodeDn(Integer adminInfoCode, @RequestParam(value = "adminInfoId[]") Integer[] adminInfoId) {

    logger.info("adminInfoCode = {}", adminInfoCode);
    logger.info("adminInfoId = {}", adminInfoId);
    Integer flag = 0;

    for (Integer integer : adminInfoId) {
        map.put("adminInfoId", integer.intValue());
        map.put("adminInfoCode", adminInfoCode);
        flag = adminService.updateAdminInfo(map);
    }

    logger.info("flag = {}", flag);
    if (flag > 0) {
        return ResultUtil.success(flag);
    }

    return ResultUtil.error(104, "更新失败..");
}
源码码云地址 :https://gitee.com/pig_farmer_x/springboot/tree/master/
Spring Boot + LayUI 批量修改数据 数据包含着对象的更多相关文章
- 在Spring Boot中加载初始化数据
文章目录 依赖条件 data.sql文件 schema.sql 文件 @sql注解 @SqlConfig 注解 在Spring Boot中加载初始化数据 在Spring Boot中,Spring Bo ...
- Spring Boot中使用Spring-data-jpa让数据访问更简单、更优雅
在上一篇Spring中使用JdbcTemplate访问数据库中介绍了一种基本的数据访问方式,结合构建RESTful API和使用Thymeleaf模板引擎渲染Web视图的内容就已经可以完成App服务端 ...
- 【redis】4.spring boot集成redis,实现数据缓存
参考地址:https://spring.io/guides/gs/messaging-redis/ ================================================== ...
- spring boot: 从配置文件中读取数据的常用方法(spring boot 2.3.4)
一,从配置文件中读取数据有哪些方法? 通常有3种用法: 1,直接使用value注解引用得到配置项的值 2, 封装到Component类中再调用 3, 用Environment类从代码中直接访问 生 ...
- phpMyAdmin批量修改Mysql数据表前缀的方法
多个网站共用一个Mysql数据库时,为使数据库管理不混乱,一般采用不同的网站使用不同前缀名的方式进行区分.而如何批量修改已有数据库的前缀名 呢?全部导出修改后再导入?还是一个表一个表的修改?今天我要介 ...
- 使用phpMyAdmin批量修改Mysql数据表前缀的方法
多个网站共用一个Mysql数据库时,为使数据库管理不混乱,一般采用不同的网站使用不同前缀名的方式进行区分.而如何批量修改已有数据库的前缀名呢?全部导出修改后再导入?还是一个表一个表的修改?今天我要介绍 ...
- Spring Boot 系列(九)数据层-集成Spring-data-jpa
实际开发中,不可避免地会对数据进行反复的增删改查操作,然而这部分工作是十分繁琐枯燥的.那么,随即而生的ORM框架就能很好的解决这个问题. 我们常用的ORM框架有:Hibernate.Mybatis.J ...
- sql批量修改插入数据
1.批量修改 select 'update 读者库 set 单位代码='''+新单位代码+''' where 单位代码='''+单位代码+'''' from 读者单位 ,)<'L' and is ...
- Spring Boot 中集成 Redis 作为数据缓存
只添加注解:@Cacheable,不配置key时,redis 中默认存的 key 是:users::SimpleKey [](1.redis-cli 中,通过命令:keys * 查看:2.key:缓存 ...
随机推荐
- 企业级rancher搭建Kubernetes(采用rancher管理平台搭建k8s)
一.简介 Rancher简介 来源官方:https://www.cnrancher.com/ Rancher是一个开源的企业级容器管理平台.通过Rancher,企业再也不必自己使用一系列的开源软件去从 ...
- python多重逻辑排序
python有自带的排序sorted函数,而且用reverse =True or False,来控制降序还是升序.但是如果有多个条件需要排序应该如何办呢? L = [(12, 12), (34, 13 ...
- django中间件和auth模块
Django中间件 由django的生命周期图我们可以看出,django的中间件就类似于django的保安,请求一个相应时要先通过中间件才能到达django后端(url.views.template. ...
- 创建Cocoapods私有库
本文以自己在公司做的一个手势密码私有库GesturePasswordKit为例说明. 1.在gitlab(或者github,我这里使用的例子是在gitlab上)上创建git仓库 (确保授权正确,避免后 ...
- 初识SpringIOC
初识SpringIOC 简介 IOC(Inversion of Control)控制反转.指的是获取对象方式由原来主动获取,到被动接收的转变.在Spring中,IOC就是工厂模式解耦,是Srping框 ...
- Ajax&Json案例
案例: * 校验用户名是否存在 1. 服务器响应的数据,在客户端使用时,要想当做json数据格式使用.有两种解决方案: 1. $.get(type):将最后一个参数type指定为"json& ...
- 浅谈.NET Framework 与CLR
承载公共语言运行时 (CLR) 的所有应用程序均需启动(或称“激活”)CLR 以运行托管代码. 通常,.NET Framework 应用程序在生成它的 CLR ...
- Ubuntu pppoe宽带拨号相关问题
因为可视化界面没有相关设置,因此采用终端命令的方法. 测试环境:Ubuntu 18.0.4 pppoe的配置:$ sudo pppoeconf 然后进入此界面进行一系列宽带拨号的设置. 联网:$ su ...
- python版md-to-html编辑器
用PyQt5封装python-markdown,支持自定义样式. 详情:https://blog.phyer.cn/article/4523
- react-intl 实现 React 国际化多语言
效果预览 React Intl 国际化步骤 创建国际化资源文件 根据语言获取国际化资源 引入 react-intl 的 local data 创建 LocaleProvider 国际化上下文组件 创建 ...