iOS开发UI篇—从代码的逐步优化看MVC
iOS开发UI篇—从代码的逐步优化看MVC
一、要求
要求完成下面一个小的应用程序。

二、一步步对代码进行优化
注意:在开发过程中,优化的过程是一步一步进行的。(如果一个人要吃五个包子才能吃饱,那么他是否直接吃第五个,前面四个不用吃就饱了?)
1.完成基本要求的代码(使用了字典转模型和xib连线)
(1)文件结构

(2)主要代码
字典转模型部分:
YYappInfo.h头文件
 //

 //  YYappInfo.h

 //  12-视图改进(1)

 //

 //  Created by apple on 14-5-25.

 //  Copyright (c) 2014年 itcase. All rights reserved.

 //

 #import <Foundation/Foundation.h>

 @interface YYappInfo : NSObject

 @property(nonatomic,copy)NSString *name;

 @property(nonatomic,copy)NSString *icon;

 @property(nonatomic,strong,readonly)UIImage *img;

 -(instancetype)initWithDict:(NSDictionary *)dict;

 /**工厂方法*/

 +(instancetype)appInfoWithDict:(NSDictionary *)dict;

 @end
YYappInfo.m文件
 //

 //  YYappInfo.m

 //  12-视图改进(1)

 //

 //  Created by apple on 14-5-25.

 //  Copyright (c) 2014年 itcase. All rights reserved.

 //

 #import "YYappInfo.h"

 @interface YYappInfo()

 {

     UIImage *_img;

 }

 @end

 @implementation YYappInfo

 -(instancetype)initWithDict:(NSDictionary *)dict

 {

     if (self=[super init]) {

         self.name=dict[@"name"];

         self.icon=dict[@"icon"];

     }

     return self;

 }

 +(instancetype)appInfoWithDict:(NSDictionary *)dict

 {

     return [[self alloc]initWithDict:dict];

 }

 -(UIImage *)img

 {

     _img=[UIImage imageNamed:self.icon];

     return _img;

 }

 @end
xib部分(YYappInfoView.h文件):
注:(xib视图和YYappInfoView进行了关联,三个属性均进行了连线)
 //

 //  YYappInfoView.h

 //  12-视图改进(1)

 //

 //  Created by apple on 14-5-25.

 //  Copyright (c) 2014年 itcase. All rights reserved.

 //

 #import <UIKit/UIKit.h>

 @interface YYappInfoView : UIView

 @property (strong, nonatomic) IBOutlet UIImageView *appInfoViewimg;

 @property (strong ,nonatomic) IBOutlet UILabel *appInfoViewlab;

 @property (strong, nonatomic) IBOutlet UIButton *appInfoViewbtn;

 @end
主要功能实现部分:
YYViewController.m文件
 //

 //  YYViewController.m

 //  12-视图改进(1)

 //

 //  Created by apple on 14-5-25.

 //  Copyright (c) 2014年 itcase. All rights reserved.

 //

 #import "YYViewController.h"

 #import "YYappInfo.h"

 #import "YYappInfoView.h"

 @interface YYViewController ()

 @property(nonatomic,strong)NSArray *apps;

 @end

 //开发思路

 //1.加载plist文件(字典转模型提供接口)

 //2.使用xib文件完成单个的view

 //3.计算坐标,使用for循环把view展现到界面上

 //4.优化代码

 @implementation YYViewController

 //get方法,懒加载

 -(NSArray *)apps

 {

     if (!_apps) {

         NSString *path = [[NSBundle mainBundle]pathForResource:@"app.plist" ofType:nil];

         NSArray * arrayM = [NSArray arrayWithContentsOfFile:path];

         NSMutableArray *appinfoarray=[NSMutableArray array];

         for (NSDictionary *dict in arrayM) {

             [appinfoarray addObject:[YYappInfo appInfoWithDict:dict]];

         }

         _apps = appinfoarray;

     }

     return _apps;

 }

 - (void)viewDidLoad

 {

     [super viewDidLoad];

     NSLog(@"%d",self.apps.count);

     int totalloc = ;

     CGFloat appviewW = ;

     CGFloat appviewH = ;

     CGFloat margin = (self.view.frame.size.width-totalloc*appviewW)/(totalloc+);

     int count=self.apps.count;

     for (int i = ; i < count; i++) {

         int row = i/totalloc;

         int loc = i%totalloc;

         CGFloat appviewX = margin + (margin + appviewW) * loc;

         CGFloat appviewY =  margin + (margin + appviewH) * row;

           YYappInfo *appinfo=self.apps[i];

         //拿出xib中的数据

         NSArray *arryM=[[NSBundle mainBundle]loadNibNamed:@"appInfoxib" owner:nil options:nil];

         YYappInfoView *appinfoview=[arryM firstObject];

         //设置位置

         appinfoview.frame=CGRectMake(appviewX, appviewY, appviewW, appviewH);

         //设置值

         appinfoview.appInfoViewimg.image=appinfo.img;

         appinfoview.appInfoViewlab.text=appinfo.name;

         //添加到视图

         appinfoview.appInfoViewbtn.tag=i;

         [appinfoview.appInfoViewbtn addTarget:self action:@selector(Click:) forControlEvents:UIControlEventTouchUpInside];

         [self.view addSubview:appinfoview];

     }

 }

 -(void)Click:(UIButton *)btn

 {

     btn.enabled=NO;

     YYappInfo *appinfo=self.apps[btn.tag];

     UILabel *lab=[[UILabel alloc]initWithFrame:CGRectMake(, , , )];

     [lab setBackgroundColor:[UIColor lightGrayColor]];

     [lab setTextAlignment:NSTextAlignmentCenter];

     [lab setText:[NSString stringWithFormat:@"%@成功下载",appinfo.name]];

     [self.view addSubview:lab];

     lab.alpha=1.0;

     [UIView animateWithDuration:2.0 animations:^{

         lab.alpha=;

     }completion:^(BOOL finished) {

         [lab removeFromSuperview];

     }];

 }

 @end
2.对1进行优化(把数据呈现部分封装到视图)
说明:在1的基础上寻找还会有那些可以优化的部分
1)改进思路:
(1)1中主文件的66~67行对控件属性的设置能否拿到视图中进行?
(2)1中61~62行是从xib文件中读取信息的操作,且和主控制器没有什么太大的关联,能否把它也封装到视图中进行?
(3)当上述两个步骤完成后,主文件69行以后的按钮操作和按钮单击事件就显得很突兀,放在主控制器中已经不再合适,是否可以把它放到视图中进行处理
2)按照上述思路优化后的代码如下:
优化视图,在视图部分之对外提供一个接口,把数据的处理封装在内部
YYappInfoView.h文件代码:
 //

 //  YYappInfoView.h

 //  12-视图改进(1)

 //

 //  Created by apple on 14-5-25.

 //  Copyright (c) 2014年 itcase. All rights reserved.

 //

 #import <UIKit/UIKit.h>

 @class YYappInfo;

 @interface YYappInfoView : UIView

 //读取

 //+(instancetype)appInfoView;

 //只对外开放一个数据接口

 +(instancetype)appInfoViewWithappInfo:(YYappInfo *)appinfo;

 @end
YYappInfoView.m文件代码
说明:该文件中的属性和click等均已做了连线的操作。
 //

 //  YYappInfoView.m

 //  12-视图改进(1)

 //

 //  Created by apple on 14-5-25.

 //  Copyright (c) 2014年 itcase. All rights reserved.

 //

 #import "YYappInfoView.h"

 #import "YYappInfo.h"

 //私有扩展,把属性拿进来

 @interface YYappInfoView ()

 @property (strong, nonatomic) IBOutlet UIImageView *appInfoViewimg;

 @property (strong ,nonatomic) IBOutlet UILabel *appInfoViewlab;

 @property (strong, nonatomic) IBOutlet UIButton *appInfoViewbtn;

 @property(strong,nonatomic)YYappInfo *appinfo;

 @end

 @implementation YYappInfoView

 +(instancetype)appInfoView

 {

     NSArray *arryM=[[NSBundle mainBundle]loadNibNamed:@"appInfoxib" owner:nil options:nil];

     YYappInfoView *appinfoview=[arryM firstObject];

     return appinfoview;

 }

 +(instancetype)appInfoViewWithappInfo:(YYappInfo *)appinfo

 {

     YYappInfoView *appInfoView=[self appInfoView];

     appInfoView.appinfo=appinfo;

     return appInfoView;

 }

 -(void)setAppinfo:(YYappInfo *)appinfoc

 {

     //这里一定要记录变化

     _appinfo=appinfoc;

     self.appInfoViewimg.image=appinfoc.img;
    self.appInfoViewlab.text=appinfoc.name;
}
 - (IBAction)Click {

     self.appInfoViewbtn.enabled=NO;

     //YYappInfo *appinfo=self.apps[];

     YYappInfo *appinfo=self.appinfo;

     UILabel *lab=[[UILabel alloc]initWithFrame:CGRectMake(, , , )];

     [lab setBackgroundColor:[UIColor lightGrayColor]];

     [lab setTextAlignment:NSTextAlignmentCenter];

     [lab setText:[NSString stringWithFormat:@"%@成功下载",appinfo.name]];

     //把lab添加到父视图(即view中)

     [self.superview addSubview:lab];

     lab.alpha=1.0;

     [UIView animateWithDuration:2.0 animations:^{

         lab.alpha=;

     }completion:^(BOOL finished) {

         [lab removeFromSuperview];

     }];

 }

 @end
优化后的主控制器部分
YYViewController.m文件代码
 //

 //  YYViewController.m

 //  12-视图改进(1)

 //

 //  Created by apple on 14-5-25.

 //  Copyright (c) 2014年 itcase. All rights reserved.

 //

 #import "YYViewController.h"

 #import "YYappInfo.h"

 #import "YYappInfoView.h"

 @interface YYViewController ()

 @property(nonatomic,strong)NSArray *apps;

 @end

 @implementation YYViewController

 -(NSArray *)apps

 {

     if (!_apps) {

         NSString *path = [[NSBundle mainBundle]pathForResource:@"app.plist" ofType:nil];

         NSArray * arrayM = [NSArray arrayWithContentsOfFile:path];

         NSMutableArray *appinfoarray=[NSMutableArray array];

         for (NSDictionary *dict in arrayM) {

             [appinfoarray addObject:[YYappInfo appInfoWithDict:dict]];

         }

         _apps = appinfoarray;

     }

     return _apps;

 }

 - (void)viewDidLoad

 {

     [super viewDidLoad];

     NSLog(@"%d",self.apps.count);

     int totalloc = ;

     CGFloat appviewW = ;

     CGFloat appviewH = ;

     CGFloat margin = (self.view.frame.size.width-totalloc*appviewW)/(totalloc+);

     int count=self.apps.count;

     for (int i = ; i < count; i++) {

         int row = i/totalloc;

         int loc = i%totalloc;

         CGFloat appviewX = margin + (margin + appviewW) * loc;

         CGFloat appviewY =  margin + (margin + appviewH) * row;

         /*思路:

          要达到的效果 appinfoview.appinfo=appinfo;

         优化后即变成  appinfoview.appinfo=self.apps[i];

         要进行上面代码的操作,需要在视图中新增加一个appinfo类的属性,这样数据——》视图的转换即可以不需要在主控制器中完成,让程序结构一目了然

          */

         YYappInfo *appinfo=self.apps[i];

         YYappInfoView *appinfoview=[YYappInfoView appInfoViewWithappInfo:appinfo];

         //设置位置

         appinfoview.frame=CGRectMake(appviewX, appviewY, appviewW, appviewH);

         //添加

         [self.view addSubview:appinfoview];

     }

 }

 @end
3.对2进一步优化(把数据处理部分拿到模型中去进行)
(1)思路:把字典转模型部分的数据处理操作,拿到模型中去处理,这样外界不需要再关心数据处理的内部细节。
(2)优化后的代码如下
YYappInfo.h文件中向外开放一个接口,返回一个处理好的数组。
 //

 //  YYappInfo.h

 //  12-视图改进(1)

 //

 //  Created by apple on 14-5-25.

 //  Copyright (c) 2014年 itcase. All rights reserved.

 //

 #import <Foundation/Foundation.h>

 @interface YYappInfo : NSObject

 @property(nonatomic,copy)NSString *name;

 @property(nonatomic,copy)NSString *icon;

 @property(nonatomic,strong)UIImage *img;

 -(instancetype)initWithDict:(NSDictionary *)dict;

 /**工厂方法*/

 +(instancetype)appInfoWithDict:(NSDictionary *)dict;

 +(NSArray *)appinfoarray;

 @end
YYappInfo.m文件中的数据处理
 //

 //  YYappInfo.m

 //  12-视图改进(1)

 //

 //  Created by apple on 14-5-25.

 //  Copyright (c) 2014年 itcase. All rights reserved.

 //

 #import "YYappInfo.h"

 @interface YYappInfo()

 @end

 @implementation YYappInfo

 -(instancetype)initWithDict:(NSDictionary *)dict

 {

     if (self=[super init]) {

         self.name=dict[@"name"];

         self.icon=dict[@"icon"];

     }

     return self;

 }

 +(instancetype)appInfoWithDict:(NSDictionary *)dict

 {

     return [[self alloc]initWithDict:dict];

 }

 -(UIImage *)img

 {

     _img=[UIImage imageNamed:self.icon];

     return _img;

 }

 //把数据处理部分拿到模型中来处理

 +(NSArray *)appinfoarray

 {

     NSString *path = [[NSBundle mainBundle]pathForResource:@"app.plist" ofType:nil];

     NSArray * arrayM = [NSArray arrayWithContentsOfFile:path];

     NSMutableArray *appinfoarray=[NSMutableArray array];

     for (NSDictionary *dict in arrayM) {

         [appinfoarray addObject:[YYappInfo appInfoWithDict:dict]];

     }

     return appinfoarray;

 }

 @end
主控制器中不再需要关心数据处理的内部细节
YYViewController.m文件现在只是负责模型和视图之间的协调工作了,怎么样?差不多了吧。
 //

 //  YYViewController.m

 //  12-视图改进(1)

 //

 //  Created by apple on 14-5-25.

 //  Copyright (c) 2014年 itcase. All rights reserved.

 //

 #import "YYViewController.h"

 #import "YYappInfo.h"

 #import "YYappInfoView.h"

 @interface YYViewController ()

 @property(nonatomic,strong)NSArray *apps;

 @end

 @implementation YYViewController

 -(NSArray *)apps

 {

     if (!_apps) {

         _apps=[YYappInfo appinfoarray];

     }

     return _apps;

 }

 - (void)viewDidLoad

 {

     [super viewDidLoad];

     int totalloc = ;

     CGFloat appviewW = ;

     CGFloat appviewH = ;

     CGFloat margin = (self.view.frame.size.width-totalloc*appviewW)/(totalloc+);

     int count=self.apps.count;

     for (int i = ; i < count; i++) {

         int row = i/totalloc;

         int loc = i%totalloc;

         CGFloat appviewX = margin + (margin + appviewW) * loc;

         CGFloat appviewY =  margin + (margin + appviewH) * row;

         YYappInfo *appinfo=self.apps[i];

         YYappInfoView *appinfoview=[YYappInfoView appInfoViewWithappInfo:appinfo];

         appinfoview.frame=CGRectMake(appviewX, appviewY, appviewW, appviewH);

         [self.view addSubview:appinfoview];

     }

 }

 @end
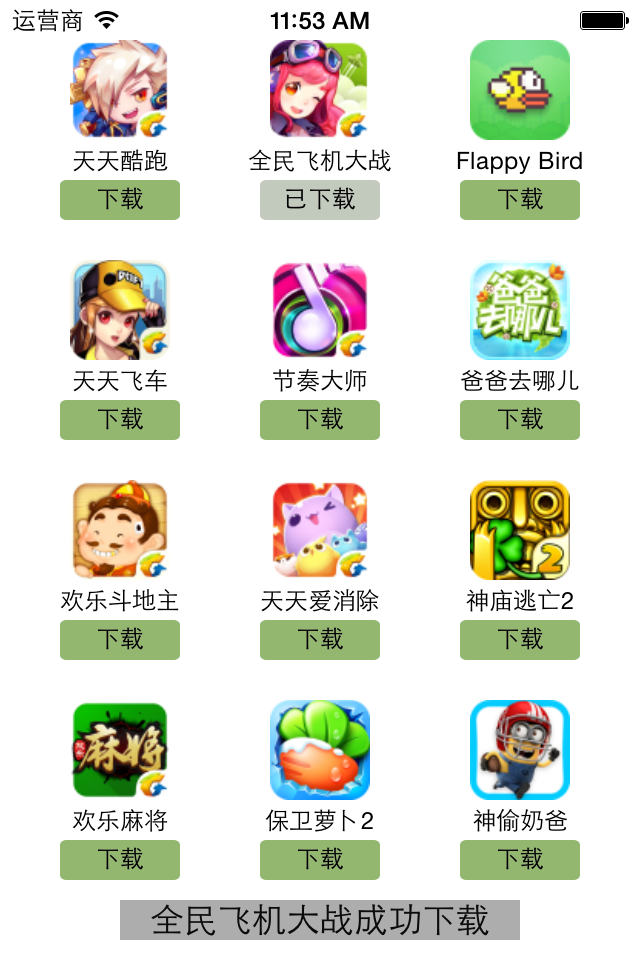
实现效果:
4.补充说明
View的封装思路
(1) 如果一个view内部的子控件比较多,一般会考虑自定义一个view,把它内部子控件的创建屏蔽起来,不让外界关心
(2) 外界可以传入对应的模型数据给view,view拿到模型数据后给内部的子控件设置对应的数据
三、mvc机制简单说明

说明:
(1)在开发过程中,作为控制器处理的量级应该很轻,不该操心的不操心。协调好模型和视图就ok了,要学会当一个好老板。
(2)三个部分各司其职,数据模型只负责数据的处理,视图部分只负责把拿到的数据进行显示,两个部分都是被动的,等待着大管家控制器的调遣。
(3)在OC中,如果视图和数据模型之间有通道,那控制器是否处于失控状态呢?
iOS开发UI篇—从代码的逐步优化看MVC的更多相关文章
- ios开发UI篇—使用纯代码自定义UItableviewcell实现一个简单的微博界面布局
本文转自 :http://www.cnblogs.com/wendingding/p/3761730.html ios开发UI篇—使用纯代码自定义UItableviewcell实现一个简单的微博界面布 ...
- iOS开发UI篇—CAlayer(自定义layer)
iOS开发UI篇—CAlayer(自定义layer) 一.第一种方式 1.简单说明 以前想要在view中画东西,需要自定义view,创建一个类与之关联,让这个类继承自UIView,然后重写它的Draw ...
- iOS开发UI篇—UITabBarController简单介绍
iOS开发UI篇—UITabBarController简单介绍 一.简单介绍 UITabBarController和UINavigationController类似,UITabBarControlle ...
- iOS开发UI篇—懒加载
iOS开发UI篇—懒加载 1.懒加载基本 懒加载——也称为延迟加载,即在需要的时候才加载(效率低,占用内存小).所谓懒加载,写的是其get方法. 注意:如果是懒加载的话则一定要注意先判断是否已经有了, ...
- iOS开发UI篇—CAlayer层的属性
iOS开发UI篇—CAlayer层的属性 一.position和anchorPoint 1.简单介绍 CALayer有2个非常重要的属性:position和anchorPoint @property ...
- iOS开发UI篇—CAlayer(创建图层)
iOS开发UI篇—CAlayer(创建图层) 一.添加一个图层 添加图层的步骤: 1.创建layer 2.设置layer的属性(设置了颜色,bounds才能显示出来) 3.将layer添加到界面上(控 ...
- iOS开发UI篇—CALayer简介
iOS开发UI篇—CALayer简介 一.简单介绍 在iOS中,你能看得见摸得着的东西基本上都是UIView,比如一个按钮.一个文本标签.一个文本输入框.一个图标等等,这些都是UIView. 其实 ...
- iOS开发UI篇—核心动画(UIView封装动画)
iOS开发UI篇—核心动画(UIView封装动画) 一.UIView动画(首尾) 1.简单说明 UIKit直接将动画集成到UIView类中,当内部的一些属性发生改变时,UIView将为这些改变提供动画 ...
- iOS开发UI篇—核心动画(转场动画和组动画)
转自:http://www.cnblogs.com/wendingding/p/3801454.html iOS开发UI篇—核心动画(转场动画和组动画) 一.转场动画简单介绍 CAAnimation的 ...
随机推荐
- SignalR实时推送
SignalR 的实现机制与 .NET WCF 或 Remoting 是相似的,都是使用远程代理来实现.在具体使用上,有两种不同目的的接口:PersistentConnection 和 Hubs,其中 ...
- (一)s3c2440 地址分配讲解 (很难很纠结)
mini2440的地址怎么分配.mini2440处理器的地址怎么分配. S3C2440处理器可以使用的物理地址空间可以达到4GB,其中前1GB的地址(也就是0x0000 0000--0x4000 00 ...
- 我们应该如何去了解JavaScript引擎的工作原理
“读了你的几篇关于JS(变量对象.作用域.上下文.执行代码)的文章,我个人觉得有点抽象,难以深刻理解.我想请教下通过什么途径能够深入点的了解javascript解析引擎在执行代码前后是怎么工作的,ec ...
- paper 105: 《Single Image Haze Removal Using Dark Channel Prior》一文中图像去雾算法的原理、实现、效果及其他
在图像去雾这个领域,几乎没有人不知道<Single Image Haze Removal Using Dark Channel Prior>这篇文章,该文是2009年CVPR最佳论文.作者 ...
- Android Studio 入门指南
转载: 原文链接:http://www.codeceo.com/article/android-studio-guide.html 写在前面 作为一个Android 开发者,你应该很了解Android ...
- C# 参数化SQL语句中的like和in
在写项目的时候遇到一个问题,sql 语句进行 like in 参数化,按照正常的方式是无法实现的我们一般的思维是: Like 参数:string strSql = "select * fro ...
- 反编译ILSpy 无法显式调用运算符或访问器 错误处理方法 转
反汇编一个dll类库,导出的项目会报出很多bug,其中主要的就是“无法显式调用运算符或访问器”这个错误,看了一下,发现问题是在调用属性的时候,都 变成了方法,例如:pivotPoint.set_X(0 ...
- jquery 新闻滚动效果
$(function () { var scrollTimer = null; var delay = 2000; //1.鼠标对新闻触发mouseout事件后每2s调用scr ...
- App.xaml.cs
using System.Windows; namespace HelloWorld { /// <summary> /// Interaction logic for App.xaml ...
- sqlserver 纵横
纵表转横表 create table Score ( Name ), Class ), score int ) ) ) ) ) ) ) ) select * from Score select t.N ...