1.注册或登录页面设计:UILabel,UIButton,UITextField
学习iOS开发已经有一段时日了,之前一直没有系统的对iOS开发的相关知识进行归纳总结,导致很多知识点云里雾里在脑子里形不成iOS开发的思想,现将自己在学习过程中遇到的一些知识进行总结,希望能对iOS初学者能有一定的帮助。最初学iOS的时候苦于没有大神指点,全靠自己一点点摸索,确实走了很多弯路,不希望还有小伙伴跟我一样走过多的弯路。
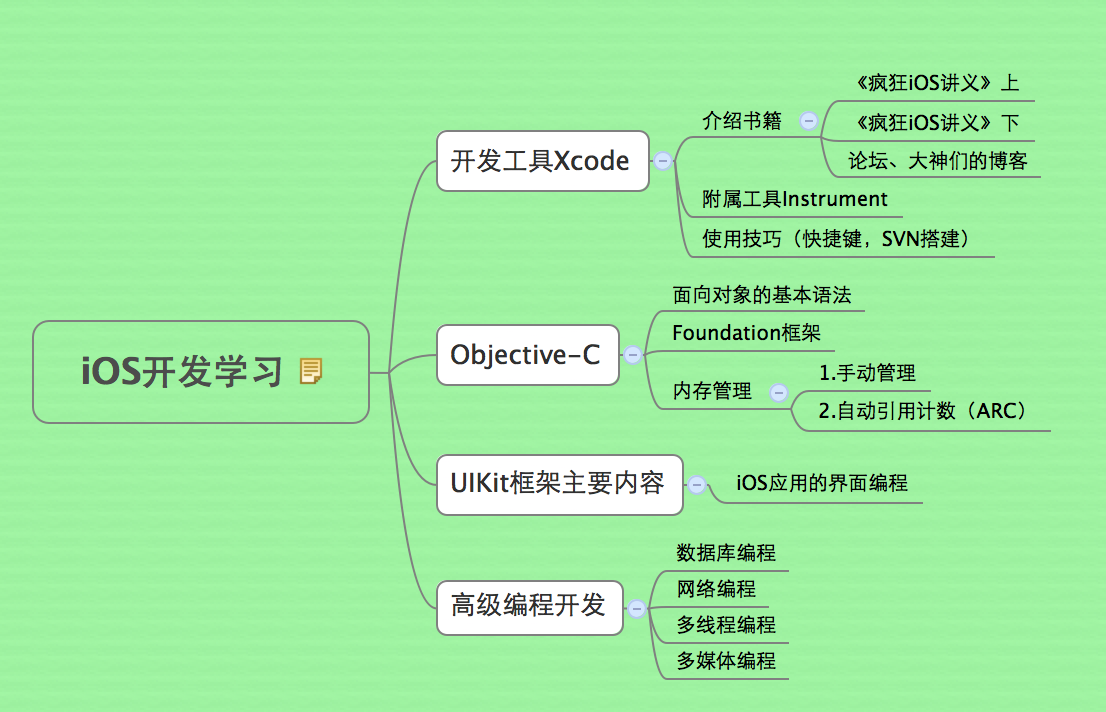
由于本人只是从去年11月份才开始玩iOS(附上自己的学习路线,如下图),受限于能力,难免有一些不完善或不恰当的地方,希望大神们多多见谅,勿拍砖,有不足或需要完善的地方也希望小伙伴们能多多指教。
作为iOS开发的入门总结的第一篇,这里以最常见的注册或登陆页面设计作为开篇,这里主要会用到UILabel,UIButton,UITextField这三个控件。为了让繁琐的知识点介绍不至于太枯燥泛味,我采用“总-->分”的方式来进行讲解,即先介绍结果,让大家提起兴趣来,然后再针对结果中遇到的各个知识点来分别进行讲解。这样读者看起来就可以各取所取,不需要的地方就可以直接跳过,节省时间。
一.注册或登录界面
如下图,实现了一个注册或登录界面,这里先只介绍单个页面,不介绍点击“完成”按钮后的动作,在之后的系列《iOS开发入门总结》中会逐步介绍,等基础知识介绍的差不多了,就可以以一个完整的注册系统作为小结。
说明:
- 这里为了展现UITextField的文本框关联键盘的设置,这里把“密码”和“确定密码”的关联键盘都设置为数字键盘,实际应用中密码一般都允许为数字或字母。
- 实现了键盘收回操作。
- 这里没有写对“用户名”进行特殊字符过滤的代码。

实现代码:
 #import "ViewController.h"

 @interface ViewController ()

 @end

 @implementation ViewController

 - (void)viewDidLoad

 {

     [super viewDidLoad];

     // Do any additional setup after loading the view, typically from a nib.

     //三个UILabel

     UILabel *nameLabel = [[UILabel alloc]initWithFrame:CGRectMake(, , , )];

     nameLabel.font = [UIFont systemFontOfSize:];

     nameLabel.text = @"用  户  名:";

     nameLabel.backgroundColor = [UIColor clearColor];

     nameLabel.textAlignment = NSTextAlignmentLeft;

     nameLabel.numberOfLines = ;  //用于设置UILabel中文本的行数

     [self.view addSubview:nameLabel];

     [nameLabel release];

     UILabel *newPasswordLabel = [[UILabel alloc]initWithFrame:CGRectMake(, +, , )];

     newPasswordLabel.font = [UIFont systemFontOfSize:];

     newPasswordLabel.text = @"密       码:";

     newPasswordLabel.backgroundColor = [UIColor clearColor];

     newPasswordLabel.textAlignment = NSTextAlignmentLeft;

     [self.view addSubview:newPasswordLabel];

     [newPasswordLabel release];

     UILabel *oncePasswordLabel = [[UILabel alloc]initWithFrame:CGRectMake(, +*, , )];

     oncePasswordLabel.font = [UIFont systemFontOfSize:];

     oncePasswordLabel.text = @"确认密码:";

     oncePasswordLabel.backgroundColor = [UIColor clearColor];

     oncePasswordLabel.textAlignment = NSTextAlignmentLeft;

     [self.view addSubview:oncePasswordLabel];

     [oncePasswordLabel release];

     //三个输入框

     UITextField *nameTextField = [[UITextField alloc]initWithFrame:CGRectMake(, , , )];

     nameTextField.placeholder = @"请输入用户名";

     nameTextField.tag = ;

     [nameTextField setSecureTextEntry:NO];

     nameTextField.font = [UIFont systemFontOfSize:];

     nameTextField.delegate = self;

     nameTextField.backgroundColor = [UIColor clearColor];

     nameTextField.borderStyle = UITextBorderStyleRoundedRect;

     [self.view addSubview:nameTextField];

     [nameTextField release];

     UITextField *passwordTextField = [[UITextField alloc]initWithFrame:CGRectMake(, +, , )];

     passwordTextField.placeholder = @"至少6位数字";

     passwordTextField.tag = ;

     [passwordTextField setSecureTextEntry:YES];

     passwordTextField.font = [UIFont systemFontOfSize:];

     passwordTextField.delegate = self;

     passwordTextField.backgroundColor = [UIColor clearColor];

     passwordTextField.borderStyle = UITextBorderStyleRoundedRect;

     passwordTextField.keyboardType = UIKeyboardTypeNumberPad;

     [self.view addSubview:passwordTextField];

     [passwordTextField release];

     UITextField *onceNewPasswordTextField = [[UITextField alloc]initWithFrame:CGRectMake(, +*, , )];

     onceNewPasswordTextField.placeholder = @"请再次输入密码";

     onceNewPasswordTextField.tag = ;

     onceNewPasswordTextField.font = [UIFont systemFontOfSize:];

     [onceNewPasswordTextField setSecureTextEntry:YES];

     onceNewPasswordTextField.delegate = self;

     onceNewPasswordTextField.backgroundColor = [UIColor clearColor];

     onceNewPasswordTextField.borderStyle = UITextBorderStyleRoundedRect;

     onceNewPasswordTextField.keyboardType = UIKeyboardTypeNumberPad;

     [self.view addSubview:onceNewPasswordTextField];

     [onceNewPasswordTextField release];

     UIButton *confirmButton = [UIButton buttonWithType:UIButtonTypeRoundedRect];

     confirmButton.frame = CGRectMake(, +*+, , );

     [confirmButton setTitle:@"确定" forState:UIControlStateNormal];       //正常状况下button显示的标题

     [confirmButton setTitle:@"确定" forState:UIControlStateHighlighted];  //高亮显示时button的标题

     confirmButton.backgroundColor = [UIColor redColor];

     [confirmButton addTarget:self action:@selector(confirm:) forControlEvents:UIControlEventTouchUpInside];//button被按下又抬起后发生的事件

     //@selector可以理解为"选择子",selector是一个指针变量,类似于sender。 这里是将method的方法指定给新建的这个confirmButton

     [self.view addSubview:confirmButton];

 }

 //收回键盘

 - (void)touchesBegan:(NSSet *)touches withEvent:(UIEvent *)event

 {

     for (int i = ; i<; i++) {

         UITextField *textField = (UITextField*)[self.view viewWithTag:+i];

         [textField resignFirstResponder];

     }

 }

 - (void)didReceiveMemoryWarning

 {

     [super didReceiveMemoryWarning];

     // Dispose of any resources that can be recreated.

 }

 @end
二.UILabel
UILabel继承了UIView,它可以设置UIView所支持的属性。
UILabel *label1 = [[UILabel alloc]initWithFrame:CGRectMake(50.0, 20.0, 200.0, 50.0)];  //设置Label的位置和大小

//设置显示文字

label1.text = @"用户名";

//设置字体:粗体,正常的是 SystemFontOfSize

label1.font = [UIFont boldSystemFontOfSize:];

//设置文字颜色

label1.textColor = [UIColor orangeColor];

//设置文字位置

label1.textAlignment = UITextAlignmentRight;

label2.textAlignment = UITextAlignmentCenter;

//设置字体大小适应label宽度

label4.adjustsFontSizeToFitWidth = YES;

//设置label的行数

label5.numberOfLines = ;

UIlabel.backgroudColor=[UIColor clearColor]; //可以去掉背景色

//设置高亮

label6.highlighted = YES;

label6.highlightedTextColor = [UIColor orangeColor];

//设置阴影

label7.shadowColor = [UIColor redColor];

label7.shadowOffset = CGSizeMake(1.0,1.0);

//设置是否能与用户进行交互

label7.userInteractionEnabled = YES;

//设置label中的文字是否可变,默认值是YES

label3.enabled = NO;

//设置文字过长时的显示格式

label3.lineBreakMode = UILineBreakModeMiddleTruncation;//截去中间

//  typedef enum {

//      UILineBreakModeWordWrap = 0,

//      UILineBreakModeCharacterWrap,

//      UILineBreakModeClip,//截去多余部分

//      UILineBreakModeHeadTruncation,//截去头部

//      UILineBreakModeTailTruncation,//截去尾部

//      UILineBreakModeMiddleTruncation,//截去中间

//  } UILineBreakMode;

//如果adjustsFontSizeToFitWidth属性设置为YES,这个属性就来控制文本基线的行为

label4.baselineAdjustment = UIBaselineAdjustmentNone;

//  typedef enum {

//      UIBaselineAdjustmentAlignBaselines,

//      UIBaselineAdjustmentAlignCenters,

//      UIBaselineAdjustmentNone,

//  } UIBaselineAdjustment;
有时需要设置UILabel中文本的行数,其属性值默认为1,用于设置该UILabel只能显示一行文本。
oldPasswordLabel.numberOfLines = ;
三.UITextField
//初始化textfield并设置位置及大小

UITextField *text = [[UITextField alloc]initWithFrame:CGRectMake(, , , )];

//当输入框没有内容时,水印提示 ,提示内容为“用户名”

//显示灰色字体,作为提示信息

text.placeholder = @"用户名";

//设置边框样式,只有设置了才会显示边框样式

text.borderStyle = UITextBorderStyleRoundedRect;

typedef enum {

    UITextBorderStyleNone,

    UITextBorderStyleLine,

    UITextBorderStyleBezel,

    UITextBorderStyleRoundedRect

} UITextBorderStyle;

//设置键盘的样式

text.keyboardType = UIKeyboardTypeNumberPad;

typedef enum {

    UIKeyboardTypeDefault,                 //默认键盘,支持所有字符

    UIKeyboardTypeASCIICapable,            //支持ASCII的默认键盘

    UIKeyboardTypeNumbersAndPunctuation,   //标准电话键盘,支持+*#字符

    UIKeyboardTypeURL,                      //URL键盘,支持.com按钮 只支持URL字符

    UIKeyboardTypeNumberPad,               //数字键盘

    UIKeyboardTypePhonePad,               //电话键盘

    UIKeyboardTypeNamePhonePad,            //电话键盘,也支持输入人名

    UIKeyboardTypeEmailAddress,            //用于输入电子 邮件地址的键盘

    UIKeyboardTypeDecimalPad,              //数字键盘 有数字和小数点

    UIKeyboardTypeTwitter,                 //优化的键盘,方便输入@、#字符

    UIKeyboardTypeAlphabet = UIKeyboardTypeASCIICapable,

} UIKeyboardType;

//每输入一个字符就变成点 用语密码输入

text.secureTextEntry = YES;

//设置输入框的背景颜色,此时设置为白色 如果使用了自定义的背景图片边框会被忽略掉

text.backgroundColor = [UIColor whiteColor];

//设置背景图片

text.background = [UIImage imageNamed:@"dd.png"];

//设置背景

text.disabledBackground = [UIImage imageNamed:@"cc.png"];

//设置输入框内容的字体样式和大小

text.font = [UIFont fontWithName:@"Arial" size:20.0f];

//设置字体颜色

text.textColor = [UIColor redColor];

//输入框中是否有个叉号,在什么时候显示,用于一次性删除输入框中的内容

text.clearButtonMode = UITextFieldViewModeAlways;

typedef enum {

    UITextFieldViewModeNever,           //从不出现

    UITextFieldViewModeWhileEditing,     //编辑时出现

    UITextFieldViewModeUnlessEditing,   //除了编辑外都出现

    UITextFieldViewModeAlways           //一直出现

} UITextFieldViewMode;

//输入框中一开始就有的文字

text.text = @"一开始就在输入框的文字";

//是否纠错

text.autocorrectionType = UITextAutocorrectionTypeNo;

typedef enum {

    UITextAutocorrectionTypeDefault,    //默认

    UITextAutocorrectionTypeNo,        //不自动纠错

    UITextAutocorrectionTypeYes,       //自动纠错

} UITextAutocorrectionType;

//再次编辑就清空

text.clearsOnBeginEditing = YES;

//内容对齐方式

text.textAlignment = UITextAlignmentLeft;

//内容的垂直对齐方式  UITextField继承自UIControl,此类中有一个属性contentVerticalAlignment

text.contentVerticalAlignment = UIControlContentVerticalAlignmentCenter;

//设置为YES时文本会自动缩小以适应文本窗口大小.默认是保持原来大小,而让长文本滚动

textFied.adjustsFontSizeToFitWidth = YES;

//设置自动缩小显示的最小字体大小

text.minimumFontSize = ;

//首字母是否大写

text.autocapitalizationType = UITextAutocapitalizationTypeNone;

typedef enum {

    UITextAutocapitalizationTypeNone, 不自动大写

    UITextAutocapitalizationTypeWords, 单词首字母大写

    UITextAutocapitalizationTypeSentences, 句子的首字母大写

    UITextAutocapitalizationTypeAllCharacters, 所有字母都大写

} UITextAutocapitalizationType;

//return键变成什么键

text.returnKeyType =UIReturnKeyDone;

typedef enum {

    UIReturnKeyDefault,          //默认 灰色按钮,标有Return

    UIReturnKeyGo,               //标有Go的蓝色按钮

    UIReturnKeyGoogle,            //标有Google的蓝色按钮,用语搜索

    UIReturnKeyJoin,              //标有Join的蓝色按钮

    UIReturnKeyNext,              //标有Next的蓝色按钮

    UIReturnKeyRoute,             //标有Route的蓝色按钮

    UIReturnKeySearch,            //标有Search的蓝色按钮

    UIReturnKeySend,              //标有Send的蓝色按钮

    UIReturnKeyYahoo,             //标有Yahoo的蓝色按钮

    UIReturnKeyYahoo,             //标有Yahoo的蓝色按钮

    UIReturnKeyEmergencyCall,     //紧急呼叫按钮

} UIReturnKeyType;

//键盘外观

textView.keyboardAppearance=UIKeyboardAppearanceDefault;

typedef enum {

    UIKeyboardAppearanceDefault,   //默认外观,浅灰色

    UIKeyboardAppearanceAlert,   //深灰 石墨色

} UIReturnKeyType;

//设置代理 用于实现协议

text.delegate = self;

//把textfield加到视图中

[self.window addSubview:text];

//最右侧加图片是以下代码  左侧类似

UIImageView *image=[[UIImageView alloc] initWithImage:[UIImage imageNamed:@"right.png"]];

text.rightView=image;

text.rightViewMode = UITextFieldViewModeAlways;

typedef enum {

    UITextFieldViewModeNever,

    UITextFieldViewModeWhileEditing,

    UITextFieldViewModeUnlessEditing,

    UITextFieldViewModeAlways

} UITextFieldViewMode;
在处理密码等隐私类的信息时,可能需要将输入的信息隐藏一下。
//每输入一个字符就变成点 ,用语密码输入

[passwordTextField setSecureTextEntry:YES];
也可以设置文本框关联的键盘,如下:
//设置键盘的样式

text.keyboardType = UIKeyboardTypeNumberPad;

typedef enum {

    UIKeyboardTypeDefault,                 //默认键盘,支持所有字符

    UIKeyboardTypeASCIICapable,            //支持ASCII的默认键盘

    UIKeyboardTypeNumbersAndPunctuation,   //标准电话键盘,支持+*#字符

    UIKeyboardTypeURL,                      //URL键盘,支持.com按钮 只支持URL字符

    UIKeyboardTypeNumberPad,               //数字键盘

    UIKeyboardTypePhonePad,               //电话键盘

    UIKeyboardTypeNamePhonePad,            //电话键盘,也支持输入人名

    UIKeyboardTypeEmailAddress,            //用于输入电子 邮件地址的键盘

    UIKeyboardTypeDecimalPad,              //数字键盘 有数字和小数点

    UIKeyboardTypeTwitter,                 //优化的键盘,方便输入@、#字符

    UIKeyboardTypeAlphabet = UIKeyboardTypeASCIICapable,

} UIKeyboardType;
有时需要限制输入文本的长度,这类操作也非常普遍和重要。
//限制输入文本的长度

- (BOOL)textField:(UITextField *)textField shouldChangeCharactersInRange:(NSRange)range replacementString:(NSString *)string

{

    if ([textField.text length] > MAXLENGTH)

    {

        textField.text = [textField.text substringToIndex:MAXLENGTH-];

        return NO;

    }

    return YES;

}
四.UIButton
UIButton *button1 = [UIButton buttonWithType:UIButtonTypeRoundedRect];

     //    能够定义的button类型有以下6种,

     //    typedef enum {

     //        UIButtonTypeCustom = 0,          自定义风格

     //        UIButtonTypeRoundedRect,         圆角矩形

     //        UIButtonTypeDetailDisclosure,    蓝色小箭头按钮,主要做详细说明用

     //        UIButtonTypeInfoLight,           亮色感叹号

     //        UIButtonTypeInfoDark,            暗色感叹号

     //        UIButtonTypeContactAdd,          十字加号按钮

     //    } UIButtonType;

         //给定button在view上的位置

         button1.frame = CGRectMake(, , , );

         //button背景色

         button1.backgroundColor = [UIColor clearColor];

         //设置button填充图片

         //[button1 setImage:[UIImage imageNamed:@"btng.png"] forState:UIControlStateNormal];

         //设置button标题

         [button1 setTitle:@"点击" forState:UIControlStateNormal];

         /* forState: 这个参数的作用是定义按钮的文字或图片在何种状态下才会显现*/

        //以下是几种状态

     //    enum {

     //        UIControlStateNormal       = 0,         常规状态显现

     //        UIControlStateHighlighted  = 1 << 0,    高亮状态显现

     //        UIControlStateDisabled     = 1 << 1,    禁用的状态才会显现

     //        UIControlStateSelected     = 1 << 2,    选中状态

     //        UIControlStateApplication  = 0x00FF0000, 当应用程序标志时

     //        UIControlStateReserved     = 0xFF000000  为内部框架预留,可以不管他

     //    };

         /*

                   * 默认情况下,当按钮高亮的情况下,图像的颜色会被画深一点,如果这下面的这个属性设置为no,

                   * 那么可以去掉这个功能

                  */

         button1.adjustsImageWhenHighlighted = NO;

         /*跟上面的情况一样,默认情况下,当按钮禁用的时候,图像会被画得深一点,设置NO可以取消设置*/

         button1.adjustsImageWhenDisabled = NO;

         /* 下面的这个属性设置为yes的状态下,按钮按下会发光*/

         button1.showsTouchWhenHighlighted = YES;

         /* 给button添加事件,事件有很多种,我会单独开一篇博文介绍它们,下面这个时间的意思是

                   按下按钮,并且手指离开屏幕的时候触发这个事件,跟web中的click事件一样。

                   触发了这个事件以后,执行butClick:这个方法,addTarget:self 的意思是说,这个方法在本类中

                   也可以传入其他类的指针*/

         [button1 addTarget:self action:@selector(butClick:) forControlEvents:UIControlEventTouchUpInside];

         //显示控件

         [self.view addSubview:button1];
单独说明一下:
    UIButton *confirmButton = [UIButton buttonWithType:UIButtonTypeRoundedRect];

    confirmButton.frame = CGRectMake(, +*+, , );

    [confirmButton setTitle:@"确定" forState:UIControlStateNormal];       //正常状况下button显示的标题

    [confirmButton setTitle:@"确定" forState:UIControlStateHighlighted];  //高亮显示时button的标题

    confirmButton.backgroundColor = [UIColor redColor];

    [confirmButton addTarget:self action:@selector(confirm:) forControlEvents:UIControlEventTouchUpInside];//button被按下又抬起后发生的事件

    //@selector可以理解为"选择子",selector是一个指针变量,类似于sender。 这里是将method的方法指定给新建的这个confirmButton

    [self.view addSubview:confirmButton];
若要设置UIButton的背景图片时:
    UIButton *confirmButton = [UIButton buttonWithType:UIButtonTypeCustom];

    confirmButton.frame = CGRectMake(, , , );

    UIImage *nextStepImage = [UIImage imageNamed:@"app.png"];

    UIImage *nextStepDownImage = [UIImage imageNamed:@"app.png"];

    nextStepImage = [nextStepImage resizableImageWithCapInsets:UIEdgeInsetsMake(, , , )];

    nextStepDownImage = [nextStepDownImage resizableImageWithCapInsets:UIEdgeInsetsMake(, , , )];

    [confirmButton setBackgroundImage:nextStepImage forState:UIControlStateNormal];

    [confirmButton setBackgroundImage:nextStepDownImage forState:UIControlStateHighlighted];

    [confirmButton setTitle:@"确定" forState:UIControlStateNormal];

    [confirmButton addTarget:self action:@selector(confirm:) forControlEvents:UIControlEventTouchUpInside];

    [self.view addSubview:confirmButton];
1.注册或登录页面设计:UILabel,UIButton,UITextField的更多相关文章
- iOS 注册或登录页面(UILable,UITextField,UIButton)
注册或登录页面 例如下面的附图 1,为了在这里展示UITextField文本框关联的键盘设置.在这里,"password"和"判定password"关联键盘被设 ...
- 【转载】拒绝平庸——浅谈WEB登录页面设计
用户活跃度是检验产品成功与否的重要指标之一,传统行业的商家极为重视门面的装潢,因为一个好的门面可以聚集人气,招揽更多的顾客.古时候的大户人家院子门口的石狮子或其他的摆件的摆放极为讲究,有一定的风水学说 ...
- 拒绝平庸——浅谈WEB登录页面设计
用户活跃度是检验产品成功与否的重要指标之一,传统行业的商家极为重视门面的装潢,因为一个好的门面可以聚集人气,招揽更多的顾客.古时候的大户人家院子门口的石狮子或其他的摆件的摆放极为讲究,有一定的风水学说 ...
- layui的登录页面设计
主要的结构 先导入layui的主要的js和css等 <html> <head> <meta charset="utf-8"> <title ...
- 【web 回车】web项目 注册或登录页面 回车登录无效,解决方案
解决方案: /** * 登陆按钮的点击事件 */ $("#loginID").click(function(){ var username = $("#u"). ...
- django登录页面设计:
urls: """day42 URL Configuration The `urlpatterns` list routes URLs to views. For mor ...
- App后台开发运维和架构实践学习总结(4)——APP的注册和登录功能设计
一.为什么需要注册和登录? 是否需要注册和登录的关键取决于产品形态. 如果用户注册登录对于用户需求.产品功能.商业模式本身带不来任何价值的话,就没必要设计这样的功能.比如一些实用工具类的产品:计算器. ...
- bmob云 实现注册和登录的功能
向大家介绍一款我感觉非常溜的一款后端云服务bmob云 借助bmob云我们可以实现注册和登录页面的功能,下面就让我给大家演示一下借助bmob云服务实现这两个功能吧. 1. 用户是一个应用程序的核心.对 ...
- 模拟SWPU邮件登录页面
模拟SWPU邮件登录页面设计流程 一.开发工具准备 本次开发该页面时使用的开发工具为vscode—— 在下载安装完成后,需要下载各类插件——如汉化.通过浏览器打开网页插件等. 二.开发过程 首先,打开 ...
随机推荐
- Hibernate 映射关系
映射组成关系 •建立域模型和关系数据模型有着不同的出发点: –域模型: 由程序代码组成, 通过细化持久化类的的粒度可提高代码的可重用性, 简化编程 –在没有数据冗余的情况下, 应该尽可能减少表的数目, ...
- C语言基础--数组及相关
概念: 一堆相同类型的数据的有序集合 格式: 元素类型 数组名称[ 元素个数 ] 定义数组: // 定义了一个名称叫做scores的数组, 数组中可以存放3个int类型的数据 ]; // 只要定义一 ...
- ubuntu 编译oce Open CASCADE
前期准备 1 安装cmake 最新版本 sudo apt-get install cmake 2 安装OpenGl Library 和OpenGL Utilities sudo apt-get ins ...
- Bootstrap框架基础
特点:写非常少的代码 即可实现多终端的页面适配 ☑ 简单灵活可用于架构流行的用户界面和交互接口的html.css.javascript工具集. ☑ 基于html5.css3的bootstrap,具 ...
- 《Java中的自动装箱和拆箱功能.》
//Java中的自动装箱和拆箱功能. class AutoboxingUnboxing { public static void main(String[] args) { //直接把一个基本类型变量 ...
- 使用GnuRadio+OpenLTE+SDR搭建4G LTE基站(上)
0×00 前言 在移动互联网大规模发展的背景下,智能手机的普及和各种互联网应用的流行,致使对无线网络的需求呈几何级增长,导致移动运营商之间的竞争愈发激烈.但由于资费下调等各种因素影响,运营商从用户获得 ...
- 黑马程序员——【Java基础】——GUI(图形用户界面)
---------- android培训.java培训.期待与您交流! ---------- 一.概述 1.GUI(GraphicalUser Interface):又称图形用户界面,是计算机用户与计 ...
- iOS 利用 Framework 进行动态更新
http://nixwang.com/2015/11/09/ios-dynamic-update/ 前言 目前 iOS 上的动态更新方案主要有以下 4 种: HTML 5 lua(wax)hotpat ...
- Hubilder快捷键
/* tips.txt的内容可以在HBuilder启动封面中显示.你可以自定义一个有趣的启动tips,增加[user]开头的文本内容即可.比如[user]我要减肥! */ 你按照Hello HBui ...
- watir学习系列--Watir API介绍
文本框: <INPUT id="email" name="_fmu.u._0.e" value="" /> ...