ASP.NET Web API Help Pages using Swagger
Understanding the various methods of an API can be a challenge for a developer when building a consuming application.
Generating good documentation and help pages as a part of your Web API using Swagger with the .NET Core implementation Swashbuckle is as easy as adding a couple of NuGet packages and modifying the Startup.cs.
Swashbuckle is an open source project for generating Swagger documents for Web APIs that are built with ASP.NET Core MVC.
Swagger is a machine readable representation of a RESTful API that enables support for interactive documentation, client SDK generation and discoverability.
This tutorial builds on the sample on Building Your First Web API with ASP.NET Core MVC and Visual Studio. If you'd like to follow along, download the sample at https://github.com/aspnet/Docs/tree/master/aspnetcore/tutorials/first-web-api/sample.
Getting Started
There are two core components to Swashbuckle
Swashbuckle.SwaggerGen : provides the functionality to generate JSON Swagger documents that describe the objects, methods, return types, etc.
Swashbuckle.SwaggerUI : an embedded version of the Swagger UI tool which uses the above documents for a rich customizable experience for describing the Web API functionality and includes built in test harness capabilities for the public methods.
NuGet Packages
You can add Swashbuckle with any of the following approaches:
- From the Package Manager Console:
Install-Package Swashbuckle -Pre
In Visual Studio:
- Right click your project in Solution Explorer > Manage NuGet Packages
- Enter Swashbuckle in the search box
- Check "Include prerelease"
- Set the Package source to nuget.org
- Tap the Swashbuckle package and then tap Install
Add and configure Swagger to the middleware
Add SwaggerGen to the services collection in the Configure method, and in the ConfigureServices method, enable the middleware for serving generated JSON document and the SwaggerUI.
public void ConfigureServices(IServiceCollection services)

{

    // Add framework services.

    services.AddMvc();

    services.AddLogging();

    // Add our repository type

    services.AddSingleton<ITodoRepository, TodoRepository>();

    // Inject an implementation of ISwaggerProvider with defaulted settings applied

    services.AddSwaggerGen();

}

// This method gets called by the runtime. Use this method to configure the HTTP request pipeline.

public void Configure(IApplicationBuilder app, IHostingEnvironment env, ILoggerFactory loggerFactory)

{

    app.UseMvcWithDefaultRoute();

    // Enable middleware to serve generated Swagger as a JSON endpoint

    app.UseSwagger();

    // Enable middleware to serve swagger-ui assets (HTML, JS, CSS etc.)

    app.UseSwaggerUi();

}
In Visual Studio, press ^F5 to launch the app and navigate to http://localhost:<random_port>/swagger/v1/swagger.json to see the document generated that describes the endpoints.
Note
Microsoft Edge, Google Chrome and Firefox display JSON documents natively. There are extensions for Chrome that will format the document for easier reading. Example below reduced for brevity.
{

   "swagger": "2.0",

   "info": {

       "version": "v1",

       "title": "API V1"

   },

   "basePath": "/",

   "paths": {

       "/api/Todo": {

       "get": {

           "tags": [

           "Todo"

           ],

           "operationId": "ApiTodoGet",

           "consumes": [],

           "produces": [

           "text/plain",

           "application/json",

           "text/json"

           ],

           "responses": {

           "200": {

               "description": "OK",

               "schema": {

               "type": "array",

               "items": {

                   "$ref": "#/definitions/TodoItem"

               }

               }

           }

           },

           "deprecated": false

       },

       "post": {

           ...

       }

       },

       "/api/Todo/{id}": {

       "get": {

           ...

       },

       "put": {

           ...

       },

       "delete": {

           ...

   },

   "definitions": {

       "TodoItem": {

       "type": "object",

       "properties": {

           "key": {

           "type": "string"

           },

           "name": {

           "type": "string"

           },

           "isComplete": {

           "type": "boolean"

           }

       }

       }

   },

   "securityDefinitions": {}

   }
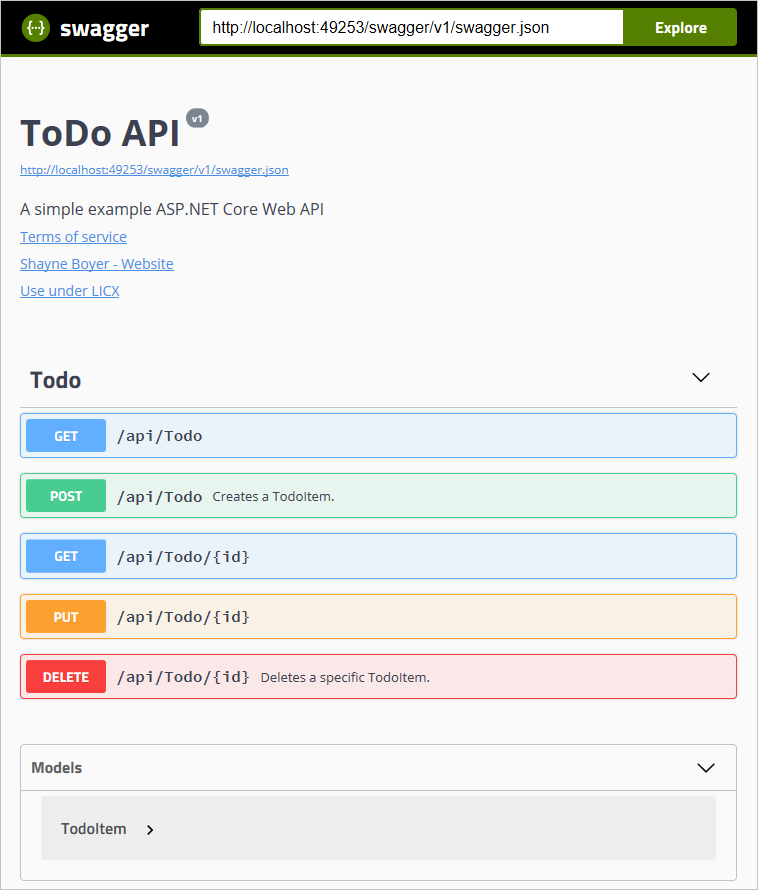
This document is used to drive the Swagger UI which can be viewed by navigating to http://localhost:<random_port>/swagger/ui
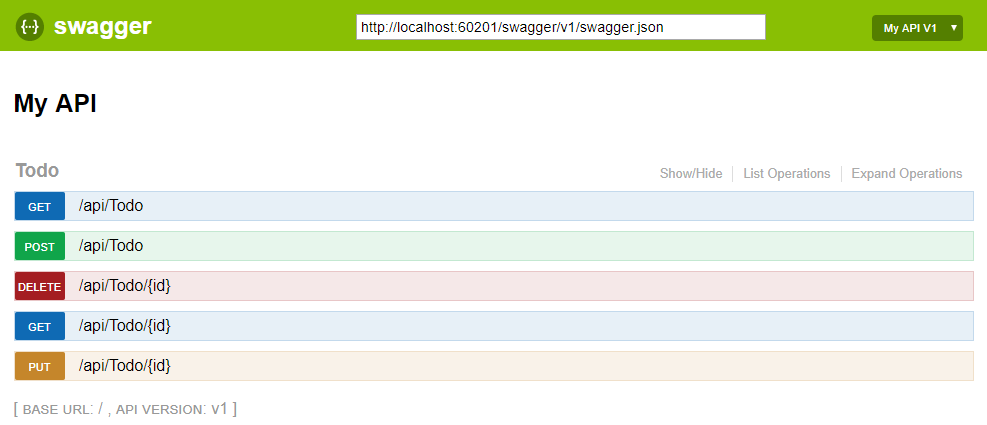
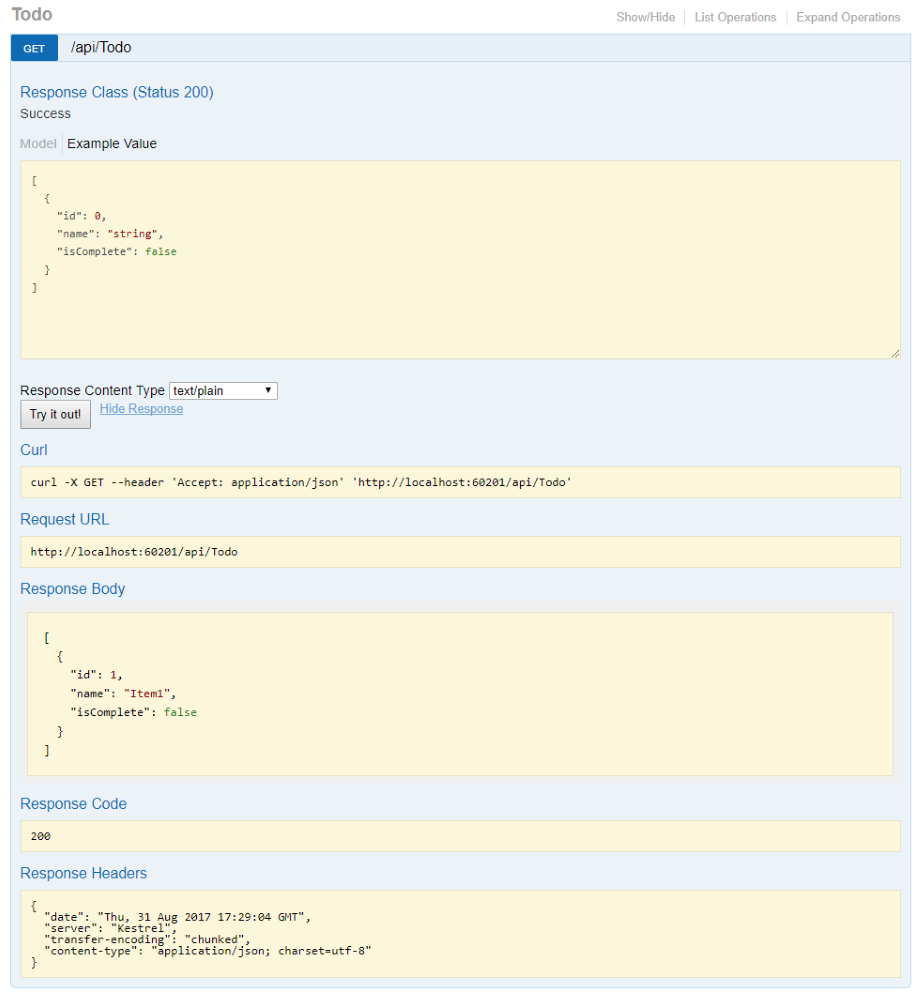
Each of the methods in the ToDo controller can be tested from the UI. Tap a method to expand the section, add any necessary parameters and tap "Try it out!".
Customization & Extensibility
Swagger is not only a simple way to represent the API, but has options for documenting the object model, as well as customizing the interactive UI to match your look and feel or design language.
API Info and Description
The ConfigureSwaggerGen method can be used to add information such as the author, license, description.
services.ConfigureSwaggerGen(options =>
{
options.SingleApiVersion(new Info
{
Version = "v1",
Title = "ToDo API",
Description = "A simple example ASP.NET Core Web API",
TermsOfService = "None",
Contact = new Contact { Name = "Shayne Boyer", Email = "", Url = "http://twitter.com/spboyer"},
License = new License { Name = "Use under LICX", Url = "http://url.com" }
});
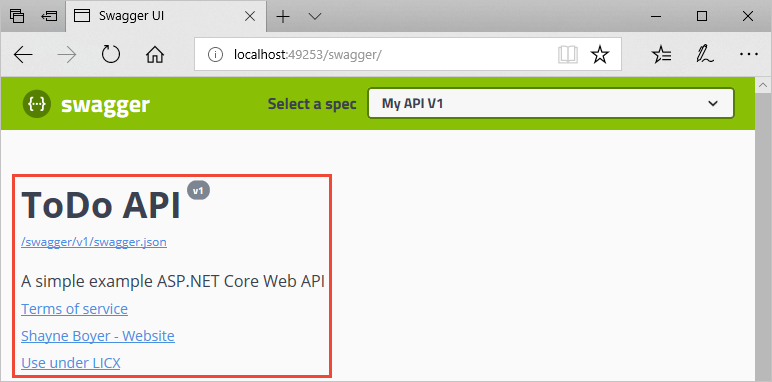
});
The following image shows the Swagger UI displaying the version information added.
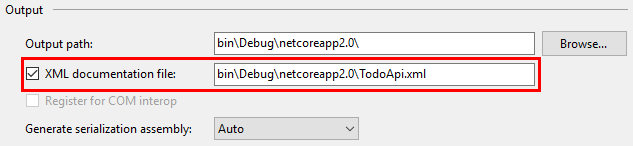
XML Comments
To enable XML comments, right click the project in Visual Studio and select Properties and then check the XML Documentation file box under the Output Settings section.
Configure Swagger to use the generated XML file.
Note
For Linux or non-Windows operating systems, file names and paths can be case sensitive. So ToDoApi.XMLwould be found on Windows but not CentOS for example.
// This method gets called by the runtime. Use this method to add services to the container.

public void ConfigureServices(IServiceCollection services)

{

    // Add framework services.

    services.AddMvc();

    services.AddLogging();

    // Add our repository type.

    services.AddSingleton<ITodoRepository, TodoRepository>();

    // Inject an implementation of ISwaggerProvider with defaulted settings applied.

    services.AddSwaggerGen();

    // Add the detail information for the API.

    services.ConfigureSwaggerGen(options =>

    {

        options.SingleApiVersion(new Info

        {

            Version = "v1",

            Title = "ToDo API",

            Description = "A simple example ASP.NET Core Web API",

            TermsOfService = "None",

            Contact = new Contact { Name = "Shayne Boyer", Email = "", Url = "http://twitter.com/spboyer"},

            License = new License { Name = "Use under LICX", Url = "http://url.com" }

        });

        //Determine base path for the application.

        var basePath = PlatformServices.Default.Application.ApplicationBasePath;

        //Set the comments path for the swagger json and ui.

        var xmlPath = Path.Combine(basePath, "TodoApi.xml");

        options.IncludeXmlComments(xmlPath);

    });

}

// This method gets called by the runtime. Use this method to configure the HTTP request pipeline.

public void Configure(IApplicationBuilder app, IHostingEnvironment env, ILoggerFactory loggerFactory)

{

    app.UseStaticFiles();

    app.UseMvcWithDefaultRoute();

    // Enable middleware to serve generated Swagger as a JSON endpoint.

    app.UseSwagger();

    // Enable middleware to serve swagger-ui assets (HTML, JS, CSS etc.)

    app.UseSwaggerUi();

}
In the code above, ApplicationBasePath gets the base path of the app, which is needed to set the full path to the XML comments. TodoApi.xml only works for this example, the name of the generated XML comments file is based on the name of your application.
Adding the triple slash comments to the method enhances the Swagger UI by adding the description to the header of the section.
/// <summary>

/// Deletes a specific TodoItem.

/// </summary>

/// <param name="id"></param>

[HttpDelete("{id}")]

public void Delete(string id)

{

    TodoItems.Remove(id);

}
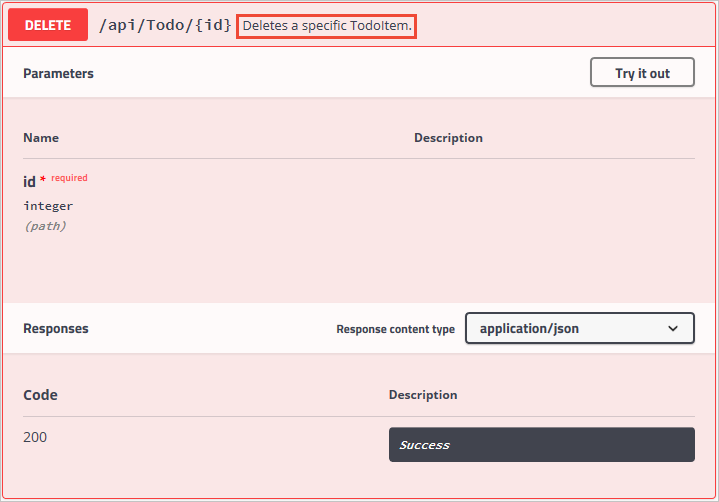
Note that the UI is driven by the generated JSON file, and these comments are also in that file as well.
"delete": {

  "tags": [

    "Todo"

  ],

  "summary": "Deletes a specific TodoItem",

  "operationId": "ApiTodoByIdDelete",

  "consumes": [],

  "produces": [],

  "parameters": [

    {

      "name": "id",

      "in": "path",

      "description": "",

      "required": true,

      "type": "string"

    }

  ],

  "responses": {

    "204": {

      "description": "No Content"

    }

  },

  "deprecated": false

}
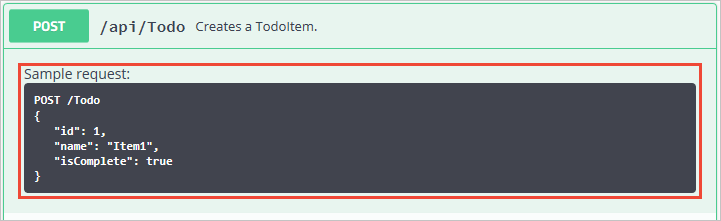
Here is a more robust example, adding <remarks /> where the content can be just text or adding the JSON or XML object for further documentation of the method.
/// <summary>
/// Creates a TodoItem.
/// </summary>
/// <remarks>
/// Note that the key is a GUID and not an integer.
///
/// POST /Todo
/// {
/// "key": "0e7ad584-7788-4ab1-95a6-ca0a5b444cbb",
/// "name": "Item1",
/// "isComplete": true
/// }
///
/// </remarks>
/// <param name="item"></param>
/// <returns>New Created Todo Item</returns>
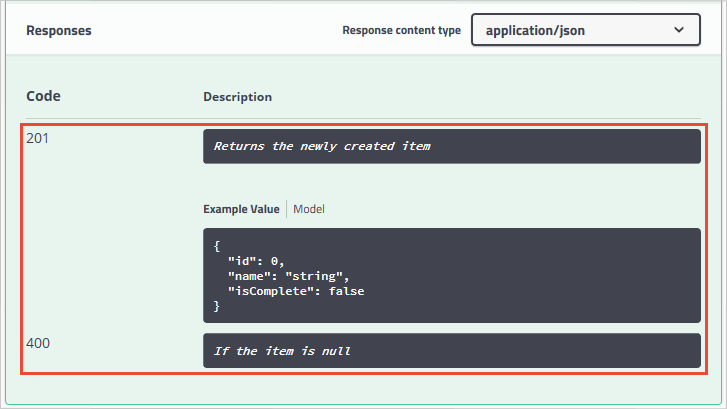
/// <response code="201">Returns the newly created item</response>
/// <response code="400">If the item is null</response>
[HttpPost]
[ProducesResponseType(typeof(TodoItem), 201)]
[ProducesResponseType(typeof(TodoItem), 400)]
public IActionResult Create([FromBody, Required] TodoItem item)
{
if (item == null)
{
return BadRequest();
}
TodoItems.Add(item);
return CreatedAtRoute("GetTodo", new { id = item.Key }, item);
}
Notice the enhancement of the UI with these additional comments.
DataAnnotations
You can decorate the API controller with System.ComponentModel.DataAnnotations to help drive the Swagger UI components.
Adding the [Required] annotation to the Name property of the TodoItem class will change the ModelSchema information in the UI. [Produces("application/json")], RegularExpression validators and more will further detail the information delivered in the generated page. The more metadata that is in the code produces a more desciptive UI or API help page.
using System;

using System.ComponentModel;

using System.ComponentModel.DataAnnotations;

namespace TodoApi.Models

{

    public class TodoItem

    {

        public string Key { get; set; }

        [Required]

        public string Name { get; set; }

        [DefaultValue(false)]

        public bool IsComplete { get; set; }

    }

}
Describing Response Types
Consuming developers are probably most concerned with what is returned; specifically response types, error codes (if not standard). These are handled in the XML comments and DataAnnotations.
Take the Create() method for example, currently it returns only "201 Created" response by default. That is of course if the item is in fact created, or a "204 No Content" if no data is passed in the POST Body. However, there is no documentation to know that or any other response. That can be fixed by adding the following piece of code.
/// <summary>

/// Creates a TodoItem.

/// </summary>

/// <remarks>

/// Note that the key is a GUID and not an integer.

///

///     POST /Todo

///     {

///        "key": "0e7ad584-7788-4ab1-95a6-ca0a5b444cbb",

///        "name": "Item1",

///        "isComplete": true

///     }

///

/// </remarks>

/// <param name="item"></param>

/// <returns>New Created Todo Item</returns>

/// <response code="201">Returns the newly created item</response>

/// <response code="400">If the item is null</response>

[HttpPost]

[ProducesResponseType(typeof(TodoItem), 201)]

[ProducesResponseType(typeof(TodoItem), 400)]

public IActionResult Create([FromBody, Required] TodoItem item)

{

    if (item == null)

    {

        return BadRequest();

    }

    TodoItems.Add(item);

    return CreatedAtRoute("GetTodo", new { id = item.Key }, item);

}
Customizing the UI
The stock UI is very functional as well as presentable, however when building documentation pages for your API you want it to represent your brand or look and feel.
Accomplishing that task with the Swashbuckle components is simple but requires adding the resources to serve static files that would not normally be included in a Web API project and then building the folder structure to host those files.
Add the "Microsoft.AspNetCore.StaticFiles": "1.0.0-*" NuGet package to the project.
Enable static files middleware.
// This method gets called by the runtime. Use this method to configure the HTTP request pipeline.

   public void Configure(IApplicationBuilder app, IHostingEnvironment env, ILoggerFactory loggerFactory)

   {

       // Enable static files middleware.

       app.UseStaticFiles();

       app.UseMvcWithDefaultRoute();

       // Enable middleware to serve generated Swagger as a JSON endpoint

       app.UseSwagger();

       // Enable middleware to serve swagger-ui assets (HTML, JS, CSS etc.)

       app.UseSwaggerUi();

   }
Acquire the core index.html file used for the Swagger UI page from the Github repository <https://github.com/domaindrivendev/Ahoy/tree/master/test/WebSites/CustomizedUi/wwwroot/swagger/ui>_ and put that in the wwwroot/swagger/ui folder and also create a new custom.css file in the same folder.

Reference custom.css in the index.html file.
<link href='custom.css' media='screen' rel='stylesheet' type='text/css' />
The following CSS provides a simple sample of a custom header title to the page.
custom.css file
.swagger-section #header

{

    border-bottom: 1px solid #000000;

    font-style: normal;

    font-weight: 400;

    font-family: "Segoe UI Light","Segoe WP Light","Segoe UI","Segoe WP",Tahoma,Arial,sans-serif;

    background-color: black;

}

.swagger-section #header h1

{

    text-align: center;

    font-size: 20px;

    color: white;

}
index.html body
<body class="swagger-section">
<div id="header">
<h1>ToDo API Documentation</h1>
</div>
<div id="message-bar" class="swagger-ui-wrap" data-sw-translate> </div>
<div id="swagger-ui-container" class="swagger-ui-wrap"></div>
</body>
There is much more you can do with the page, see the full capabilities for the UI resources at the Swagger UI Github repository.
ASP.NET Web API Help Pages using Swagger的更多相关文章
- 使用ASP.NET Web API Help Pages 创建在线接口文档
操作步骤 1.新建Web API项目 2.在项目Areas文件夹下找到以下文件,取消注释图中代码. 3.右键解决方案,属性,如图设置. 4.运行程序,点击右上角API 接口列表: 详情-无参数: 详情 ...
- web API help pages with Swagger / OpenAPI
https://docs.microsoft.com/en-us/aspnet/core/tutorials/web-api-help-pages-using-swagger?view=aspnetc ...
- ASP.NET Core 中文文档 第二章 指南 (09) 使用 Swagger 生成 ASP.NET Web API 在线帮助测试文档
原文:ASP.NET Web API Help Pages using Swagger 作者:Shayne Boyer 翻译:谢炀(kiler) 翻译:许登洋(Seay) 对于开发人员来说,构建一个消 ...
- Swagger 生成 ASP.NET Web API
使用 Swagger 生成 ASP.NET Web API 在线帮助测试文档 原文:ASP.NET Web API Help Pages using Swagger作者:Shayne Boyer翻译: ...
- Asp.Net Web Api中使用Swagger
关于swagger 设计是API开发的基础.Swagger使API设计变得轻而易举,为开发人员.架构师和产品所有者提供了易于使用的工具. 官方网址:https://swagger.io/solutio ...
- [水煮 ASP.NET Web API2 方法论](1-1)在MVC 应用程序中添加 ASP.NET Web API
问题 怎么样将 Asp.Net Web Api 加入到现有的 Asp.Net MVC 项目中 解决方案 在 Visual Studio 2012 中就已经把 Asp.Net Web Api 自动地整合 ...
- Creating Help Pages for ASP.NET Web API -摘自网络
When you create a web API, it is often useful to create a help page, so that other developers will k ...
- ASP.NET Web API 文件產生器 - 使用 Swagger
转帖:http://kevintsengtw.blogspot.hk/2015/12/aspnet-web-api-swagger.html Swagger 是一套 API 互動文件產生器,使用 HT ...
- ASP.NET Web API 中使用 swagger 来管理 API 文档
本文以 ASP.NET Web API 为后台框架,利用 EF6 连接 postgreSQL 数据库,使用 swagger 来生成 REST APIs文档.文章分二个部分,第一部分主要讲如何用 EF6 ...
随机推荐
- 在Eclipse上使用Maven
Maven安装 去官网下载Maven,如下链接: http://maven.apache.org/download.cgi# 选择下载Binary zip archive 解压到本地,安装Maven前 ...
- EasyUi 改变 selelct 的 下拉内容 div 的高度
直接上 效果图: 修改之后的 滚动条高度: 代码: 源代码下载
- Go语言异步服务器框架原理和实现
Go语言类库中,有两个官方的服务器框架,一个HTTP,一个是RPC.使用这个两个框架,已经能解决大部分的问题,但是,也有一些需求,这些框架是不够的,这篇文章,我们先分析一下HTTP 和 RPC服务器的 ...
- FP并行算法的几个相关方向
1 集群系统中的 FP-tree 并行算法(many for one一个任务 还是 云计算one for many多个任务?) 计算机集群系统利用网络把一组具有高性能的工作站或者 PC 机按一定的结构 ...
- 基于RMI服务传输大文件的完整解决方案
基于RMI服务传输大文件,分为上传和下载两种操作,需要注意的技术点主要有三方面,第一,RMI服务中传输的数据必须是可序列化的.第二,在传输大文件的过程中应该有进度提醒机制,对于大文件传输来说,这点很重 ...
- Makefile目标,伪目标,头文件自动依赖
目标 即我们最终要生成的文件,make默认生成第一个目标,注意 makefile中tab和空格不是一回事,规则使用tab缩进,编辑器不要设置诸如"将tab替换为空格之类的选项",目 ...
- SpringMvc-Httl-shiro的整合
来到新的公司一个月,以前实习公司的用的是srping+hibernate+struts2,而在这里不在用的这些了,而是用的springMVC和jdbc模板来操作数据了,所以又用了一段时间去慢慢融入这个 ...
- 使用jlink直接烧norflash或者nandflash不借助uboot的猜想
由于喜欢折腾,我是在linux下使用jlink的,既然JLinkExe可以进行内存读写操作,loadbin等操作,并且通过指定命令文件支持批量指令输入,那么首先jlink是可以直接访问内部存储器的,包 ...
- JavaWeb学习----Cookie实现记住密码的功能
[声明] 欢迎转载,但请保留文章原始出处→_→ 生命壹号:http://www.cnblogs.com/smyhvae/ 文章来源:http://www.cnblogs.com/smyhvae/p/4 ...
- c++形参改变实参(对指针的理解
这几天搞逻辑比较晕,居然把指针的概念都混淆了. eg:int *p;//当然不对指针初始化在有些编译器是通不过编译的,比如VS(尤其是选中了SDL) 指针p是一个对象,定义开始没有分配了内存空间,只是 ...