
Python学习第二十八课——Django(urls)
Django框架中的urls配置:
首先通过pycharm创建一个Django项目:
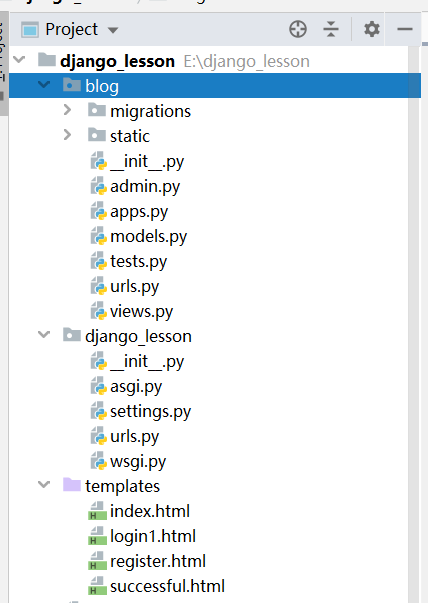
例如要写blog的功能:则在digango_lesson中的urls代码如下:
"""django_lesson URL Configuration

The `urlpatterns` list routes URLs to views. For more information please see:

    https://docs.djangoproject.com/en/3.0/topics/http/urls/

Examples:

Function views

    1. Add an import:  from my_app import views

    2. Add a URL to urlpatterns:  path('', views.home, name='home')

Class-based views

    1. Add an import:  from other_app.views import Home

    2. Add a URL to urlpatterns:  path('', Home.as_view(), name='home')

Including another URLconf

    1. Import the include() function: from django.urls import include, path

    2. Add a URL to urlpatterns:  path('blog/', include('blog.urls'))

"""

from django.conf.urls import url

from django.contrib import admin

from django.urls import path, include

from blog import views

urlpatterns = [

    path('admin/', admin.site.urls),

    path('show_time/', views.show_time),

    path('blog/', include('blog.urls')), # 将urls 进行分发  发到blog文件夹下的urls

]
blog项目功能的urls 全部写在 blog文件夹下的urls,如下:
"""django_lesson URL Configuration

The `urlpatterns` list routes URLs to views. For more information please see:

    https://docs.djangoproject.com/en/3.0/topics/http/urls/

Examples:

Function views

    1. Add an import:  from my_app import views

    2. Add a URL to urlpatterns:  path('', views.home, name='home')

Class-based views

    1. Add an import:  from other_app.views import Home

    2. Add a URL to urlpatterns:  path('', Home.as_view(), name='home')

Including another URLconf

    1. Import the include() function: from django.urls import include, path

    2. Add a URL to urlpatterns:  path('blog/', include('blog.urls'))

"""

from django.conf.urls import url

from django.contrib import admin

from django.urls import path, include

from blog import views

urlpatterns = [

    url(r'article/(\d{4})$/(\d{2})', views.article_year),

    url(r'article/(?P<year>\d{4})$/(?P<mouth>\d{2})', views.article_year_mouth), # 这种写法参数必须起尖括号里面的名字

    url(r'article/(?P<year>\d{4})/(?P<mouth>\d{2})/(?P<day>\d{2})', views.article_year_mouth_day), # 这种写法参数必须起尖括号里面的名字

    url(r'register', views.register,name="reg"),

    # url(r'login', views.login,name="log"),

]
写完url后 要在views中完成功能代码:
from django.shortcuts import render, HttpResponse

import time

# Create your views here.

def show_time(request):

    t = time.ctime()

    # return HttpResponse("Hellow")

    return render(request, "index.html", {"time": t})

def article_year(request, y, m):

    return HttpResponse("日期:%s年 %s月" % (y, m))

def article_year_mouth(request, year, mouth):

    return HttpResponse("这个日期日期:%s年 %s月" % (year, mouth))

def article_year_mouth_day(request, year, mouth, day):

    return HttpResponse("现在的日期:%s年 %s月 %s日" % (year, mouth, day))

def register(request):

    if request.method == "POST":

        print(request.POST.get("user"))  # user

        print(request.POST.get("pwd"))  #

        return HttpResponse("success!")

    return render(request, "register.html")

# def login(request):

#     username = request.GET.get("user")

#     password = request.GET.get("pwd")

#     if username == "hanhan" and password == "123":

#         return render(request, "successful.html")

#     else:

#         return render(request, "register.html")
用到html应该全部放在templates文件夹中:
<!DOCTYPE html>

<html lang="en">

<head>

    <meta charset="UTF-8">

    <title>Title</title>

</head>

<body>

<h1>学生注册</h1>

<form action="{% url 'reg'  %}" method="post">

    <!--{% url 'reg'  %} 对应的是blog下面的urls url(r'register', views.register,name="reg"),-->

    <p>用户名<input type="text" name="user"></p>

    <p>密码  <input type="text" name="pwd"></p>

    <p>爱好  <input type="checkbox" name="hobby">篮球

             <input type="checkbox" name="hobby">足球

            <input type="checkbox" name="hobby">乒乓球

    </p>

    <p><input type="submit"></p>

</form>

</body>

</html>
如果要加入JS,等文件则需要在settings中配置:
# 加在末尾即可

STATICFILES_DIRS = (

    os.path.join(BASE_DIR, "blog/static"),

)  # 逗号很重要  static相当于包的名字  固定这样写 才可以找到
HTML中用JS代码如下:
index.html:
<!DOCTYPE html>

<html lang="en">

<head>

    <meta charset="UTF-8">

{#    {% load staticfiles %}#}

    <title>Title</title>

</head>

<body>

<h1>Django,你好,现在时间为:{{time}}</h1>

{#第一种 执行Script 文件 #}

<script src="/static/jquery-3.1.1.js"></script>  <!--要放到处理代码后面  -->

{#第二种#}

{#<script src="{% static 'jquery-3.1.1.js' %}"></script>#}

<script>

    $("h1").css("color","red")

</script>

</body>

</html>
Python学习第二十八课——Django(urls)的更多相关文章
- Python学习第二十八课——Django(templates)
templates 讲后台得到的数据渲染到页面上:话不多说,先看具体代码. urls: from django.conf.urls import url from django.contrib imp ...
- Python学习第二十六课——PyMySql(python 链接数据库)
Python 链接数据库: 需要先安装pymysql 包 可以设置中安装,也可以pip install pymysql 安装 加载驱动: import pymysql # 需要先安装pymysql 包 ...
- Python学习第二十五课——Mysql (多表查询)
多表查询: 内连接查询: 首先:创建两个表一个为tableA,一个为tableB,并且插入数据(代码省略) 同时查询两个表的记录: select * from tableA,tableB; 根据tab ...
- Python学习第二十四课——Mysql 外键约束
外键:主要是关联两个表的 举个栗子:在建表中创建外键 -- 添加外键例子 CREATE TABLE teacher( id TINYINT PRIMARY KEY auto_increment, na ...
- Python学习第二十二课——Mysql 表记录的一些基本操作 (增删改)
记录基本操作: 增:(insert into) 基本语法: insert into 表名(字段) values(对应字段的值): 例子1: insert into employee(id,name,a ...
- Python学习第十八课——继承,接口继承等
1.继承:字面意思 # 继承 : 字面意思 class father: pass class grandfather: pass class children(father): # 单继承 pass ...
- NeHe OpenGL教程 第二十八课:贝塞尔曲面
转自[翻译]NeHe OpenGL 教程 前言 声明,此 NeHe OpenGL教程系列文章由51博客yarin翻译(2010-08-19),本博客为转载并稍加整理与修改.对NeHe的OpenGL管线 ...
- 风炫安全web安全学习第二十八节课 CSRF攻击原理
风炫安全web安全学习第二十八节课 CSRF攻击原理 CSRF 简介 跨站请求伪造 (Cross-Site Request Forgery, CSRF),也被称为 One Click Attack 或 ...
- 风炫安全WEB安全学习第二十三节课 利用XSS获取COOKIE
风炫安全WEB安全学习第二十三节课 利用XSS获取COOKIE XSS如何利用 获取COOKIE 我们使用pikachu写的pkxss后台 使用方法: <img src="http:/ ...
随机推荐
- (c#)奇数值单元格的数量
题目 解
- Bugku-CTF之多次
Day33 多次 http://123.206.87.240:9004 本题有2个flag flag均为小写 flag格式 flag{}
- Django框架-模型层
Django框架-模型层 一.单表查询之必知必会13条 1.时间字段中的两个关键性参数 create_time = models.DateField() # 年月日 create_time = mod ...
- 最小树形图模板 UVA11183
题意:给定n个节点m条边的有向带权图,求以0为根节点的最小树形图权值大小 用这个代码的时候要注意,这里的数据是从0开始的,边也是从0开始算, 所以在打主代码的时候,如果是从1开始,那么算法里面的从0开 ...
- 前端——语言——Core JS——《The good part》读书笔记——第一章节(Good Parts)
本章是引言,有四个小节,具体内容如下: 第一小节 第一小节介绍作者的观点,作者编写本书的目的. 原文:I discovered that I could be a better programmer ...
- label 阻止冒泡 防止点击label 触发2次事件
// 必须要把 jnput的外面的label加上事件阻止冒泡,否则点击label的时候,会冒泡到input上 再次触发input的点击事件 $('.xt_order_cleft_modb_rl_dx' ...
- Python中,关于调用带参函数,一些需要注意的问题(监听时)
1.如果监听调用的函数不带参数(start()) Button.clicked.connect(start)) def strat(): ... 2.如果监听调用的函数带参数(start(x,y)) ...
- centOs安装出现No package git available的解决办法
来源地址 [http://chinacheng.iteye.com/blog/1825538 ] centos安装git 下载源代码安装后,git clone出现“fatal unable to fi ...
- OGG在windows环境下字符集的配置
windows环境下不配置字符集(默认使用windows自己的字符集),从linux等系统同步过来的表中如果含有中文字符列将显示为乱码,被ogg误认为虚拟列,从而导致进程abend. 设置ogg进程在 ...
- 吴裕雄--天生自然神经网络与深度学习实战Python+Keras+TensorFlow:Bellman函数、贪心算法与增强性学习网络开发实践
!pip install gym import random import numpy as np import matplotlib.pyplot as plt from keras.layers ...