
使用netbeans 搭建maven工程 整合spring springmvc框架
使用netbeans7.4
自带的tomcat7.0
所以jdk选择7.xx
然后等待生成空的工程,会缺一些文件夹,和文件,后续需要的时候补齐
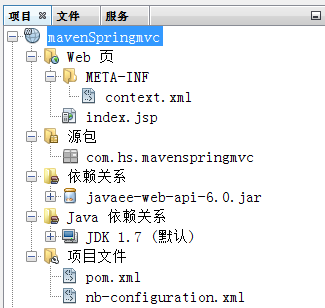
然后修改pom.xml添加引用,直接覆盖dependencies标签就可以了,这里边添加了比较完整的引用,不会出现404错误
 <!--spring相关的依赖-->

        <dependency>

            <groupId>org.springframework</groupId>

            <artifactId>spring-aop</artifactId>

            <version>4.3.9.RELEASE</version>

        </dependency>

        <dependency>

            <groupId>org.springframework</groupId>

            <artifactId>spring-aspects</artifactId>

            <version>4.3.9.RELEASE</version>

        </dependency>

        <dependency>

            <groupId>org.springframework</groupId>

            <artifactId>spring-beans</artifactId>

            <version>4.3.9.RELEASE</version>

        </dependency>

        <dependency>

            <groupId>org.springframework</groupId>

            <artifactId>spring-context</artifactId>

            <version>4.3.9.RELEASE</version>

        </dependency>

        <dependency>

            <groupId>org.springframework</groupId>

            <artifactId>spring-context-support</artifactId>

            <version>4.3.9.RELEASE</version>

        </dependency>

        <dependency>

            <groupId>org.springframework</groupId>

            <artifactId>spring-core</artifactId>

            <version>4.3.9.RELEASE</version>

        </dependency>

        <dependency>

            <groupId>org.springframework</groupId>

            <artifactId>spring-expression</artifactId>

            <version>4.3.9.RELEASE</version>

        </dependency>

        <dependency>

            <groupId>org.springframework</groupId>

            <artifactId>spring-instrument</artifactId>

            <version>4.3.9.RELEASE</version>

        </dependency>

        <dependency>

            <groupId>org.springframework</groupId>

            <artifactId>spring-instrument-tomcat</artifactId>

            <version>4.3.9.RELEASE</version>

        </dependency>

        <dependency>

            <groupId>org.springframework</groupId>

            <artifactId>spring-jdbc</artifactId>

            <version>4.3.9.RELEASE</version>

        </dependency>

        <dependency>

            <groupId>org.springframework</groupId>

            <artifactId>spring-jms</artifactId>

            <version>4.3.9.RELEASE</version>

        </dependency>

        <dependency>

            <groupId>org.springframework</groupId>

            <artifactId>spring-orm</artifactId>

            <version>4.3.9.RELEASE</version>

        </dependency>

        <dependency>

            <groupId>org.springframework</groupId>

            <artifactId>spring-oxm</artifactId>

            <version>4.3.9.RELEASE</version>

        </dependency>

        <dependency>

            <groupId>org.springframework</groupId>

            <artifactId>spring-test</artifactId>

            <version>4.3.9.RELEASE</version>

        </dependency>

        <dependency>

            <groupId>org.springframework</groupId>

            <artifactId>spring-tx</artifactId>

            <version>4.3.9.RELEASE</version>

        </dependency>

        <dependency>

            <groupId>org.springframework</groupId>

            <artifactId>spring-web</artifactId>

            <version>4.3.9.RELEASE</version>

        </dependency>

        <dependency>

            <groupId>org.springframework</groupId>

            <artifactId>spring-webmvc</artifactId>

            <version>4.3.9.RELEASE</version>

        </dependency>

        <dependency>

            <groupId>org.springframework</groupId>

            <artifactId>spring-webmvc-portlet</artifactId>

            <version>4.3.9.RELEASE</version>

        </dependency>
netbeans生成的maven工程没有web.xml文件 如何新建https://www.cnblogs.com/jnhs/p/9945362.html
然后新建srping的配置文件applicationContext.xml
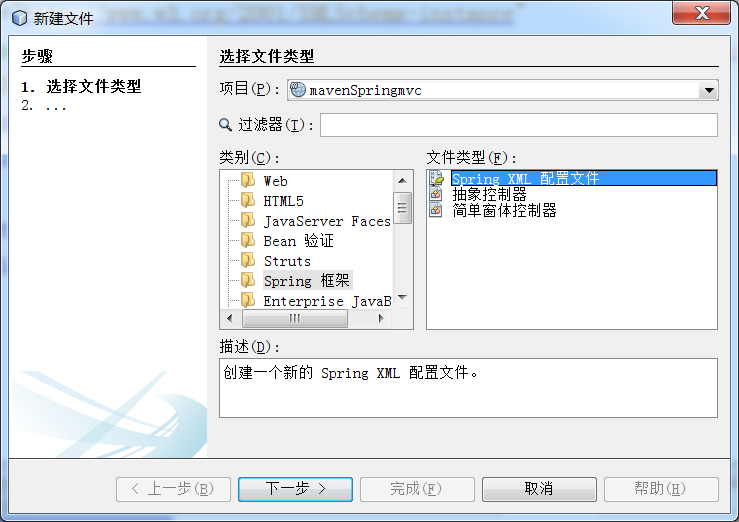
下一步提示,选择要使用的项
什么也不选,直接把以下内容贴进去
<?xml version="1.0" encoding="UTF-8"?>

<beans xmlns="http://www.springframework.org/schema/beans"

       xmlns:xsi="http://www.w3.org/2001/XMLSchema-instance"

       xmlns:aop="http://www.springframework.org/schema/aop"

       xmlns:c="http://www.springframework.org/schema/c"

       xmlns:context="http://www.springframework.org/schema/context"

       xmlns:flow="http://www.springframework.org/schema/webflow-config"

       xmlns:jee="http://www.springframework.org/schema/jee"

       xmlns:jms="http://www.springframework.org/schema/jms"

       xmlns:lang="http://www.springframework.org/schema/lang"

       xmlns:osgi="http://www.springframework.org/schema/osgi"

       xmlns:p="http://www.springframework.org/schema/p"

       xmlns:tx="http://www.springframework.org/schema/tx"

       xmlns:util="http://www.springframework.org/schema/util"

       xsi:schemaLocation="http://www.springframework.org/schema/beans http://www.springframework.org/schema/beans/spring-beans-2.5.xsd

          http://www.springframework.org/schema/aop http://www.springframework.org/schema/aop/spring-aop-4.3.xsd

          http://www.springframework.org/schema/context http://www.springframework.org/schema/context/spring-context-4.3.xsd

          http://www.springframework.org/schema/webflow-config http://www.springframework.org/schema/webflow-config/spring-webflow-config-2.0.xsd

          http://www.springframework.org/schema/jee http://www.springframework.org/schema/jee/spring-jee-4.3.xsd

          http://www.springframework.org/schema/jms http://www.springframework.org/schema/jms/spring-jms-4.3.xsd

          http://www.springframework.org/schema/lang http://www.springframework.org/schema/lang/spring-lang-4.3.xsd

          http://www.springframework.org/schema/osgi http://www.springframework.org/schema/osgi/spring-osgi-1.2.xsd

          http://www.springframework.org/schema/tx http://www.springframework.org/schema/tx/spring-tx-4.3.xsd

          http://www.springframework.org/schema/util http://www.springframework.org/schema/util/spring-util-4.3.xsd

">

</beans>
然后同样步骤,新建spring的配置文件spring-servlet.xml
<?xml version="1.0" encoding="UTF-8"?>

<beans xmlns="http://www.springframework.org/schema/beans"

       xmlns:xsi="http://www.w3.org/2001/XMLSchema-instance"

       xmlns:aop="http://www.springframework.org/schema/aop"

       xmlns:c="http://www.springframework.org/schema/c"

       xmlns:context="http://www.springframework.org/schema/context"

       xmlns:flow="http://www.springframework.org/schema/webflow-config"

       xmlns:jee="http://www.springframework.org/schema/jee"

       xmlns:jms="http://www.springframework.org/schema/jms"

       xmlns:lang="http://www.springframework.org/schema/lang"

       xmlns:osgi="http://www.springframework.org/schema/osgi"

       xmlns:p="http://www.springframework.org/schema/p"

       xmlns:tx="http://www.springframework.org/schema/tx"

       xmlns:util="http://www.springframework.org/schema/util"

       xmlns:mvc="http://www.springframework.org/schema/mvc"

       xsi:schemaLocation="http://www.springframework.org/schema/beans http://www.springframework.org/schema/beans/spring-beans-2.5.xsd

          http://www.springframework.org/schema/aop http://www.springframework.org/schema/aop/spring-aop-4.3.xsd

          http://www.springframework.org/schema/context http://www.springframework.org/schema/context/spring-context-4.3.xsd

          http://www.springframework.org/schema/webflow-config http://www.springframework.org/schema/webflow-config/spring-webflow-config-2.0.xsd

          http://www.springframework.org/schema/jee http://www.springframework.org/schema/jee/spring-jee-4.3.xsd

          http://www.springframework.org/schema/jms http://www.springframework.org/schema/jms/spring-jms-4.3.xsd

          http://www.springframework.org/schema/lang http://www.springframework.org/schema/lang/spring-lang-4.3.xsd

          http://www.springframework.org/schema/osgi http://www.springframework.org/schema/osgi/spring-osgi-1.2.xsd

          http://www.springframework.org/schema/tx http://www.springframework.org/schema/tx/spring-tx-4.3.xsd

          http://www.springframework.org/schema/util http://www.springframework.org/schema/util/spring-util-4.3.xsd

          http://www.springframework.org/schema/mvc http://www.springframework.org/schema/mvc/spring-mvc.xsd

">

    <!--关于扫描包的问题https://blog.csdn.net/lhpnba/article/details/77988616-->

    <context:component-scan

        base-package="com.hs" >

        <!--只扫描控制器。 -->

        <context:include-filter type="annotation"

                                expression="org.springframework.stereotype.Controller" />

    </context:component-scan>

    <mvc:annotation-driven />

    <!--对静态资源的处理-->

    <mvc:resources mapping="/static/**" location="/static/" />

    <!-- 视图解析器 -->

    <!-- <bean class="org.springframework.web.servlet.HandlerInterceptor"></bean> -->

    <bean id="viewResolver" class="org.springframework.web.servlet.view.InternalResourceViewResolver">

        <property name="prefix" value="/WEB-INF/"/>

        <property name="suffix" value=".jsp"/>

        <property name="viewClass" value="org.springframework.web.servlet.view.JstlView"/>

    </bean>

</beans>
存放于

继续新建controller包和controller类

根据一般习惯,把jsp放在WEB-INF/jsp文件夹中,我们新建一个结果页面,让controller跳转到这里
然后在web.xml添加spring的配置文件
 <listener>

        <listener-class>

            org.springframework.web.context.ContextLoaderListener

        </listener-class>

    </listener>

    <!-- 指定Spring Bean的配置文件所在目录。默认配置在WEB-INF目录下 -->

    <context-param>

        <param-name>contextConfigLocation</param-name>

        <param-value>WEB-INF/config/applicationContext.xml</param-value>

    </context-param>

    <!--SPRING MVC 配置-->

    <servlet>

        <servlet-name>spring</servlet-name>

        <servlet-class>org.springframework.web.servlet.DispatcherServlet</servlet-class>

        <init-param>

            <param-name>contextConfigLocation</param-name>

            <param-value>WEB-INF/config/spring-servlet.xml</param-value>

        </init-param>

        <load-on-startup>1</load-on-startup>

    </servlet>

    <servlet-mapping>

        <servlet-name>spring</servlet-name>

        <url-pattern>/</url-pattern>

        <!--注意/和/*的区别-->

    </servlet-mapping>
以上基本就完成所有配置了
现在我们在controller中接收一下请求,并返回界面
然后运行,请求一下配置的url就可以看到跳转到新的页面
如果提示
HTTP Status 404 -
后边没了,这种情况是没有进入controller
这个情况可以使用调试模式,打一个类断点,你会发现,请求之后直接跳到404,没有进类断点,原因比较复杂:

根据错误信息来除错

有的是注解重名
有的是其他错误,比如缺少依赖
另一种是
HTTP Status 404 -你的路径
这种情况是跳转的页面不存在,没找到,一般就是路径写错了,这种情况就检查你的路径就可以了
使用netbeans 搭建maven工程 整合spring springmvc框架的更多相关文章
- 使用maven整合spring+springmvc+mybatis
使用maven整合spring+springmvc+mybatis 开发环境: 1. jdk1.8 2. eclipse4.7.0 (Oxygen) 3. mysql 5.7 在pom.xml文件中, ...
- 搭建Maven工程的时候,做单元测试,报ClassNotFoundException
搭建Maven工程的时候报错 问题原因是在spring.xml中配置的 classpath:config.properties 没有在工程中创建.
- Maven 工程下 Spring MVC 站点配置 (三) C3P0连接池与@Autowired的应用
Maven 工程下 Spring MVC 站点配置 (一) Maven 工程下 Spring MVC 站点配置 (二) Mybatis数据操作 前两篇文章主要是对站点和数据库操作配置进行了演示,如果单 ...
- Maven 工程下 Spring MVC 站点配置 (一)
最近,查找一些具体资料时,虽然会有很多,但是系统的却很少,尤其是对maven 下 spring mvc 站点搭建的配置,总是说的很多但让新手一目了然的步骤却少之又少. 对此闲暇时整理了一下,做了一套较 ...
- Maven 工程下 Spring MVC 站点配置 (二) Mybatis数据操作
详细的Spring MVC框架搭配在这个连接中: Maven 工程下 Spring MVC 站点配置 (一) Maven 工程下 Spring MVC 站点配置 (二) Mybatis数据操作 这篇主 ...
- spring 学习(一):使用 intellijIDEA 创建 maven 工程进行 Spring ioc 测试
spring学习(一):使用 intellijIDEA 创建 maven 工程进行 Spring ioc 测试 ioc 概念 控制反转(Inversion of Control,缩写为IOC),是面向 ...
- myBatis+Spring+SpringMVC框架面试题整理
myBatis+Spring+SpringMVC框架面试题整理(一) 2018年09月06日 13:36:01 新新许愿树 阅读数 14034更多 分类专栏: SSM 版权声明:本文为博主原创文章 ...
- maven项目快速搭建SSM框架(一)创建maven项目,SSM框架整合,Spring+Springmvc+Mybatis
首先了解服务器开发的三层架构,分配相应的任务,这样就能明确目标,根据相应的需求去编写相应的操作. 服务器开发,大致分为三层,分别是: 表现层 业务层 持久层 我们用到的框架分别是Spring+Spri ...
- 基于Maven的ssm(spring+springMvc+Mybatis)框架搭建
前言 本demo是在idea下搭建的maven项目,数据库使用Mysql,jdk版本是1.8.0_171,ideal:2017.3.5 一.新建项目 1.file->new->porjec ...
随机推荐
- 四. (TDZ)展示性死区
在ES6中怎么使用 var Let const ? 1.var 声明之前 2. let 声明之前 3. const声明之前
- Excel skill: 如何替换换行符,以及如何把一格转换成多行/多列
http://blog.sciencenet.cn/blog-508298-695290.html 增加一辅助列,用替换函数替换掉软回车.比如A列是数据,从A1开始,则插入B列,B1输入公式=REPL ...
- 网络编程(client发信息给server)
client发信息给server
- Python-线程(1)
目录 什么是线程 进程与线程的区别 开启线程 为什么要使用线程 线程之间数据是共享的 什么是线程 线程与进程都是虚拟单位,目的是为了更好的描述某种事物 进程与线程的区别 进程:资源单位 线程:执行单位 ...
- iOS开发NSFetchedResultsController的使用CoreData和TableView数据同步更新
1.效果 2.代码 #import "ViewController.h" #import "Student+CoreDataProperties.h" #def ...
- Xcode导航栏功能简介
1.Xcode 1.1.AboutXcode 1.2.Preferences General Accounts Behaviors1 Behavior2 Navigation Fonts& ...
- 深入理解JVM(一)类加载器部分、类变量、常量、jvm参数
类加载概述 在java代码中,类型的加载.连接与初始化过程都是在程序运行期间完成的 类型:class.interface(object本身).类型可在运行期间生成,如动态代理.一种runting概念 ...
- Maven入门指南
Maven入门指南 本指南旨在第一次为使用Maven的人员提供参考,但也打算作为一本包含公共用例的独立参考和解决方案的工具书.对于新用户,建议您按顺序浏览该材料.对于更熟悉Maven的用户,本指南致力 ...
- [自学]数据库ER图基础概念整理(转)
ER图分为实体.属性.关系三个核心部分.实体是长方形体现,而属性则是椭圆形,关系为菱形. ER图的实体(entity)即数据模型中的数据对象,例如人.学生.音乐都可以作为一个数据对象,用长方体来表示, ...
- create-react-app 创建项目失败
创建失败后查阅相关资料,亲测删除 C:\Users\Administrator\AppData\Roaming\npm-cache\ 该文件夹下所有内容后成功.