centos6.5虚拟机快照技术
一、查看现有磁盘镜像格式与转换
查看磁盘格式
[root@localhost ~]# qemu-img info /var/lib/libvirt/images/centos7.img

image: /var/lib/libvirt/images/centos7.img

file format: raw

virtual size: .0G ( bytes)

disk size: .0G
安装电源服务
# yum install acpid -y
关闭虚拟机
#virsh shutdown centos7
转换磁盘格式
# qemu-img convert -f raw -O qcow2 /var/lib/libvirt/images/centos7.img /var/lib/libvirt/images/centos7.qcow2
-f-------源镜像的格式
-O-----目标镜像的格式
查看转换后的磁盘大小
[root@localhost ~]# du -sh /var/lib/libvirt/images/centos7.qcow2

.4G    /var/lib/libvirt/images/centos7.qcow2
查看转换后的磁盘格式
[root@localhost ~]# qemu-img info /var/lib/libvirt/images/centos7.qcow2

image: /var/lib/libvirt/images/centos7.qcow2

file format: qcow2

virtual size: .0G ( bytes)

disk size: .4G

cluster_size:
二、修改虚拟机配置文件
修改磁盘格式
# virsh edit centos7
 <disk type='file' device='disk'>

      <driver name='qemu' type='qcow2' cache='none'/>

      <source file='/var/lib/libvirt/images/centos7.qcow2'/>

      <target dev='hda' bus='ide'/>

      <address type='pci' domain='0x0000' bus='0x00' slot='0x05' function='0x0'/>

    </disk>

    <disk type='block' device='cdrom'>

      <driver name='qemu' type='raw'/>

      <target dev='hdc' bus='ide'/>

      <readonly/>

      <address type='drive' controller='' bus='' target='' unit=''/>

    </disk>
三、对虚拟机进行快照管理
创建centos7虚拟机快照
注意:需要修改磁盘格式
[root@localhost ~]# virsh snapshot-create-as centos7 centos7_snaphshot

Domain snapshot centos7_snaphshot created

[root@localhost ~]#
查看虚拟机镜像快照的版本
# virsh snapshot-list centos7

查看当前虚拟机镜像快照的版本
可以看到为当前最新的快照版本
[root@localhost ~]# virsh snapshot-current centos7
<domainsnapshot>
<name>centos7_snaphshot</name>
<state>shutoff</state>
<creationTime>1547653724</creationTime>
<memory snapshot='no'/>
<disks>
<disk name='hda' snapshot='internal'/>
<disk name='hdc' snapshot='no'/>
</disks>
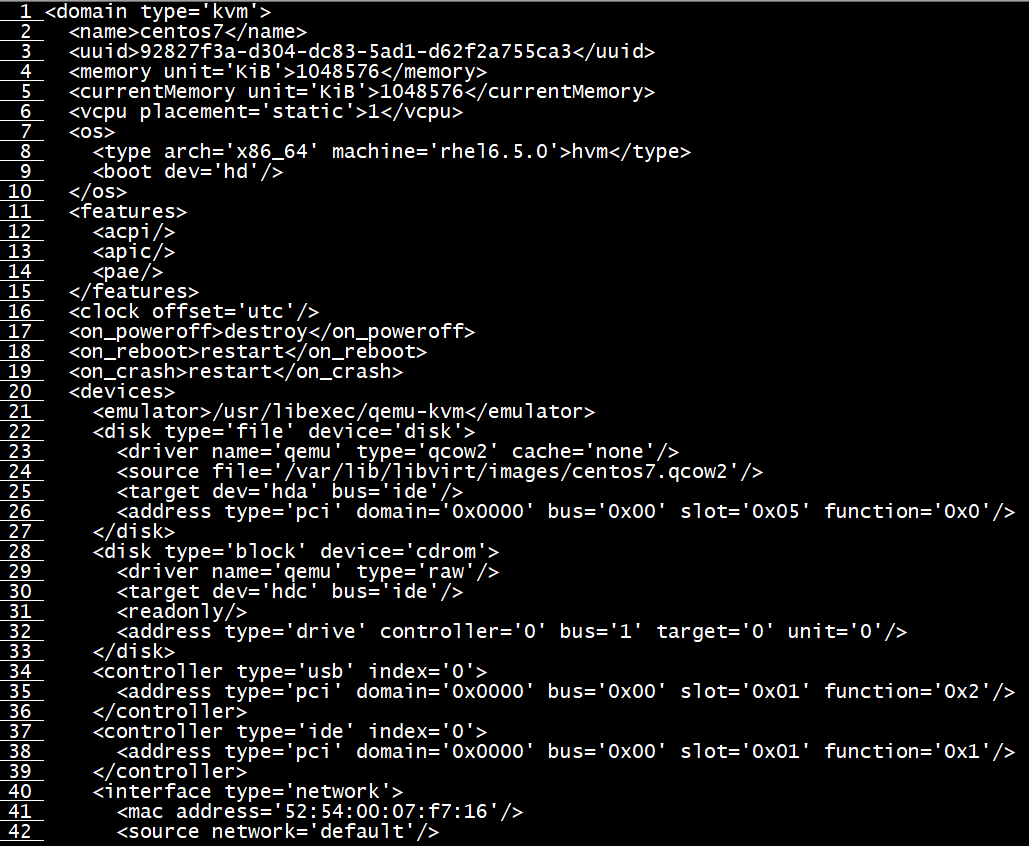
<domain type='kvm'>
<name>centos7</name>
<uuid>92827f3a-d304-dc83-5ad1-d62f2a755ca3</uuid>
<memory unit='KiB'></memory>
<currentMemory unit='KiB'></currentMemory>
<vcpu placement='static'></vcpu>
<os>
<type arch='x86_64' machine='rhel6.5.0'>hvm</type>
<boot dev='hd'/>
</os>
<features>
<acpi/>
<apic/>
<pae/>
</features>
<clock offset='utc'/>
<on_poweroff>destroy</on_poweroff>
<on_reboot>restart</on_reboot>
<on_crash>restart</on_crash>
<devices>
<emulator>/usr/libexec/qemu-kvm</emulator>
<disk type='file' device='disk'>
<driver name='qemu' type='qcow2' cache='none'/>
<source file='/var/lib/libvirt/images/centos7.qcow2'/>
<target dev='hda' bus='ide'/>
<address type='pci' domain='0x0000' bus='0x00' slot='0x05' function='0x0'/>
</disk>
<disk type='block' device='cdrom'>
<driver name='qemu' type='raw'/>
<target dev='hdc' bus='ide'/>
<readonly/>
<address type='drive' controller='' bus='' target='' unit=''/>
</disk>
<controller type='ide' index=''>
<address type='pci' domain='0x0000' bus='0x00' slot='0x01' function='0x1'/>
</controller>
<controller type='usb' index=''/>
<interface type='network'>
<mac address='52:54:00:07:f7:16'/>
<source network='default'/>
<model type='virtio'/>
<address type='pci' domain='0x0000' bus='0x00' slot='0x03' function='0x0'/>
</interface>
<serial type='pty'>
<target port=''/>
</serial>
<console type='pty'>
<target type='serial' port=''/>
</console>
<input type='mouse' bus='ps2'/>
<graphics type='vnc' port='-1' autoport='yes' keymap='en-us'/>
<sound model='ich6'>
<address type='pci' domain='0x0000' bus='0x00' slot='0x04' function='0x0'/>
</sound>
<video>
<model type='cirrus' vram='' heads=''/>
<address type='pci' domain='0x0000' bus='0x00' slot='0x02' function='0x0'/>
</video>
<memballoon model='virtio'>
<address type='pci' domain='0x0000' bus='0x00' slot='0x06' function='0x0'/>
</memballoon>
</devices>
</domain>
</domainsnapshot>
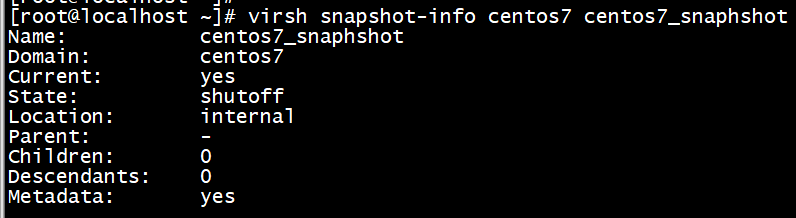
查看快照
# virsh snapshot-info centos7 centos7_snaphshot
四、恢复虚拟机快照
1、恢复虚拟机快照必须关闭虚拟机
查看虚拟机是否是关闭状态
# virsh domstate centos7

确认需要恢复的快照时间,恢复到centos7_snaphshot
# virsh snapshot-list centos7

3、执行恢复并确认恢复版本
# virsh snapshot-revert centos7 centos7_snaphshot

查看当前虚拟机镜像快照的版本
[root@localhost ~]# virsh snapshot-current centos7

<domainsnapshot>

  <name>centos7_snaphshot</name>

  <state>shutoff</state>

  <creationTime></creationTime>

  <memory snapshot='no'/>

  <disks>

    <disk name='hda' snapshot='internal'/>

    <disk name='hdc' snapshot='no'/>

  </disks>

  <domain type='kvm'>

    <name>centos7</name>

    <uuid>92827f3a-d304-dc83-5ad1-d62f2a755ca3</uuid>

    <memory unit='KiB'></memory>

    <currentMemory unit='KiB'></currentMemory>

    <vcpu placement='static'></vcpu>

    <os>

      <type arch='x86_64' machine='rhel6.5.0'>hvm</type>

      <boot dev='hd'/>

    </os>
五、 删除虚拟机快照
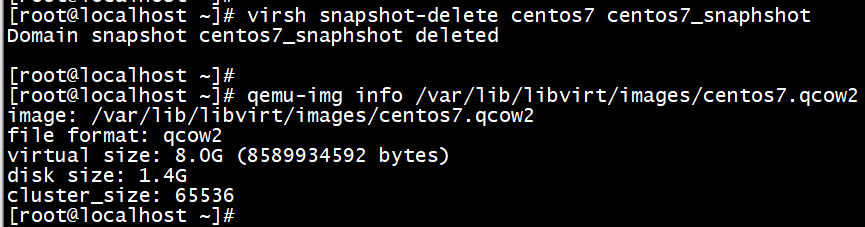
1、查看虚拟机快照
# qemu-img info /var/lib/libvirt/images/centos7.qcow2

2、删除快照
# virsh snapshot-delete centos7 centos7_snaphshot

# virsh snapshot-delete centos7 centos7_snaphshot
centos6.5虚拟机快照技术的更多相关文章
- vmware vSphere克隆与快照技术
通过Web vCenter我们可以很容易的对虚拟机进行管理,通过克隆技术或创建模板,我们可以迅速的创建虚拟机,我们也可以通过快照技术去捕获虚拟机的一些状态,比如说虚拟机的内存.设置或者虚拟磁盘的情况等 ...
- KVM虚拟机快照链创建,合并,删除及回滚研究
1 QEMU,KVM,libvirt关系 QEMU QEMU提供了一个开源的服务器全虚拟化解决方案,它可以使你在特定平台的物理机上模拟出其它平台的处理器,比如在X86 CPU上虚拟出Power的CPU ...
- 再谈 COW、ROW 快照技术
目录 目录 前言 快照与备份的区别 快照技术 增量快照之 COW 增量快照之 row 前言 在经过了一段时间的实践之后,再次回顾 COW/ROW 快照技术的实现原理,温故而知新. 快照与备份的区别 传 ...
- Redhat6.x下如何制作虚拟机快照和镜像封装
一.虚拟机快照 1.确认你的物理机上的vg还有足够的剩余空间 [root@hacker ~]# vgs VG #PV #LV #SN Attr VSize VFree vg_ ...
- centos6.6 虚拟机集群搭建
1.centosos6.6下载 windows 64位: thunder://QUFodHRwOi8vbGludXguemh1YW5neGl0b25nLmNvbTo4MDgvMjAxNTAxL0Nlb ...
- 分布式存储 CentOS6.5虚拟机环境搭建FastDFS-5.0.5集群(转载-2)
原文:http://www.cnblogs.com/PurpleDream/p/4510279.html 分布式存储 CentOS6.5虚拟机环境搭建FastDFS-5.0.5集群 前言: ...
- vmware克隆Centos6.7虚拟机网卡无法启动问题
快速处理办法: cat /etc/sysconfig/network-scripts/ifcfg-eth0 sed -i '/UUID/d' /etc/sysconfig/network-script ...
- kvm+libvirt虚拟机快照浅析[转]
浅析snapshots, blockcommit,blockpull 作者:Kashyap Chamarthy <kchamart#redhat.com> Date: Tue, 23 Oc ...
- centos6.5虚拟机无法访问外网解决办法
安装了centos6.5虚拟机,使用的是桥接方式.把所有的配置已经写到/etc/sysconfig/network-scripts/ifcfg-eth0中后,发现内网可以ping通,外网却无法访问. ...
随机推荐
- oracle 数据库中(创建、解锁、授权、删除)用户
上文我们已经建立了名为orcl66的数据库. 想要在数据库中创建.修改用户需要我们以管理员权限登录到数据库中. 首先我们通过sqlplus命令登录连接数据库. 输入sqlplus命令--用户名: sy ...
- Windows server 2008 R2 安装指引
1.虚拟机实验安装win server 2008 R2 企业版, 安装环境: 虚拟机版本:VM 14 本地系统:win 7 64 位 专业版 打开VM14,新建虚拟机,选择自定义高级(此处也可以选择典 ...
- hdu3974 Assign the task dfs序+线段树
There is a company that has N employees(numbered from 1 to N),every employee in the company has a im ...
- AangularJS入门总结二
双向数据绑定:在Mode(JS)中改变数据,而这些变动立刻就会自动出现在View上,反之亦然.一方面可以做到model变化驱动了DOM中元素变化,另一方面也可以做到DOM元素的变化也会影响到Model ...
- day 04 Java并发多线程
http://www.cnblogs.com/hellocsl/p/3969768.html?utm_source=tuicool&utm_medium=referralPS:而JVM 每遇到 ...
- Arrays类的使用
定义 : 此类包含用来操作数组(比如排序和搜索)的各种方法.使用需要导入import java.util.Arrays;包 1.sort方法(对数组进行升序排列) public class Array ...
- How to implement a windbg plugin
How to implement a windbg plugin Define EXT_CLASS #include "lauxlib.h" class EXT_CLASS : p ...
- Ionic 使用karma进行单元测试
1. 创建Ionic工程 ionic start projectname cd projectname 2.安装karma插件 npm install karma karma-jasmine karm ...
- DeviceIoControl 驱动交互
驱动程序通信的函数,除了ReadFile和WriteFile函数还有DeviceIoControl函数,而且DeviceIoControl函数那是相当的彪悍.因为它可以自定义控制码,你只要在IRP_M ...
- Apache Kafka监控之KafkaOffsetMonitor
转载自:http://www.cnblogs.com/Leo_wl/p/4564699.html 1.概述 前面给大家介绍了Kafka的背景以及一些应用场景,并附带上演示了Kafka的简单示例.然后, ...