cycript使用
cycript的原理是动态库注入,但是其动态库注入的原理,与我们常见的通过LC_LOAD_DYLIB在可执行文件中注入动态库不同. cycript的操作是 :

抓取到要挂载的应用, 由于越狱机上拥有权限,所以直接在挂载的进程上创建一个挂起的线程, 然后在这个线程里申请一片用于加载动态库的内存,

然后恢复线程,动态库就被注入。
越狱的手机上安装cycript
查找进程
ps -e|grep /Application/ 查找MobileNotes

注入进程:
cycript -p MobileNotes

cycript命令:
查看地址对象:
#address

object-c message
_ivarDescription
_shortMethodDescription
nextResponder
_autolayoutTrace
recursiveDescription
_methodDescription
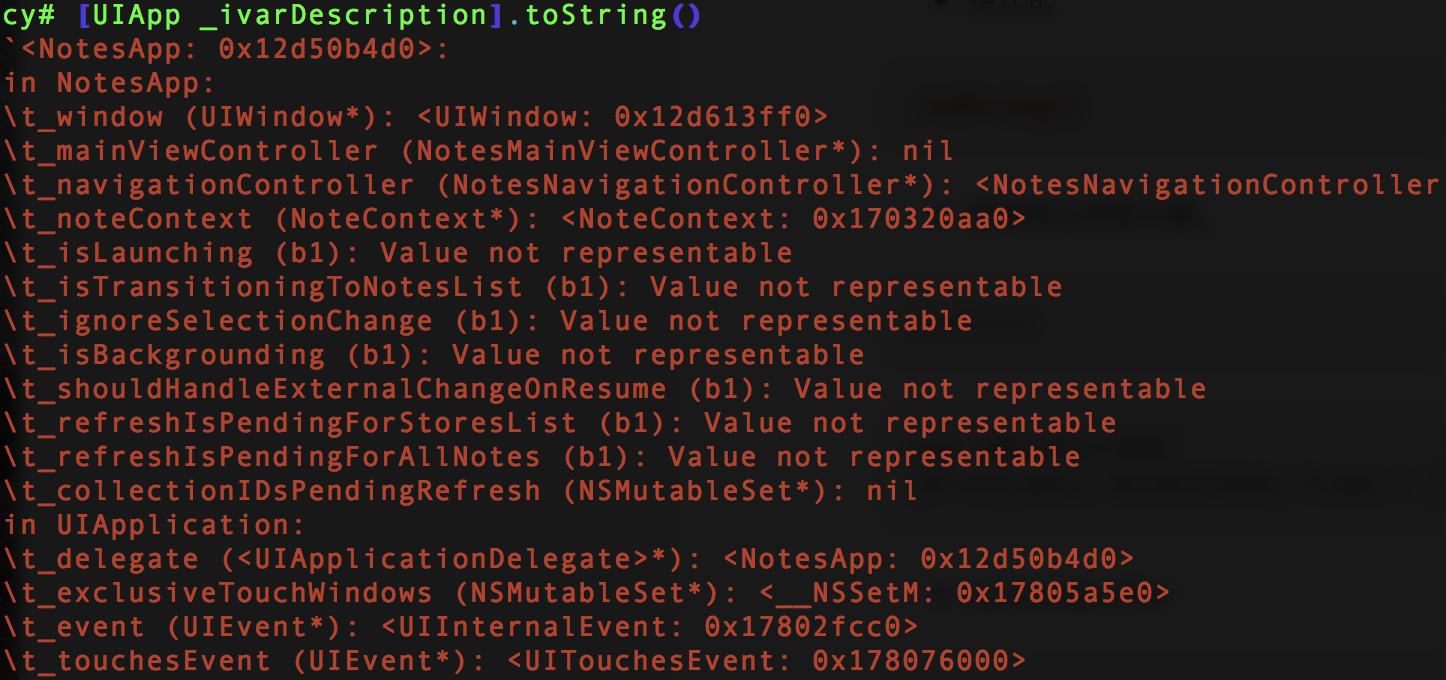
[UIApp description]

_methodDescription

_ivarDescription
这个应该是成员变量
打印当前界面
UIApp.keyWindow.recursiveDescription().toString()
throw new TypeError(`'<UIWindow: 0x12d613ff0; frame = (0 0; 320 568); gestureRecognizers = <NSArray: 0x17005cd10>; layer = <UIWindowLayer: 0x17002fe20>>
| <UILayoutContainerView: 0x1781ba320; frame = (0 0; 320 568); autoresize = W+H; gestureRecognizers = <NSArray: 0x17805e7b0>; layer = <CALayer: 0x170036c40>>
| | <UINavigationTransitionView: 0x1701f0200; frame = (0 0; 320 568); clipsToBounds = YES; autoresize = W+H; layer = <CALayer: 0x170036c00>>
| | | <UIViewControllerWrapperView: 0x17016f240; frame = (0 0; 320 568); autoresize = W+H; layer = <CALayer: 0x170224460>>
| | | | <NotesBackgroundView: 0x1781f4500; frame = (0 0; 320 568); autoresize = W+H; layer = <CALayer: 0x178038120>>
| | | | | <NotesTextureBackgroundView: 0x178192fe0; frame = (0 0; 320 568); autoresize = W+H; layer = <CALayer: 0x1780385c0>>
| | | | | | <NotesTextureView: 0x178193f50; frame = (0 -44; 320 640); layer = <CALayer: 0x178037fc0>>
| | | | | <UIView: 0x17816ed00; frame = (0 0; 320 568); autoresize = W+H; layer = <CALayer: 0x178038340>>
| | | | | | <NotesListTableView: 0x12d83c400; baseClass = UITableView; frame = (0 0; 320 568); clipsToBounds = YES; opaque = NO; autoresize = W+H; gestureRecognizers = <NSArray: 0x178241cb0>; layer = <CALayer: 0x178038060>; contentOffset: {0, -20}>
| | | | | | | <UIView: 0x17016f0c0; frame = (0 -20; 320 568); autoresize = W+H; layer = <CALayer: 0x170224080>>
| | | | | | | <UITableViewWrapperView: 0x17816ee80; frame = (0 0; 320 568); autoresize = W+H; layer = <CALayer: 0x1780388a0>>
| | | | | | | | <NoteCell: 0x12d63bad0; baseClass = UITableViewCell; frame = (0 44; 320 44); opaque = NO; autoresize = W; layer = <CALayer: 0x170225000>>
| | | | | | | | | <UITableViewCellScrollView: 0x12d63bfc0; frame = (0 0; 320 44); autoresize = W+H; gestureRecognizers = <NSArray: 0x1702514c0>; layer = <CALayer: 0x170225060>; contentOffset: {0, 0}>
| | | | | | | | | | <UITableViewCellContentView: 0x17016f540; frame = (0 0; 294.5 43.5); gestureRecognizers = <NSArray: 0x170251760>; layer = <CALayer: 0x170225140>>
| | | | | | | | | | <NoteCellContentView: 0x12d514b30; frame = (0 0; 320 44); opaque = NO; autoresize = W+H; layer = <CALayer: 0x17803ebc0>>
| | | | | | | | | | <_UITableViewCellSeparatorView: 0x1781949e0; frame = (15 43.5; 305 0.5); layer = <CALayer: 0x17803fc40>>
| | | | | | | | | | <UIImageView: 0x1781f3300; frame = (294.5 14; 10.5 15); opaque = NO; userInteractionEnabled = NO; layer = <CALayer: 0x17803ec40>>
| | | | | | | <UILabel: 0x12d516bd0; frame = (0 0; 102
nextResponder找到视图控制器 ViewController
_autolayoutTrace
cy# [#0x1781ba320 _autolayoutTrace].toString()
`
<UIWindow:0x12d613ff0>
| <UILayoutContainerView:0x1781ba320>
| | <UINavigationTransitionView:0x1701f0200>
| | | <UIViewControllerWrapperView:0x17016f240>
| | | | <NotesBackgroundView:0x1781f4500>
| | | | | <NotesTextureBackgroundView:0x178192fe0>
| | | | | | <NotesTextureView:0x178193f50>
| | | | | <UIView:0x17816ed00>
| | | | | | <NotesListTableView:0x12d83c400>
| | | | | | | <UIView:0x17016f0c0>
| | | | | | | <UITableViewWrapperView:0x17816ee80>
| | | | | | | | <NoteCell:0x12d63bad0>
| | | | | | | | | <UITableViewCellScrollView:0x12d63bfc0>
| | | | | | | | | | <UITableViewCellContentView:0x17016f540>
| | | | | | | | | | <NoteCellContentView:0x12d514b30>
| | | | | | | | | | <_UITableViewCellSeparatorView:0x1781949e0>
| | | | | | | | | | <UIImageView:0x1781f3300>
| | | | | | | <UILabel:0x12d516bd0>
| | | | | | | <UISearchBar:0x12d6352a0>
| | | | | | | | <UIView:0x17016ec40>
| | | | | | | | | <UISearchBarBackground:0x12d635bc0>
| | | | | | | | | | <_UIBackdropView:0x12d6379c0>
| | | | | | | | | <UISearchBarTextField:0x12d636b40>
| | | | | | | | | | <_UISearchBarSearchFieldBackgroundView:0x12d528ce0>
| | | | | | | | | | | <_UISearchBarSearchFieldBackgroundView:0x12d636dc0>
| | | | | | | | | | | <_UISearchBarSearchFieldBackgroundView:0x12d636050>
| | | | | | | | | | <UIImageView:0x1781f5500>
| | | | | | | | | | <UISearchBarTextFieldLabel:0x12d639100>
| | | | | | | <_UITableViewCellSeparatorView:0x178194910>
| | | | | | | <_UITableViewCellSeparatorView:0x178194ab0>
| | | | | | | <_UITableViewCellSeparatorView:0x178194b80>
| | | | | | | <_UITableViewCellSeparatorView:0x178194c50>
| | | | | | | <_UITableViewCellSeparatorView:0x178194d20>
| | | | | | | <_UITableViewCellSeparatorView:0x178194df0>
| | | | | | | <_UITableViewCellSeparatorView:0x178194ec0>
| | | | | | | <_UITableViewCellSeparatorView:0x178194f90>
| | | | | | | <_UITableViewCellSeparatorView:0x178195060>
| | | | | | | <_UITableViewCellSeparatorView:0x178195130>
| | | | | | | <_UITableViewCellSeparatorView:0x178195200>
| | | | | | | <_UITableViewCellSeparatorView:0x1781952d0>
| | | | | | | <_UITableViewCellSeparatorView:0x1781953a0>
| | | | | | | <_UITableViewCellSeparatorView:0x178195540>
| | | | | | | <_UITableViewCellSeparatorView:0x1781956e0>
| | | | | | | <_UITableViewCellSeparatorView:0x178195880>
| | | | | | | <_UITableViewCellSeparatorView:0x178195a20>
| | | | | | | <_UITableViewCellSeparatorView:0x178195c90>
| | | | | <NotesTextureBackgroundView:0x178194020>
| | | | | | <NotesTextureView:0x1781940f0>
| | <UINavigationBar:0x12d6145a0>
| | | <_UINavigationBarBackground:0x12d614ea0>
| | | <UINavigationButton:0x12d639e40>
| | | | <UIButtonLabel:0x12d512860>
| | | <_UINavigationBarBackIndicatorView:0x1701f1300>`
cy#
bundleIdentifier 获appid
cy# [[NSBundle mainBundle] bundleIdentifier]
@"com.apple.mobilenotes"
cycript使用的更多相关文章
- iOS运行时工具-cycript
cycript是大神saurik开发的一个非常强大的工具,可以让开发者在命令行下和应用交互,在运行时查看和修改应用.它确实可以帮助你破解一些应用,但我觉得这个工具主要还是用来学习其他应用的设计(主要是 ...
- iOS执行时工具-cycript
cycript是大神saurik开发的一个很强大的工具,能够让开发人员在命令行下和应用交互,在执行时查看和改动应用.它确实能够帮助你破解一些应用,但我认为这个工具主要还是用来学习其它应用的设计(主要是 ...
- cycript
cycript是大神saurik开发的一个非常强大的工具,可以让开发者在命令行下和应用交互,在运行时查看和修改应用.它确实可以帮助你破解一些应用,但我觉得这个工具主要还是用来学习其他应用的设计(主要是 ...
- iOS逆向工程之Cycript
1.连接设备 打开一个终端,输入指令: iproxy 重新打开一个新的终端,输入指令: ssh -p root@127.0.0.1 这时候会提示输入密码:默认密码为“alpine”.这样就可以连接到设 ...
- iOS逆向系列-Cycript
概述 Cycript 是Objective-C++.ES(JavaScript).Java等语法的混合物. 可以用来探索.修改.调试正在运行的Mac\iOS App. 通过Cydia安装Cycript ...
- iOS逆向工程之App脱壳
本篇博客以微信为例,给微信脱壳."砸壳"在iOS逆向工程中是经常做的一件事情,,因为从AppStore直接下载安装的App是加壳的,其实就是经过加密的,这个“砸壳”的过程就是一个解 ...
- 【腾讯Bugly干货分享】移动App入侵与逆向破解技术-iOS篇
本文来自于腾讯bugly开发者社区,非经作者同意,请勿转载,原文地址:http://dev.qq.com/topic/577e0acc896e9ebb6865f321 如果您有耐心看完这篇文章,您将懂 ...
- 【腾讯Bugly干货分享】iOS黑客技术大揭秘
本文来自于腾讯bugly开发者社区,非经作者同意,请勿转载,原文地址:http://dev.qq.com/topic/5791da152168f2690e72daa4 “8小时内拼工作,8小时外拼成长 ...
- iOS黑客技术相关
在黑客的世界里,没有坚不可破的防护系统,也没有无往不胜.所向披靡的入侵利器,有时候看似简单的问题,破解起来也许花上好几天.好几个月,有时候看似很 low 的工具往往能解决大问题:我们以实现微信自动抢红 ...
随机推荐
- .NET Core错误:The specified framework 'Microsoft.NETCore.App', version '1.0.0-rc2-3002702' was not found.
本地Dos命令行中,cd到你的项目目录下,生成, dotnet {U_Project_Name}.dll 发布 dotnet publish ,然后将发布的文件夹中的文件全部拷贝到服务器中,至此,问题 ...
- .NET Core开发日志——HttpClientFactory
当需要向某特定URL地址发送HTTP请求并得到相应响应时,通常会用到HttpClient类.该类包含了众多有用的方法,可以满足绝大多数的需求.但是如果对其使用不当时,可能会出现意想不到的事情. 博客园 ...
- CH 1201 - 最大子序和 - [单调队列]
题目链接:传送门 描述输入一个长度为n的整数序列,从中找出一段不超过m的连续子序列,使得整个序列的和最大. 例如 $1,-3,5,1,-2,3$. 当 $m=4$ 时,$S=5+1-2+3=7$:当 ...
- export,import ,export default区别
export,import ,export default区别 一.export,import ,export default ES6模块主要有两个功能:export和import export用于对 ...
- [daily][archlinux][rsync] rsync
科普文档:https://wiki.archlinux.org/index.php/Rsync 之前改文件系统时,用过. 然而用的不太对,导致一部分文件的权限出了问题. [troubleshoot][ ...
- ms sql server 游标
很简单的一个小例子. /****** Object: StoredProcedure [dbo].[usp_test] Script Date: 10/28/2016 15:08:31 ******/ ...
- iOS 修改TabBar的item间距
@interface HPTabBarController ()<UITabBarControllerDelegate>//继承自UITabBarController @property ...
- python 遍历list并删除部分元素
python 遍历list并删除部分元素https://blog.csdn.net/afgasdg/article/details/82844403有两个list,list_1 为0-9,list_2 ...
- Linux 下安装JDK和jmeter 及环境配置记录过程
一.安装首先要查看linux系统的位数,用命令getconf LONG_BIT,我的是centOS 32位 二.官网下载32位的JDK8 http://www.oracle.com/technetwo ...
- mybatis获取批量插入的主键自增id
一.写一个实体类 public class UserInfo { private long userId; private String userAccount; private String use ...