ActiveMQ的P2P示例
ActiveMQ的P2P示例(点对点通信)
(1)下载安装activemq,启动activeMQ。
详细步骤参考博客:http://www.cnblogs.com/DFX339/p/9050878.html
(2)新建maven项目(java项目或者web项目都可以)
代码下载地址:https://github.com/DFX339/activeMQ_demo.git
目录结构如下,需要编写的文件: Consumer.java Provider.java pom.xml

生产者的创建: Provider.java
package cn.dfx.activeMQ_demo.queue;

import javax.jms.Connection;

import javax.jms.ConnectionFactory;

import javax.jms.Destination;

import javax.jms.JMSException;

import javax.jms.MessageProducer;

import javax.jms.Session;

import javax.jms.TextMessage;

import org.apache.activemq.ActiveMQConnection;

import org.apache.activemq.ActiveMQConnectionFactory;

/**

 * activemq的消息

 * @author Administrator

 *

 */

public class Provider {

      public static void main(String[] args) {

          System.out.println("进入生产者--");

            //连接信息设置

            String username = "system";

            String password = "manager";

            String brokerURL = "failover://tcp://localhost:61616";

            //默认的URL的值:ActiveMQConnection.DEFAULT_BROKER_URL;

            System.out.println("默认的URL:"+brokerURL);

            //连接工厂

            ConnectionFactory connectionFactory = null;

            //连接

            Connection connection = null;

            //会话 接受或者发送消息的线程

            Session session = null;

            //消息的目的地

            Destination destination = null;

            //消息生产者

            MessageProducer messageProducer = null;

            //实例化连接工厂

            connectionFactory = new ActiveMQConnectionFactory(username, password, brokerURL);

            try {

                //通过连接工厂获取连接

                connection = connectionFactory.createConnection();

                //启动连接

                connection.start();

                //创建session

                session = connection.createSession(true, Session.AUTO_ACKNOWLEDGE);

                //创建一个名称为QueueTest的消息队列

                destination = session.createQueue("QueueTest");

                //创建消息生产者

                messageProducer = session.createProducer(destination);

                //发送消息

                TextMessage message = null;

                TextMessage message1 =  session.createTextMessage();

                message1.setText("这是字符串呀");

                for (int i=200; i<220; i++) {

                    //创建要发送的文本信息

                    message = session.createTextMessage("Queue消息测试" +(i+1));

                    //通过消息生产者发出消息

                    messageProducer.send(message);

                    messageProducer.send(message1);

                    System.out.println("发送成功:" + message.getText());

                }

                session.commit();

            } catch (Exception e) {

                e.printStackTrace();

            }finally{

                if(null != connection){

                    try {

                        connection.close();

                    } catch (JMSException e) {

                        e.printStackTrace();

                    }

                }

            }

        }

}
消费者的创建: Consumer.java
package cn.dfx.activeMQ_demo.queue;

import javax.jms.Session;

import javax.jms.Connection;

import javax.jms.ConnectionFactory;

import javax.jms.Destination;

import javax.jms.JMSException;

import javax.jms.MessageConsumer;

import javax.jms.MessageProducer;

import javax.jms.TextMessage;

import org.apache.activemq.ActiveMQConnection;

import org.apache.activemq.ActiveMQConnectionFactory;

public class Consumer {

    public static void main(String[] args) {

        System.out.println("进入消费者--");

        //连接信息设置

        String username = "system";

        String password = "manager";

        String brokerURL = ActiveMQConnection.DEFAULT_BROKER_URL;

        //连接工厂

        ConnectionFactory connectionFactory = null;

        //连接

        Connection connection = null;

        //会话 接受或者发送消息的线程

        Session session = null;

        //消息的目的地

        Destination destination = null;

        //消息消费者

        MessageConsumer messageConsumer = null;

        //实例化连接工厂

        connectionFactory = new ActiveMQConnectionFactory(username, password, brokerURL);

        try {

              System.out.println("消费者开始建立连接-----");

            //通过连接工厂获取连接

            connection = connectionFactory.createConnection();

            //启动连接

            connection.start();

            System.out.println("消费者开始启动连接-----");

            //创建session

            session = connection.createSession(false, Session.AUTO_ACKNOWLEDGE);

            //创建一个连接QueueTest的消息队列

            destination = session.createQueue("QueueTest");

            //创建消息消费者

            messageConsumer = session.createConsumer(destination);

            System.out.println("消费者创建后-----");

            while (true) {

                System.out.println("消费者准备接收消息-----");

                TextMessage textMessage = (TextMessage) messageConsumer.receive(100000);

                System.out.println("消费者成功接收消息-----");

                if(textMessage != null){

                    System.out.println("成功接收消息:" + textMessage.getText());

                }else {

                    break;

                }

            }

        } catch (JMSException e) {

            e.printStackTrace();

        }

    }

}
项目依赖包的配置文件: pom.xml
<project xmlns="http://maven.apache.org/POM/4.0.0" xmlns:xsi="http://www.w3.org/2001/XMLSchema-instance"

    xsi:schemaLocation="http://maven.apache.org/POM/4.0.0 http://maven.apache.org/maven-v4_0_0.xsd">

    <modelVersion>4.0.0</modelVersion>

    <groupId>cn.dfx</groupId>

    <artifactId>activeMQ_demo</artifactId>

    <packaging>war</packaging>

    <version>0.0.1-SNAPSHOT</version>

    <name>activeMQ_demo Maven Webapp</name>

    <url>http://maven.apache.org</url>

    <build>

        <finalName>activeMQ_demo</finalName>

        <plugins>

            <plugin>

                <inherited>true</inherited>

                <groupId>org.apache.maven.plugins</groupId>

                <artifactId>maven-compiler-plugin</artifactId>

                <version>3.5.1</version>

                <configuration>

                    <source>${compiler.source}</source>

                    <target>${compiler.target}</target>

                    <encoding>${project.build.sourceEncoding}</encoding>

                    <compilerArguments>

                        <extdirs>${project.basedir}/src/main/webapp/WEB-INF/lib</extdirs>

                    </compilerArguments>

                </configuration>

            </plugin>

        </plugins>

    </build>

    <properties>

        <project.build.sourceEncoding>UTF-8</project.build.sourceEncoding>

        <compiler.source>1.7</compiler.source>

        <compiler.target>1.7</compiler.target>

        <!-- servlet/jsp/EL (2.4/2.0/?)(2.5/2.1/2.1),(3.0/2.2/2.2),(3.1/2.3/3.0) -->

        <servlet.version>3.1.0</servlet.version>

        <jsp.version>2.3.1</jsp.version>

        <jstl.version>1.2</jstl.version>

        <junit.version>4.12</junit.version>

    </properties>

    <dependencies>

        <dependency>

            <groupId>junit</groupId>

            <artifactId>junit</artifactId>

            <version>${junit.version}</version>

            <scope>test</scope>

        </dependency>

        <dependency>

            <groupId>javax.servlet</groupId>

            <artifactId>javax.servlet-api</artifactId>

            <version>${servlet.version}</version>

            <scope>provided</scope>

        </dependency>

        <dependency>

            <groupId>javax.servlet.jsp</groupId>

            <artifactId>javax.servlet.jsp-api</artifactId>

            <version>${jsp.version}</version>

            <scope>provided</scope>

        </dependency>

        <!-- activemq的依赖 -->

        <dependency>

            <groupId>javax.jms</groupId>

             <artifactId>jms</artifactId>

            <version>1.1</version>

        </dependency>

        <dependency>

            <groupId>org.apache.activemq</groupId>

            <artifactId>activemq-pool</artifactId>

            <version>5.7.0</version>

        </dependency>

        <dependency>

            <groupId>org.apache.activemq</groupId>

            <artifactId>activemq-core</artifactId>

            <version>5.5.0</version>

        </dependency>

    <!-- 引入spring的相关依赖 -->

        <dependency>

            <groupId>org.springframework</groupId>

            <artifactId>spring-core</artifactId>

            <version>3.0.3.RELEASE</version>

        </dependency>

         <dependency>

            <groupId>org.springframework</groupId>

            <artifactId>spring-beans</artifactId>

            <version>3.0.3.RELEASE</version>

        </dependency>

        <dependency>

            <groupId>org.springframework</groupId>

            <artifactId>spring-aop</artifactId>

            <version>3.0.3.RELEASE</version>

        </dependency>

        <dependency>

            <groupId>org.springframework</groupId>

            <artifactId>spring-context</artifactId>

            <version>3.0.3.RELEASE</version>

        </dependency>

        <dependency>

            <groupId>org.slf4j</groupId>

            <artifactId>slf4j-simple</artifactId>

            <version>1.7.25</version>

        </dependency>

    </dependencies>

</project>
在这之前先启动 activemq
在这之前先启动 activemq
在这之前先启动 activemq
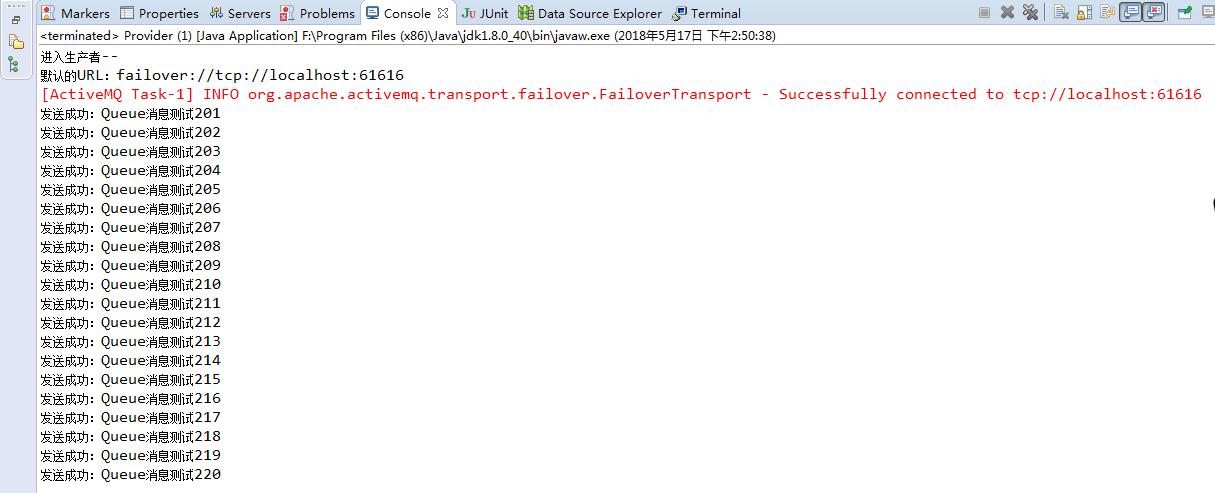
运行 Provider.java (发送消息到队列中), 出现如下结果:
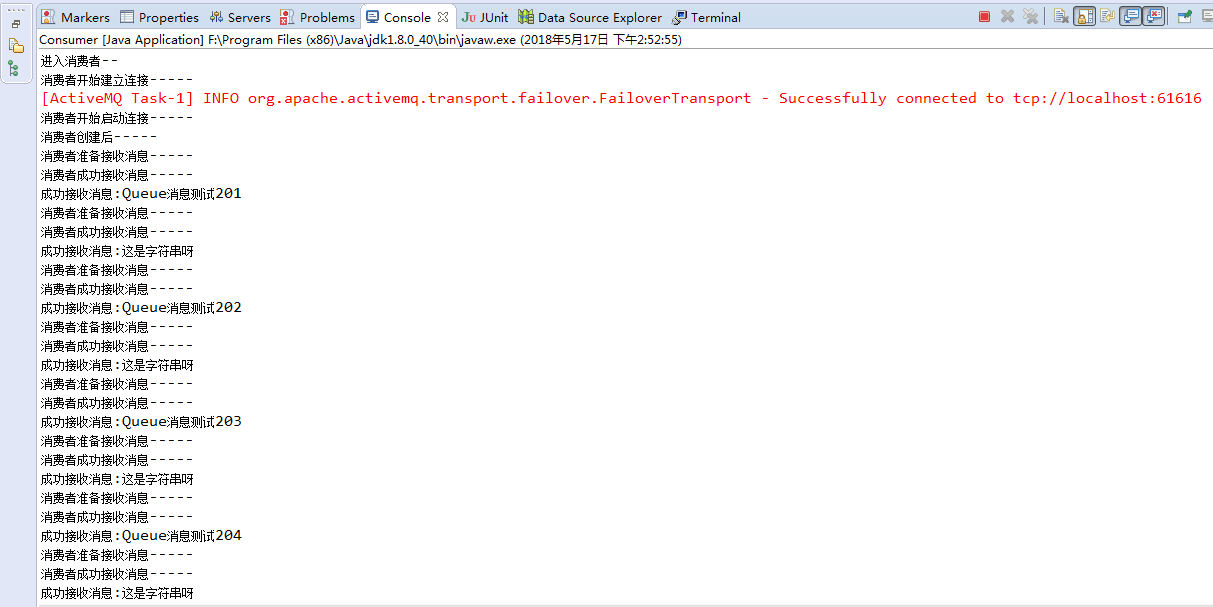
运行Consumer.java(从队列中取出消息) ,出现结果如下
注: 消息提供者(provider)可以不断的发送消息,消费者(consumer)一直会监听,然后读取。
ActiveMQ的P2P示例的更多相关文章
- ActiveMQ的p2p模式与发布订阅模式
1.消息中间件:采用异步通讯防止,支持点对点以及发布订阅模式,可以解决高并发问题 传统调用接口,可能发生阻塞,重复提交,超时等等问题,可以利用消息中间件发送异步通讯请求 ...
- ActiveMQ queue 代码示例
生产者: package com.111.activemq; import javax.jms.Connection; import javax.jms.ConnectionFactory; impo ...
- ActiveMQ入门操作示例
1. Queue 1.1 Producer 生产者:生产消息,发送端. 把jar包添加到工程中. 第一步:创建ConnectionFactory对象,需要指定服务端ip及端口号. 第二步:使用Conn ...
- ActiveMQ第一个示例
首先先安装ActiveMQ:https://www.cnblogs.com/hejianliang/p/9149590.html 创建Java项目,把 activemq-all-5.15.4.jar ...
- ActiveMQ Topic使用示例
一.非持久的Topic Topic 发送 public class NoPersistenceSender { public static void main(String[] args) throw ...
- ActiveMQ笔记(1):编译、安装、示例代码
一.编译 虽然ActiveMQ提供了发布版本,但是建议同学们自己下载源代码编译,以后万一有坑,还可以尝试自己改改源码. 1.1 https://github.com/apache/activemq/r ...
- ActiveMQ应用(1)-安装及示例
简介: Apache ActiveMQ ™ 是最流行最强大的开源消息及继承模式服务器.i Apache ActiveMQ 速度快,支持多种语言的客户端及代理,可便捷的使用企业集成模式,完整支持JMS1 ...
- ActiveMQ入门示例
1.ActiveMQ下载地址 http://activemq.apache.org/download.html 2.ActiveMQ安装,下载解压之后如下目录
- 分布式--ActiveMQ 消息中间件(一) https://www.jianshu.com/p/8b9bfe865e38
1. ActiveMQ 1). ActiveMQ ActiveMQ是Apache所提供的一个开源的消息系统,完全采用Java来实现,因此,它能很好地支持J2EE提出的JMS(Java Message ...
随机推荐
- 牛客国庆集训派对Day3 G Stones
Stones 思路: sg函数打表找规律 代码: #pragma GCC optimize(2) #pragma GCC optimize(3) #pragma GCC optimize(4) #in ...
- lua闭包实现迭代器遍历数组
--实现访问数组的迭代器 function visit(t) return function() i = i + return t[i] end end --要访问的数组 ,,,} itor = vi ...
- 不会 tsconfig | tslint 常遇到的问题
1. require('xx-xx') 不能用时 https://stackoverflow.com/questions/31173738/typescript-getting-error-ts230 ...
- 关于ascii码的一些内容
1.通过C#程序输出tab(制表符)内容. 1.1常用方式我们可以是 //测试输出\t到文件 File.WriteAllText("test.txt", "a\tb\tc ...
- stm32复位引脚NRST
STM32F的NRST是异步复位脚. 当NRST输入低电平的时候,MCU处于复位状态,重设所有的内部寄存器,及片内几十KB的SRAM. 当NRST从低电平变高时,PC指针从0开始. 但是复位的时候不会 ...
- django-simple-captcha 验证码插件介绍 django-simple-captcha 使用 以及添加动态ajax刷新验证
django-simple-captcha作为一款django的验证码插件,使用方法非常简单,能够快速应用到web应用中. 文档官网地址:django-simple-captcha 参考博客:http ...
- causal snps | causal variants | tensorflow | 神经网络实战 | Data Simulation
先读几篇文章: Interpretation of Association Signals and Identification of Causal Variants from Genome-wide ...
- Build Castles(构建城堡)
Charlemagne, the King of Frankie, 英文描述 请参考图片中的说明. 中文描述 根据给出的数组确定能够盖多少城堡. 思路和点评 我不能确定我的思路是正确的,也欢迎大家参与 ...
- Fiddler抓包—搞定接口测试
·包的定义 在包交换网络里,单个消息被划分为多个数据块,这些数据块称为包,它包含发送者和接受者的地址信息.这些包然后沿着不同的路径在一个或多个网络中传输,并且在目的地重新组合. ·应用 简 ...
- Weighted Channel Dropout for Regularization of Deep Convolutional Neural Network
这是AAAI2019的一篇论文,主要是为了解决小数据集的过拟合问题,使用了针对于卷积层的Dropout的方法. 论文的要点记录于下: 1.在训练过程中对于卷积层的channels进行droipout, ...