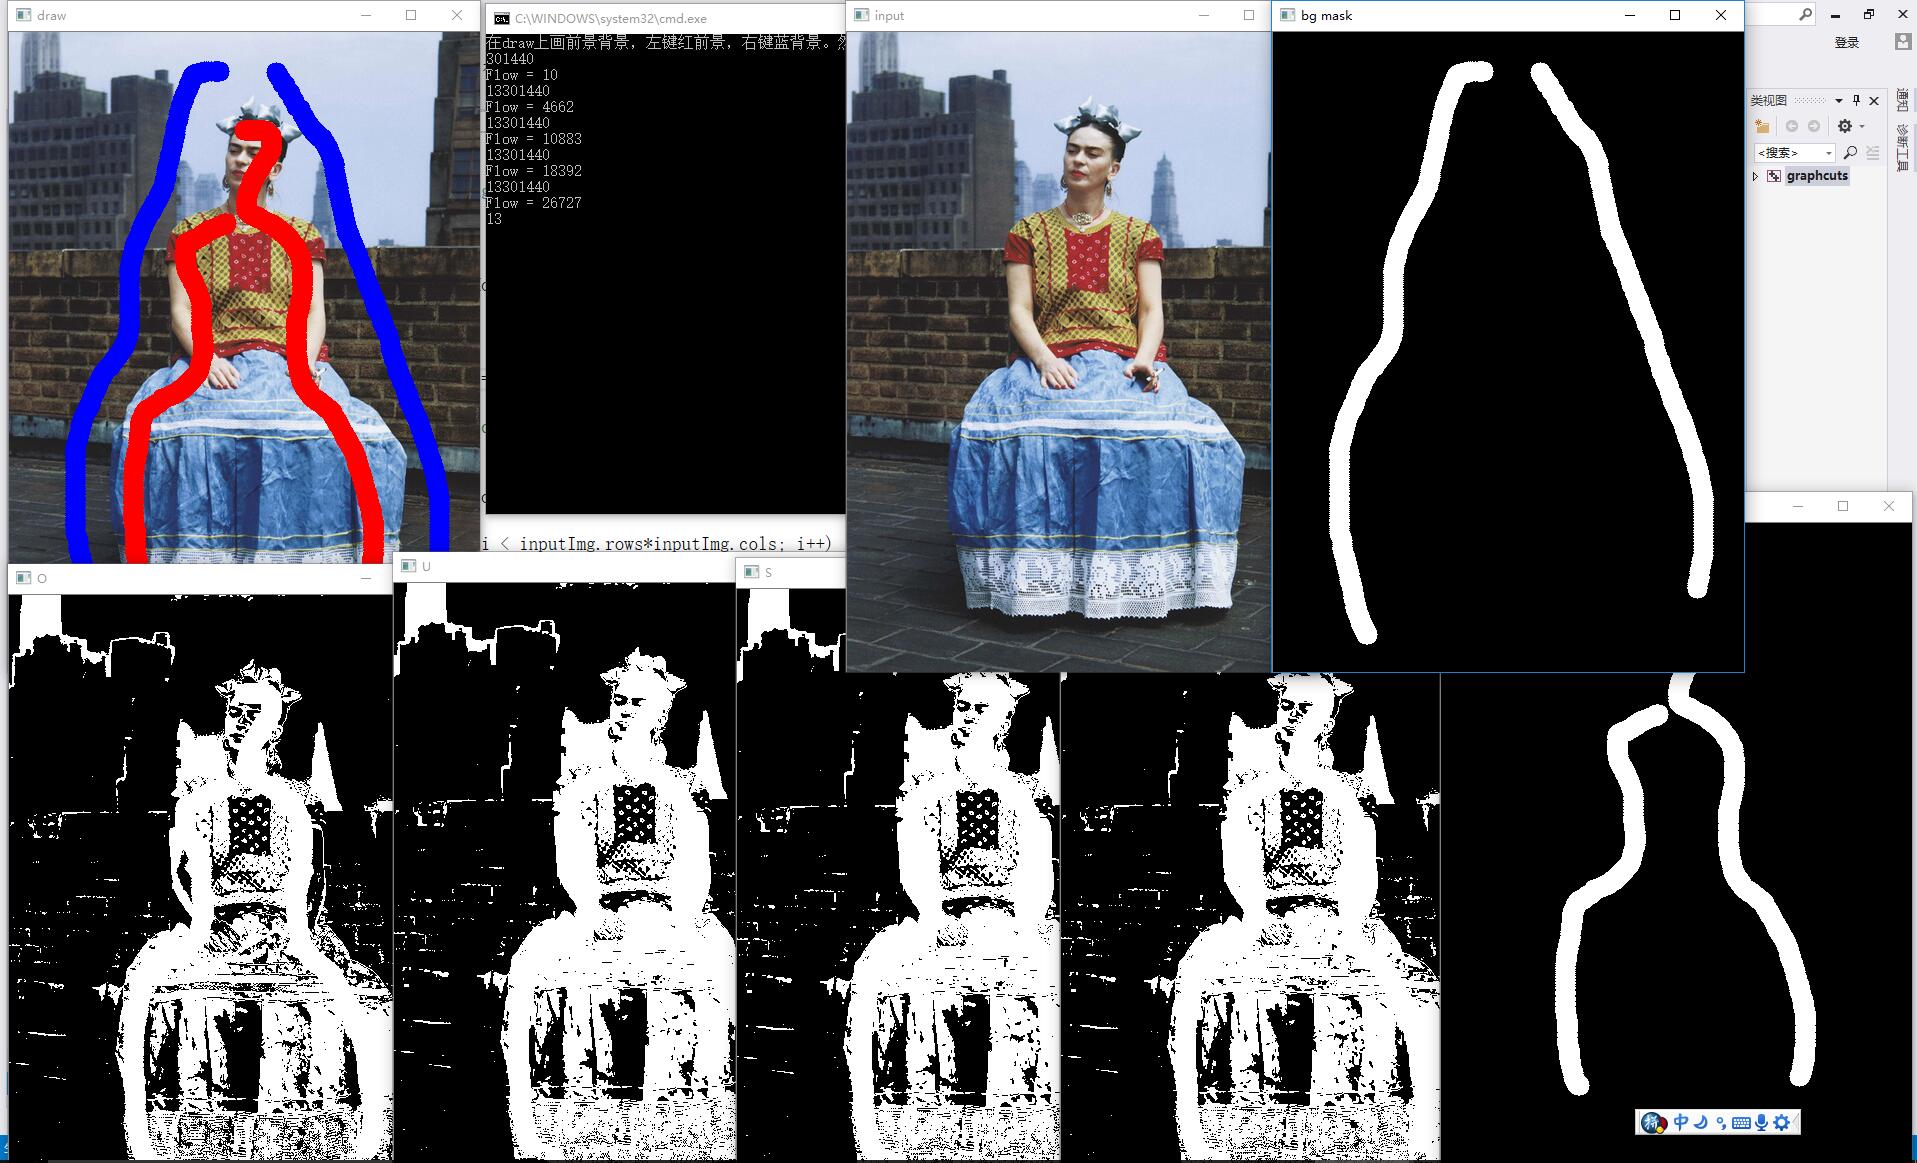
vs2015+opencv3.3.1+ maxflow-v3.01 c++实现Yuri Boykov 的Interactive Graph Cuts
出的结果不理想。 感觉是tlink的权重的计算有问题,以及参数的设置。三个可设置参数是后面的 i j k 。如果你找到了一组好参数请告诉我。
下载地址 http://download.csdn.net/download/li_haoren/10232283
Interactive Graph Cuts for Optimal Boundary & Region Segmentation of Objects in N-D Images code
#include "opencv2\imgproc\imgproc.hpp"  // Gaussian Blur

#include "opencv2\core\core.hpp"        // Basic OpenCV structures (cv::Mat, Scalar)

#include <opencv2\highgui\highgui.hpp> // OpenCV window I/O

#include <iostream> // for standard I/O

#include <string>   // for strings

#include <iomanip>  // for controlling float print precision

#include <sstream>  // string to number conversion

#include<vector>

#include<cmath>

#include "graph.h"  //maxflow-v3.01   下载地址 http://vision.csd.uwo.ca/code/maxflow-v3.01.zip

typedef Graph<int, int, int> GraphType;

using namespace  cv;

using namespace  std;

 int ofexp = 5;//Lambda

double BSigma = 2;//the Sigma of B{p,q}   小边缘越清

double RSigma = 3;//the Sigma of Rp		小号

const string filename = "1.jpg";//照片

bool rButtonDown = false;

bool lButtonDown = false;

int numUsedBins = 0;

float varianceSquared = 0;

int scribbleRadius = 10;

Mat inputImg = imread(filename, 3), showImg = imread(filename, 3);

Mat fgScribbleMask;

Mat bgScribbleMask;

static void onMouse(int event, int x, int y, int, void*)

{

	//cout << "On Mouse: (" << x << "," << y << ")" <<endl;

	if (event == CV_EVENT_LBUTTONDOWN)

	{

		lButtonDown = true;

	}

	else if (event == CV_EVENT_RBUTTONDOWN)

	{

		rButtonDown = true;

	}

	else if (event == CV_EVENT_LBUTTONUP)

	{

		lButtonDown = false;

	}

	else if (event == CV_EVENT_RBUTTONUP)

	{

		rButtonDown = false;

	}

	else if (event == CV_EVENT_MOUSEMOVE)

	{

		if (rButtonDown)

		{

			// scribble the background

			circle(bgScribbleMask, Point(x, y), scribbleRadius, 255, -1);

			circle(showImg, Point(x, y), scribbleRadius, CV_RGB(0, 0, 255), -1);

		}

		else if (lButtonDown)

		{

			// scribble the foreground

			circle(showImg, Point(x, y), scribbleRadius, CV_RGB(255, 0, 0), -1);

			circle(fgScribbleMask, Point(x, y), scribbleRadius, 255, -1);

			//fgScribbleMask.at<char>(y,x)=(char)255;

			// set variables using mask

			//showImg.setTo(redColorElement,fgScribbleMask);

			//showImg.at<Vec3b>(y,x)[0] = 0;

			//showImg.at<Vec3b>(y,x)[1] = 0;

			//showImg.at<Vec3b>(y,x)[2] = 255;

		}

	}

	imshow("draw", showImg);

	imshow("fg mask", fgScribbleMask);

	imshow("bg mask", bgScribbleMask);

}

vector<double> slink(inputImg.cols*inputImg.rows),tlink(inputImg.cols*inputImg.rows);

double k=0;

GraphType *g = new GraphType(inputImg.cols*inputImg.rows, inputImg.cols*inputImg.rows*4);

inline int node1n(int i, int j) { return i*inputImg.cols + j; }

void computnlink() {

	double weight0=0; double weight1=0; double weight2=0; double weight3=0;

	for (int i = 0; i < inputImg.rows; ++i)

		for (int j = 0; j < inputImg.cols; ++j)

		{

			g->add_node();

		}

	for (int i = 0; i < inputImg.rows; ++i)

		for (int j = 0; j < inputImg.cols; ++j)

		{

			if (i  == 0);

			else {

				 weight0 =

						ofexp*exp(-(pow(inputImg.at<Vec3b>(i, j)[0] - inputImg.at<Vec3b>(i - 1, j)[0], 2) +

						pow(inputImg.at<Vec3b>(i, j)[1] - inputImg.at<Vec3b>(i - 1, j)[1], 2) +

						pow(inputImg.at<Vec3b>(i, j)[2] - inputImg.at<Vec3b>(i - 1, j)[2], 2)) / 6.0 / BSigma / BSigma);

				 g->add_edge(node1n(i, j), node1n(i - 1, j), weight0, weight0);

			}

			if (i + 1 ==inputImg.rows);

			else {

				weight2 =

					ofexp*exp(-(pow(inputImg.at<Vec3b>(i, j)[0] - inputImg.at<Vec3b>(i + 1, j)[0], 2) +

						pow(inputImg.at<Vec3b>(i, j)[1] - inputImg.at<Vec3b>(i + 1, j)[1], 2) +

						pow(inputImg.at<Vec3b>(i, j)[2] - inputImg.at<Vec3b>(i + 1, j)[2], 2)) / 6.0 / BSigma / BSigma);

				g->add_edge(node1n(i, j), node1n(i + 1, j), weight2, weight2);

			}

			if (j==0);

			else {

				weight3 =

					ofexp*exp(-(pow(inputImg.at<Vec3b>(i, j)[0] - inputImg.at<Vec3b>(i , j-1)[0], 2) +

						pow(inputImg.at<Vec3b>(i, j)[1] - inputImg.at<Vec3b>(i , j-1)[1], 2) +

						pow(inputImg.at<Vec3b>(i, j)[2] - inputImg.at<Vec3b>(i , j-1)[2], 2)) / 6.0 / BSigma / BSigma);

				g->add_edge(node1n(i, j), node1n(i , j-1), weight3, weight3);

			}

			if (j + 1 == inputImg.cols);

			else {

				weight1 =

					ofexp*exp(-(pow(inputImg.at<Vec3b>(i, j)[0] - inputImg.at<Vec3b>(i, j +1)[0], 2) +

						pow(inputImg.at<Vec3b>(i, j)[1] - inputImg.at<Vec3b>(i, j + 1)[1], 2) +

						pow(inputImg.at<Vec3b>(i, j)[2] - inputImg.at<Vec3b>(i, j + 1)[2], 2)) / 6.0 / BSigma / BSigma);

				g->add_edge(node1n(i, j), node1n(i, j + 1), weight1, weight1);

			}

			if (k < weight1+ weight0+ weight3+ weight2)

				k = weight1 + weight0 + weight3 + weight2;

		}

	k += 1;

}

Mat greyimg = imread(filename, 0); double gray[256]; double Bgray[256]; double Fgray[256]; double weight1 = 0; double weight2 = 0;

/*weight有问题改动*/void computtlink() {

	for (int i = 0; i < greyimg.rows*greyimg.cols; i++) {

		++gray[greyimg.at<uchar>(i)];

		if(bgScribbleMask.at<uchar>(i))

		++Bgray[greyimg.at<uchar>(i)];

		if (fgScribbleMask.at<uchar>(i))

		++Fgray[greyimg.at<uchar>(i)];

	}

	cout << greyimg.rows*greyimg.cols<<endl;

	for (int i = 0; i < greyimg.rows*greyimg.cols; i++) {

		weight1 = 0; weight2 = 0;

		for (int j = 0; j < 256; j++) {

			weight1 += (!gray[j]) ? 0 : ((Fgray[j] / gray[j])*exp(-1 * (pow(greyimg.at<uchar>(i) - j, 2))/2 / RSigma));

			weight2 += (!gray[j]) ? 0 : ((Bgray[j] / gray[j])*exp(-1 * (pow(greyimg.at<uchar>(i) - j, 2))/2/ RSigma));

		}

		if (bgScribbleMask.at<uchar>(i))

			{g->add_tweights(i,   /* capacities */ k, 0); continue;}

		if (fgScribbleMask.at<uchar>(i))

			{g->add_tweights(i,   /* capacities */ 0, k); continue;}

		g->add_tweights(i,   /* capacities */weight2 ,weight1   );

	}

}

int main() {

	cout << "在draw上画前景背景,左键红前景,右键蓝背景。然后在input输入s 开始运算" << endl;

	bgScribbleMask.create(2, inputImg.size, CV_8UC1);

	bgScribbleMask = 0;

	fgScribbleMask.create(2, inputImg.size, CV_8UC1);

	Mat result;

	result.create(2, inputImg.size, CV_8UC1);

	result = 0;

	fgScribbleMask = 0;

	namedWindow("draw");

	imshow("draw", showImg);

	namedWindow("input");

	imshow("input", inputImg); string ii[250];

	for (int i = 1; i < 250; i++)

		ii[i] = i;

		setMouseCallback("draw", onMouse, 0);

		while (1) {

			char key = waitKey(0);

			if (key == 's') {

				double j = 5; int k = 13;for (int i = 1; i < 10; ++++i)

				{

					ofexp = i;//Lambda                               三个可变动参数

					BSigma = j;//the Sigma of B{p,q}   小边缘越清

					RSigma = k;

					computnlink(); computtlink(); int flow = g->maxflow(); printf("Flow = %d\n", flow);

					cout << k;

					for (int i = 0; i < inputImg.rows*inputImg.cols; i++) {

						if (g->what_segment(i)) {

							result.at<uchar>(i) = 255; result.at<uchar>(i) = 255; result.at<uchar>(i) = 255;

						}

					}

					namedWindow(ii[i+k*6]);

					imshow(ii[i+k * 6], result);

				}

			}

		}

		return 0;

}
vs2015+opencv3.3.1+ maxflow-v3.01 c++实现Yuri Boykov 的Interactive Graph Cuts的更多相关文章
- win7下VS2015+opencv3.1.0配置
由于opencv与vs的适配版本不同,本人在官网下载opencv3.1.0,其可以和VS2013.VS2015适配,文中以VS2015为例 opencv2.4.13-----vc11;vc12 ope ...
- [转]VS2015+OpenCV3.3 GPU模块和opencv_contrib模块的编译以及采用CMake编译opencv_contrib时提示“No extra modules found in folder”问题的解决方案
据官方说法,目前还不是太稳定的算法模块都在opencv_contrib里边,由于不稳定,所以不能在release版本里发行,只有在稳定以后才会放进release里边.但是这里边有很多我们经常要用的算法 ...
- Win10 64位+VS2015+Opencv3.3.0安装配置
Win10 64位+VS2015+Opencv3.3.0安装配置 1.我们首先下载VS2015.OpenCV3.3.0. 1.1 VS2015下载 在官网https://visualstudio.mi ...
- win10+VS2015+opencv3.4.0配置方法
win10+VS2015+opencv3.4.0配置方法 操作环境: windows10 64位opencv 3.4.0:https://opencv.org/releases.html(选择open ...
- win10+vs2015+opencv3.0 x86/x64配置(debug+release)
最近做一些图像识别的项目,用到了opencv,opencv3.1没有x86版本,所以只能用opencv3.0来完成,下面介绍一下在window10下vs2015 配置opencv3.0的过程(x86和 ...
- opencv配置(win10+VS2015+opencv3.1)
Step 1:准备工作 a.win10 b.vs2015 c.opencv3.1[从http://opencv.org/downloads.html下载] Step 2.开始安装 a. 双击openc ...
- opencv探索之路(一):win10 X64+VS2015+opencv3.10安装教程
我的电脑64位Win10系统,现在利用VS2015安装opencv3.10.安装之路颇为艰辛,从一开始的VS2015的安装,到opencv的安装,都充满挑战,历经千辛万苦终于把opencv开发环境搭建 ...
- win10*64+vs2015+opencv3.0工程模板配置
参考网上的资料,自己再次整合一下,为新手提供个方便,也为自己备份. 一.下载安装opencv3.0 1.首先下载opencv3.0的包(windows版本的) 2.安装opencv,路径自己选好,自动 ...
- VS2015+Opencv3.2配置(一次配好)
对于 VS2015+QT5.8的配置我就不介绍了,由于我配置的比较早,具体有的东西忘掉了,大家可以参考下面这几篇文章. 留白留白留白留白留白(稍后补) 对于Opencv+VS的配置是我重点要说的内容. ...
随机推荐
- 1133 Splitting A Linked List
题意:把链表按规则调整,使小于0的先输出,然后输出键值在[0,k]的,最后输出键值大于k的. 思路:利用vector<Node> v,v1,v2,v3.遍历链表,把小于0的push到v1中 ...
- 010. VS2015创建MVC项目
1. 文件→新建→项目 2.选择空模板→选中MVC 3. 预览(如果是使用aspx, 则可以删除Views中的web.config, 如果使用Razor则不要删除, 否则会报Views/Home/In ...
- MyBatis 工具 pndao - 自动写 SQL
pndao的原理并不复杂,是基于MyBatis的方法命名约定来生成SQL,并且写入MyBatis需要的XML. 写之前会判断是否已经存在XML或者注解,如果已经存在则略过此方法,所以无论是注解还是XM ...
- List对象中的组合、查询、扩展
var Pnts = segs.Select( c => pntTsLst.Where ...
- 微信小程序之本地缓存
目前,微信给每个小程序提供了10M的本地缓存空间(哎哟妈呀好大) 有了本地缓存,你的小程序可以做到: 离线应用(已测试在无网络的情况下,可以操作缓存数据) 流畅的用户体验 减少网络请求,节省服务器资源 ...
- leetcode728
vector<int> selfDividingNumbers(int left, int right) { vector<int> V; for (int i = left; ...
- Spring IOC设计原理解析:本文乃学习整理参考而来
Spring IOC设计原理解析:本文乃学习整理参考而来 一. 什么是Ioc/DI? 二. Spring IOC体系结构 (1) BeanFactory (2) BeanDefinition 三. I ...
- FeiQ项目
一.映射表 UDPMeditor.h中: typedef void (UDPMeditor::*pFunc)(char*,long); struct ProtocolMap { PackdefType ...
- jQuery 给class附点击事件获取对应的索引
有一类div标签,class为pointbox,数量不等,有多个.我需要在点击某一个标签的时候实时获取该标签在这类标签中索引值,以便进行其他操作. 代码很简单: $(".pointbox&q ...
- 18-拍卖叫价(hdu2149 巴什博弈)
http://acm.hdu.edu.cn/showproblem.php?pid=2149 Public Sale Time Limit: 1000/1000 MS (Java/Others) ...