Spring Boot+Mybatis:实现数据库登录注册与两种properties配置参数读取
〇、参考资料
1、hutool介绍
https://blog.csdn.net/abst122/article/details/124091375
2、Spring Boot+Mybatis实现登录注册
https://www.cnblogs.com/wiki918/p/16221758.html
3、Spring Boot读取自定义配置文件
https://www.yisu.com/zixun/366877.html
4、Spring Boot读取properties配置文件的两种方式
https://blog.csdn.net/weixin_42352733/article/details/121830775
一、概述
1、技术栈
Spring Boot+Mybatis+Lombok+Hutool+Slf4j+thymeleaf
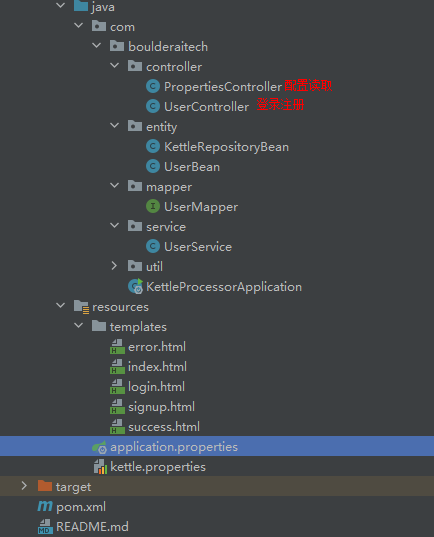
2、项目截图
二、登录注册(后台)
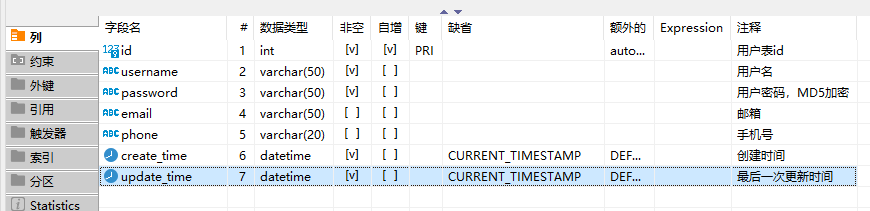
1、数据库设计
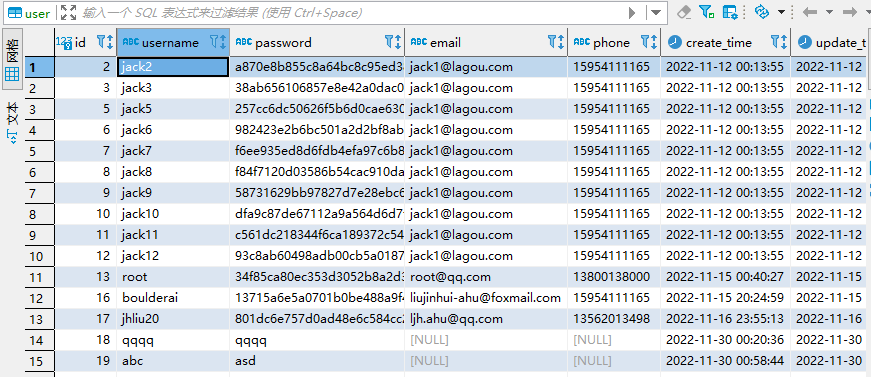
表结构:
表数据:

建表语句:
CREATE TABLE `user` (

  `id` int NOT NULL AUTO_INCREMENT COMMENT '用户表id',

  `username` varchar(50) NOT NULL COMMENT '用户名',

  `password` varchar(50) NOT NULL COMMENT '用户密码,MD5加密',

  `email` varchar(50) DEFAULT NULL COMMENT '邮箱',

  `phone` varchar(20) DEFAULT NULL COMMENT '手机号',

  `create_time` datetime NOT NULL DEFAULT CURRENT_TIMESTAMP COMMENT '创建时间',

  `update_time` datetime NOT NULL DEFAULT CURRENT_TIMESTAMP COMMENT '最后一次更新时间',

  PRIMARY KEY (`id`)

) ENGINE=InnoDB AUTO_INCREMENT=19 DEFAULT CHARSET=utf8mb4 COLLATE=utf8mb4_0900_ai_ci COMMENT='用户表'
2、POJO(Entity)编写-UserBean.java
package com.boulderaitech.entity;

import com.fasterxml.jackson.annotation.JsonFormat;

import lombok.AllArgsConstructor;

import lombok.Data;

import lombok.NoArgsConstructor;

import java.io.Serializable;

import java.util.Date;

@Data //提供了set、get方法及toString

@AllArgsConstructor

@NoArgsConstructor

public class UserBean implements Serializable {

    private Integer id; //为什么用Integer,不用int

    private String username;

    private String password;

    private String email;

    private String phone;

    @JsonFormat(pattern = "yyyy-MM-mm HH:mm:ss")

    private Date create_time;

    @JsonFormat(pattern = "yyyy-MM-mm HH:mm:ss")

    private Date update_time;

}
3、Controller编写-UserController.java
package com.boulderaitech.controller;

import cn.hutool.core.lang.Opt;

import cn.hutool.core.util.StrUtil;

import com.boulderaitech.entity.UserBean;

import com.boulderaitech.service.UserService;

import lombok.extern.slf4j.Slf4j;

import org.springframework.beans.factory.annotation.Autowired;

import org.springframework.stereotype.Controller;

import org.springframework.web.bind.annotation.RequestMapping;

import org.springframework.web.bind.annotation.RequestMethod;

@Slf4j

@Controller // 不能用@RestController

public class UserController {

    //将Service注入Web层

    @Autowired

    UserService userService;

    //用户测试

    @RequestMapping("/hello")

    public String hello() {

        return "login";

    }

    @RequestMapping("/register")

    public String register() {

        return "signup";

    }

    @RequestMapping(value = "/login", method = RequestMethod.POST)

    public String login(String username,String password) {

        UserBean userBean = userService.login(username,password);

        log.info("username:{}",username);

        log.info("password:{}",password);

        //hutool-core	核心,包括Bean操作、日期、各种Util等

        if(StrUtil.isNotEmpty(username)) {

            if(userBean != null) {

                return "success";

                //方法引用-遍历集合

                //Opt.ofEmptyAble(userBean).ifPresent(System.out::println);

            }

        } else {

            return "用户名不允许为空";

        }

        return "error";

    }

    @RequestMapping(value = "/signup", method = RequestMethod.POST)

    public String signup(String username,String password) {

        userService.insert(username,password);

        return "success";

    }

}
4、Service编写-UserService.java
package com.boulderaitech.service;

import com.boulderaitech.entity.UserBean;

import com.boulderaitech.mapper.UserMapper;

import org.springframework.stereotype.Service;

import javax.annotation.Resource;

@Service

public class UserService {

    //将dao层属性注入service层,为什么不用Autowired

    @Resource

    private UserMapper userMapper;

    public UserBean login(String username, String password) {

        return userMapper.getInfo(username,password);

    }

    public void insert(String username, String password) {

        userMapper.saveUser(username,password);

    }

}
5、Mapper编写-UserMapper.java
package com.boulderaitech.mapper;

import com.boulderaitech.entity.UserBean;

import org.apache.ibatis.annotations.Insert;

import org.apache.ibatis.annotations.Mapper;

import org.apache.ibatis.annotations.Param;

import org.apache.ibatis.annotations.Select;

@Mapper //添加Mapper注解,就不用写xml的mapper映射文件了

public interface UserMapper {

    //多个参数要加@Param修饰

    //思考:xml中的<include>代码片段怎么配

    @Select("SELECT * FROM user WHERE username=#{username} AND password= #{password}")

    UserBean getInfo(@Param("username") String username,@Param("password") String password);

    @Insert("INSERT INTO user(username,password) VALUE(#{username},#{password})")

    void saveUser(@Param("username") String username,@Param("password") String password);

}
6、配置文件编写-application.properties
# Spring Boot端口号

server.port=9088

# 数据源配置

spring.datasource.driver-class-name=com.mysql.cj.jdbc.Driver

spring.datasource.password=qaz123

spring.datasource.username=root

spring.datasource.url=jdbc:mysql://192.168.40.111:3306/visualization?serverTimezone=UTC&useUnicode=true&characterEncoding=utf-8&useSSL=true

spring.thymeleaf.prefix=classpath:/templates/
7、启动类编写-KettleProcessorApplication.java
package com.boulderaitech;

import org.springframework.boot.SpringApplication;

import org.springframework.boot.autoconfigure.SpringBootApplication;

/**

 * Spring Boot启动类,加Spring Boot注解,调用Spring的静态run方法

 */

@SpringBootApplication

public class KettleProcessorApplication {

    public static void main(String[] args) {

        SpringApplication.run(KettleProcessorApplication.class);

    }

}
三、登录注册(前台)
1、登录页面-login.html
<!DOCTYPE html>

<html lang="en">

<head>

  <meta charset="UTF-8">

  <title>login</title>

</head>

<body>

<form role="form" action = "/login" method="post">

  账号:<input type="text" id="username" name = "username"> <br>

  密码:<input type="password" id = "password" name = "password"> <br>

  <input type="submit" id = "login" value = "登录">

</form>

<a href="/register">注册</a>

</body>

</html>
2、注册页面-signup.html
<!--注册页面-->

<!DOCTYPE html>

<html lang="en">

<head>

    <meta charset="UTF-8">

    <title>注册</title>

</head>

<body>

<form role="form" action="/signup" method="post">

    请输入姓名:<input type="text" name="username" id="name"><br>

    请输入密码:<input type="password" name="password" id="password"><br>

    <input type="submit" name="sign" value="提交">

</form>

</body>

</html>
3、成功页面-success.html
<!DOCTYPE html>

<html lang="en">

<head>

    <meta charset="UTF-8">

    <title>success</title>

</head>

<body>

<h1>欢迎,恭喜登录成功/注册成功</h1>

</body>

</html>
4、失败页面-error.html
<!DOCTYPE html>

<html lang="en">

<head>

    <meta charset="UTF-8">

    <title>error</title>

</head>

<body>

<h1>登录失败!</h1>

</body>

</html>
四、配置读取
1、配置编写-kettle.properties
# 读取properties的两种方式:https://blog.csdn.net/weixin_42352733/article/details/121830775

environment=xuelei-www

kettle.repository.type=database

kettle.repository.username=admin

kettle.repository.password=admin
2、POJO(Entity)编写-KettleRepositoryBean.java
package com.boulderaitech.entity;

import lombok.AllArgsConstructor;

import lombok.Data;

import lombok.NoArgsConstructor;

import org.springframework.boot.context.properties.ConfigurationProperties;

import org.springframework.stereotype.Component;

@Data

@Component

@NoArgsConstructor

@AllArgsConstructor

@ConfigurationProperties(prefix = "kettle.repository")

public class KettleRepositoryBean {

    private String type;

    private String username;

    private String password;

}
3、Controller编写-PropertiesController.java
package com.boulderaitech.controller;
import com.boulderaitech.entity.KettleRepositoryBean;
import org.springframework.beans.factory.annotation.Autowired;
import org.springframework.beans.factory.annotation.Value;
import org.springframework.context.annotation.PropertySource;
import org.springframework.web.bind.annotation.RequestMapping;
import org.springframework.web.bind.annotation.RestController;
@RestController //Controller和RestCOntroller的区别
@PropertySource("classpath:kettle.properties") //默认是application.properties
public class PropertiesController {
@Value("${environment}")
private String envName;
@Autowired
private KettleRepositoryBean kettleRepositoryBean;
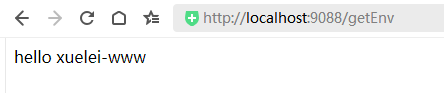
@RequestMapping("/getEnv")
public String getEnv() {
return "hello " + envName;
}
@RequestMapping("/getRepoInfo")
public String getRepoInfo() {
return "hello " + kettleRepositoryBean.toString();
}
}五、验证
1、登录

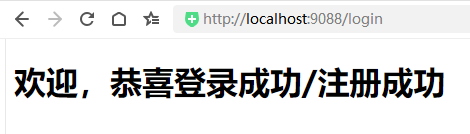
2、注册

3、读取单个配置
4、读取实体类配置(多个)

Spring Boot+Mybatis:实现数据库登录注册与两种properties配置参数读取的更多相关文章
- Spring boot+mybatis+thymeleaf 实现登录注册,增删改查
本文重在实现理解,过滤器,业务,逻辑需求,样式请无视.. 项目结构如下 1.idea新建Spring boot项目,在pom中加上thymeleaf和mybatis支持.pom.xml代码如下 < ...
- Java Spring+Mysql+Mybatis 实现用户登录注册功能
前言: 最近在学习Java的编程,前辈让我写一个包含数据库和前端的用户登录功能,通过看博客等我先是写了一个最基础的servlet+jsp,再到后来开始用maven进行编程,最终的完成版是一个 Spri ...
- Spring Boot入门教程2-1、使用Spring Boot+MyBatis访问数据库(CURD)注解版
一.前言 什么是MyBatis?MyBatis是目前Java平台最为流行的ORM框架https://baike.baidu.com/item/MyBatis/2824918 本篇开发环境1.操作系统: ...
- spring boot:解决cors跨域问题的两种方法(spring boot 2.3.2)
一,什么是CORS? 1,CORS(跨域资源共享)(CORS,Cross-origin resource sharing), 它是一个 W3C 标准中浏览器技术的规范, 它允许浏览器向非同一个域的服务 ...
- mybatis(二)执行CRUD操作的两种方式配置和注解
一.使用MyBatis对表执行CRUD操作——基于XML的实现 1.定义sql映射xml文件 userMapper.xml文件的内容如下: <?xml version="1.0&quo ...
- Spring Boot 定义系统启动任务,你会几种方式?
在 Servlet/Jsp 项目中,如果涉及到系统任务,例如在项目启动阶段要做一些数据初始化操作,这些操作有一个共同的特点,只在项目启动时进行,以后都不再执行,这里,容易想到web基础中的三大组件( ...
- (45). Spring Boot MyBatis连接Mysql数据库【从零开始学Spring Boot】
大家在开发的时候,会喜欢jdbcTemplate操作数据库,有喜欢JPA操作数据库的,有喜欢MyBatis操作数据库的,对于这些我个人觉得哪个使用顺手就使用哪个就好了,并没有一定要使用哪个,个人在实际 ...
- Spring Boot MyBatis 数据库集群访问实现
Spring Boot MyBatis 数据库集群访问实现 本示例主要介绍了Spring Boot程序方式实现数据库集群访问,读库轮询方式实现负载均衡.阅读本示例前,建议你有AOP编程基础.mybat ...
- Spring Boot + Mybatis + H2 database数据库
H2 Database H2 由纯 Java 编写的开源关系数据库,可以直接嵌入到应用程序中,不受平台约束,便于测试. h2数据库特点 (1)性能.小巧 (2)同时支持网络版和嵌入式版本,另外还提供了 ...
- # spring boot + mybatis 读取数据库
spring boot + mybatis 读取数据库 创建数据库 use testdb; drop table if exists t_city; create table t_city( id i ...
随机推荐
- Linux宝塔如何开启指定的目录浏览功能
哈喽,各位运维晚上好, 今天突发奇想,想给我的个人博客加一个功能,就是如何去打开一个网站文件夹的目录浏览功能,这个还是挺有趣的. 为了以后我还能想起怎么用,我决定记录下来,以便能用,也能给大家一个参考 ...
- 第四章:Django表单 - 2:Django表单API详解
声明:以下的Form.表单等术语都指的的广义的Django表单. Form要么是绑定了数据的,要么是未绑定数据的. 如果是绑定的,那么它能够验证数据,并渲染表单及其数据,然后生成HTML表单.如果未绑 ...
- 使用port-forward访问集群中的应用程序,以Redis 为例
为Redis创建Deployment和Service 创建 Redis Deployment,YAML文件如下: apiVersion: apps/v1 kind: Deployment metada ...
- nginx日志输出配置json格式
修改nginx配置文件 http { include mime.types; default_type application/octet-stream; charset utf-8; # 原有日志格 ...
- 【C++】从零开始的CS:GO逆向分析1——寻找偏移与基址的方法
[C++]从零开始的CS:GO逆向分析1--寻找偏移与基址的方法 前言:此文章主要用于提供方法与思路,fps游戏基本都能如此找偏移,文章里找的偏移比较少,主要用来演示寻找思路,文章的后记中会附一个 ...
- 聊聊Vim的工作原理
聊聊Vim的工作原理 日常里一直在用Vim这个编辑器,前阵子学习关于Linux中的fd(文件描述符)时,发现vim的进程描述符会比上一个自动加一,后续了解到vim的工作原理后,解开了这个疑问,所以记录 ...
- 洛谷U81904 【模板】树的直径
有负边权,所以用树形DP来找树的直径. 1 //树形DP求树的直径 2 #include<bits/stdc++.h> 3 using namespace std; 4 const int ...
- 代码随想录第七天| 454.四数相加II、383. 赎金信 、15. 三数之和 、18. 四数之和
第一题454.四数相加II 给你四个整数数组 nums1.nums2.nums3 和 nums4 ,数组长度都是 n ,请你计算有多少个元组 (i, j, k, l) 能满足: 0 <= i, ...
- PHP Phar反序列化学习
PHP Phar反序列化学习 Phar Phar是PHP的压缩文档,是PHP中类似于JAR的一种打包文件.它可以把多个文件存放至同一个文件中,无需解压,PHP就可以进行访问并执行内部语句. 默认开启版 ...
- Vue中router路由的使用、router-link的使用(在项目中的实际运用方式)
文章目录 1.先看router中的index.js文件 2.router-link的使用 3.实现的效果 前提:router已经安装 1.先看router中的index.js文件 import Vue ...