2.Prometheus邮件报警配置
1、安装配置 Alertmanager
wget https://github.com/prometheus/alertmanager/releases/download/v0.20.0/alertmanager-0.20.0.linux-amd64.tar.gz

tar -zxv -f alertmanager-0.20.0.linux-amd64.tar.gz -C /usr/local

cd /usr/local

mv alertmanager-0.20.0.linux-amd64/ alertmanager
2,创建启动文件
vim /usr/lib/systemd/system/alertmanager.service

[Unit]

Description=alertmanager

Documentation=https://github.com/prometheus/alertmanager

After=network.target

[Service]

Type=simple

User=prometheus

ExecStart=/usr/local/alertmanager/alertmanager --config.file=/usr/local/alertmanager/alert-test.yml --storage.path=/usr/local/alertmanager/data

Restart=on-failure

[Install]

WantedBy=multi-user.target
Alertmanager 安装目录下默认有 alertmanager.yml 配置文件,可以创建新的配置文件,在启动时指定即可。
cd /usr/local/alertmanager

vim alert-test.yml

global:

  smtp_smarthost: 'smtp.qiye.aliyun.com:25'

  smtp_from: 'jump@tongchuangkeji.net'

  smtp_auth_username: 'jump@tongchuangkeji.net'

  smtp_auth_password: 'xxxx'

  smtp_require_tls: false

templates:

  - '/alertmanager/template/*.tmpl'

route:

  group_by: ['alertname', 'cluster', 'service']

  group_wait: 30s

  group_interval: 5m

  repeat_interval: 10m

  receiver: default-receiver

receivers:

- name: 'default-receiver'

  email_configs:

  - to: 'liqilong@edspay.com'

    html: ''

    headers: {Subject: "[WARN] 报警邮件 test"}
邮箱一开始使用的是公司的邮箱,结果在后边验证的时候,总是会报错level=error ts=2019-01-26T06:21:59.062483579Z caller=notify.go:332 component=dispatcher msg="Error on notify" err="*smtp.plainAuth failed: unencrypted connection",也在这里看了一些人踩坑的报告,试验了25、465、587端口,发现均无效果,最后改成163邮箱,直接就生效了。
- smtp_smarthost:是用于发送邮件的邮箱的 SMTP 服务器地址+端口;
- smtp_auth_password:是发送邮箱的授权码而不是登录密码;
- smtp_require_tls:不设置的话默认为 true,当为 true 时会有 starttls 错误,为了简单这里设置为 false;
- templates:指出邮件的模板路径;
- receivers 下 html 指出邮件内容模板名,这里模板名为 “alert.html”,在模板路径中的某个文件中定义。
- headers:为邮件标题;
使用阿里云企业邮箱无法发送邮件,报错如下:
Jun 11 13:40:52 worker alertmanager: level=error ts=2020-06-11T05:40:52.638Z caller=notify.go:372 component=dispatcher msg="Error on notify" err="*smtp.plainAuth auth: unencrypted connection" context_err="context deadline exceeded"

Jun 11 13:40:52 worker alertmanager: level=error ts=2020-06-11T05:40:52.638Z caller=dispatch.go:301 component=dispatcher msg="Notify for alerts failed" num_alerts=1 err="*smtp.plainAuth auth: unencrypted connection"
3,配置告警规则
配置 rule.yml。
cd /usr/local/prometheus

vim rule.yml

groups:

- name: alert-rules.yml

  rules:

  - alert: InstanceStatus # alert 名字

    expr: up{job="192.168.75.10"} == 0 # 判断条件,job是指prometheus.yml文件中的job_name

    for: 10s # 条件保持 10s 才会发出 alter

    labels: # 设置 alert 的标签

      severity: "critical"

    annotations:  # alert 的其他标签,但不用于标识 alert

      description: 服务器  已当机超过 20s

      summary: 服务器  运行状态
在 prometheus.yml 中指定 rule.yml 的路径
cat prometheus.yml

# my global config

global:

  scrape_interval:     15s # Set the scrape interval to every 15 seconds. Default is every 1 minute.

  evaluation_interval: 15s # Evaluate rules every 15 seconds. The default is every 1 minute.

  # scrape_timeout is set to the global default (10s).

# Alertmanager configuration

alerting:

  alertmanagers:

  - static_configs:

    - targets:

      - localhost:9093 # 这里修改为 localhost,# 新增

# Load rules once and periodically evaluate them according to the global 'evaluation_interval'.

rule_files:

  # - "first_rules.yml"

  # - "second_rules.yml"

  - "/usr/local/prometheus/rule.yml" # 新增

# A scrape configuration containing exactly one endpoint to scrape:

# Here it's Prometheus itself.

scrape_configs:

  # The job name is added as a label `job=<job_name>` to any timeseries scraped from this config.

  - job_name: '192.168.75.11'

    # metrics_path defaults to '/metrics'

    # scheme defaults to 'http'.

    static_configs:

    - targets: ['localhost:9090','localhost:9100']

  - job_name: '192.168.75.10'

    scrape_interval: 5s

    static_configs:

    - targets: ['192.168.75.10:9100']
重启 Prometheus 服务:
chown -R prometheus.prometheus /usr/local/prometheus/rule.yml

systemctl restart prometheus
4,编写邮件模板
注意:文件后缀为 tmpl
mkdir -pv /alertmanager/template/ # 路径跟上面的alertmanager.yml 配置文件保持一致

vim /alertmanager/template/alert.tmpl

<table>

	<tr><td>报警名</td><td>开始时间</td></tr>

	<tr><td></td><td></td></tr>

</table>
注意:启动的时候报错如下:
Jun 11 12:55:44 worker alertmanager: level=error ts=2020-06-11T04:55:44.744Z caller=main.go:236 msg="Unable to create data directory" err="mkdir data/: permission denied"

Jun 11 12:55:44 worker systemd: alertmanager.service: main process exited, code=exited, status=1/FAILURE

Jun 11 12:55:44 worker systemd: Unit alertmanager.service entered failed state.

Jun 11 12:55:44 worker systemd: alertmanager.service failed.

Jun 11 12:55:44 worker systemd: alertmanager.service holdoff time over, scheduling restart.

Jun 11 12:55:44 worker systemd: Stopped alertmanager.
这是因为在新版本中默认情况下存储路径
--storage.path是相对目录data/,但是prometheus用户在该路径下没权限创建目录,所以导致启动报错
解决办法:在alertmanager.service文件中指定默认存储路径在当前路径下即可
5,启动 Alertmanager
chown -R prometheus.prometheus /usr/local/alertmanager

systemctl daemon-reload

systemctl start alertmanager.service

systemctl status alertmanager.service

ss -tnl|grep 9093
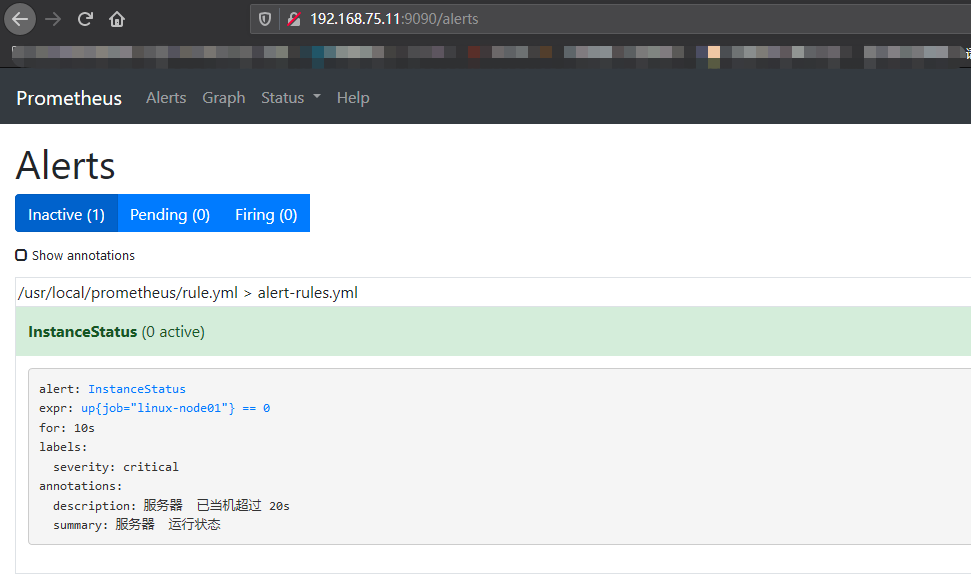
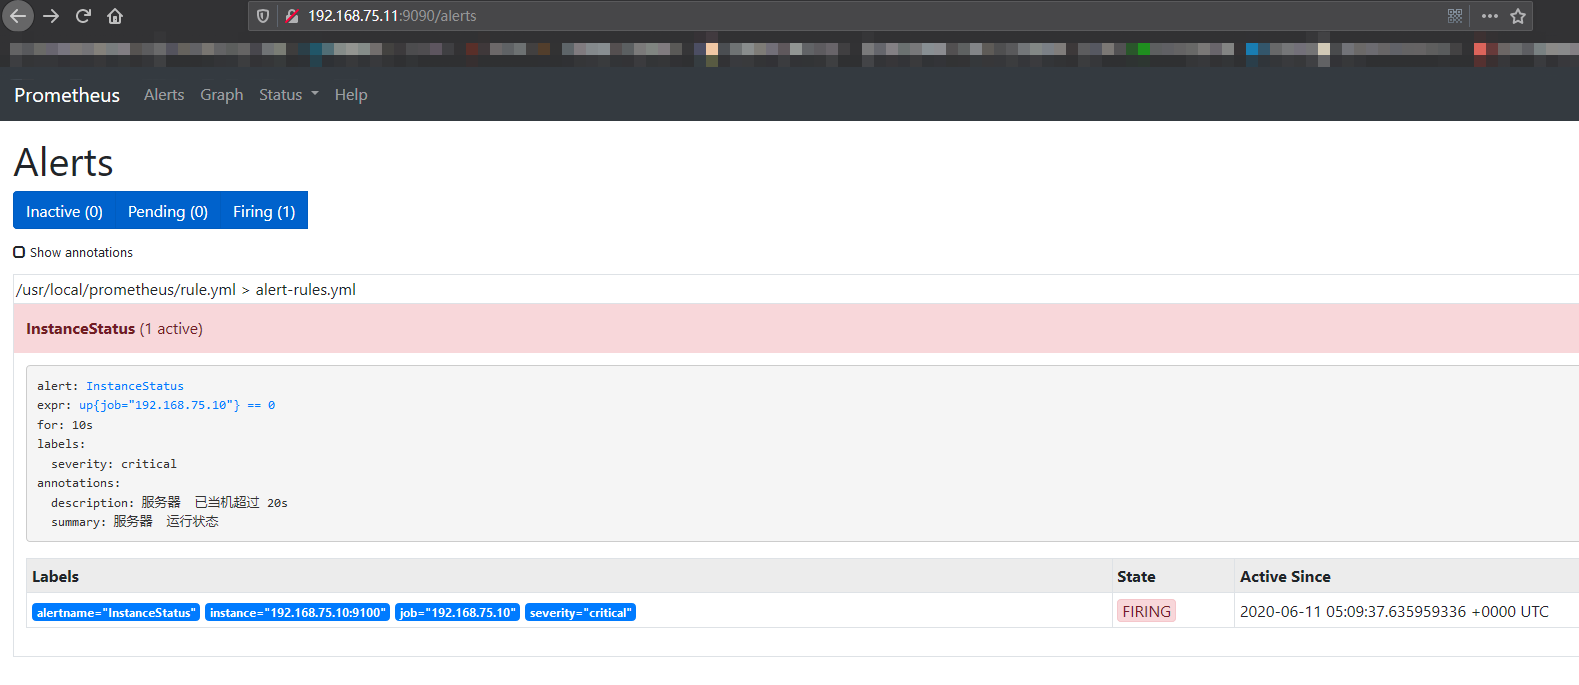
6,验证效果
此时到管理界面可以看到如下信息:
然后停止192.168.75.10节点上的 node_exporter 服务,然后再看效果。
接着邮箱应该会收到邮件:
略
2.Prometheus邮件报警配置的更多相关文章
- zabbix 邮件报警配置
zabbxi 邮件告警推送有两种方式: 1.使用zabbix服务端的本地邮箱账号发送,邮件名为:user@hostname.localdomain,user为发送邮件的用户,hostname为zabb ...
- Zabbix邮件报警配置
一.安装sendmail或者postfix yum install sendmail #安装 service sendmail start #启动 chkconfig sendmail on #设置开 ...
- zabbix(7)邮件报警配置
邮件报警可以使用Linux自带邮件服务器(postfix等),也可以使用其他邮件服务器(像腾讯邮箱,126邮箱) 一.使用mail. 1.确定zabbix server是否安装发送邮件的命令mail, ...
- CentOS7.3下Zabbix3.5之邮件报警配置
一.邮件客户端以及脚本相关配置 1.安装sendmail,一般操作系统默认安装了安装 yum install sendmail 启动 service sendmail start 设置开机启动 chk ...
- 实战:Zabbix 3.4邮件报警配置
环境:CentOS 7 + Zabbix 3.4 如果只是监测并不能满足需求,还需要通过邮件的方式对问题进行报警.接下来进行实战操作: 一.安装邮件发送工具 mailx 如果CentOS 有邮件服务, ...
- jenkins(5): jenkins邮件报警配置
参考: https://blog.csdn.net/u013066244/article/details/78665075 1. 使用 增强版的邮件通知 1.1 安装插件 1.2. 系统配置 ...
- Oracle管理监控之使用utl_mail自动邮件报警配置
--代发邮件存储过程源码如下: CREATE OR REPLACE PROCEDURE send_mail(p_recipient VARCHAR2, -- 邮件接收人 ...
- elasticsearch5之Elastalert 安装使用 配置邮件报警和微信报警
简介 Elastalert是用python2写的一个报警框架(目前支持python2.6和2.7,不支持3.x),github地址为 https://github.com/Yelp/elastaler ...
- zabbix3 设置邮件报警(五)
Zabbix邮件报警配置 一.安装sendmail或者postfix(安装一种即可) yum install sendmail #安装 service sendmail start #启动 chkco ...
随机推荐
- .NET Core 实现后台任务(定时任务)BackgroundService(二)
原文连接:https://www.cnblogs.com/ysmc/p/16468560.html 在上一篇文档中说到使用 IHostedService 接口实现定时任务,其中,有小伙伴就问到,为什么 ...
- 【百度飞桨】手写数字识别模型部署Paddle Inference
从完成一个简单的『手写数字识别任务』开始,快速了解飞桨框架 API 的使用方法. 模型开发 『手写数字识别』是深度学习里的 Hello World 任务,用于对 0 ~ 9 的十类数字进行分类,即输入 ...
- jdbc 09: preparedStatement实现增删改查
jdbc连接mysql,利用preparedStatement实现增删改查 package com.examples.jdbc.o9_preparedStatement实现增删改; import ja ...
- 3.Android高仿网易云音乐-首页复杂发现界面布局和功能/RecyclerView复杂布局
0.效果图 效果图依次为发现界面顶部,包含首页轮播图,水平滚动的按钮,推荐歌单:然后是发现界面推荐单曲,点击单曲就是直接进入播放界面:最后是全局播放控制条上点击播放列表按钮显示的播放列表弹窗. 1.整 ...
- Java开发学习(十九)----AOP环绕通知案例之密码数据兼容处理
一.需求分析 需求: 对百度网盘分享链接输入密码时尾部多输入的空格做兼容处理. 问题描述: 点击链接,会提示,请输入提取码,如下图所示 当我们从别人发给我们的内容中复制提取码的时候,有时候会多复制到一 ...
- 神工鬼斧惟肖惟妙,M1 mac系统深度学习框架Pytorch的二次元动漫动画风格迁移滤镜AnimeGANv2+Ffmpeg(图片+视频)快速实践
原文转载自「刘悦的技术博客」https://v3u.cn/a_id_201 前段时间,业界鼎鼎有名的动漫风格转化滤镜库AnimeGAN发布了最新的v2版本,一时间街谈巷议,风头无两.提起二次元,目前国 ...
- Postgres常用SQL
- [SDOI2017]序列计数 (矩阵加速,小容斥)
题面 Alice想要得到一个长度为n的序列,序列中的数都是不超过m的正整数,而且这n个数的和是p的倍数. Alice还希望,这n个数中,至少有一个数是质数. Alice想知道,有多少个序列满足她的要求 ...
- Java连接简单使用ElasticSearch
目录 1. 添加依赖 2. 代码,无账号密码 3. 代码,有账号密码,并且是https方式 4. 参考文章 1. 添加依赖 <!-- https://mvnrepository.com/arti ...
- scp复制发送文件夹到其他服务器上
简述scp: scp是secure copy的简写,是linux系统下基于ssh登陆进行安全的远程文件拷贝命令. 写法: scp [可选参数] 登录名@地址:源路径 目标路径. 举例:scp -r ...