Elasticsearch Dockerfile 例子
文章转载自:https://elasticstack.blog.csdn.net/article/details/111692444
前提条件
在继续执行本教程中概述的步骤之前,你需要具备一个关键的先决条件:你需要一个稳定且受支持的 Docker 版本,才能使用 Dockerfile 创建 Elasticsearch 映像。你可以使用如下的命令来检查你的 Docker 的版本:
$ docker --version

Docker version 20.10.0, build 7287ab3
Elasticsearch YAML 文件
针对定制的 Docker image,我们通常需要定制自己的 elasticsearch.yml 文件。然后,你需要使用 Dockerfile 的 COPY 命令将文件内容复制到容器中。我们首先来创建一个文件目录:
mkdir elasticsearch-docker && cd elasticsearch-docker
使用 Elasticsearch 和 Dockerfile 时,你可以使用 YAML 进行许多不同的配置更改。 以下 YAML 命令仅显示了你可以为在 Docker 中运行的 Elasticsearch 集群修改的一些内容:
elasticsearch.yml
# ---------------------------------- Cluster -----------------------------------

#

# Use a descriptive name for your cluster:

#

cluster.name: cluster-liuxg

#

# ------------------------------------ Node ------------------------------------

#

# Use a descriptive name for the node:

#

node.name: node1

#

# Add custom attributes to the node:

#

#node.attr.rack: r1

#

# ----------------------------------- Paths ------------------------------------

#

# Path to directory where to store the data (separate multiple locations by comma):

#

path.data: /var/lib/elasticsearch

#

# Path to log files:

#

path.logs: /var/log/elasticsearch

#

# ----------------------------------- Memory -----------------------------------

#

# Lock the memory on startup:

#

#bootstrap.memory_lock: true

#

# Make sure that the heap size is set to about half the memory available

# on the system and that the owner of the process is allowed to use this

# limit.

#

# Elasticsearch performs poorly when the system is swapping the memory.

#

# ---------------------------------- Network -----------------------------------

#

# Set the bind address to a specific IP (IPv4 or IPv6):

#

network.host: 0.0.0.0

#

# Set a custom port for HTTP:

#

http.port: 9200

#

# For more information, consult the network module documentation.

#

# --------------------------------- Discovery ----------------------------------

#

# Pass an initial list of hosts to perform discovery when this node is started:

# The default list of hosts is ["127.0.0.1", "[::1]"]

#

#discovery.seed_hosts: ["host1", "host2"]

#

# Bootstrap the cluster using an initial set of master-eligible nodes:

#

#cluster.initial_master_nodes: ["node-1", "node-2"]

#

# For more information, consult the discovery and cluster formation module documentation.

#

# ---------------------------------- Gateway -----------------------------------

#

# Block initial recovery after a full cluster restart until N nodes are started:

#

#gateway.recover_after_nodes: 3

#

# For more information, consult the gateway module documentation.

#

# ---------------------------------- Various -----------------------------------

#

# Require explicit names when deleting indices:

#

#action.destructive_requires_name: true

discovery.type: single-node
在上面我修改了 cluster.name 以及 node.name。更重要的是我修改了 network.host 为 0.0.0.0,这样可以使得 Elasticsearch 可以被外部所访问。你可以根据自己实际的需求配置这个文件。
Elasticsearch Dockerfile
你可以通过多种方式在 Dockerfile 中构建 Elasticsearch 映像。 在以下示例中,Ubuntu 镜像使用 wget 下载 Elasticsearch 服务的 DEB 软件包:
Dockerfile
FROM ubuntu:20.04

# container creator

LABEL maintainer="liu_xiao_guo@yahoo.com"

# copy the configuration file into the container

COPY logging.yml /usr/share/elasticsearch/config/

RUN groupadd -g 1000 elasticsearch && useradd elasticsearch -u 1000 -g 1000

# install APT transport and wget

RUN apt-get update && \

  apt-get install -y --no-install-recommends \

  apt-transport-https \

  curl \

  wget -y

RUN wget https://artifacts.elastic.co/downloads/elasticsearch/elasticsearch-7.10.1-amd64.deb --no-check-certificate && dpkg -i elasticsearch-7.10.1-amd64.deb

COPY --chown=elasticsearch:elasticsearch elasticsearch.yml /etc/elasticsearch/

# start elasticsearch service

USER elasticsearch

ENV PATH=$PATH:/usr/share/elasticsearch/bin

CMD ["elasticsearch"]

# expose the default Elasticsearch port

EXPOSE 9200 9300
注意:请确保在同一行中运行 apt-get update 和 apt-get install 命令,如上例所示。 如果你不这样做,它将被缓存并且不会每次都更新。
我们使用如下的命令来 build docker image:
docker build -t liuxg/liuxg-elasticsearch $PWD
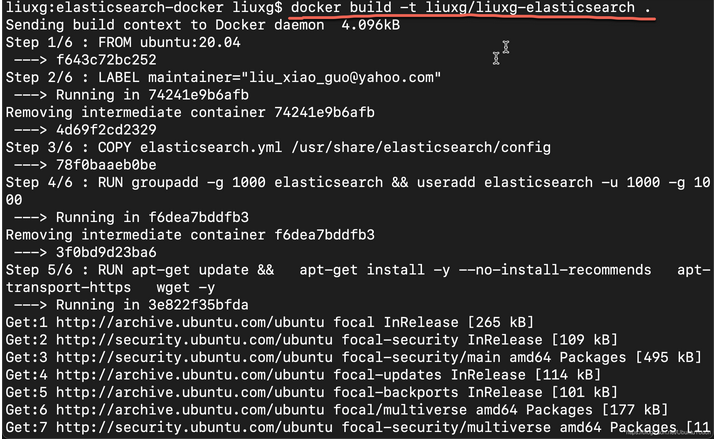
上面的 -t 是给这个镜像一个名称。我们使用 . 来表示当前的目录。等运行完上面的命令后,我们可以使用如下的命令来进行检查:
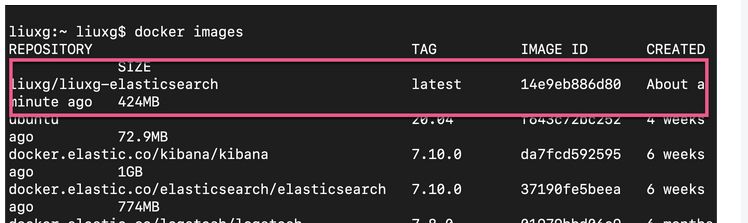
docker images
上面的命令显示:
我们可以看到一个新增加的 docker image。
另外一种方法是我们通过下载已经创建好的 Elasticsearch 镜像,然后把我们的配置文件直接拷入到镜像的容器中。下面的例子展示如何实现:
Dockerfile
FROM elasticsearch:7.10.1

# container creator

MAINTAINER orkb

# copy the configuration file into the container

COPY elasticsearch.yml /usr/share/elasticsearch/config

# expose the default Elasticsearch port

EXPOSE 9200 9300
注意:Docker 仅允许你从每个 Dockerfile 提取一个镜像,因此请确保不要使用多个 FROM 命令。 如果你确实尝试使用 FROM 提取多个镜像,它将仅使用最后一个命令构建一个镜像,而忽略之前的任何命令。
至此,我们已经成功地创建了我们的 docker 镜像。我们可以使用如下的命令来检查是否有刚才被创建的镜像运行的容器:
docker ps -a
docker ps -a | grep liuxg
上面的命令显示没有任何运行的容器。这是因为到目前为止仅创建了镜像。 你需要使用 docker run 命令从镜像创建容器。
启动一个 Elasticsearch 容器
你可以使用以下命令来运行先前创建的 liuxg/iuxg-elasticsearch Docker 镜像:
docker run --rm -it liuxg/liuxg-elasticsearch /bin/bash
你还可以使用 -p 选项公开默认的 Elasticsearch 端口 9200。以下是如何使用此选项的示例:
docker run --rm -p 9200:9200 liuxg/liuxg-elasticsearch
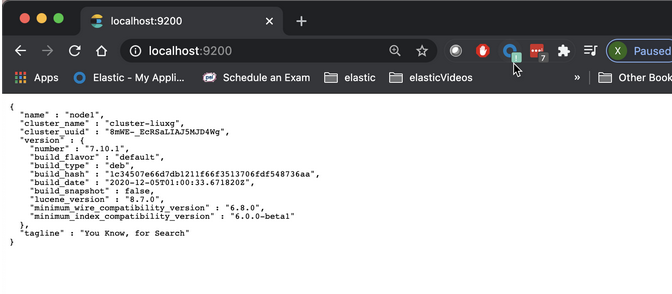
一旦我们启动这个容器,我们可以在 host 机器的命令行中打入如下的命令来进行查看:
curl -XGET http://localhost:9200
上面命令显示的结果为:
$ curl -XGET http://localhost:9200

{

  "name" : "node1",

  "cluster_name" : "cluster-liuxg",

  "cluster_uuid" : "8mWE-_EcRSaLIAJ5MJD4Wg",

  "version" : {

    "number" : "7.10.1",

    "build_flavor" : "default",

    "build_type" : "deb",

    "build_hash" : "1c34507e66d7db1211f66f3513706fdf548736aa",

    "build_date" : "2020-12-05T01:00:33.671820Z",

    "build_snapshot" : false,

    "lucene_version" : "8.7.0",

    "minimum_wire_compatibility_version" : "6.8.0",

    "minimum_index_compatibility_version" : "6.0.0-beta1"

  },

  "tagline" : "You Know, for Search"

}
从上面我们可以看出来 cluster_name 以及 node 名字都是我们之前在 elasticsearch.yml 中所设置的。我们可以在浏览器中访问 localhost:9200 查看:
Elasticsearch Dockerfile 例子的更多相关文章
- springboot整合elasticsearch入门例子
springboot整合elasticsearch入门例子 https://blog.csdn.net/tianyaleixiaowu/article/details/72833940 Elastic ...
- python操作Elasticsearch (一、例子)
E lasticsearch是一款分布式搜索引擎,支持在大数据环境中进行实时数据分析.它基于Apache Lucene文本搜索引擎,内部功能通过ReST API暴露给外部.除了通过HTTP直接访问El ...
- 用Dockerfile构建docker image
dockerfile是为快速构建docker image而设计的,当你使用docker build 命令的时候,docker 会读取当前目录下的命名为Dockerfile(首字母大写)的纯文本文件并执 ...
- 《读书报告 -- Elasticsearch入门 》-- 安装以及简单使用(1)
<读书报告 – Elasticsearch入门 > 第一章 Elasticsearch入门 Elasticsearch是一个实时的分布式搜索和分析引擎,使得人们可以在一定规模上和一定速度上 ...
- 使用Hive读取ElasticSearch中的数据
本文将介绍如何通过Hive来读取ElasticSearch中的数据,然后我们可以像操作其他正常Hive表一样,使用Hive来直接操作ElasticSearch中的数据,将极大的方便开发人员.本文使用的 ...
- Docker实战-编写Dockerfile
一.编译镜像 1. 编译镜像 Dockerfile类似于Makfile,用户使用docker build就可以编译镜像,使用该命令可以设置编译镜像时使用的CPU数量.内存大小.文件路径等 语法:doc ...
- 使用 Elasticsearch 实现博客站内搜索
Reference: http://www.open-open.com/lib/view/open1452046497511.html 一直以来,为了优化本博客站内搜索效果和速度,我使用 bing ...
- Elasticsearch学习记录(分布式的特性)
Elasticsearch学习记录(分布式的特性) 分布式的特性 我们提到Elasticsearch可以扩展到上百(甚至上千)的服务器来处理PB级的数据.然而我们的例子只给出了一些使用Elastics ...
- boot接入elasticsearch
boot接入elasticsearch 参考博客:https://blog.csdn.net/li521wang/article/details/83792552 项目源码demo:https://g ...
随机推荐
- SpringBoot:Redis中的zset
zset被描述为有序集合,但RedisTemplate的OpsForZSet().range方法的返回值是set,那么: 这样直接查询zset返回set的操作会使得元素失去顺序吗? 先明确:Set是什 ...
- 了解有哪几个C标准&了解C编译管道
下列哪个不是C标准.参考:C语言标准 小知识:C语言标准的发展 K&R C: 1978年,丹尼斯·里奇(Dennis Ritchie)和布莱恩·科尔尼干(Brian Kernighan)出版了 ...
- 青山不遮,毕竟东流,集成Web3.0身份钱包MetaMask以太坊一键登录(Tornado6+Vue.js3)
原文转载自「刘悦的技术博客」https://v3u.cn/a_id_213 上世纪九十年代,海湾战争的时候,一位美军军官担心他们的五角大楼会被敌人的一枚导弹干掉,从而导致在全球的美军基地处于瘫痪状态. ...
- Win10使用fvm管理多个Flutter版本
Win10使用fvm管理多个Flutter版本 参考:https://blog.csdn.net/PyMuma/article/details/115298645 1.升级Flutter 由于现在的f ...
- DolphinScheduler 线上 Meetup 视频回放(07.25)
上周六下午 DolphinScheduler 社区联合 Doris 社区进行了 2020 年首次线上 Meetup,各位讲师都做了非常精彩的分享,也吸引了 1900 多位技术伙伴观看. 其中 Dolp ...
- k8s驱逐篇(2)-kubelet节点压力驱逐
kubelet节点压力驱逐 kubelet监控集群节点的 CPU.内存.磁盘空间和文件系统的inode 等资源,根据kubelet启动参数中的驱逐策略配置,当这些资源中的一个或者多个达到特定的消耗水平 ...
- 总结-DSU ON TREE(树上启发式合并)
考试遇到一道题: 有一棵n个点的有根树,每个点有一个颜色,每次询问给定一个点\(u\)和一个数\(k\),询问\(u\)子是多少个不同颜色节点的\(k\)级祖先.n<=500000. 显然对每一 ...
- 用Socket套接字发送和接收文件(中间用数组存取)
创建服务端: public class TcpFileServer { public static void main(String[] args) throws Exception { //1创建S ...
- QQ国际版V8.0.11.4530
简洁,快速,无广告,好用! 预览图 下载地址 QQ国际版.apk 其他简洁版本如下 在线观看 视频地址[灰常简洁占用超低!]
- MySQL源码分析之SQL函数执行
1.MySQL中执行一条SQL的总体流程 2.SQL函数执行过程 1.MySQL中执行一条SQL的总体流程 一条包含函数的SQL语句,在mysql中会经过: 客户端发送,服务器连接,语法解析,语句执行 ...