Elasticsearch Dockerfile 例子
文章转载自:https://elasticstack.blog.csdn.net/article/details/111692444
前提条件
在继续执行本教程中概述的步骤之前,你需要具备一个关键的先决条件:你需要一个稳定且受支持的 Docker 版本,才能使用 Dockerfile 创建 Elasticsearch 映像。你可以使用如下的命令来检查你的 Docker 的版本:
$ docker --version

Docker version 20.10.0, build 7287ab3
Elasticsearch YAML 文件
针对定制的 Docker image,我们通常需要定制自己的 elasticsearch.yml 文件。然后,你需要使用 Dockerfile 的 COPY 命令将文件内容复制到容器中。我们首先来创建一个文件目录:
mkdir elasticsearch-docker && cd elasticsearch-docker
使用 Elasticsearch 和 Dockerfile 时,你可以使用 YAML 进行许多不同的配置更改。 以下 YAML 命令仅显示了你可以为在 Docker 中运行的 Elasticsearch 集群修改的一些内容:
elasticsearch.yml
# ---------------------------------- Cluster -----------------------------------

#

# Use a descriptive name for your cluster:

#

cluster.name: cluster-liuxg

#

# ------------------------------------ Node ------------------------------------

#

# Use a descriptive name for the node:

#

node.name: node1

#

# Add custom attributes to the node:

#

#node.attr.rack: r1

#

# ----------------------------------- Paths ------------------------------------

#

# Path to directory where to store the data (separate multiple locations by comma):

#

path.data: /var/lib/elasticsearch

#

# Path to log files:

#

path.logs: /var/log/elasticsearch

#

# ----------------------------------- Memory -----------------------------------

#

# Lock the memory on startup:

#

#bootstrap.memory_lock: true

#

# Make sure that the heap size is set to about half the memory available

# on the system and that the owner of the process is allowed to use this

# limit.

#

# Elasticsearch performs poorly when the system is swapping the memory.

#

# ---------------------------------- Network -----------------------------------

#

# Set the bind address to a specific IP (IPv4 or IPv6):

#

network.host: 0.0.0.0

#

# Set a custom port for HTTP:

#

http.port: 9200

#

# For more information, consult the network module documentation.

#

# --------------------------------- Discovery ----------------------------------

#

# Pass an initial list of hosts to perform discovery when this node is started:

# The default list of hosts is ["127.0.0.1", "[::1]"]

#

#discovery.seed_hosts: ["host1", "host2"]

#

# Bootstrap the cluster using an initial set of master-eligible nodes:

#

#cluster.initial_master_nodes: ["node-1", "node-2"]

#

# For more information, consult the discovery and cluster formation module documentation.

#

# ---------------------------------- Gateway -----------------------------------

#

# Block initial recovery after a full cluster restart until N nodes are started:

#

#gateway.recover_after_nodes: 3

#

# For more information, consult the gateway module documentation.

#

# ---------------------------------- Various -----------------------------------

#

# Require explicit names when deleting indices:

#

#action.destructive_requires_name: true

discovery.type: single-node
在上面我修改了 cluster.name 以及 node.name。更重要的是我修改了 network.host 为 0.0.0.0,这样可以使得 Elasticsearch 可以被外部所访问。你可以根据自己实际的需求配置这个文件。
Elasticsearch Dockerfile
你可以通过多种方式在 Dockerfile 中构建 Elasticsearch 映像。 在以下示例中,Ubuntu 镜像使用 wget 下载 Elasticsearch 服务的 DEB 软件包:
Dockerfile
FROM ubuntu:20.04

# container creator

LABEL maintainer="liu_xiao_guo@yahoo.com"

# copy the configuration file into the container

COPY logging.yml /usr/share/elasticsearch/config/

RUN groupadd -g 1000 elasticsearch && useradd elasticsearch -u 1000 -g 1000

# install APT transport and wget

RUN apt-get update && \

  apt-get install -y --no-install-recommends \

  apt-transport-https \

  curl \

  wget -y

RUN wget https://artifacts.elastic.co/downloads/elasticsearch/elasticsearch-7.10.1-amd64.deb --no-check-certificate && dpkg -i elasticsearch-7.10.1-amd64.deb

COPY --chown=elasticsearch:elasticsearch elasticsearch.yml /etc/elasticsearch/

# start elasticsearch service

USER elasticsearch

ENV PATH=$PATH:/usr/share/elasticsearch/bin

CMD ["elasticsearch"]

# expose the default Elasticsearch port

EXPOSE 9200 9300
注意:请确保在同一行中运行 apt-get update 和 apt-get install 命令,如上例所示。 如果你不这样做,它将被缓存并且不会每次都更新。
我们使用如下的命令来 build docker image:
docker build -t liuxg/liuxg-elasticsearch $PWD
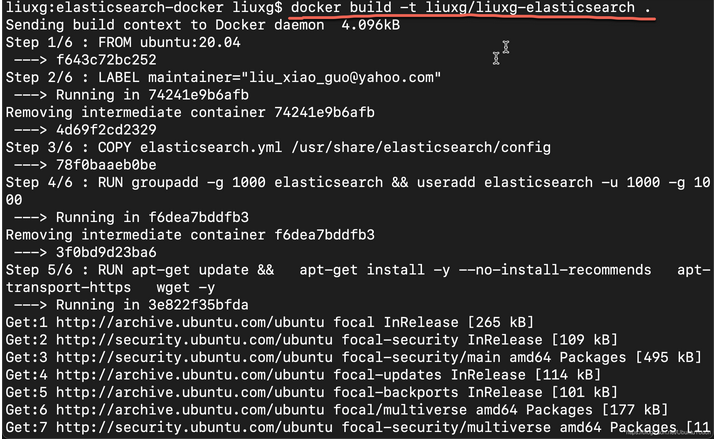
上面的 -t 是给这个镜像一个名称。我们使用 . 来表示当前的目录。等运行完上面的命令后,我们可以使用如下的命令来进行检查:
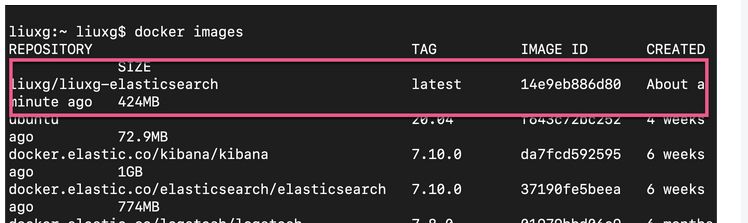
docker images
上面的命令显示:
我们可以看到一个新增加的 docker image。
另外一种方法是我们通过下载已经创建好的 Elasticsearch 镜像,然后把我们的配置文件直接拷入到镜像的容器中。下面的例子展示如何实现:
Dockerfile
FROM elasticsearch:7.10.1

# container creator

MAINTAINER orkb

# copy the configuration file into the container

COPY elasticsearch.yml /usr/share/elasticsearch/config

# expose the default Elasticsearch port

EXPOSE 9200 9300
注意:Docker 仅允许你从每个 Dockerfile 提取一个镜像,因此请确保不要使用多个 FROM 命令。 如果你确实尝试使用 FROM 提取多个镜像,它将仅使用最后一个命令构建一个镜像,而忽略之前的任何命令。
至此,我们已经成功地创建了我们的 docker 镜像。我们可以使用如下的命令来检查是否有刚才被创建的镜像运行的容器:
docker ps -a
docker ps -a | grep liuxg
上面的命令显示没有任何运行的容器。这是因为到目前为止仅创建了镜像。 你需要使用 docker run 命令从镜像创建容器。
启动一个 Elasticsearch 容器
你可以使用以下命令来运行先前创建的 liuxg/iuxg-elasticsearch Docker 镜像:
docker run --rm -it liuxg/liuxg-elasticsearch /bin/bash
你还可以使用 -p 选项公开默认的 Elasticsearch 端口 9200。以下是如何使用此选项的示例:
docker run --rm -p 9200:9200 liuxg/liuxg-elasticsearch
一旦我们启动这个容器,我们可以在 host 机器的命令行中打入如下的命令来进行查看:
curl -XGET http://localhost:9200
上面命令显示的结果为:
$ curl -XGET http://localhost:9200

{

  "name" : "node1",

  "cluster_name" : "cluster-liuxg",

  "cluster_uuid" : "8mWE-_EcRSaLIAJ5MJD4Wg",

  "version" : {

    "number" : "7.10.1",

    "build_flavor" : "default",

    "build_type" : "deb",

    "build_hash" : "1c34507e66d7db1211f66f3513706fdf548736aa",

    "build_date" : "2020-12-05T01:00:33.671820Z",

    "build_snapshot" : false,

    "lucene_version" : "8.7.0",

    "minimum_wire_compatibility_version" : "6.8.0",

    "minimum_index_compatibility_version" : "6.0.0-beta1"

  },

  "tagline" : "You Know, for Search"

}
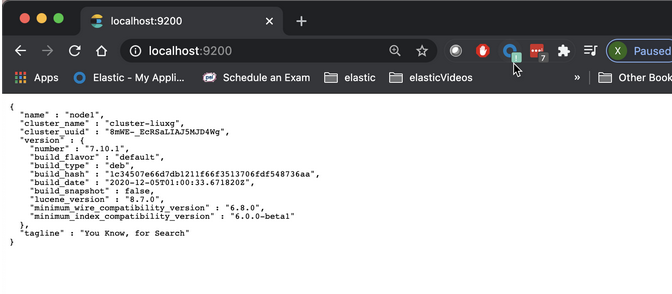
从上面我们可以看出来 cluster_name 以及 node 名字都是我们之前在 elasticsearch.yml 中所设置的。我们可以在浏览器中访问 localhost:9200 查看:
Elasticsearch Dockerfile 例子的更多相关文章
- springboot整合elasticsearch入门例子
springboot整合elasticsearch入门例子 https://blog.csdn.net/tianyaleixiaowu/article/details/72833940 Elastic ...
- python操作Elasticsearch (一、例子)
E lasticsearch是一款分布式搜索引擎,支持在大数据环境中进行实时数据分析.它基于Apache Lucene文本搜索引擎,内部功能通过ReST API暴露给外部.除了通过HTTP直接访问El ...
- 用Dockerfile构建docker image
dockerfile是为快速构建docker image而设计的,当你使用docker build 命令的时候,docker 会读取当前目录下的命名为Dockerfile(首字母大写)的纯文本文件并执 ...
- 《读书报告 -- Elasticsearch入门 》-- 安装以及简单使用(1)
<读书报告 – Elasticsearch入门 > 第一章 Elasticsearch入门 Elasticsearch是一个实时的分布式搜索和分析引擎,使得人们可以在一定规模上和一定速度上 ...
- 使用Hive读取ElasticSearch中的数据
本文将介绍如何通过Hive来读取ElasticSearch中的数据,然后我们可以像操作其他正常Hive表一样,使用Hive来直接操作ElasticSearch中的数据,将极大的方便开发人员.本文使用的 ...
- Docker实战-编写Dockerfile
一.编译镜像 1. 编译镜像 Dockerfile类似于Makfile,用户使用docker build就可以编译镜像,使用该命令可以设置编译镜像时使用的CPU数量.内存大小.文件路径等 语法:doc ...
- 使用 Elasticsearch 实现博客站内搜索
Reference: http://www.open-open.com/lib/view/open1452046497511.html 一直以来,为了优化本博客站内搜索效果和速度,我使用 bing ...
- Elasticsearch学习记录(分布式的特性)
Elasticsearch学习记录(分布式的特性) 分布式的特性 我们提到Elasticsearch可以扩展到上百(甚至上千)的服务器来处理PB级的数据.然而我们的例子只给出了一些使用Elastics ...
- boot接入elasticsearch
boot接入elasticsearch 参考博客:https://blog.csdn.net/li521wang/article/details/83792552 项目源码demo:https://g ...
随机推荐
- 基于ABP实现DDD--仓储实践
由于软件系统中可能有着不同的数据库,不同的ORM,仓储思想的本质是解耦它们.在ABP中具体的实现仓储接口定义在领域层,实现在基础设施层.仓储接口被领域层(比如领域服务)和应用层用来访问数据库,操作 ...
- MLX90640 红外热成像仪测温模块简要介绍说明
MLX90640 红外热成像仪测温模块简要介绍说明 (1) A 型和 B 型的区别 区别主要有以下几点 视场角不同: A 型为 110*75° , B 型为 55*35° ,通俗一点讲就是 A 型是广 ...
- 云表平台VS永中office,谁更胜一筹?
20年前,永中软件在国外办公软件独霸江山以及盗版软件肆意横行的夹缝中呱呱坠地. 经过永中人日日夜夜的不懈奋斗,永中Office V1.0面世. 永中科技 从创立之初永中软件便预见了独立创新.自主可控的 ...
- CF1702A Round Down the Price 题解
题意:给定一个数 \(n\),找出一个数为 \(10^k \leq n\),求二者的差. 建立一个数组,储存 \(10^k\),每次直接查询求差输出. 注意数据范围. #include<cstd ...
- DQL分组查询和DQL分页查询
分组查询: 1.语法:group by 分组字段: 2.注意: 分组之后查询的字符按:分组字段.聚合函数 where 和having 的区别 where再分组前进行限定,如果不满足条件则不参与分组.h ...
- 2501-Logback的使用与配置范例xml
在项目中logback一般配合slf4j使用,slf4j是面上的框架,logback才是真正记录处理日志的框架. 参考文献: Java日志框架:logback详解 http://www.importn ...
- 王霸雄图荣华敝屣,谈笑间尽归尘土|基于Python3双队列数据结构搭建股票/外汇交易匹配撮合系统
原文转载自「刘悦的技术博客」https://v3u.cn/a_id_192 如果你爱他,那么送他去股市,因为那里是天堂:如果你恨他,送他去股市,因为那里是地狱. 在过去的一年里,新冠疫情持续冲击世界经 ...
- Odoo14 收发邮件服务器设置
# 维护邮箱的七个地方 # 1.settings中Discuss栏将External Email Servers勾选(启用外部邮件服务),然后维护Alias Domain(域名) # 2.Techni ...
- 云原生Devops 的实现方法
DevOps 是一个持续改善软件产品的过程,它通过极短的发布周期.全面自动化的集成和交付流水线,以及团队间的紧密协作来不断改善产品.DevOps 的目标是缩短将创意变成用户可以使用的产品的时间,并降低 ...
- mysql-shell for GreatSQL 8.0.27编译安装及使用
目录 0. 前言 1. 修改说明 2. 编译mysql-shell 2.1 环境准备 2.2 开始编译mysql & mysql-shell 2.3 利用patchelf修改mysqlsh二进 ...