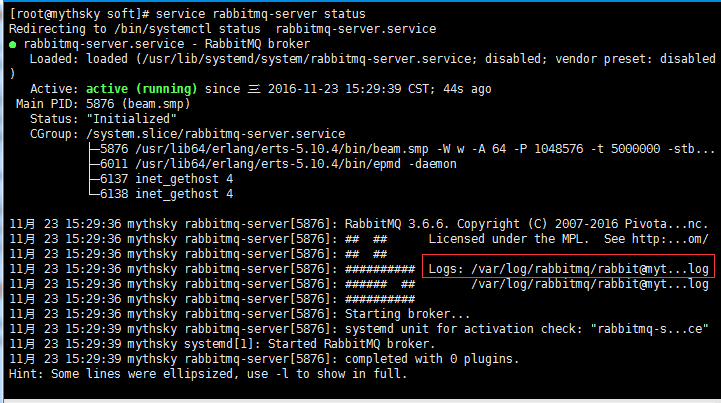
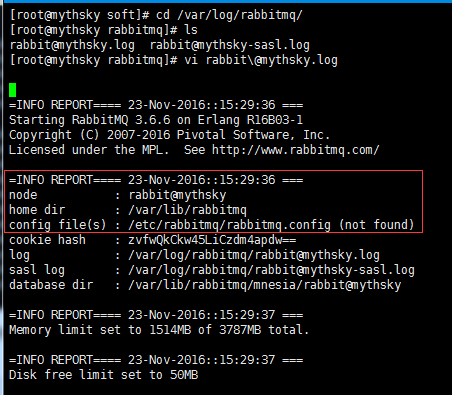
centos7 rabbitmq安装以及应用


public class RabbitUtil {

    @Autowired

    private ConnectionFactory connectionFactory;

    @Autowired

    private RabbitTemplate rabbitTemplate;

    private static RabbitUtil rabbitUtil;

    @PostConstruct

    private void init() {

        rabbitUtil = this;

        rabbitUtil.rabbitTemplate = this.rabbitTemplate;

        rabbitUtil.connectionFactory = this.connectionFactory;

    }

    public static RabbitTemplate getRabbitTemplate() {

        return rabbitUtil.rabbitTemplate;

    }

    public static ConnectionFactory getConnectionFactory() {

        return rabbitUtil.connectionFactory;

    }

    /**

     * 发送RMQ消息

     *

     * @param message

     * @throws AmqpException

     */

    public void convertAndSend(String message) throws AmqpException {

        convertAndSend(null, null, message, false);

    }

    /**

     * 发送RMQ消息

     *

     * @param routingKey

     * @param message

     * @throws AmqpException

     */

    public void convertAndSend(String routingKey, String message) throws AmqpException {

        convertAndSend(null, routingKey, message, false);

    }

    /**

     * 发送RMQ消息

     *

     * @param exchange

     * @param routingKey

     * @param message

     * @throws AmqpException

     */

    public static void convertAndSend(String exchange, String routingKey, String message) throws AmqpException {

        convertAndSend(exchange, routingKey, message, false);

    }

    private static void convertAndSend(String exchange, String routingKey, Object message, boolean waitForAck)

            throws AmqpException {

        if (waitForAck) {

        } else {

            if (StringUtils.isNotEmpty(exchange) && StringUtils.isNotEmpty(routingKey)) {

                getRabbitTemplate().convertAndSend(exchange, routingKey, message);

            } else if (StringUtils.isNotEmpty(routingKey)) {

                getRabbitTemplate().convertAndSend(routingKey, message);

            } else {

                getRabbitTemplate().convertAndSend(message);

            }

        }

    }

    /**

     * 查询队列消息数量

     * @param queue

     * @throws Exception

     */

    public static long getMessageCount(String queue) throws Exception {

        Connection connection = null;

        Channel channel = null;

        try {

            ConnectionFactory connectionFactory = getConnectionFactory();

            connection = connectionFactory.createConnection();

            channel = connection.createChannel(false);

            return channel.messageCount(queue);

        } finally {

            if(channel != null){

                channel.close();

            }

            if(connection != null){

                connection.close();

            }

        }

    }
centos7 rabbitmq安装以及应用的更多相关文章
- centos7 rabbitmq安装/配置
原文:centos7 rabbitmq安装/配置 因为RabbitMQ是由erlang实现的,所以要先安装erlang再安装rabbitMQ 1.先配置yum软件源地址EPEL(EPEL是 ...
- Linux(CENTOS7) RabbitMq安装
RabbitMQ是一个在AMQP协议标准基础上完整的,可服用的企业消息系统.它遵循Mozilla Public License开源协议,采用 Erlang 实现的工业级的消息队列(MQ)服务器,Rab ...
- centos7 rabbitmq 安装
http://www.rabbitmq.com/install-rpm.html Overview rabbitmq-server is included in Fedora. However, th ...
- 使用专业的消息队列产品rabbitmq之centos7环境安装
我们在项目开发的时候都不可避免的会有异步化的问题,比较好的解决方案就是使用消息队列,可供选择的队列产品也有很多,比如轻量级的redis, 当然还有重量级的专业产品rabbitmq,rabbitmq ...
- [转]centos7环境安装rabbitMQ
使用专业的消息队列产品rabbitmq之centos7环境安装 http://www.cnblogs.com/huangxincheng/p/6006569.html CentOS7上安装Rabbit ...
- RabbitMQ消息队列(三)-Centos7下安装RabbitMQ3.6.1
如果你看过前两章对RabbitMQ已经有了一定了解,现在已经摩拳擦掌,来吧动手吧! 用什么系统 本文使用的是Centos7,为了保证对linux不太熟悉的伙伴也能轻松上手(避免折在安装的路上),下面是 ...
- 【rabbitmq】Centos7 下安装rabbitmq
rabbitmq安装 rabbitmq的安装依赖erlang,首先应该先安装erlang,然后安装rabbitmq: Step1:安装erlang erlang-rpm安装教程 选择在Centos7 ...
- centos7下安装rabbitmq
RabbitMQ: RabbitMQ是流行的开源消息队列系统,是AMQP(Advanced Message Queuing Protocol高级消息队列协议)的标准实现,用erlang语言开发.Rab ...
- centos7环境安装rabbitMQ
使用专业的消息队列产品rabbitmq之centos7环境安装 http://www.cnblogs.com/huangxincheng/p/6006569.html [源码安装,适用GNOME + ...
随机推荐
- Git 代码版本还原方法
因为我的个人网站 restran.net 已经启用,博客园的内容已经不再更新.请访问我的个人网站获取这篇文章的最新内容,Git 代码版本还原方法 在使用 Git 管理自己的代码和资料时,难免会遇到意料 ...
- Eclipse 中yml自动提示功能相关设置
转自:https://blog.csdn.net/lililuni/article/details/82849376
- PPT怎么母版怎么修改及应用
打开一个PPT,假设我要建一个母版(目的就是母版容易全部修改,不用同样的内容一个一个改) 然后点击如图"视图"+"幻灯片母版" 然后就会出现一个这样的工具栏界面 ...
- Spring 3.2 事件驱动模型
事件 @SuppressWarnings("serial") public class CheckEvent extends ApplicationEvent { public C ...
- UI5-文档-4.1-Hello World!
如你所知,SAPUI5是关于HTML5的.让我们开始构建第一个仅使用HTML的“Hello World”. Preview 浏览器显示文本“Hello World” Coding 你可以在此查看和下载 ...
- 一个js程序:离下一个圣诞节还有多少天?
话不多说上代码: //离下一个圣诞节还有多少天 var christ=new Date(); christ.setMonth(11); christ.setDate(25); var year=now ...
- ADO数据库编程入门
ADO 是目前在Windows环境中比较流行的客户端数据库编程技术. ADO是建立在OLE DB底层技术之上的高级编程接口,因而它兼具有强大的数据处理功能(处理各种不同类型的数据源.分布式的数据处理等 ...
- bash: ifconfig: command not found 问题解决
ifconfig使用出现问题了?竟然提示找不到~~于是百度~~ [flymouse@localhost /]$ ifconfig 提示:“bash: ifconfig: command not fou ...
- conductor FAQ
在一段时间后(如1小时,1天等),您如何安排将任务放入队列中? 轮询任务后,更新任务的状态IN_PROGRESS并将其callbackAfterSeconds设置为所需的时间.任务将保留在队列中,直到 ...
- IN_sales_order带后续P IN_ITEM_SITE带P\SP\TP DUMMY
IN_sales_order带后续P IN_ITEM_SITE带P\SP\TP DUMMY SAP_MATERIAL_SO 处理材料订单缺少BOM,ROUTING信息