扩展类 HOW TO EXTEND CLASSES TO MAKE NEW CLASSES IN PYTHON
How to Extend Classes to Make New Classes in Python - dummies https://www.dummies.com/programming/python/how-to-extend-classes-to-make-new-classes-in-python/
As you might imagine, creating a fully functional, production-grade class in Python (one that is used in a real-world application actually running on a system that is accessed by users) is time consuming because real classes perform a lot of tasks. Fortunately, Python supports a feature called inheritance. By using inheritance, you can obtain the features you want from a parent class when creating a child class.
Overriding the features that you don’t need and adding new features lets you create new classes relatively fast and with a lot less effort on your part. In addition, because the parent code is already tested, you don’t have to put quite as much effort into ensuring that your new class works as expected.
BUILDING THE CHILD CLASS
Parent classes are normally supersets of something. For example, you might create a parent class named Car and then create child classes of various car types around it.
In this case, you build a parent class named Animal and use it to define a child class named Chicken. Of course, you can easily add other child classes after you have Animal in place, such as a Gorilla class. However, for this example, you build just the one parent and one child class.
class Animal:

 def __init__(self, Name=", Age=0, Type="):

  self.Name = Name

  self.Age = Age

  self.Type = Type

 def GetName(self):

  return self.Name

 def SetName(self, Name):

  self.Name = Name

 def GetAge(self):

  return self.Age

 def SetAge(self, Age):

  self.Age = Age

 def GetType(self):

  return self.Type

 def SetType(self, Type):

  self.Type = Type

 def __str__(self):

  return "{0} is a {1} aged {2}".format(self.Name,

           self.Type,

           self.Age)

class Chicken(Animal):

 def __init__(self, Name=", Age=0):

  self.Name = Name

  self.Age = Age

  self.Type = "Chicken"

 def SetType(self, Type):

  print("Sorry, {0} will always be a {1}"

   .format(self.Name, self.Type))

 def MakeSound(self):

  print("{0} says Cluck, Cluck, Cluck!".format(self.Name))
The Animal class tracks three characteristics: Name, Age, and Type. A production application would probably track more characteristics, but these characteristics do everything needed for this example. The code also includes the required accessors for each of the characteristics. The __str__() method completes the picture by printing a simple message stating the animal characteristics.
The Chicken class inherits from the Animal class. Notice the use of Animal in parentheses after the Chicken class name. This addition tells Python that Chicken is a kind of Animal, something that will inherit the characteristics of Animal.
Notice that the Chicken constructor accepts only Name and Age. The user doesn’t have to supply a Type value because you already know that it’s a chicken. This new constructor overrides the Animal constructor. The three attributes are still in place, but Type is supplied directly in the Chickenconstructor.
Someone might try something funny, such as setting her chicken up as a gorilla. With this in mind, the Chicken class also overrides the SetType() setter. If someone tries to change the Chicken type, that user gets a message rather than the attempted change. Normally, you handle this sort of problem by using an exception, but the message works better for this example by making the coding technique clearer.
Finally, the Chicken class adds a new feature, MakeSound(). Whenever someone wants to hear the sound a chicken makes, he can call MakeSound() to at least see it printed on the screen.
TESTING THE CLASS IN AN APPLICATION
Testing the Chicken class also tests the Animal class to some extent. Some functionality is different, but some classes aren’t really meant to be used. The Animal class is simply a parent for specific kinds of animals, such as Chicken. The following steps demonstrate the Chicken class so that you can see how inheritance works.
Open a Python File window.
You see an editor in which you can type the example code.
Type the following code into the window — pressing Enter after each line:
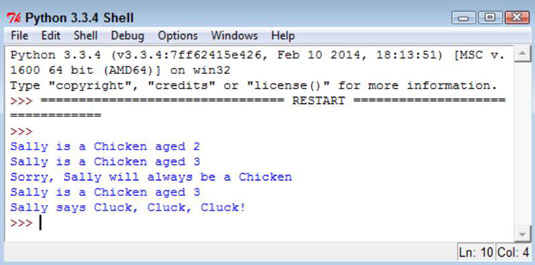
import Animals

MyChicken = Animals.Chicken("Sally", 2)

print(MyChicken)

MyChicken.SetAge(MyChicken.GetAge() + 1)

print(MyChicken)

MyChicken.SetType("Gorilla")

print(MyChicken)

MyChicken.MakeSound()
The first step is to import the Animals module. Remember that you always import the filename, not the class. The Animals.py file actually contains two classes in this case: Animal and Chicken.
The example creates a chicken, MyChicken, named Sally, who is age 2. It then starts to work with MyChicken in various ways.
For example, Sally has a birthday, so the code updates Sally’s age by 1. Notice how the code combines the use of a setter, SetAge(), with a getter, GetAge(), to perform the task. After each change, the code displays the resulting object values for you. The final step is to let Sally say a few words.
Choose Run→Run Module.
You see each of the steps used to work with MyChicken. As you can see, using inheritance can greatly simplify the task of creating new classes when enough of the classes have commonality so that you can create a parent class that contains some amount of the code.
https://stackoverflow.com/questions/15374857/should-all-python-classes-extend-object
python继承(二)extends - baiyan_er的博客 - CSDN博客 https://blog.csdn.net/baiyan_er/article/details/78935451
class car(object):
    def __init__(self, brand, color):
        self.brand = brand
        self.color = color

    def run(self):
        print('A car is running.', self.brand, self.color)

class SUV(car):
    def __init__(self, brand, color, seats):
        car.brand = brand
        car.color = color
        self.seats = seats

    def run(self):
        print('A SUV is runnung.', self.brand, self.color, self.seats)

aCar = car('carBrand', 'red')
aCar.run()
aSUV = SUV('suvBrand', 'black', 5)
aSUV.run()
A car is running. carBrand red
A SUV is runnung. suvBrand black 5
方法重写:子类继承父类时,子类的方法签名和父类一样,此时子类重写了父类的方法,当生成子类对象时,调用的是子类重写的方法
class car(object):

    def __init__(self,brand,color):

        self.brand=brand

        self.color=color

    def run(self):

        print("汽车在公路上行驶...")

class  suv(car):

    def __init__(self,brand,color,seats):

       car.brand=brand

       car.color=color

       self.seats=seats

    def run(self):

        print("suv汽车在公路上行驶...")

suv=suv("奔驰","黑色",5)

suv.run()

# 子类和父类的方法名子是一样的方法的重写
多继承:类同时继承多个父类,class c(A,B),iv e AB均有相同方法,而子类又得写时,调用写在前面的方法,如果子类没有方法,则调用自己前面的方法
可以通过:类名 . __mro__ 输出类的访问顺序
class A(object):

    def test(self):

        print("......A........")

class B(object):

    def test(self):

        print("......B........")

class C(A,B):

    def test(self):

        super().test()

        print("......C........")

c=C()

c.test()

print(C.__mro__)
扩展类 HOW TO EXTEND CLASSES TO MAKE NEW CLASSES IN PYTHON的更多相关文章
- tp5自定义扩展类的使用extend
1.在入口index.php定义目录 define('EXTEND_PATH', __DIR__ .'/../extend/'); 2.在使用页引用 use lib\Page; 3.初始化 $page ...
- js深入研究之扩展类,克隆对象,混合类(自定义的extend函数,clone函数,与augment函数)
1.类扩展 /* EditInPlaceField类 */ /* 扩展函数 */ function extend(subClass, superClass) { var F = function() ...
- C# 扩展类
C# 中提供一个非常实用的供能,扩展方法(Extension method) 扩展方法是通过额外的静态方法扩展现有的类型.通过扩展方法,可以对已有类型做自己想做的相关扩展.方法:定义静态类,扩展方法也 ...
- GenericAPIView类与几个扩展类的综合使用
五个扩展类 扩展类 作用 封装的方法 状态码(成功,失败) ListModelMixin 查询多条数据 list 200 CreateModelMixin 新增一条数据 create 201,400 ...
- DRF框架(五)——context传参,二次封装Response类,两个视图基类(APIView/GenericAPIView),视图扩展类(mixins),子类视图(工具视图),视图集(viewsets),工具视图集
复习 1.整体修改与局部修改 # 序列化get (给前端传递参数) #查询 ser_obj = ModelSerializer(model_obj) #只传递一个参数,默认是instance的参数,查 ...
- Dubbo#编译动态扩展类
这篇排版有问题 后面修改....**** 以ExtensionLoader.getExtensionLoader(Protocol.class).getAdaptiveExtension();为例 - ...
- 针对thinkphp 5框架存储过程bug而重写的存储过程的扩展类
近期用tp5框架调取存储过程发现有bug,借鉴了一些官方的函数.以及找了个mysqli的类把存储过程重新写了个扩展类,下面两个类直接放置项目extend目录的stored(这个文件夹名称请按个人习惯命 ...
- tp中调用PHP系统扩展类
例如使用Redis扩展类: use Reids; $redis = new Redis();
- Java+7入门经典 - 6 扩展类与继承 Part 1/2
第6章 扩展类与继承 面向对象编程的一个重要特性: 允许基于已定义的类创建新的类; 6.1 使用已有的类 派生 derivation, 派生类 derived class, 直接子类 direct s ...
随机推荐
- javascript 捕获异常方法
捕获异常的实例: var str="fasdfsadfsad$$异常信息$$你看不到我"; var arr=str.split("$$"); arr[1]; 通 ...
- SSH框架阶段 ——SSH的优缺点,使用场景?
Hibernate优点: (1) 对象/关系数据库映射(ORM)它使用时只需要操纵对象,使开发更对象化,抛弃了数据库中心的思想,完全的面向对象思想(2) 透明持久化(persistent)带有持久化状 ...
- <转>巧用notepad++ 批量转换ansi 和 utf8
原方出处:http://stackoverflow.com/questions/7256049/notepad-converting-ansi-encoded-file-to-utf-8 Here s ...
- Function.prototype.bind、call与apply方法简介
前言 前段时间面试遇见一题,题目内容大概是 function Parent() { this.prop = 'parent'; } Parent.prototype.get = function() ...
- DropFileName = "svchost.exe" 问题解决方案
1.至以下链接处下载ATTK扫描工具: http://support.trendmicro.com.cn ... stomizedpackage.exe (32位) http://support.tr ...
- Atitit.upnp SSDP 查找nas的原理与实现java php c#.net c++
Atitit.upnp SSDP 查找nas的原理与实现java php c#.net c++ 1. 查找nas的原理1 2. 与dlna的关系1 3. 与ssdp的关系1 4. Cling - Ja ...
- 红茶一杯话Binder (初始篇)
1 什么是Binder? 简单地说,Binder是Android平 台上的一种跨进程交互技术.该技术最早并不是由Google公司提出的,它的前身是Be Inc公司开发的OpenBinder,而且在Pa ...
- std::copy ( myvector.begin(), myvector.end(), out_it )
在实际生产环境中,不能进行调试,所以程序通常需要编译一个DEBUG版本来辅助我们找出问题所在,编译这样的DEBUG版本最常用的手段就是在关键处输出我们关心一些变量的值到屏幕. 如果输出的简单的变量值, ...
- linux下调试使用的 一些shell命令
查看文件日期:strings |grep Build gdb g++ gcc make systemctl gdb: bt s n b 1.firewalld的基本使用 启动: systemctl s ...
- tomcat各目录下的作用
1.tomcat的主目录下的文件 bin目录主要是用来存放tomcat的命令,主要有两大类,一类是以.sh结尾的(linux命令),另一类是以.bat结尾的(windows命令). 重要: 很多环 ...