用JWT技术为SpringBoot的API增加授权保护(转),需要自己实现userdetailservice接口
转自:https://blog.csdn.net/haiyan_qi/article/details/77373900
概述
示例 https://github.com/qihaiyan/jwt-boot-auth
用spring-boot开发RESTful API非常的方便,在生产环境中,对发布的API增加授权保护是非常必要的。现在我们来看如何利用JWT技术为API增加授权保护,保证只有获得授权的用户才能够访问API。
开发一个简单的API
spring提供了一个网页可以便捷的生成springboot程序。
如图:在Search for dependencies中选择H2、Web、Security、JPA,这几个依赖在我们的示例工程中会用到。
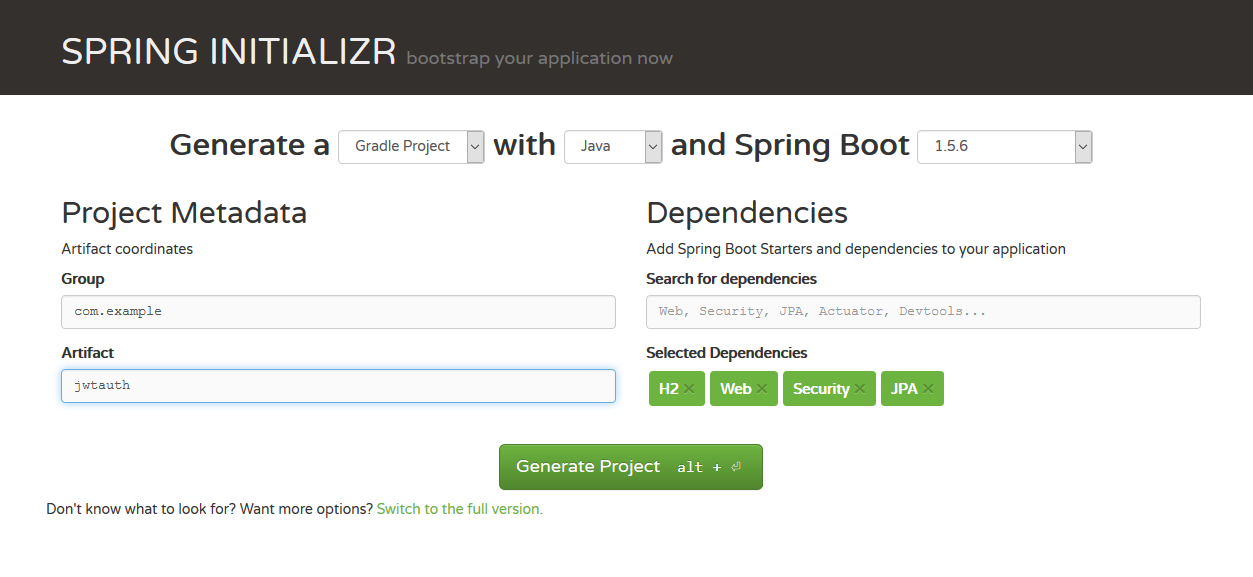
点击Generate Project按钮后,下载文件到本地。
在JwtauthApplication.java中增加一个方法:
@RequestMapping("/hello")

@ResponseBody

public String hello(){

  return "hello";

}- 1
- 2
- 3
- 4
- 5
这样一个简单的RESTful API就开发好了。
现在我们运行一下程序看看效果,打开命令行工具,执行:
cd jwtauth

gradle bootRun- 1
- 2
等待程序启动完成后,可以简单的通过curl工具进行API的调用:
curl http://localhost:8080/tasks- 1
至此,我们的接口就开发完成了。但是这个接口没有任何授权防护,任何人都可以访问,这样是不安全的,下面我们开始加入授权机制。
增加用户注册功能
首先增加一个实体类MyUser:
package com.example.jwtauth;

import javax.persistence.Entity;

import javax.persistence.GeneratedValue;

import javax.persistence.GenerationType;

import javax.persistence.Id;

@Entity

public class MyUser {

    @Id

    @GeneratedValue(strategy = GenerationType.IDENTITY)

    private long id;

    private String username;

    private String password;

    public long getId() {

        return id;

    }

    public String getUsername() {

        return username;

    }

    public void setUsername(String username) {

        this.username = username;

    }

    public String getPassword() {

        return password;

    }

    public void setPassword(String password) {

        this.password = password;

    }

}- 1
- 2
- 3
- 4
- 5
- 6
- 7
- 8
- 9
- 10
- 11
- 12
- 13
- 14
- 15
- 16
- 17
- 18
- 19
- 20
- 21
- 22
- 23
- 24
- 25
- 26
- 27
- 28
- 29
- 30
- 31
- 32
- 33
- 34
- 35
然后增加一个Repository类MyUserRepository,可以读取和保存用户信息:
package com.example.jwtauth;

import org.springframework.data.jpa.repository.JpaRepository;

public interface MyUserRepository extends JpaRepository<MyUser, Long> {

    MyUser findByUsername(String username);

}- 1
- 2
- 3
- 4
- 5
- 6
- 7
得益于SpringDataJpa,只需要定义一个interface,就让我们拥有了数据的CRUD功能。由于我们在build.gradle中引入了H2,所以我们拥有了一个本地数据库,不需要做任何配置,springboot就会使用这个数据库,不得不说springboot确实极大的减轻了开发工作量。
下面增加一个类UserController,实现用户注册的接口:
package com.example.jwtauth;

import org.springframework.security.crypto.bcrypt.BCryptPasswordEncoder;

import org.springframework.web.bind.annotation.PostMapping;

import org.springframework.web.bind.annotation.RequestBody;

import org.springframework.web.bind.annotation.RequestMapping;

import org.springframework.web.bind.annotation.RestController;

@RestController

@RequestMapping("/users")

public class UserController {

    private MyUserRepository applicationUserRepository;

    private BCryptPasswordEncoder bCryptPasswordEncoder;

    public UserController(MyUserRepository myUserRepository,

                          BCryptPasswordEncoder bCryptPasswordEncoder) {

        this.applicationUserRepository = myUserRepository;

        this.bCryptPasswordEncoder = bCryptPasswordEncoder;

    }

    @PostMapping("/signup")

    public void signUp(@RequestBody MyUser user) {

        user.setPassword(bCryptPasswordEncoder.encode(user.getPassword()));

        applicationUserRepository.save(user);

    }

}- 1
- 2
- 3
- 4
- 5
- 6
- 7
- 8
- 9
- 10
- 11
- 12
- 13
- 14
- 15
- 16
- 17
- 18
- 19
- 20
- 21
- 22
- 23
- 24
- 25
- 26
- 27
其中的
@PostMapping("/signup")- 1
这个方法定义了用户注册接口,并且指定了url地址是/users/signup。由于类上加了注解 @RequestMapping(“/users”),类中的所有方法的url地址都会有/users前缀,所以在方法上只需指定/signup子路径即可。
密码采用了BCryptPasswordEncoder进行加密,我们在Application中增加BCryptPasswordEncoder实例的定义。
@SpringBootApplication

@RestController

public class JwtauthApplication {

    @Bean

    public BCryptPasswordEncoder bCryptPasswordEncoder() {

        return new BCryptPasswordEncoder();

    }

// ...- 1
- 2
- 3
- 4
- 5
- 6
- 7
- 8
增加JWT认证功能
用户填入用户名密码后,与数据库里存储的用户信息进行比对,如果通过,则认证成功。传统的方法是在认证通过后,创建sesstion,并给客户端返回cookie。现在我们采用JWT来处理用户名密码的认证。区别在于,认证通过后,服务器生成一个token,将token返回给客户端,客户端以后的所有请求都需要在http头中指定该token。服务器接收的请求后,会对token的合法性进行验证。验证的内容包括:
内容是一个正确的JWT格式
检查签名
检查claims
检查权限
处理登录
创建一个类JWTLoginFilter,核心功能是在验证用户名密码正确后,生成一个token,并将token返回给客户端:
package com.example.jwtauth;

import com.fasterxml.jackson.databind.ObjectMapper;

import io.jsonwebtoken.Jwts;

import io.jsonwebtoken.SignatureAlgorithm;

import org.springframework.security.authentication.AuthenticationManager;

import org.springframework.security.authentication.UsernamePasswordAuthenticationToken;

import org.springframework.security.core.Authentication;

import org.springframework.security.core.AuthenticationException;

import org.springframework.security.core.userdetails.User;

import org.springframework.security.web.authentication.UsernamePasswordAuthenticationFilter;

import javax.servlet.FilterChain;

import javax.servlet.ServletException;

import javax.servlet.http.HttpServletRequest;

import javax.servlet.http.HttpServletResponse;

import java.io.IOException;

import java.util.ArrayList;

import java.util.Date;

public class JWTLoginFilter extends UsernamePasswordAuthenticationFilter {

    private AuthenticationManager authenticationManager;

    public JWTLoginFilter(AuthenticationManager authenticationManager) {

        this.authenticationManager = authenticationManager;

    }

    @Override

    public Authentication attemptAuthentication(HttpServletRequest req,

                                                HttpServletResponse res) throws AuthenticationException {

        try {

            MyUser user = new ObjectMapper()

                    .readValue(req.getInputStream(), MyUser.class);

            return authenticationManager.authenticate(

                    new UsernamePasswordAuthenticationToken(

                            user.getUsername(),

                            user.getPassword(),

                            new ArrayList<>())

            );

        } catch (IOException e) {

            throw new RuntimeException(e);

        }

    }

    @Override

    protected void successfulAuthentication(HttpServletRequest req,

                                            HttpServletResponse res,

                                            FilterChain chain,

                                            Authentication auth) throws IOException, ServletException {

        String token = Jwts.builder()

                .setSubject(((User) auth.getPrincipal()).getUsername())

                .setExpiration(new Date(System.currentTimeMillis() + 60 * 60 * 24 * 1000))

                .signWith(SignatureAlgorithm.HS512, "MyJwtSecret")

                .compact();

        res.addHeader("Authorization", "Bearer " + token);

    }

}- 1
- 2
- 3
- 4
- 5
- 6
- 7
- 8
- 9
- 10
- 11
- 12
- 13
- 14
- 15
- 16
- 17
- 18
- 19
- 20
- 21
- 22
- 23
- 24
- 25
- 26
- 27
- 28
- 29
- 30
- 31
- 32
- 33
- 34
- 35
- 36
- 37
- 38
- 39
- 40
- 41
- 42
- 43
- 44
- 45
- 46
- 47
- 48
- 49
- 50
- 51
- 52
- 53
- 54
- 55
- 56
- 57
- 58
- 59
该类继承自UsernamePasswordAuthenticationFilter,重写了其中的2个方法:
attemptAuthentication :接收并解析用户凭证。
successfulAuthentication :用户成功登录后,这个方法会被调用,我们在这个方法里生成token。
授权验证
用户一旦登录成功后,会拿到token,后续的请求都会带着这个token,服务端会验证token的合法性。
创建JwtAuthenticationFilter类,我们在这个类中实现token的校验功能。
package com.example.jwtauth;

import io.jsonwebtoken.Jwts;

import org.springframework.security.authentication.AuthenticationManager;

import org.springframework.security.authentication.UsernamePasswordAuthenticationToken;

import org.springframework.security.core.context.SecurityContextHolder;

import org.springframework.security.web.authentication.www.BasicAuthenticationFilter;

import javax.servlet.FilterChain;

import javax.servlet.ServletException;

import javax.servlet.http.HttpServletRequest;

import javax.servlet.http.HttpServletResponse;

import java.io.IOException;

import java.util.ArrayList;

public class JwtAuthenticationFilter extends BasicAuthenticationFilter {

    public JwtAuthenticationFilter(AuthenticationManager authManager) {

        super(authManager);

    }

    @Override

    protected void doFilterInternal(HttpServletRequest req,

                                    HttpServletResponse res,

                                    FilterChain chain) throws IOException, ServletException {

        String header = req.getHeader("Authorization");

        if (header == null || !header.startsWith("Bearer ")) {

            chain.doFilter(req, res);

            return;

        }

        UsernamePasswordAuthenticationToken authentication = getAuthentication(req);

        SecurityContextHolder.getContext().setAuthentication(authentication);

        chain.doFilter(req, res);

    }

    private UsernamePasswordAuthenticationToken getAuthentication(HttpServletRequest request) {

        String token = request.getHeader("Authorization");

        if (token != null) {

            // parse the token.

            String user = Jwts.parser()

                    .setSigningKey("MyJwtSecret")

                    .parseClaimsJws(token.replace("Bearer ", ""))

                    .getBody()

                    .getSubject();

            if (user != null) {

                return new UsernamePasswordAuthenticationToken(user, null, new ArrayList<>());

            }

            return null;

        }

        return null;

    }

}- 1
- 2
- 3
- 4
- 5
- 6
- 7
- 8
- 9
- 10
- 11
- 12
- 13
- 14
- 15
- 16
- 17
- 18
- 19
- 20
- 21
- 22
- 23
- 24
- 25
- 26
- 27
- 28
- 29
- 30
- 31
- 32
- 33
- 34
- 35
- 36
- 37
- 38
- 39
- 40
- 41
- 42
- 43
- 44
- 45
- 46
- 47
- 48
- 49
- 50
- 51
- 52
- 53
- 54
- 55
该类继承自BasicAuthenticationFilter,在doFilterInternal方法中,从http头的Authorization 项读取token数据,然后用Jwts包提供的方法校验token的合法性。如果校验通过,就认为这是一个取得授权的合法请求。
SpringSecurity配置
通过SpringSecurity的配置,将上面的方法组合在一起。
package com.example.jwtauth;

import org.springframework.boot.autoconfigure.security.SecurityProperties;

import org.springframework.context.annotation.Configuration;

import org.springframework.core.annotation.Order;

import org.springframework.http.HttpMethod;

import org.springframework.security.config.annotation.authentication.builders.AuthenticationManagerBuilder;

import org.springframework.security.config.annotation.web.builders.HttpSecurity;

import org.springframework.security.config.annotation.web.configuration.EnableWebSecurity;

import org.springframework.security.config.annotation.web.configuration.WebSecurityConfigurerAdapter;

import org.springframework.security.core.userdetails.UserDetailsService;

import org.springframework.security.crypto.bcrypt.BCryptPasswordEncoder;

@Configuration

@Order(SecurityProperties.ACCESS_OVERRIDE_ORDER)

public class MyWebSecurityConfig extends WebSecurityConfigurerAdapter {

    private UserDetailsService userDetailsService;

    private BCryptPasswordEncoder bCryptPasswordEncoder;

    public MyWebSecurityConfig(UserDetailsService userDetailsService, BCryptPasswordEncoder bCryptPasswordEncoder) {

        this.userDetailsService = userDetailsService;

        this.bCryptPasswordEncoder = bCryptPasswordEncoder;

    }

    @Override

    protected void configure(HttpSecurity http) throws Exception {

        http.cors().and().csrf().disable().authorizeRequests()

                .antMatchers(HttpMethod.POST, "/users/signup").permitAll()

                .anyRequest().authenticated()

                .and()

                .addFilter(new JWTLoginFilter(authenticationManager()))

                .addFilter(new JwtAuthenticationFilter(authenticationManager()));

    }

    @Override

    public void configure(AuthenticationManagerBuilder auth) throws Exception {

        auth.userDetailsService(userDetailsService).passwordEncoder(bCryptPasswordEncoder);

    }

}- 1
- 2
- 3
- 4
- 5
- 6
- 7
- 8
- 9
- 10
- 11
- 12
- 13
- 14
- 15
- 16
- 17
- 18
- 19
- 20
- 21
- 22
- 23
- 24
- 25
- 26
- 27
- 28
- 29
- 30
- 31
- 32
- 33
- 34
- 35
- 36
- 37
- 38
- 39
这是标准的SpringSecurity配置内容,就不在详细说明。注意其中的
.addFilter(new JWTLoginFilter(authenticationManager()))
.addFilter(new JwtAuthenticationFilter(authenticationManager()))
这两行,将我们定义的JWT方法加入SpringSecurity的处理流程中。
下面对我们的程序进行简单的验证:
# 请求hello接口,会收到403错误

curl http://localhost:8080/hello

# 注册一个新用户

curl -H "Content-Type: application/json" -X POST -d '{

    "username": "admin",

    "password": "password"

}' http://localhost:8080/users/signup

# 登录,会返回token,在http header中,Authorization: Bearer 后面的部分就是token

curl -i -H "Content-Type: application/json" -X POST -d '{

    "username": "admin",

    "password": "password"

}' http://localhost:8080/login

# 用登录成功后拿到的token再次请求hello接口

# 将请求中的XXXXXX替换成拿到的token

# 这次可以成功调用接口了

curl -H "Content-Type: application/json" \

-H "Authorization: Bearer XXXXXX" \

"http://localhost:8080/hello"
- 1
- 2
- 3
- 4
- 5
- 6
- 7
- 8
- 9
- 10
- 11
- 12
- 13
- 14
- 15
- 16
- 17
- 18
- 19
- 20
- 21
- 22
总结
至此,给SpringBoot的接口加上JWT认证的功能就实现了,过程并不复杂,主要是开发两个SpringSecurity的filter,来生成和校验JWT token。
JWT作为一个无状态的授权校验技术,非常适合于分布式系统架构,因为服务端不需要保存用户状态,因此就无需采用redis等技术,在各个服务节点之间共享session数据。
用JWT技术为SpringBoot的API增加授权保护(转),需要自己实现userdetailservice接口的更多相关文章
- 使用JWT设计SpringBoot项目api接口安全服务
转载直: 使用JWT设计SpringBoot项目api接口安全服务
- Servlet第五篇【介绍会话技术、Cookie的API、详解、应用】
什么是会话技术 基本概念: 指用户开一个浏览器,访问一个网站,只要不关闭该浏览器,不管该用户点击多少个超链接,访问多少资源,直到用户关闭浏览器,整个这个过程我们称为一次会话. 为什么我们要使用会话技术 ...
- ASP.NET Core2利用Jwt技术在服务端实现对客户端的身份认证
背景 在微服务架构下,一般都会按不同的业务或功能将整个系统切分成不同的独立子系统,再通过REST API或RPC进行通讯并相互调用,形成各个子系统之间的串联结构.在这里,我们将采用REST API的通 ...
- 使用JWT来实现对API的授权访问
目录 什么是JWT JWT的结构 Header Payload Signature 解码后的JWT JWT是怎样工作的 在JAVA里使用JWT 引入依赖 JWT Service 生成JWT 解码JWT ...
- OAuth 2和JWT - 如何设计安全的API?
OAuth 2和JWT - 如何设计安全的API? Moakap译,原文 OAuth 2 VS JSON Web Tokens: How to secure an API 本文会详细描述两种通用的保证 ...
- TTL 机制排毒,线上k8s的Job已经通过API 增加了Job的TTL 时长,且成功响应,为什么系统还是清理了Job?
TTL 机制排毒,线上k8s的Job已经通过API 增加了Job的TTL 时长,且成功响应,为什么系统还是清理了Job? 面试官:"已完成 Job 的 TTL 机制了解嘛?简单说说TTL存在 ...
- Hadoop Yarn REST API未授权漏洞利用挖矿分析
欢迎大家前往腾讯云+社区,获取更多腾讯海量技术实践干货哦~ 一.背景情况 5月5日腾讯云安全曾针对攻击者利用Hadoop Yarn资源管理系统REST API未授权漏洞对服务器进行攻击,攻击者可以在未 ...
- xmlrpc实现bugzilla api调用(无会话保持功能,单一接口请求)
xmlrpc实现bugzilla4 xmlrpc api调用(无会话保持功能,单一接口请求),如需会话保持,请参考我的另外一篇随笔(bugzilla4的xmlrpc接口api调用实现分享: xml ...
- 【转+自己研究】新姿势之Docker Remote API未授权访问漏洞分析和利用
0x00 概述 最近提交了一些关于 docker remote api 未授权访问导致代码泄露.获取服务器root权限的漏洞,造成的影响都比较严重,比如 新姿势之获取果壳全站代码和多台机器root权限 ...
随机推荐
- [BZOJ 3144] 切糕
Link: BZOJ 3144 传送门 Solution: 发现要把点集分成不连通的两部分,最小割的模型还是很明显的 首先我们将原图转化为$R+1$层,从而将点权化为边权 关键还是在于建图是怎么保证$ ...
- 【动态规划】Codeforces Round #392 (Div. 2) D. Ability To Convert
D. Ability To Convert time limit per test 1 second memory limit per test 256 megabytes input standar ...
- 安装virtualenvwrapper
理解:virtualenv 和 virtualenvwrapper 是两种东西,前者可以单独使用,后者是管理前者的工具,尤其是当有多个 virtualenv(隔离环境时).所以下面的配置都是在为了使用 ...
- Exercise02_15
import javax.swing.JOptionPane; public class Distance { public static void main(String[] args){ Stri ...
- tcp状态-TIME_WAIT与CLOSE_WAIT带来的坑
tcp状态: http://www.cnblogs.com/DengGao/p/tcp_state.html 1. tcp连接会占用系统资源(文件描述符), 有时候甚至会导致系统假死(不能发起或者处理 ...
- java--模板方法模式
/* 需求:获取一段程序的运行时间 原理:获取程序开始和结束的时间并相减即可 获取时间:用java中已有的一个类:System.currentTimeMillis(); 当代码完成优化后,就可以解决这 ...
- 开源的库RestSharp轻松消费Restful Service
现在互联网上的服务接口都是Restful的,SOAP的Service已经不是主流..NET/Mono下如何消费Restful Service呢,再也没有了方便的Visual Studio的方便生产代理 ...
- java获取桌面路径的方法
FileSystemView fsv = FileSystemView.getFileSystemView(); File com=fsv.getHomeDirectory(); System.out ...
- Coherence装载数据的研究-PreloadRequest
最近给客户准备培训,看到Coherence可以通过三种方式批量加载数据,分别是: Custom application InvocableMap - PreloadRequest Invocation ...
- ubuntu登录黑屏“failed to start session”, gdm+kdm+lightdm
sudo apt-get install ubuntu-desktop sudo systemctl start gdm sudo service lightdm restart sudo syste ...