无责任Windows Azure SDK .NET开发入门篇三[使用Azure AD 管理用户信息--3.2 Create创建用户]
3.2 Create创建用户
[HttpPost, Authorize]

public async Task<ActionResult> Create(

    [Bind(Include = "UserPrincipalName,AccountEnabled,PasswordProfile,MailNickname,DisplayName,GivenName,Surname,JobTitle,Department")]

    User user)

{

    ActiveDirectoryClient client = null;

    try

    {

        client = AuthenticationHelper.GetActiveDirectoryClient();

        await client.Users.AddUserAsync(user);

    }

    catch (Exception e)

    {

        if (e.Message == "Authorization Required.")

        {

            HttpContext.GetOwinContext().Authentication.Challenge(OpenIdConnectAuthenticationDefaults.AuthenticationType);

        }

        return View();

    }

    return RedirectToAction("Index");

}
Create的代码同样很清晰,采用了Bind Include简化了View的表单提交。对应的View的代码如下
@model Microsoft.Azure.ActiveDirectory.GraphClient.User

@{

    ViewBag.Title = "CreateUser";

}

<h2>Create User</h2>

@using (Html.BeginForm("Create", "AzureActiveDirectory", null, FormMethod.Post, new { @class = "form-horizontal" }))

{

    @Html.ValidationSummary(true)

        <div class="form-group">

            @Html.LabelFor(model => model.UserPrincipalName, "用户名(英文名@域名)", new { @class = "col-sm-2 control-label" })

            <div class="col-sm-10">

                @Html.TextBoxFor(model => model.UserPrincipalName)

                @Html.ValidationMessageFor(model => model.UserPrincipalName)

            </div>

        </div>

        <div class="form-group">

            @Html.LabelFor(model => model.AccountEnabled, "账号启用", new { @class = "col-sm-2 control-label" })

            <div class="col-sm-10">

                @Html.EditorFor(model => model.AccountEnabled)

                @Html.ValidationMessageFor(model => model.AccountEnabled)

            </div>

        </div>

        <div class="form-group">

            @Html.LabelFor(model => model.PasswordProfile.Password, "密码(必须强密码)", new { @class = "col-sm-2 control-label" })

            <div class="col-sm-10">

                @Html.TextBoxFor(model => model.PasswordProfile.Password)

                @Html.ValidationMessageFor(model => model.PasswordProfile.Password)

            </div>

        </div>

        <div class="form-group">

            @Html.LabelFor(model => model.MailNickname, "别名(必须英文名)", new { @class = "col-sm-2 control-label" })

            <div class="col-sm-10">

                @Html.TextBoxFor(model => model.MailNickname)

                @Html.ValidationMessageFor(model => model.MailNickname)

            </div>

        </div>

        <div class="form-group">

            @Html.LabelFor(model => model.DisplayName, "显示名称", new { @class = "col-sm-2 control-label" })

            <div class="col-sm-10">

                @Html.TextBoxFor(model => model.DisplayName)

                @Html.ValidationMessageFor(model => model.DisplayName)

            </div>

        </div>

        <div class="form-group">

            @Html.LabelFor(model => model.GivenName, "名字", new { @class = "col-sm-2 control-label" })

            <div class="col-sm-10">

                @Html.TextBoxFor(model => model.GivenName)

                @Html.ValidationMessageFor(model => model.GivenName)

            </div>

        </div>

        <div class="form-group">

            @Html.LabelFor(model => model.Surname, "姓氏", new { @class = "col-sm-2 control-label" })

            <div class="col-sm-10">

                @Html.TextBoxFor(model => model.Surname)

                @Html.ValidationMessageFor(model => model.Surname)

            </div>

        </div>

        <div class="form-group">

            @Html.LabelFor(model => model.JobTitle, "职务", new { @class = "col-sm-2 control-label" })

            <div class="col-sm-10">

                @Html.TextBoxFor(model => model.JobTitle)

                @Html.ValidationMessageFor(model => model.JobTitle)

            </div>

        </div>

        <div class="form-group">

            @Html.LabelFor(model => model.Department, "部门", new { @class = "col-sm-2 control-label" })

            <div class="col-sm-10">

                @Html.TextBoxFor(model => model.Department)

                @Html.ValidationMessageFor(model => model.Department)

            </div>

        </div>

        <p>

            <input type="submit" value="Create" class="btn btn-primary" />

        </p>

}
执行后的结果为
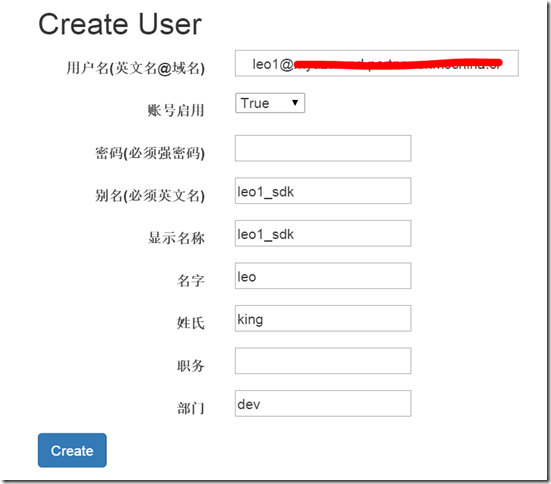
创建成功跳转到Index页面

为了让大家清楚的理解User属性对应的Azure门户管理上的提示,我在View中比较详细的做了说明,下表可以更清晰的看到对应
|
属性名 |
门户对应 |
要求 |
|
UserPrincipalName |
用户名 |
英文名@域名 |
|
AccountEnabled |
账号状态 |
|
|
Password |
密码 |
必须强密码 |
|
MailNickname |
别名 |
必须英文名 |
|
DisplayName |
显示名称 |
|
|
GivenName |
名字 |
|
|
Surname |
姓氏 |
|
|
JobTitle |
职务 |
|
|
Department |
部门 |
|
|
StreetAddress |
街道地址 |
|
|
City |
城市 |
|
|
State |
省/自治区/直辖市 |
|
|
Country |
国家或地区 |
|
|
PhysicalDeliveryOfficeName |
办公室号码 |
|
|
TelephoneNumber |
办公电话 |
|
|
PostalCode |
邮政编码 |
无责任Windows Azure SDK .NET开发入门篇三[使用Azure AD 管理用户信息--3.2 Create创建用户]的更多相关文章
- 无责任Windows Azure SDK .NET开发入门篇三[使用Azure AD 管理用户信息]
三.使用Azure AD管理用户信息 在上一章我们采用OpenID的方案和Azure AD交互进行身份验证,本章节我们继续了解如何在Azure AD中创建用户,列出用户信息,修改用户信息和删除用户信息 ...
- 无责任Windows Azure SDK .NET开发入门篇三[使用Azure AD 管理用户信息--3.4 Edit修改用户信息]
3.4 Edit修改用户信息 我们用FormCollection简化了表单提交,非常方便的进行用户信息修改. [HttpPost, Authorize] public async Task<Ac ...
- 无责任Windows Azure SDK .NET开发入门篇三[使用Azure AD 管理用户信息--3.3 Details用户详细信息]
3.3 Details用户详细信息 用户详细信息是通过objectId获取.代码如下 public async Task<ActionResult> Details(string obje ...
- 无责任Windows Azure SDK .NET开发入门篇三[使用Azure AD 管理用户信息--3.1 Index用户列表]
3.1 Index用户列表 或许当前域下的用户列表 [Authorize] public async Task<ActionResult> Index() { var userList = ...
- 无责任Windows Azure SDK .NET开发入门篇三[使用Azure AD 管理用户信息--3.5 Delete删除用户]
3.5 Delete删除用户 删除也是通过ObjectID获得对象进行删除 [Authorize] public async Task<ActionResult> Delete(strin ...
- 无责任Windows Azure SDK .NET开发入门篇二[使用Azure AD 进行身份验证-2.2身份验证开发]
2.2身份验证开发 在我们的案例中,我们是用户通过Web应用程序进行身份识别. 上面的图示说明了如下的一些概念 l Azure AD 是标识提供程序,负责对组织的目录中存在的用户和应用程序的标识进行验 ...
- 无责任Windows Azure SDK .NET开发入门篇二[使用Azure AD 进行身份验证]
二.使用Azure AD进行身份验证 之所以将Azure AD 作为开始,是应为基本上我们所有应用都需要进行安全管理.Azure Active Directory (Azure AD) 通过以下方式简 ...
- 无责任Windows Azure SDK .NET开发入门篇二[使用Azure AD 进行身份验证--2.1使用Azure AD需要了解几个概念]
2.1使用Azure AD需要了解几个概念 l Azure AD目录 当你注册 Microsoft 云服务时,便会获得一个 Azure AD 目录.你可根据需要创建更多的目录.例如,可以将第一个目录保 ...
- 无责任Windows Azure SDK .NET开发入门篇(一):开发前准备工作
Windows Azure开发前准备工作 什么是 Azure SDK for .NET?微软官方告诉我们:Azure SDK for .NET 是一套应用程序,其中包括 Visual Studio 工 ...
随机推荐
- (转)Python 字典排序
我们知道Python的内置dictionary数据类型是无序的,通过key来获取对应的value.可是有时我们需要对dictionary中 的item进行排序输出,可能根据key,也可能根据value ...
- foreach的指针问题
从代码: $arr = array(,,,,); echo '$arr = array(1,2,3,4,5)','<br>'; foreach($arr as $key => &am ...
- php的session_start
如果session使用cookie记录,那么在session_start时会设置一个cookie,参数取决于php.ini的设置,当然也可以通过session_set_param在程序里设置.不同站点 ...
- 【英语】Bingo口语笔记(34) - Hit系列
hit it off 合得来 hit the bottle 喝醉酒 hit the spot 正合要求,恰到好处
- library cache lock和cursor: pin S wait on X等待
1.现象: 客户10.2.0.4 RAC环境,出现大量的library cache lock和cursor: pin S wait on X等待,经分析是由于统计信息收集僵死导致的.数据库在8点到9点 ...
- 将数据库中的表注册到K2服务中,并封装为Smart Object
转:http://www.cnblogs.com/dannyli/archive/2011/08/15/2139550.html K2 blackpearl项目中经常需要将其他数据中的表注册到K2服务 ...
- struts 中 s:iterator 使用注意事项
后台定义类 public class Course_pj { private String _id; private String _courseid; private String _course_ ...
- 无法加载 DLL“ArcGISVersion.dll”: 找不到指定的模块
无法加载 DLL“ArcGISVersion.dll”: 找不到指定的模块.(异常来自 HRESULT:0x8007007E).
- 用Python组合Celery Redis RabbitMQ进行分布式数据抓取
首先,记录下遇到的问题吧,在抓取的过程中为了避免IO操作,主要用Redis做插入缓存,当内存占用率很大时,会周期性的持续到Mysql里 虽然是拆东墙补西墙,但把数据抓取完毕后持续化可以慢慢进行,毕竟数 ...
- ps 图片提取线稿方法2种 转