《Ray Tracing in One Weekend》阅读笔记 - 9、Metal(金属)
如果我们希望不同的物体使用不同的材料,则需要进行设计决策。我们可以使用具有许多参数的通用材料,而将不同的材料类型仅将其中一些参数归零。这不是一个坏方法。或者我们可以有一个抽象的材料类来封装行为。我是后一种方法的粉丝。对于我们的程序,材料需要做两件事:
- 产生散射射线(或说它吸收了入射射线)。
- 如果散射,说出应将射线衰减多少。
这建议了抽象类:
9.1. An Abstract Class for Materials( 材料抽象类)
#ifndef MATERIAL_H

#define MATERIAL_H

#include "rtweekend.h"

#include "hittable.h"

struct hit_record;

// abstract class

class material {

public:

    virtual bool scatter(

            const ray &r_in, const hit_record &rec, color &attenuation, ray &scattered

    ) const = 0;

};

#endif
9.2. A Data Structure to Describe Ray-Object Intersections(描述射线对象相交的数据结构)
hit_record是为了避免使用一堆参数,因此我们可以在其中填充所需的任何信息。 您可以改为使用参数。 这是一个品味问题。 hittables和material需要彼此了解,因此参考文献有一定的循环性。 在C ++中,您只需要警告编译器该指针是一个类,下面的hittable类中的“类材料”就是这样做的:
/*该结构体记录“撞点”处的信息:离光线起点的距离t、撞点的坐标向量p、撞点出的法向量normal.*/

struct hit_record {

    point3 p;

    vec3 normal;

    // new variables

    shared_ptr<material> mat_ptr;

    double t;

    bool front_face;

}
我们在这里设置的是材料将告诉我们射线如何与表面相互作用。 hit_record只是将一堆参数填充到结构中的一种方法,因此我们可以将它们作为一组发送。 当光线撞击表面(例如特定的球体)时,hit_record中的材质指针将被设置为指向当我们开始时在main()中设置该球体时所给定的材质指针。 当ray_color()例程获取hit_record时,它可以调用材质指针的成员函数来找出散射的光线(如果有)。
class sphere : public hittable {

    public:

        sphere() {}

        sphere(point3 cen, double r, shared_ptr<material> m)

            : center(cen), radius(r), mat_ptr(m) {};

        virtual bool hit(

            const ray& r, double t_min, double t_max, hit_record& rec) const override;

    public:

        point3 center;

        double radius;

        shared_ptr<material> mat_ptr;

};

bool sphere::hit(const ray& r, double t_min, double t_max, hit_record& rec) const {

    ...

    rec.t = root;

    rec.p = r.at(rec.t);

    vec3 outward_normal = (rec.p - center) / radius;

    rec.set_face_normal(r, outward_normal);

    rec.mat_ptr = mat_ptr;

    return true;

}
9.3. Modeling Light Scatter and Reflectance(模拟光散射和反射率)
如果您仔细阅读上面的代码,您会发现一小撮恶作剧的机会。如果我们生成的随机单位向量与法向向量完全相反,则两者之和将为零,这将导致散射方向向量为零。这会在以后导致不良情况(无穷大和NaN),因此我们需要在传递条件之前先对其进行拦截。
为此,我们将创建一个新的vector方法—vec3::near_zero()如果矢量在所有维度上都非常接近零,则返回true。
class vec3 {

    ...

    bool near_zero() const {

        // Return true if the vector is close to zero in all dimensions.

        const auto s = 1e-8;

        return (fabs(e[0]) < s) && (fabs(e[1]) < s) && (fabs(e[2]) < s);

    }

    ...

};
// 兰伯特模型类

class lambertian : public material {

    public:

        lambertian(const color& a) : albedo(a) {}

        virtual bool scatter(

            const ray& r_in, const hit_record& rec, color& attenuation, ray& scattered

        ) const override {

            auto scatter_direction = rec.normal + random_unit_vector();

            // Catch degenerate scatter direction

            // 此时随机的向量近似为与normal法线向量相反方向的向量

            if (scatter_direction.near_zero())

                scatter_direction = rec.normal;

            scattered = ray(rec.p, scatter_direction);

            attenuation = albedo;

            return true;

        }

    public:

        color albedo;

};
9.4. Mirrored Light Reflection(镜面光反射)
对于光滑的金属,射线不会被随机散射。关键数学是:射线如何从金属镜反射回来? 向量数学是我们的朋友在这里:
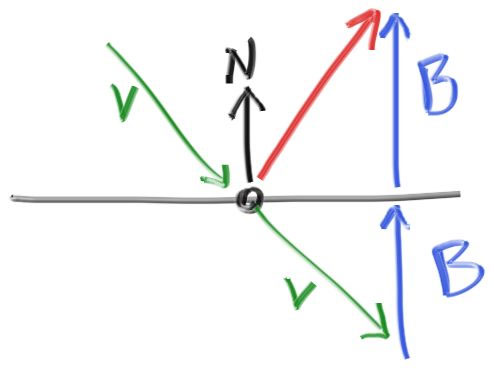
Figure 11: Ray reflection
红色的反射射线方向为 v+2b。在我们的设计中n是单位向量,但是 v未必。长度b 应该 v*n。因为v 点,我们将需要一个减号,产生:
// 反射

// 法线是单位向量 所以点积结果就是向量v在n上投影的长度

vec3 reflect(const vec3 &v, const vec3 &n) {

    return v - 2 * dot(v, n) * n;

}
金属材料只是使用该公式反射光线:
class metal : public material {

public:

    metal(const color &a) : albedo(a) {}

    bool scatter(const ray &r_in, const hit_record &rec, color &attenuation, ray &scattered) const override {

        vec3 reflected = reflect(unit_vector(r_in.direction()), rec.normal);

        scattered = ray(rec.p, reflected);

        attenuation = albedo;

        return (dot(scattered.direction(), rec.normal) > 0);

    }

public:

    color albedo;

};
我们要修改ray_color()函数以使用此函数:
color ray_color(const ray& r, const hittable& world, int depth) {

    hit_record rec;

    // If we've exceeded the ray bounce limit, no more light is gathered.

    if (depth <= 0)

        return color(0,0,0);

    if (world.hit(r, 0.001, infinity, rec)) {

        ray scattered;

        color attenuation;

        if (rec.mat_ptr->scatter(r, rec, attenuation, scattered))

            return attenuation * ray_color(scattered, world, depth-1);

        return color(0,0,0);

    }

    vec3 unit_direction = unit_vector(r.direction());

    auto t = 0.5*(unit_direction.y() + 1.0);

    return (1.0-t)*color(1.0, 1.0, 1.0) + t*color(0.5, 0.7, 1.0);

}
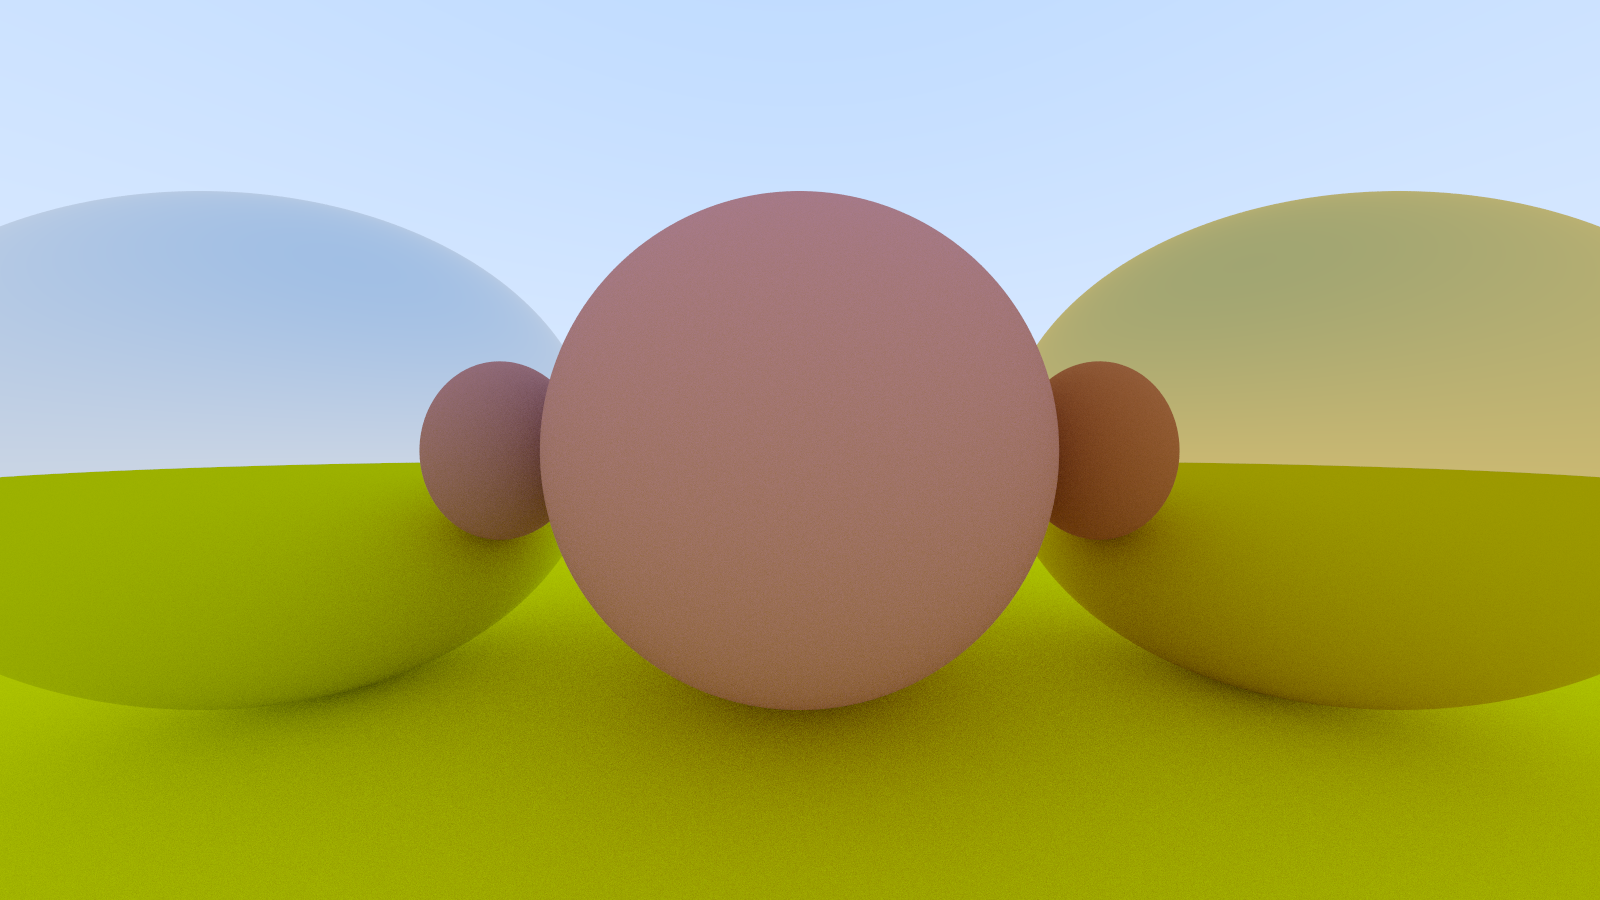
9.5. A Scene with Metal Spheres(金属球的场景)
在场景中添加一些金属球:
    auto material_ground = make_shared<lambertian>(color(0.8, 0.8, 0.0));

    auto material_center = make_shared<lambertian>(color(0.7, 0.3, 0.3));

    auto material_left   = make_shared<metal>(color(0.8, 0.8, 0.8));

    auto material_right  = make_shared<metal>(color(0.8, 0.6, 0.2));

    world.add(make_shared<sphere>(point3( 0.0, -100.5, -1.0), 100.0, material_ground));

    world.add(make_shared<sphere>(point3( 0.0,    0.0, -1.0),   0.5, material_center));

    world.add(make_shared<sphere>(point3(-1.0,    0.0, -1.0),   0.5, material_left));

    world.add(make_shared<sphere>(point3( 1.0,    0.0, -1.0),   0.5, material_right));
大功告成
效果
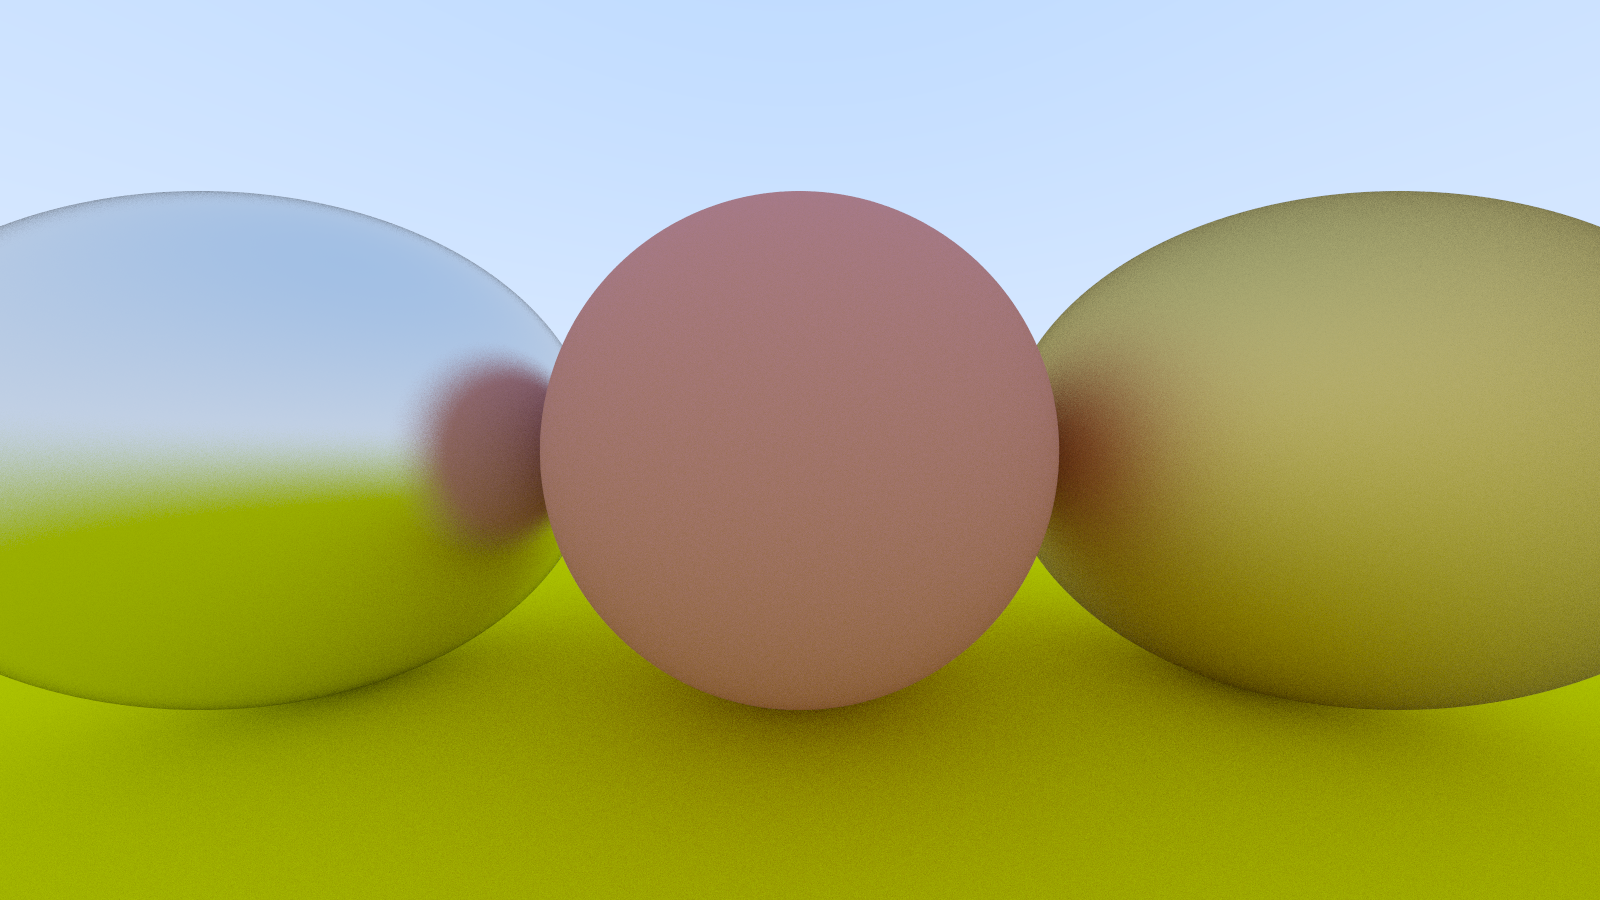
9.6. Fuzzy Reflection(模糊反射)
我们还可以通过使用小球体并为射线选择新的端点来随机化反射方向:

球体越大,反射将变得越模糊。 这建议添加一个模糊度参数,该参数仅是球体的半径(因此零是没有扰动)。 要注意的是,对于大球体或掠食性射线,我们可能会散射到水面以下。 我们可以让表面吸收那些
// 金属类

class metal : public material {

public:

    metal(const color &a, double f) : albedo(a), fuzz(f < 1 ? f : 1) {}

    bool scatter(const ray &r_in, const hit_record &rec, color &attenuation, ray &scattered) const override {

        vec3 reflected = reflect(unit_vector(r_in.direction()), rec.normal);

        scattered = ray(rec.p, reflected + fuzz * random_in_unit_sphere());

        attenuation = albedo;

        return (dot(scattered.direction(), rec.normal) > 0);

    }

public:

    color albedo;

    double fuzz;

};
    shared_ptr<metal> material_left = make_shared<metal>(color(0.8, 0.8, 0.8), 0.3);

    shared_ptr<metal> material_right = make_shared<metal>(color(0.8, 0.6, 0.2), 1.0);
效果
这图真的太漂亮了QAQ
《Ray Tracing in One Weekend》阅读笔记 - 9、Metal(金属)的更多相关文章
- Ray Tracing in one Weekend 阅读笔记
目录 一.创建Ray类,实现背景 二.加入一个球 三.让球的颜色和其法线信息相关 四.多种形状,多个碰撞体 五.封装相机类 六.抗锯齿 七.漫发射 八.抽象出材料类(编写metal类) 九.介质材料( ...
- 【Ray Tracing The Next Week 超详解】 光线追踪2-1
Preface 博主刚放假回家就进了医院,今天刚完事儿,来续写第二本书 Ready 我们来总结一下上一本书的笔记中我们的一些规定 1. 数学表达式 我们采用小写粗黑体代表向量,大写粗黑体代表矩阵, ...
- Three.js源码阅读笔记-5
Core::Ray 该类用来表示空间中的“射线”,主要用来进行碰撞检测. THREE.Ray = function ( origin, direction ) { this.origin = ( or ...
- 《Ray Tracing in One Weekend》、《Ray Tracing from the Ground Up》读后感以及光线追踪学习推荐
<Ray Tracing in One Weekend> 优点: 相对简单易懂 渲染效果相当好 代码简短,只看书上的代码就可以写出完整的程序,而且Github上的代码是将基类与之类写在一起 ...
- 【Ray Tracing The Next Week 超详解】 光线追踪2-7 任意长方体 && 场景案例
上一篇比较简单,很久才发是因为做了一些好玩的场景,后来发现这一章是专门写场景例子的,所以就安排到了这一篇 Preface 这一篇要介绍的内容有: 1. 自己做的光照例子 2. Cornell box画 ...
- 【RAY TRACING THE REST OF YOUR LIFE 超详解】 光线追踪 3-7 混合概率密度
Preface 注:鉴于很多网站随意爬取数据,可能导致内容残缺以及引用失效等问题,影响阅读,请认准原创网址: https://www.cnblogs.com/lv-anchoret/category ...
- 【RAY TRACING THE REST OF YOUR LIFE 超详解】 光线追踪 3-5 random direction & ONB
Preface 往后看了几章,对这本书有了新的理解 上一篇,我们第一次尝试把MC积分运用到了Lambertian材质中,当然,第一次尝试是失败的,作者发现它的渲染效果和现实有些出入,所以结尾处声明要 ...
- 【RAY TRACING THE REST OF YOUR LIFE 超详解】 光线追踪 3-4 基于重要性采样的材质初探
Preface 我们今天来把第三本书从开局到现在讲的一大堆理论运用到我们的框架中,那么今天我们首先将原始的材质改为基于重要性采样原理的材质 这一篇是代码工程中进行MC理论应用的初步尝试篇 Read ...
- 【Ray Tracing The Next Week 超详解】 光线追踪2-8 Volume
Preface 今天有两个东东,一个是体积烟雾,一个是封面图 下一篇我们总结项目代码 Chapter 8:Volumes 我们需要为我们的光线追踪器添加新的物体——烟.雾,也称为participat ...
- 【Ray Tracing The Next Week 超详解】 光线追踪2-6 Cornell box
Chapter 6:Rectangles and Lights 今天,我们来学习长方形区域光照 先看效果 light 首先我们需要设计一个发光的材质 /// light.hpp // ------- ...
随机推荐
- python3使用tracemalloc追踪mmap内存变化
技术背景 在前面一篇博客中我们介绍了一些用python3处理表格数据的方法,其中重点包含了vaex这样一个大规模数据处理的方案.这个数据处理的方案是基于内存映射(memory map)的技术,通过创建 ...
- antd+react项目迁移vite的解决方案
antd+react+webpack往往是以react技术栈为主的前端项目的标准组合,三者都有成熟的生态和稳定的表现,但随着前端圈的技术不断革新,号称下一代构建平台vite2的发布,webpack似乎 ...
- unzip解压中文乱码
1 问题描述 直接 unzip xxx.zip 乱码,肯定是编码问题了不用问.但是unzip没有指定编码的选项: 网上的解决方案如下: unzip -O GBK/GB18030CP936 xx.zip ...
- C语言-内存函数的实现(一)之memcpy
C语言中的内存函数有如下这些 memcpy memmove memcmp memset 下面看看memcpy函数 memcpy 我们想想,之前有那个字符串拷贝的函数,即strcpy函数.都有拷贝的函数 ...
- HUAWEI AppGallery Connect 正式发布移动端App,随时随地掌握应用动态
华为应用市场AppGallery Connect应用一站式服务平台正式发布移动端App,帮助您随时随地查看应用信息,获取运营分析数据,接收重要消息通知,快速回复用户评论等,提升应用的运营管理效率,更便 ...
- kubectl简介
kubectl简介 kubectl是操作k8s集群的命令行工具,安装在k8s的master节点,kubectl在$HOME/.kube目录中查找一个名为config的文件, 你可以通过设置Kubeco ...
- Docker笔记(二) 安装常用软件
常用环境安装 这里收集一些常用环境的安装步骤,可直接复制进行使用,节省安装时间,后续会随时补充 安装MySQL5.7.32 下载mysql5.7.32的镜像 ( 记得下载镜像要先确保镜像仓库中存在这个 ...
- Unittest单元测试框架——BeautifulReport测试报告和Yagmail自动发送邮件
一.前言 之前在做appium自动化的时候,已经提到过unittest框架的基本概念.用例执行,以及BeautifulReport测试报告的简单使用了(地址:https://www.cnblogs.c ...
- 【github】 加速国内 Github 访问,下载,的9种方案!
原文参考 https://mp.weixin.qq.com/s/ptFBjWXj88fsI3Oh6PghRA 1. GitHub 镜像访问 这里提供两个最常用的镜像地址: https://github ...
- hdu1074 状态压缩dp+记录方案
题意: 给你一些作业,每个作业有自己的结束时间和花费时间,如果超过结束时间完成,一天扣一分,问你把n个作业完成最少的扣分,要求输出方案. 思路: 状态压缩dp,记录方案数的地方 ...