Java-Dubbo学习及整合SpringBoot
Dubbo架构
Dubbo是Java的RPC框架,具有三大核心功能:面向接口的远程方法调用,智能容错和负载均衡,以及服务的自动注册和发现
Dubbo架构图:
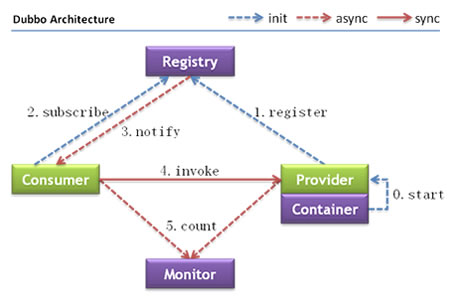
节点角色说明:
| 节点 | 说明 |
| Provider | 需要暴露服务的服务提供方 |
| Consumer | 调用远程服务的服务消费方 |
| Registry | 服务注册与发现的注册中心 |
| Monitor | 统计服务次数和调用时间的监控中心 |
| Container |
服务运行容器 |
调用关系说明:
0. Container负责启动、加载、运行Provider
1. Provider在启动时,向Registry注册自己提供的服务
2. Consumer在启动时,向Registry订阅自己所需的服务
3. Registry返回Provider地址列表给Consumer,若地址有变更,将基于长连接推送变更数据给Consumer
4. Consumer从Provider地址列表中,基于软负载均衡算法,选一台Provider进行调用
5. Consumer和Provider在内存中累计调用次数和调用时间,定时每分钟发一次统计数据到Monitor
模块目录说明:
1. API:存放service接口以及实体类、数据传输对象等
2. Consumer:消费者目录,远程调用Provider提供的接口实现,即交互层
3. Provider:生产者目录,提供给Consumer的接口实现类
Dubbo整合
写个SpringBoot整合Dubbo的demo,清晰明了地了解这几层分层的含义,以及Dubbo的相关配置
1)API层
UserInfo实体类
 1 @ToString

 2 @AllArgsConstructor

 3 @NoArgsConstructor

 4 @Data

 5 public class userInfo implements Serializable {

 6 /**

 7 *    Serializable 序列化

 8 *    实体类必须实现序列化接口

 9 **/

10     private Long id;

11     private String userName;

12     private Integer userId;

13     private String userEmail;

14     private String userAddress;

15     private String userGender;

16 }
UserInfoService接口
1 public interface UserInfoService {

2     public List<userInfo> getUserInfo();

3 }
2)Provider层
pom.xml添加相关依赖
 1 <dependencies>

 2         <!-- 添加api依赖 -->

 3         <dependency>

 4             <groupId>com.tttori</groupId>

 5             <artifactId>api</artifactId>

 6             <version>0.0.1-SNAPSHOT</version>

 7             <scope>compile</scope>

 8         </dependency>

 9

10         <!-- dubbo依赖 -->

11         <dependency>

12             <groupId>com.alibaba.boot</groupId>

13             <artifactId>dubbo-spring-boot-starter</artifactId>

14             <version>0.2.0</version>

15         </dependency>

16

17         <!-- zookeeper cli端 -->

18         <dependency>

19             <groupId>org.apache.curator</groupId>

20             <artifactId>curator-framework</artifactId>

21             <version>2.13.0</version>

22         </dependency>

23 </dependencies>
dubbo-config.xml配置dubbo
ServiceImpl类使用@Service("x")注解,其中x与配置中ref一致
<?xml version="1.0" encoding="UTF-8"?>

<beans xmlns="http://www.springframework.org/schema/beans"

       xmlns:xsi="http://www.w3.org/2001/XMLSchema-instance"

       xmlns:dubbo="http://code.alibabatech.com/schema/dubbo"

       xsi:schemaLocation="http://www.springframework.org/schema/beans

       http://www.springframework.org/schema/beans/spring-beans.xsd

       http://code.alibabatech.com/schema/dubbo

       http://code.alibabatech.com/schema/dubbo/dubbo.xsd">

    <!-- 声明服务名dubbo-provider -->

    <dubbo:application name="dubbo-provider"/>

    <!-- 声明zookeeper注册中心,暴露服务地址127.0.0.1:2181 -->

    <dubbo:registry id="tttori" protocol="zookeeper" address="127.0.0.1:2181"/>

    <!-- 使用dubbo协议,暴露服务端口随机 -->

    <dubbo:protocol name="dubbo" port="-1"/>

    <!-- 暴露服务接口,ref指向实现对象 -->

    <dubbo:service interface="com.tttori.api.service.UserInfoService" ref="userInfoService" registry="tttori" timeout="5000"/>

    <dubbo:consumer check="false" timeout="5000"/>

</beans>
UserInfoServiceImpl提供服务的接口实现类
 1 @Service("userInfoService") //dubbo包下的Service 暴露服务

 2 @Component //POJO实例化入容器中

 3 public class UserInfoServiceImpl implements UserInfoService{

 4     @Override

 5     public List<userInfo> getUserInfo(){

 6         userInfo userinfo1 = new userInfo(1001L,"Jack",1413112,"01414112@qq.com","China","M");

 7        userInfo userinfo2 = new userInfo(1002L,"Dell",1414116,"01414116@qq.com","China","M");

 8        return Arrays.asList(userinfo1,userinfo2);

 9     }

10 }
ProviderApplication主启动类
 1 @SpringBootApplication

 2 @ComponentScan(basePackages = {

 3         "com.tttori.provider.serviceImpl"

 4 })

 5 @MapperScan(basePackages = {"com.tttori.provider.mapper"})

 6 @ImportResource(locations = {"classpath:dubbo-config.xml"})

 7 @EnableScheduling

 8 public class ProviderApplication {

 9

10     public static void main(String[] args) {

11         SpringApplication.run(ProviderApplication.class, args);

12

13         try {

14             System.in.read();

15         } catch (IOException e) {

16             e.printStackTrace();

17         }

18     }

19

20 }
3)Consumer层
pom.xml添加API的依赖
 1     <dependencies>

 2         <!-- api依赖 -->

 3         <dependency>

 4             <groupId>com.maziyao</groupId>

 5             <artifactId>api</artifactId>

 6             <version>0.0.1-SNAPSHOT</version>

 7             <scope>compile</scope>

 8         </dependency>

 9         ...

10     </dependencies>
dubbo-config.xml配置dubbo
 1 <?xml version="1.0" encoding="UTF-8"?>

 2 <beans xmlns="http://www.springframework.org/schema/beans"

 3        xmlns:xsi="http://www.w3.org/2001/XMLSchema-instance"

 4        xmlns:dubbo="http://code.alibabatech.com/schema/dubbo"

 5        xsi:schemaLocation="http://www.springframework.org/schema/beans

 6        http://www.springframework.org/schema/beans/spring-beans.xsd

 7        http://code.alibabatech.com/schema/dubbo

 8        http://code.alibabatech.com/schema/dubbo/dubbo.xsd">

 9

10     <!-- 配置服务名 -->

11     <dubbo:application name="dubbo-consumer"/>

12

13     <!-- 指定注册中心地址 -->

14     <dubbo:registry id="tttori" address="zookeeper://127.0.0.1:2181"/>

15

16     <!-- 订阅接口,生成远程服务代理 -->

17     <dubbo:reference id="userInfoService" interface="com.tttori.api.service.UserInfoService" registry="tttori"/>

18

19 </beans>
UserController交互层
@RestController //控制层

public class UserController {

    @Autowired

    UserService UserService;

    @ResponseBody //返回Json数据

    @RequestMapping("/info")

    public List<userInfo> getInfo(){

        /**

        * Consumer接口实现类调用远程服务Provider接口

        **/

        return userService.getUserInfo();

    }

}
ConsumerApplication启动类
1 @SpringBootApplication

2 @ImportResource(locations = {"classpath:dubbo-config.xml"})

3 public class ConsumerApplication {

4

5     public static void main(String[] args) {

6         SpringApplication.run(ConsumerApplication.class, args);

7     }

8

9 }
总结
SpringBoot整合Dubbo步骤
1)pom.xml
0. Provider和Consumer配置Dubbo相关的Starter(ZK)
2)dubbo-config.xml
0. dubbo.application.name 声明当前服务名
1. dubbo.protocol.name 指定通信规则,dubbo协议
2. dubbo.registry.protocol.address 声明注册中心,暴露服务地址
3. dubbo.service.interface.ref.registry 暴露服务接口(Provider)
4. dubbo.registry.interface.ref.registry 订阅服务接口(Consumer)
3)暴露服务
服务实现类使用@Service和@Component注释
4)消费服务
@Reference/@Autowired实现自动注入
Java-Dubbo学习及整合SpringBoot的更多相关文章
- Dubbo学习-6-springboot整合dubbo
1.在前面帖子和工程的基础上,这里使用springboot整合dubbo,首先创建springboot项目: https://start.spring.io/ 进入spring Initializr ...
- Java开发学习(三十七)----SpringBoot多环境配置及配置文件分类
一.多环境配置 在工作中,对于开发环境.测试环境.生产环境的配置肯定都不相同,比如我们开发阶段会在自己的电脑上安装 mysql ,连接自己电脑上的 mysql 即可,但是项目开发完毕后要上线就需要该配 ...
- Netty学习篇③--整合springboot
经过前面的netty学习,大概了解了netty各个组件的概念和作用,开始自己瞎鼓捣netty和我们常用的项目的整合(很简单的整合) 项目准备 工具:IDEA2017 jar包导入:maven 项目框架 ...
- 22.Java面试学习平台-整合OSS对象存储
SpringCloud实战项目全套学习教程连载中 PassJava 学习教程 简介 PassJava-Learning项目是PassJava(佳必过)项目的学习教程.对架构.业务.技术要点进行讲解. ...
- dubbo入门学习(三)-----dubbo整合springboot
springboot节省了大量的精力去配置各种bean,因此通过一个简单的demo来整合springboot与dubbo 一.创建boot-user-service-provider 本篇博文基于上篇 ...
- SpringBoot学习之整合Mybatis
本博客使用IDEA开发工具,通过Maven构建SpringBoot项目,初始化项目添加的依赖有:spring-boot-starter-jdbc.spring-boot-starter-web.mys ...
- java JDK8 学习笔记——第16章 整合数据库
第十六章 整合数据库 16.1 JDBC入门 16.1.1 JDBC简介 1.JDBC是java联机数据库的标准规范.它定义了一组标准类与接口,标准API中的接口会有数据库厂商操作,称为JDBC驱动程 ...
- Dubbo整合SpringBoot
目前的dubbo已支持和springboot集成,还是之前的例子,这次我们通过springboot容器来实现.借此了解一下基于springboot容器启动的dubbo的配置及使用. 1. 准备工作 创 ...
- Dubbo整合Springboot框架
本文使用的是alibaba的Dubbo. Dubbo整合Springboot可以分为四步: 第一步:首先需要了解Dubbo官方给的建议,至少有三个工程: 接口工程:主要存实体bean和业务接口 服务提 ...
随机推荐
- 连接mysql数据库实现增删改查(一)
在python中我们通过pymysql来连接数据库,具体实现如下 ''' 连接mysql数据库 此类进行封装了一些基础的操作数据库方法 ''' import pymysql from Homework ...
- Nginx:Nginx配置文件详解
Nginx是一款面向性能设计的HTTP服务器,相较于Apache.lighttpd具有占有内存少,稳定性高等优势. 如下是Nginx的配置详解: ######Nginx配置文件nginx.conf中文 ...
- PHP安装amqp扩展 出现未装librabbitmq错误
这错误的原因是因为没有安装amqp的依赖包rabbitmq-c,需要先安装rabbitmq-c. 1.安装rabbitmq-c-0.7.1 没有安装就会提示上面的错误我选择的是最新版本0.7.1 wg ...
- java -jar 运行springboot项目时内存设置
java -Xms64m #JVM启动时的初始堆大小 -Xmx128m #最大堆大小 -Xmn64m #年轻代的大小,其余的空间是老年代 -XX:MaxMetaspaceSize=128m # -XX ...
- Python网页正文转换语音文件的操作方法
天气真的是越来越冷啦,有时候我们想翻看网页新闻,但是又冷的不想把手拿出来,移动鼠标翻看.这时候,是不是特别想电脑像讲故事一样,给我们念出来呢?人生苦短,我有python啊,试试用 Python 来朗读 ...
- Java | this的本质 和 static的本质
this 在说this之前先说一下,对象创建的过程: 1.分配对象空间,并将对象成员变量初始化. 2.执行属性值的显式初始化. 3.执行构造方法. 4.返回相关的地址给相关的对象. this的本质 ...
- Java的标准日志
虽然开源社区有很多优秀的日志框架,但我们学习标准的java日志框架是为了更好的理解其他框架啊(近期项目要用ELK) 看自己以前写的Log4J简直不忍直视啊啊啊啊,那时还感觉自我良好 1. 为什么要使用 ...
- Redis双写一致性与缓存更新策略
一.双写一致性 双写一致性,也就是说 Redis 和 mysql 数据同步 双写一致性数据同步的方案有: 1.先更新数据库,再更新缓存 这个方案一般不用: 因为当有两个请求AB先后更新数据库后,A应该 ...
- Skywalking-03:Skywalking本地调试
live-demo 与 skywalking 源码联调 构建项目 找一个目录执行如下命令 git clone https://github.com/apache/skywalking.git # cl ...
- DNS的原理和解析过程
DNS的解析原理和过程: 在Internet上域名和IP是对应的,DNS解析有两种:一种是正向解析,另外一种是反向解析. 正向解析:正向解析就是将域名转换成对应的 IP地址的过程,它应用于在浏览器地址 ...