cesium 3dtiles模型单体化点击高亮效果
前言
cesium 官网的api文档介绍地址cesium官网api,里面详细的介绍 cesium 各个类的介绍,还有就是在线例子:cesium 官网在线例子,这个也是学习 cesium 的好素材。
cesium官网在线例子
https://sandcastle.cesium.com/?src=3D+Tiles+Feature+Picking.html
大概思路如下:
- 加载3dtiles模型
var tileset = new Cesium.Cesium3DTileset({

url: Cesium.IonResource.fromAssetId(75343),

});

viewer.scene.primitives.add(tileset);
- 创建html元素,鼠标移动以及点击模型高亮作用
// HTML overlay for showing feature name on mouseover

var nameOverlay = document.createElement("div");

viewer.container.appendChild(nameOverlay);

nameOverlay.className = "backdrop";

nameOverlay.style.display = "none";

nameOverlay.style.position = "absolute";

nameOverlay.style.bottom = "0";

nameOverlay.style.left = "0";

nameOverlay.style["pointer-events"] = "none";

nameOverlay.style.padding = "4px";

nameOverlay.style.backgroundColor = "black";
- 设置选中要素的样式以及创建选中模型
// Information about the currently selected feature

var selected = {

feature: undefined,

originalColor: new Cesium.Color(),

};

// An entity object which will hold info about the currently selected feature for infobox display

var selectedEntity = new Cesium.Entity();
- 鼠标响应事件交互
// 获取默认的左键单击处理程序,用于在左键单击时未拾取要素
var clickHandler = viewer.screenSpaceEventHandler.getInputAction(
Cesium.ScreenSpaceEventType.LEFT_CLICK
); // 如果支持剪影,则鼠标上方的剪影功能为蓝色,鼠标单击的剪影功能为绿色
// 如果不支持轮廓,请将特征颜色更改为鼠标悬停时为黄色,单击鼠标时为绿色
if (
Cesium.PostProcessStageLibrary.isSilhouetteSupported(viewer.scene)
) {
// 支持轮廓
var silhouetteBlue = Cesium.PostProcessStageLibrary.createEdgeDetectionStage();
silhouetteBlue.uniforms.color = Cesium.Color.BLUE;//蓝色
silhouetteBlue.uniforms.length = 0.01;
silhouetteBlue.selected = []; var silhouetteGreen = Cesium.PostProcessStageLibrary.createEdgeDetectionStage();
silhouetteGreen.uniforms.color = Cesium.Color.LIME;
silhouetteGreen.uniforms.length = 0.01;
silhouetteGreen.selected = []; viewer.scene.postProcessStages.add(
Cesium.PostProcessStageLibrary.createSilhouetteStage([
silhouetteBlue,
silhouetteGreen,
])
); // 在悬停时勾勒出蓝色的轮廓
viewer.screenSpaceEventHandler.setInputAction(function onMouseMove(
movement
) {
// 如果先前高亮显示了某个要素,请撤消该高亮显示
silhouetteBlue.selected = []; //点击新要素
var pickedFeature = viewer.scene.pick(movement.endPosition);
if (!Cesium.defined(pickedFeature)) {
nameOverlay.style.display = "none";
return;
} //要素被点击,显示它的覆盖内容
nameOverlay.style.display = "block";
nameOverlay.style.bottom =
viewer.canvas.clientHeight - movement.endPosition.y + "px";
nameOverlay.style.left = movement.endPosition.x + "px";
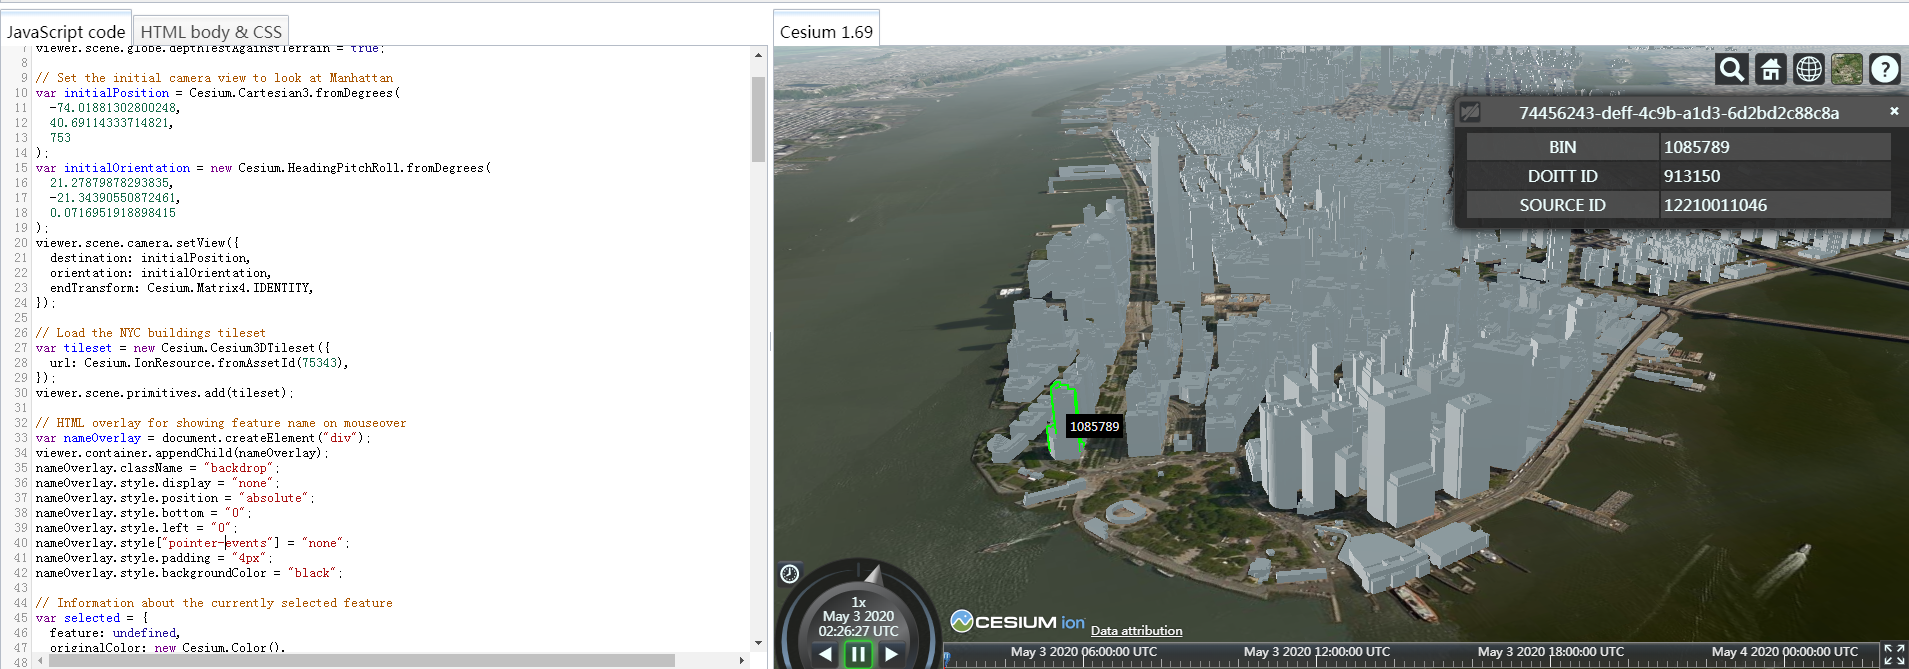
var name = pickedFeature.getProperty("BIN");
nameOverlay.textContent = name; // 突出显示尚未选定的功能
if (pickedFeature !== selected.feature) {
silhouetteBlue.selected = [pickedFeature];
}
},
Cesium.ScreenSpaceEventType.MOUSE_MOVE); // 在信息框中显示选定内容和元数据
viewer.screenSpaceEventHandler.setInputAction(function onLeftClick(
movement
) {
// 如果先前选择了某个特征,请撤消高亮显示
silhouetteGreen.selected = []; // 点击新要素
var pickedFeature = viewer.scene.pick(movement.position);
if (!Cesium.defined(pickedFeature)) {
clickHandler(movement);
return;
} // Select the feature if it's not already selected
if (silhouetteGreen.selected[0] === pickedFeature) {
return;
} // 保存选定要素的原始颜色
var highlightedFeature = silhouetteBlue.selected[0];
if (pickedFeature === highlightedFeature) {
silhouetteBlue.selected = [];
} // 高亮新选择要素
silhouetteGreen.selected = [pickedFeature]; // 设置要素信息框描述
var featureName = pickedFeature.getProperty("name");
selectedEntity.name = featureName;
selectedEntity.description =
'Loading <div class="cesium-infoBox-loading"></div>';
viewer.selectedEntity = selectedEntity;
selectedEntity.description =
'<table class="cesium-infoBox-defaultTable"><tbody>' +
"<tr><th>BIN</th><td>" +
pickedFeature.getProperty("BIN") +
"</td></tr>" +
"<tr><th>DOITT ID</th><td>" +
pickedFeature.getProperty("DOITT_ID") +
"</td></tr>" +
"<tr><th>SOURCE ID</th><td>" +
pickedFeature.getProperty("SOURCE_ID") +
"</td></tr>" +
"</tbody></table>";
},
Cesium.ScreenSpaceEventType.LEFT_CLICK);
} else {
// 不支持轮廓。相反,更改特征颜色
// 有关当前突出显示的功能的信息
var highlighted = {
feature: undefined,
originalColor: new Cesium.Color(),
}; // 鼠标移动显示黄色
viewer.screenSpaceEventHandler.setInputAction(function onMouseMove(
movement
) {
// 如果先前高亮显示了某个要素,请撤消该高亮显示
if (Cesium.defined(highlighted.feature)) {
highlighted.feature.color = highlighted.originalColor;
highlighted.feature = undefined;
}
// 点击新要素
var pickedFeature = viewer.scene.pick(movement.endPosition);
if (!Cesium.defined(pickedFeature)) {
nameOverlay.style.display = "none";
return;
}
// 要素被点击,显示它的覆盖内容
nameOverlay.style.display = "block";
nameOverlay.style.bottom =
viewer.canvas.clientHeight - movement.endPosition.y + "px";
nameOverlay.style.left = movement.endPosition.x + "px";
var name = pickedFeature.getProperty("name");
if (!Cesium.defined(name)) {
name = pickedFeature.getProperty("id");
}
nameOverlay.textContent = name;
// Highlight the feature if it's not already selected.
if (pickedFeature !== selected.feature) {
highlighted.feature = pickedFeature;
Cesium.Color.clone(
pickedFeature.color,
highlighted.originalColor
);
pickedFeature.color = Cesium.Color.YELLOW;
}
},
Cesium.ScreenSpaceEventType.MOUSE_MOVE); //为所选内容上色并在信息框中显示元数据
viewer.screenSpaceEventHandler.setInputAction(function onLeftClick(
movement
) {
// 如果先前选择了某个特征,请撤消高亮显示
if (Cesium.defined(selected.feature)) {
selected.feature.color = selected.originalColor;
selected.feature = undefined;
}
// 点击新要素
var pickedFeature = viewer.scene.pick(movement.position);
if (!Cesium.defined(pickedFeature)) {
clickHandler(movement);
return;
}
// Select the feature if it's not already selected
if (selected.feature === pickedFeature) {
return;
}
selected.feature = pickedFeature;
// Save the selected feature's original color
if (pickedFeature === highlighted.feature) {
Cesium.Color.clone(
highlighted.originalColor,
selected.originalColor
);
highlighted.feature = undefined;
} else {
Cesium.Color.clone(pickedFeature.color, selected.originalColor);
}
// Highlight newly selected feature
pickedFeature.color = Cesium.Color.LIME;
// Set feature infobox description
var featureName = pickedFeature.getProperty("name");
selectedEntity.name = featureName;
selectedEntity.description =
'Loading <div class="cesium-infoBox-loading"></div>';
viewer.selectedEntity = selectedEntity;
selectedEntity.description =
'<table class="cesium-infoBox-defaultTable"><tbody>' +
"<tr><th>BIN</th><td>" +
pickedFeature.getProperty("BIN") +
"</td></tr>" +
"<tr><th>DOITT ID</th><td>" +
pickedFeature.getProperty("DOITT_ID") +
"</td></tr>" +
"<tr><th>SOURCE ID</th><td>" +
pickedFeature.getProperty("SOURCE_ID") +
"</td></tr>" +
"<tr><th>Longitude</th><td>" +
pickedFeature.getProperty("longitude") +
"</td></tr>" +
"<tr><th>Latitude</th><td>" +
pickedFeature.getProperty("latitude") +
"</td></tr>" +
"<tr><th>Height</th><td>" +
pickedFeature.getProperty("height") +
"</td></tr>" +
"<tr><th>Terrain Height (Ellipsoid)</th><td>" +
pickedFeature.getProperty("TerrainHeight") +
"</td></tr>" +
"</tbody></table>";
},
Cesium.ScreenSpaceEventType.LEFT_CLICK);
其他小专栏例子:3dtiles单体化
https://xiaozhuanlan.com/topic/3241096587
具体看上述链接文章,里面有详细的介绍
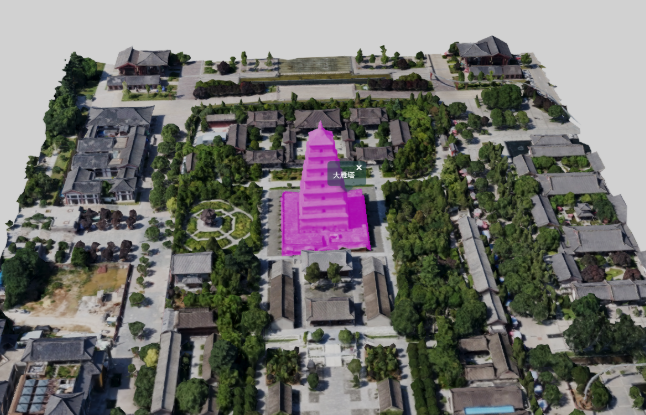
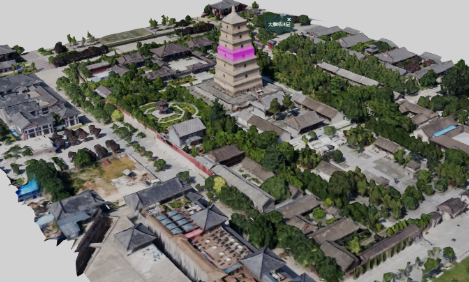
本篇文章效果例子:结合geoserver实现3dtiles倾斜模型单体化点击高亮
实现思路如下:鼠标点击倾斜模型,获取对应的点击坐标点;然后根据pick获取到的坐标点,结合geoserver发布的wfs服务,进行空间查询,匹配对应的geojson数据;最后根据获取到的geojson数据源来绘制显示高亮效果,并且弹出对应气泡窗口。
效果图: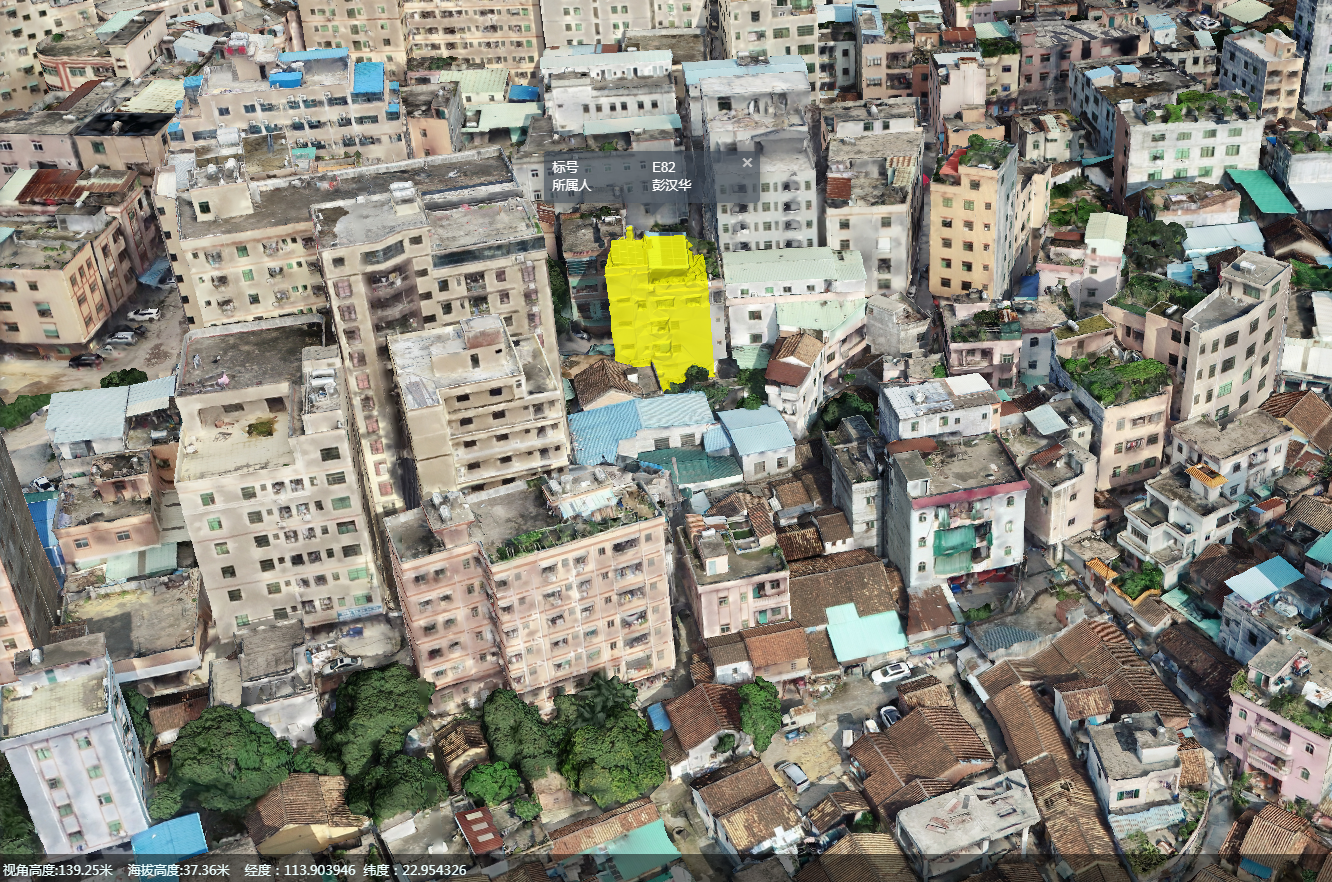
- 监听鼠标点击事件:
this.handler.setInputAction(function (evt) { //单机开始绘制

var picks = viewer.scene.drillPick(evt.position);

viewer.scene.render();

var cartesian;

var isOn3dtiles = false;

for (var i = 0; i < picks.length; i++) {

if ((picks[i] && picks[i].primitive) || picks[i] instanceof Cesium.Cesium3DTileFeature) { //模型上拾取

isOn3dtiles = true;

}

}

if (isOn3dtiles) {

cartesian = viewer.scene.pickPosition(evt.position);

var lnglat = cUtil.cartesianToLnglat(cartesian);//坐标转换

that.queryWFSData([lnglat]);

} else {

console.warn("请到模型上拾取!");

return;

}

}, Cesium.ScreenSpaceEventType.LEFT_CLICK);
- geoserver空间查询,具体的wfs服务空间查询参数那些可以参照这篇文章,cesium结合geoserver实现地图空间查询(附源码下载):
queryWFSData: function (lnglats) {

if (!lnglats || lnglats.length < 1) return;

var that = this;

queryWFSData({

typeName: typeName,

propertyName: propertyName,

url: mapUrl,

queryData: {

type: '1',

coors: lnglats

},

success: function (data) {

if (!data.features || data.features.length == 0) {

console.warn("未查询到相关数据!");

return;

}

that.loadGeojson(data);//查询结果高亮绘制显示

}

})

}
- 高亮绘制显示:
loadGeojson: function (data) {

if (!data) return;

var that = this;

Cesium.GeoJsonDataSource.load(data, {

stroke: Cesium.Color.HOTPINK,

fill: Cesium.Color.YELLOW.withAlpha(.8),

clampToGround: true,

strokeWidth: 3

}).then(function (dataSource) {

that.quyerDataSourceArr.push(dataSource);

viewer.dataSources.add(dataSource);

var entities = dataSource.entities.values;

that.bindPopup(entities);

viewer.flyTo(entities, {

offset: new Cesium.HeadingPitchRange(0, Cesium.Math.toRadians(-90.0), 100)

});

});

}
- 气泡窗口显示:
bindPopup: function (entities) {

if (!entities || entities.length < 1) return;

var that = this;

entities.forEach(function (ent) {

ent.attr = "loadgeojson";

var properties = ent._properties;

var contentStr = "";

for (var i in properties) {

var name = ppObj[i];

var value = properties[i]._value;

if (name && value) {

contentStr +=

`

<tr>

<td>${name}</td>

<td>${value}</td>

</tr>

`;

}

}

var content =

`

<table style='width:200px;'>

${contentStr}

</table>

`;

//绑定弹窗

var hierarchy = ent.polygon.hierarchy._value.positions;

var center = cUtil.getCenterByPositions(hierarchy);

var lnglat = cUtil.cartesianToLnglat(center);

var tileH = viewer.scene.sampleHeight(Cesium.Cartographic.fromDegrees(lnglat[0], lnglat[1]));

var popupCartesian = Cesium.Cartesian3.fromDegrees(lnglat[0], lnglat[1], tileH);

var popup = new MovePrompt(viewer, {

type: 2,

content: content,

popupCartesian: popupCartesian,

offset: {

y: -30

}

})

that.popupArr.push(popup);

ent.popup = popup;

});

}
更多精彩文章,见下面的cesium小专栏:
cesium 3dtiles模型单体化点击高亮效果的更多相关文章
- 解决Skyline 6.5版本中3DML模型单体化后外部网页挂接问题
using System; using System.Collections.Generic; using System.ComponentModel; using System.Data; usin ...
- UI-切圆角、透明度、取消按钮点击高亮效果、按钮文字带下划线
一.切UIView的某个角为圆角 如果需要将UIView的4个角全部都为圆角,做法相当简单,只需设置其Layer的cornerRadius属性即可(项目需要使用QuartzCore框架).而若要指定某 ...
- 关于H5中 input消除默认,取消在手机上的点击高亮效果
input消除默认,代码如下 input{ -webkit-tap-highlight-color: rgba(255, 255, 255, 0); ...
- UICollectionViewCell点击高亮效果(附带效果GIF)
首先效果如下: 背景是这样的:UI上使用的是UICollectionView,所以后面会使用它的协议方法完成. 实现思路是这样的:高亮状态+点击后短时间内保持颜色变化 实现的代码参考如下: // Ce ...
- H5中 input消除默认,取消在手机上的点击高亮效果
input消除默认,代码如下 input{ -webkit-tap-highlight-color: rgba(255, 255, 255, 0); ...
- CesiumLab V1.4 分类3dtiles生成(倾斜单体化、楼层房间交互)我记得我是写过一篇关于倾斜单体化的简书文章的,但是现在找不到了。不过找不到也好,就让他随风逝去吧,因为当时我写那篇文章的时候,就发现了cesium实际是有另一种更高效的单体化。就下面这个示例https://cesiumjs.org/Cesium/Build/Apps/Sandcastle/index.html?src=
我记得我是写过一篇关于倾斜单体化的简书文章的,但是现在找不到了.不过找不到也好,就让他随风逝去吧,因为当时我写那篇文章的时候,就发现了cesium实际是有另一种更高效的单体化.就下面这个示例 http ...
- cesium入门示例-矢量化单体分类
实现楼层的分层选择和属性信息展示,该功能基于大雁塔倾斜数据实现单体化分类显示. 数据准备: 1.大雁塔倾斜数据,已转换为3dTiles,参考cesium入门示例-3dTiles加载的第2节osgb数据 ...
- cesium加载纽约市3dtiles模型
const tileset = new Cesium.Cesium3DTileset({ url: '../../assets/data/NewYork/tileset.json' }); viewe ...
- Cesium专栏-terrain地形、3dtiles模型、gltf模型 高度采样
在Cesium中,对于terrain地形.3dtiles模型.gltf模型的高度采样是一个很基本的功能,基于此,可以做一些深度应用,而Cesium已经帮我们提供了相应的API,在这里,我帮大家总结一下 ...
随机推荐
- shiro验证时,当authenticationStrategy为AllSuccessfulStrategy时
shiro验证时,当authenticationStrategy为AllSuccessfulStrategy时,如果某一个验证出错,那么 PrincipalCollection principalCo ...
- 自己常用的CMake用法总结
欢迎指正 CMake : A.download : https://cmake.org/download/ B.tutorial: https://cmake.org/cmake-tutorial/ ...
- 【九度OJ】题目1061:成绩排序 解题报告
[九度OJ]题目1061:成绩排序 解题报告 标签(空格分隔): 九度OJ [LeetCode] http://ac.jobdu.com/problem.php?pid=1061 题目描述: 有N个学 ...
- 【LeetCode】709. To Lower Case 解题报告(Python)
作者: 负雪明烛 id: fuxuemingzhu 个人博客: http://fuxuemingzhu.cn/ 目录 题目描述: 题目大意 解题方法 ASIIC码操作 日期 题目地址:https:// ...
- 【剑指Offer】二叉树中和为某一值的路径 解题报告(Python)
[剑指Offer]二叉树中和为某一值的路径 解题报告(Python) 标签(空格分隔): 剑指Offer 题目地址:https://www.nowcoder.com/ta/coding-intervi ...
- 1108 - Instant View of Big Bang
1108 - Instant View of Big Bang PDF (English) Statistics Forum Time Limit: 2 second(s) Memory Limi ...
- Probabilistic Principal Component Analysis
目录 引 主要内容 EM算法求解 附录 极大似然估计 代码 Tipping M E, Bishop C M. Probabilistic Principal Component Analysis[J] ...
- 「会员卡管理系统」 · Java Swing + MySQL JDBC开发
目录 目录 一.语言和环境 二.实现功能 三.数据库设计 四.具体要求及推荐实现步骤 五.注意事项 六.评分标准 >>>实现代码: 数据库 com.ynavc.Bean com.yn ...
- SpringCloud使用汇总Config
1.Config Server对外提供的资源格式 配置中心的HTTP服务有5种资源格式: /{application}/{profile}[/{label}] /{application}-{prof ...
- 『无为则无心』Python函数 — 30、Python变量的作用域
目录 1.作用于的概念 2.局部变量 3.全局变量 4.变量的查找 5.作用域中可变数据类型变量 6.多函数程序执行流程 1.作用于的概念 变量作用域指的是变量生效的范围,在Python中一共有两种作 ...