Spring中@Value标签的使用详解
1.@Value标签
由于Spring对通过IOC的方式对对象进行统一管理,所以对任何对象而言,其生成方法均由Spring管理。传统的方法是通过XML配置每一个Bean,并对这个Bean的所有Field进行声明式配置。
以一个简单的学校的例子为示范。假设有两种角色,老师和班长。
package org.kingszelda.version3.controller;

/**

 * Created by shining.cui on 2017/7/30.

 */

public class Teacher {

    /**

     * 姓名

     */

    private String name = "王老师";

    /**

     * 教授科目

     */

    private String major = "数学";

    /**

     * 教授课程班级的班长

     */

    private ClassMonitor classMonitor = new ClassMonitor();

    /**

     * 老师会上课

     */

    public void teachLesson() {

    }

    /**

     * 老师要收作业,然而老师并不亲自收,而是交给班长收

     */

    public void collectHomework() {

        classMonitor.collectHomework();

    }

    public String getName() {

        return name;

    }

    public void setName(String name) {

        this.name = name;

    }

    public String getMajor() {

        return major;

    }

    public void setMajor(String major) {

        this.major = major;

    }

    public ClassMonitor getClassMonitor() {

        return classMonitor;

    }

    public void setClassMonitor(ClassMonitor classMonitor) {

        this.classMonitor = classMonitor;

    }

}
老师有自己的名字和教授的科目两个属性,这属于老师的静态属性。老师有很多“功能“,比如上课和收作业。上课属于老师可以自己完成的功能,而收作业则需要班长帮忙。所以老师为了完成自己的工作是不能独立存在的,需要依赖班长。
/**

 * Created by shining.cui on 2017/7/30.

 */

public class ClassMonitor {

    public void collectHomework(){

        System.out.println("开始收作业了!");

        System.out.println("收作业完毕");

    }

}
这里我们假设班长只有一个功能,就是收作业。
上面的例子很好的说明了对象之间相互依赖共同合作的方法,即互相依赖。这些功能交给spring之后管理起来就方便多了,以xml的方式为例,需要如下配置:
<?xml version="1.0" encoding="UTF-8"?>

<beans xmlns="http://www.springframework.org/schema/beans"

       xmlns:xsi="http://www.w3.org/2001/XMLSchema-instance"

       xmlns:context="http://www.springframework.org/schema/context"

       xsi:schemaLocation="http://www.springframework.org/schema/beans http://www.springframework.org/schema/beans/spring-beans.xsd http://www.springframework.org/schema/context http://www.springframework.org/schema/context/spring-context.xsd">

    <bean id="classMonitor" class="org.kingszelda.version3.controller.ClassMonitor"/>

    <bean id="teacher" class="org.kingszelda.version3.controller.Teacher">

        <property name="name" value="王老师"/>

        <property name="major" value="数学"/>

        <property name="classMonitor" ref="classMonitor"/>

    </bean>

</beans>
通过这种配置的方式之后,实体之间的依赖关系变得一清二楚。比如Teacher的名字,科目,所依赖的班长是哪个,只看配置文件就可以一目了然。但是,当实体变多了之后,可想而知,这个xml配置文件将庞大的不可想象,就更不要提可读性了。
于是Spring从3.0开始推出了基于注解的形式,来简化配置。
package org.kingszelda.version3.controller;

import org.springframework.beans.factory.annotation.Value;

import org.springframework.stereotype.Service;

import javax.annotation.Resource;

/**

 * Created by shining.cui on 2017/7/30.

 */

@Service

public class Teacher {

    /**

     * 姓名

     */

    @Value("王老师")

    private String name;

    /**

     * 教授科目

     */

    @Value("数学")

    private String major;

    /**

     * 教授课程班级的班长

     */

    @Resource

    private ClassMonitor classMonitor;

    /**

     * 老师会上课

     */

    public void teachLesson() {

    }

    /**

     * 老师要收作业,然而老师并不亲自收,而是交给班长收

     */

    public void collectHomework() {

        classMonitor.collectHomework();

    }

}
通过注解的形式已经减少了大量的get、set方法,通过@Resource注入了依赖的班长,并且通过@Value注入了老师的姓名和科目。
问题来了,当姓名与科目如何做到可配置,而不是写死的呢?对应xml与注解都有其对应的方式。
首先声明一个config.perproties文件:
name=张老师

major=数学
xml:
<?xml version="1.0" encoding="UTF-8"?>

<beans xmlns="http://www.springframework.org/schema/beans"

       xmlns:xsi="http://www.w3.org/2001/XMLSchema-instance"

       xmlns:context="http://www.springframework.org/schema/context"

       xsi:schemaLocation="http://www.springframework.org/schema/beans http://www.springframework.org/schema/beans/spring-beans.xsd http://www.springframework.org/schema/context http://www.springframework.org/schema/context/spring-context.xsd">

    <context:property-placeholder location="classpath:config.properties"/>

    <bean id="classMonitor" class="org.kingszelda.version3.controller.ClassMonitor"/>

    <bean id="teacher" class="org.kingszelda.version3.controller.Teacher">

        <property name="name" value="${name}"/>

        <property name="major" value="${major}"/>

        <property name="classMonitor" ref="classMonitor"/>

    </bean>

</beans>
注解:
package org.kingszelda.version3.controller;

import org.springframework.beans.factory.annotation.Value;

import org.springframework.stereotype.Service;

import javax.annotation.Resource;

/**

 * Created by shining.cui on 2017/7/30.

 */

@Service

public class Teacher {

    /**

     * 姓名

     */

    @Value("${name}")

    private String name;

    /**

     * 教授科目

     */

    @Value("${major}")

    private String major;

    /**

     * 教授课程班级的班长

     */

    @Resource

    private ClassMonitor classMonitor;

    /**

     * 老师会上课

     */

    public void teachLesson() {

    }

    /**

     * 老师要收作业,然而老师并不亲自收,而是交给班长收

     */

    public void collectHomework() {

        classMonitor.collectHomework();

    }

}
我们看到,不论是通过xml配置,还是通过注解@Value的方式,姓名与科目都在生成Teacher对象是被赋值进去了。
2.@Value是如何起作用的

Spirng在生命周期里关于Bean的处理大概可以分为下面几步:
- 加载Bean定义(从xml或者从@Import等)
- 处理BeanFactoryPostProcessor
- 实例化Bean
- 处理Bean的property注入
- 处理BeanPostProcessor
而当我们在声明了<context:property-placeholder location="classpath:config.properties"/>标签之后,即声明了一个配置型bean交给Spring容器进行管理,即PropertyPlaceholderConfigurer类。我们先看一下这个类的继承结构。
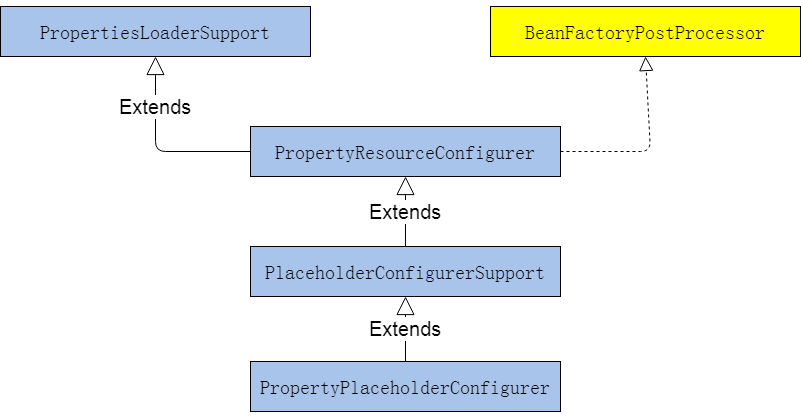
蓝色的是功能性结构,实现了解析文件,处理文件的功能,黄色的是Spring的钩子功能,声明了功能性模块被调用的时机。这里PrepertyPlaceholderConfigurer实现了BeanFactoryPostProcesser接口,并实现了postProcessBeanFactory()方法即当Spring容器的BeanFactory被构造成功之后会调用这个方法。这里要注意,ApplicationContext也是BeanFactory的派生类。这时,我们先看父类的PropertyResourceConfigurer方法postProcessBeanFactory。因为这个类继承了Spring的BeanFactoryPostProcesser接口,所以这个方法一定是操作BeanFactory的。
    @Override

    public void postProcessBeanFactory(ConfigurableListableBeanFactory beanFactory) throws BeansException {

        try {
       //1.获取当前容器配置的所有Properties文件,可能由多个文件merge而来

            Properties mergedProps = mergeProperties();

            //2.如果需要的话,将Properties文件的内容进行转化,因为默认的Preperties都是String的key-value形式。
            //Spring提供的默认方式是不转化,保持String,String的key-value

            convertProperties(mergedProps);

            //3.由子类继承,对容器与Properties进行操作,即value注入。

            processProperties(beanFactory, mergedProps);

        }

        catch (IOException ex) {

            throw new BeanInitializationException("Could not load properties", ex);

        }

    }
这里最重要的第一步就是获得Properties文件即mergeProperties方法,这是解析资源文件最基本的方法,所以这个方法一定存在于当前功能的最基类中,即PropertiesLoaderSupport。由于xml中是这样配置的:
<context:property-placeholder location="classpath:config.properties"/>
这里声明了一个PropertyPlaceholderConfigurer对象,显然是调用了setLocation方法,而这个方法同样存在于该功能模块的最基本父类PropertiesLoaderSupport中。
public abstract class PropertiesLoaderSupport {

       //……省略

    private Resource[] locations;

       //……省略

        public void setLocation(Resource location) {

        this.locations = new Resource[] {location};

    }

       //注意:晚声明的文件内容将覆盖早声明的文件内容,所以请自己保证文件之间内容不要重叠,否则以最后一个文件为准

        public void setLocations(Resource... locations) {

        this.locations = locations;

    }

       //……省略

}
mergeProperties方法中进行了配置化管理,针对某些标志位进行额外的操作,这里不做过多说明,其最重要的功能是调用了下面方法:
    protected void loadProperties(Properties props) throws IOException {

        if (this.locations != null) {
       //1.遍历声明的Resource文件地址

            for (Resource location : this.locations) {

                if (logger.isInfoEnabled()) {

                    logger.info("Loading properties file from " + location);

                }

                try {
            //2.获得Resource文件流,并加载内容到Properties对象中

                    PropertiesLoaderUtils.fillProperties(

                            props, new EncodedResource(location, this.fileEncoding), this.propertiesPersister);

                }

                catch (IOException ex) {

                    if (this.ignoreResourceNotFound) {

                        if (logger.isWarnEnabled()) {

                            logger.warn("Could not load properties from " + location + ": " + ex.getMessage());

                        }

                    }

                    else {

                        throw ex;

                    }

                }

            }

        }

    }
回想PropertyResourceConfigurer主流程中的三个方法,第一步已经执行完毕,加载了配置的properties文件,第二步是spring自己的默认实现,将非空的key对应的value放入Properties中,第三步则该由子类各自实现了,将BeanFactory与Properties进行统一操作。这时候我们看我们直接声明的派生类PropertyPlaceholderConfigurer。
    @Override

    protected void processProperties(ConfigurableListableBeanFactory beanFactoryToProcess, Properties props)

            throws BeansException {

     //1.声明一个支持value为String类型的Resolver

        StringValueResolver valueResolver = new PlaceholderResolvingStringValueResolver(props);

        //2.将key-value注入到BeanFactory的某些bean中
        doProcessProperties(beanFactoryToProcess, valueResolver);

    }
接下来就是真正的value注入环节了
protected void doProcessProperties(ConfigurableListableBeanFactory beanFactoryToProcess,

            StringValueResolver valueResolver) {

     //1.将key-value内容声明为BeanDefinitionVisitor对象,用来根据BeanDefinition修改即将生成的对应的Bean内容

        BeanDefinitionVisitor visitor = new BeanDefinitionVisitor(valueResolver);

        String[] beanNames = beanFactoryToProcess.getBeanDefinitionNames();

        for (String curName : beanNames) {
        //2.只有同一个容器内的才可以进行value注入,同时应该避免掉操作本身,避免进入循环递归

            if (!(curName.equals(this.beanName) && beanFactoryToProcess.equals(this.beanFactory))) {

                BeanDefinition bd = beanFactoryToProcess.getBeanDefinition(curName);

                try {

                    visitor.visitBeanDefinition(bd);

                }

                catch (Exception ex) {

                    throw new BeanDefinitionStoreException(bd.getResourceDescription(), curName, ex.getMessage(), ex);

                }

            }

        }

        //3.处理一些拥有别名的类

        beanFactoryToProcess.resolveAliases(valueResolver);

        //4.New in Spring 3.0: resolve placeholders in embedded values such as annotation attributes.(这一步有些不懂,以后再修正)
beanFactoryToProcess.addEmbeddedValueResolver(valueResolver); }
在上述代码中,第2步已经修改了原始的BeanDefinition,我们一路跟进去看,原来核心的替换功能在PropertyPlaceholderHelper中:
protected String parseStringValue(

            String strVal, PlaceholderResolver placeholderResolver, Set<String> visitedPlaceholders) {

     //1.对每一个key进行处理

        StringBuilder result = new StringBuilder(strVal);

     //2.首先考虑有占位符的情况,默认是${}

        int startIndex = strVal.indexOf(this.placeholderPrefix);

        while (startIndex != -1) {

            int endIndex = findPlaceholderEndIndex(result, startIndex);

            if (endIndex != -1) {

                String placeholder = result.substring(startIndex + this.placeholderPrefix.length(), endIndex);

                String originalPlaceholder = placeholder;

                if (!visitedPlaceholders.add(originalPlaceholder)) {

                    throw new IllegalArgumentException(

                            "Circular placeholder reference '" + originalPlaceholder + "' in property definitions");

                }

                //3.如果有占位符,则去掉占位符递归调用本方法,即key=${abc},处理成key=abc的形式试图获取value

                placeholder = parseStringValue(placeholder, placeholderResolver, visitedPlaceholders);

                //4.真正的从key-value集合中获得key对应的value

                String propVal = placeholderResolver.resolvePlaceholder(placeholder);
          //5.如果没有找到,则试图按照${key:default}的形式解析

                if (propVal == null && this.valueSeparator != null) {

                    int separatorIndex = placeholder.indexOf(this.valueSeparator);

                    if (separatorIndex != -1) {
                        //6.获得:之前的内容,即真正的key

                        String actualPlaceholder = placeholder.substring(0, separatorIndex);

                        //7.获得:之后的内容,即默认值
                        String defaultValue = placeholder.substring(separatorIndex + this.valueSeparator.length());
               //8.再次尝试从key-value集合中获得内容,因为如果真的是key-value的形式,按照全名是肯定找不到的

                        propVal = placeholderResolver.resolvePlaceholder(actualPlaceholder);
                        //9.如果找到了就按照配置的走,如果没有找到则附上默认值

                        if (propVal == null) {

                            propVal = defaultValue;

                        }

                    }

                }

                if (propVal != null) {

                    //10.如果找到了这个value,则再次递归调用自己,避免value也是占位符的情况

                    propVal = parseStringValue(propVal, placeholderResolver, visitedPlaceholders);
                    //11.将获得的结果替换掉

                    result.replace(startIndex, endIndex + this.placeholderSuffix.length(), propVal);

                    if (logger.isTraceEnabled()) {

                        logger.trace("Resolved placeholder '" + placeholder + "'");

                    }

                    startIndex = result.indexOf(this.placeholderPrefix, startIndex + propVal.length());

                }

                else if (this.ignoreUnresolvablePlaceholders) {

                    // Proceed with unprocessed value.

                    startIndex = result.indexOf(this.placeholderPrefix, endIndex + this.placeholderSuffix.length());

                }

                else {

                    throw new IllegalArgumentException("Could not resolve placeholder '" +

                            placeholder + "'" + " in string value \"" + strVal + "\"");

                }

                visitedPlaceholders.remove(originalPlaceholder);

            }

            else {

                startIndex = -1;

            }

        }

        return result.toString();

    }
3.总结
Spring管理bean的方式大大减少了编程人员的编码复杂度,这个复杂度并没有消失,而是转嫁到Spring容器中。我们可以通过xml或者@value注解的方式注入field属性,这对多环境profiles的应用是非常关键的,掌握了Spring的这条注入路径之后,对于帮助理解Spring或者查找一些值注入的问题都非常有帮助。
Spring中@Value标签的使用详解的更多相关文章
- Spring中@Component注解,@Controller注解详解
在使用Spring的过程中,为了避免大量使用Bean注入的Xml配置文件,我们会采用Spring提供的自动扫描注入的方式,只需要添加几行自动注入的的配置,便可以完成 Service层,Controll ...
- Spring中的循环依赖解决详解
前言 说起Spring中循环依赖的解决办法,相信很多园友们都或多或少的知道一些,但当真的要详细说明的时候,可能又没法一下将它讲清楚.本文就试着尽自己所能,对此做出一个较详细的解读.另,需注意一点,下文 ...
- spring中Bean的注入参数详解
字面值 一般指可用字符串表示的值,这些值可以通过<value>元素标签进行注入.在默认情况下,基本数据类型及其封装类.String等类型都可以采取字面值注入的方式,Spring容器在 ...
- Spring中bean的作用域scope详解
参考文献:http://blog.csdn.net/jacklearntech/article/details/40157861 http://www.cnblogs.com/qq78292959/p ...
- Spring中Controller和RequestMapping的详解
先看一个简单的实例: @Controller @RequestMapping("/hello") public class anyTypeController{ @RequestM ...
- Spring中的ApplicationListener的使用详解案例
本文链接:https://blog.csdn.net/u010963948/article/details/83507185 1.ApplicationContext Spring的核心,Contex ...
- Spring中配置文件applicationContext.xml配置详解
<?xml version="1.0" encoding="UTF-8"?><beans xmlns="http://www.spr ...
- Python中with标签的使用详解
1.在python DTL模板中,想要定义变量,可以通过"with"语句来实现. 2."with"语句有两种使用方式: 第一种是"with xx=xx ...
- HTML video 视频标签全属性详解
HTML 5 video 视频标签全属性详解 现在如果要在页面中使用video标签,需要考虑三种情况,支持Ogg Theora或者VP8(如果这玩意儿没出事的话)的(Opera.Mozilla.C ...
随机推荐
- 【Django】Python web开发:几个模板系统的性能对比(转)
http://blog.chedushi.com/archives/910 结论: 点评一下吧.django就是个渣,不多废话了.webpy的代码很简洁,可惜速度太慢了.bottle看起来快一点,不过 ...
- 关于javacc的认识
http://www.cnblogs.com/Gavin_Liu/archive/2009/03/07/1405029.html
- 会话跟踪技术之——cookie
1.cookieForm <%@ page language="java" contentType="text/html; charset=UTF-8" ...
- C#导入导出Excele数据
注:对于实体类对象最好新建一个并且继承原有实体类,这样可以将类型进行修改: 方法一:此种方法是用EPPLUS中的FileInfo流进行读取的(是不是流我还真不太了解,若有懂得请留言,非常感谢了) us ...
- [Tyvj模拟赛]运
运 题目 [问题背景]zhx 和妹子们玩数数游戏. [问题描述] 仅包含4或7的数被称为幸运数.一个序列的子序列被定义为从序列中删去若干个数, 剩下的数组成的新序列.两个子序列被定义为不同的当且仅当其 ...
- VMware的安装和使用
注:内容系兄弟连Linux教程(百度传课:史上最牛的Linux视频教程)的学习笔记. VMware的安装和使用 1. 虚拟机的安装 这里安装虚拟机VMware10,下载安装程序,双击安装-->为 ...
- php+mysql事务处理例子详细分析实例下载
一.数据引擎innodb用begin,rollback,commit来实现提交事务处理,begin开始事务后出现错误就rollback事务回滚或者没有错误就commit提事务提交确认完成. start ...
- 分辨率验证工具 - 【Firesizer】的使用
Firesizer是一款测试分辨率的插件. 下载方式:Firefox工具栏——〉工具——〉附加组件--〉搜索Firesizer并安装,浏览器会自动重启 使用方式:浏览器右下角直接切换分辨率即可,如下图 ...
- 自动生成AWR报告
--自动生成AWR报告 -------------------2013/09/23 脚本代码: #!/bin/bash AWR_FORMAT=html NUM_DAYS=1 MAX_S ...
- /dev/null 2>&1解释
/dev/null 2>&1 解释 crontab内容 :50 18 5-30 * * /script/myscript.sh 1> /dev/null 2>&1 其 ...