【iOS UI】UINavigationController
1.1简介
UINavigationController可以翻译为导航控制器,在iOS里经常用到。
下面的图显示了导航控制器的流程。最左侧是根视图,当用户点击其中的General项时 ,General视图会滑入屏幕;当用户继续点击Auto-Lock项时,Auto-Lock视图将滑入屏幕。相应地,在对象管理上,导航控制器使用了导航堆栈。根视图控制器在堆栈最底层,接下来入栈的是General视图控制器和Auto-Lock视图控制器。可以调用pushViewControllerAnimated:方法将视图控制器推入栈顶,也可以调用popViewControllerAnimated:方法将视图控制器弹出堆栈。

1.2UINavigationController结构组成
看下图,UINavigationController有Navigation bar ,Navigation View ,Navigation toolbar等组成。

2.1
- 新建一个空项目UINavigationControllerDemo
- 新建一个UIViewController,并在UIViewController.xib中添加一个Button设置名字为Goto SecondView
- 打开AppDelegate.h,添加属性
#import <UIKit/UIKit.h>

@interface MLKAppDelegate : UIResponder <UIApplicationDelegate>

@property (strong, nonatomic) UIWindow *window;

@property (strong,nonatomic) UINavigationController *navController;

@end
AppDelegate.mdidFinishLaunchingWithOptions
- (BOOL)application:(UIApplication *)application didFinishLaunchingWithOptions:(NSDictionary *)launchOptions

{

    self.window = [[UIWindow alloc] initWithFrame:[[UIScreen mainScreen] bounds]];

    // Override point for customization after application launch.

    MLKRootViewController *rootController=[[MLKRootViewController alloc]init];

    rootController.title=@"Root View";

    self.navController=[[UINavigationController alloc]init];

    [self.navController pushViewController:rootController animated:YES];

    //

    [self.window addSubview:self.navController.view];

    //

    self.window.backgroundColor = [UIColor whiteColor];

    [self.window makeKeyAndVisible];

    return YES;

}
运行

2.2 添加UIBarButtonItem
bar ButtonItem分左右UIBarButtonItem。我们把左右的都添加上去。
在RootViewController.m中添加代码如下:
- (void)viewDidLoad

{

    [super viewDidLoad];

    // Do any additional setup after loading the view from its nib.

    //添加UIBarButtonItem

    UIBarButtonItem *leftButton=[[UIBarButtonItem alloc]initWithBarButtonSystemItem:UIBarButtonSystemItemAction target:self action:@selector(selectLeftAction:)];

    //

    self.navigationItem.leftBarButtonItem=leftButton;

    UIBarButtonItem *rightButton=[[UIBarButtonItem alloc]initWithBarButtonSystemItem:UIBarButtonSystemItemAction target:self action:@selector(selectRightAction:)];

    //

    self.navigationItem.rightBarButtonItem=rightButton;

}
UIBarButtonSystemItemAction的风格,这是系统自带的按钮风格,系统自带的按钮有下面这些

2.3响应UIBarButtonItem的点击事件
//响应UIBarButtonItem事件的实现

-(void)selectLeftAction:(id)sender{

    UIAlertView *alert=[[UIAlertView alloc] initWithTitle:@"提示" message:@"你点击了导航左按钮" delegate:self cancelButtonTitle:@"确定" otherButtonTitles:nil, nil];

    [alert show];

}

-(void)selectRightAction:(id)sender{

    UIAlertView *alert=[[UIAlertView alloc] initWithTitle:@"提示" message:@"你点击了导航右按钮" delegate:self cancelButtonTitle:@"确定" otherButtonTitles:nil, nil];

    [alert show];

}

3.1创建一个新的UIViewController SecondViewController
3.2为RootViewController的Button设置点击方法
-(void)goToSecondView:(id)sender{

    MLKSecondViewController *secondView=[[MLKSecondViewController alloc]init];

    [self.navigationController pushViewController:secondView animated:YES];

    secondView.title=@"Second View";

}
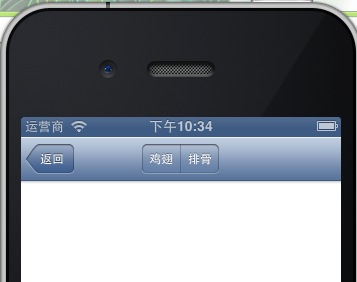
SecondViewController页面

如何在导航栏中实现这种效果呢

这就是SegmentedControl
在SecondViewController.m的viewDidLoad添加如下代码
- (void)viewDidLoad

{

    [super viewDidLoad];

    // Do any additional setup after loading the view from its nib.

    NSArray *array = [NSArray arrayWithObjects:@"鸡翅",@"排骨", nil];

    UISegmentedControl *segmentedController = [[UISegmentedControl alloc] initWithItems:array];

    segmentedController.segmentedControlStyle = UISegmentedControlSegmentCenter;

    [segmentedController addTarget:self action:@selector(segmentAction:) forControlEvents:UIControlEventValueChanged];

    self.navigationItem.titleView = segmentedController;

}
设置点击事件
-(void)segmentAction:(id)sender

{

    switch ([sender selectedSegmentIndex]) {

        case :

        {

            UIAlertView *alter = [[UIAlertView alloc] initWithTitle:@"提示" message:@"你点击了鸡翅" delegate:self  cancelButtonTitle:@"确定" otherButtonTitles:nil, nil];

            [alter show];

        }

            break;

        case :

        {

            UIAlertView *alter = [[UIAlertView alloc] initWithTitle:@"提示" message:@"你点击了排骨" delegate:self  cancelButtonTitle:@"确定" otherButtonTitles:nil, nil];

            [alter show];

        }

            break;

        default:

            break;

    }

}

左上角的返回上级View的barButtonitem的名字是上级目录的Title,如果title或者适合做button的名字,怎么办呢?我们可以自己定义
在RootViewController viewDidLoad方法
    //自定义backBarButtonItem

    UIBarButtonItem *backButton = [[UIBarButtonItem alloc] initWithTitle:@"返回" style:UIBarButtonItemStyleDone target:nil action:nil];

    self.navigationItem.backBarButtonItem=backButton;
5.1显示ToolBar
在SecondViewController的viewDidLoad方法中添加下面的代码这样ToolBar就显示出来了
[self.navigationController setToolbarHidden:NO animated:YES];
在ToolBar上添加UIBarButtonItem
    UIBarButtonItem *one = [[UIBarButtonItem alloc] initWithBarButtonSystemItem:UIBarButtonSystemItemAdd target:nil action:nil];

    UIBarButtonItem *two = [[UIBarButtonItem alloc] initWithBarButtonSystemItem:UIBarButtonSystemItemBookmarks target:nil action:nil];

    UIBarButtonItem *three = [[UIBarButtonItem alloc] initWithBarButtonSystemItem:UIBarButtonSystemItemAction target:nil action:nil];

    UIBarButtonItem *four = [[UIBarButtonItem alloc] initWithBarButtonSystemItem:UIBarButtonSystemItemEdit target:nil action:nil];

    UIBarButtonItem *flexItem = [[UIBarButtonItem alloc] initWithBarButtonSystemItem:UIBarButtonSystemItemFlexibleSpace target:nil action:nil];

    [self setToolbarItems:[NSArray arrayWithObjects:flexItem, one, flexItem, two, flexItem, three, flexItem, four, flexItem, nil]];

注意:用 [self.navigationController.toolbar setItems:(NSArray *) animated:<#(BOOL)#>]这个方法添加item是不起效果的。下面我动态自己添加Toolbar时,这个才起效果。
5.2动态添加ToolBar
SecondViewController.h文件中添加属性
@property UIToolbar *toolBar;
   //先隐藏ToolBar

    [self.navigationController  setToolbarHidden:YES animated:YES];

    UIBarButtonItem *searchButton = [[UIBarButtonItem alloc] initWithBarButtonSystemItem:UIBarButtonSystemItemSearch target:self action:@selector(goToThirdView:)];

    self.toolBar = [[UIToolbar alloc] initWithFrame:CGRectMake(0.0, self.view.frame.size.height - _toolBar.frame.size.height - 44.0, self.view.frame.size.width, 44.0)];

    [_toolBar setBarStyle:UIBarStyleDefault];

    _toolBar.autoresizingMask = UIViewAutoresizingFlexibleTopMargin;

    [_toolBar setItems:[NSArray arrayWithObject:searchButton]];

    [self.view addSubview:_toolBar];
响应UIBarButtonItem的点击事件,跳转到第三个页面去
-(void)goToThirdView:(id)sender{

    MLKThirdViewController *thirdView=[[MLKThirdViewController alloc]init];

    [self.navigationController pushViewController:thirdView animated:YES];

    thirdView.title=@"Third View";

}
【iOS UI】UINavigationController的更多相关文章
- 【iOS系列】-UINavigationController的使用(Segue传递数据)
[iOS系列]-UINavigationController的使用 UINavigationController是以以栈(先进后出)的形式保存子控制器, 常用属性: UINavigationItem有 ...
- 【iOS系列】-xib封装使用
[iOS系列]-xib封装使用 Xib文件可以用来描述某一块局部的UI界面 Xib文件的加载 修改xib文件的大小size(Freeform) 第一: NSArray *objs = [[NSBund ...
- 【iOS系列】-iOS的多线程解析
[iOS系列]-iOS的多线程解析 iOS的多线程实现技术: 1:GCD -- Grand Central Dispatch 是基于C语言的底层API 用Block定义任务,使用起来非常灵活便捷 提供 ...
- 【转】【iOS开发】打开另一个APP(URL Scheme与openURL)
目标 平常我们做iOS开发,会经常遇到打开其他的APP的功能.本篇文章讲的就是打开别人的APP的一些知识.我们的目标是: 打开别人的APP 让别人打开我们的APP iOS9的适配问题 使用URL Sc ...
- 【iOS系列】-自定义Modar动画
[iOS系列]-自定义Modar动画.md 我们需要做的最终的modar动画的效果是这样的, 就是点击cell,cell发生位移,慢慢的到第二个界面上的.为了做出这样的动画效果,我们需要以下的知识. ...
- 【iOS系列】- iOS吸附效果的实现 之 UICollectionView的使用全解
[iOS系列]- iOS吸附效果的实现 之 UICollectionView的使用全解 UICollectionView可以做很多的布局,在iOS开发中较为重要,所以这里就以实例来讲解UICollec ...
- 【iOS系列】-A server with the specified hostname could not be found.问题解决
[iOS系列]-A server with the specified hostname could not be found.问题解决 Reveal 在iOS开发中可以方便查看界面的布局,较为方便的 ...
- 【iOS系列】-iOS查看沙盒文件图文教程(真机+模拟器)
[iOS系列]-iOS查看沙盒文件图文教程(真机+模拟器) 1:模拟器 1.1 方法1: 程序中打印一下的地址,能直接前往沙盒路径. NSString *path = [NSSearchPathFor ...
- 【iOS系列】-UIWebView加载网页禁止左右滑动
[iOS系列]-UIWebView加载网页禁止左右滑动 问题: 做项目时候,用UIWebView加载网页的时候,要求是和微信网页中打开的网页的效果一样,也即是只能上下滑动,不能左右滑动,也不能缩放. ...
随机推荐
- Delphi的Hint介绍以及用其重写气泡提示以达到好看的效果
Delphi中使用提示是如此简单,只需将欲使用Hint的控件作如下设置: ShowHint := True; Hint := ‘提示信息’; 不必写一行代码,相当方便. 但有时我们又想自己定制提示的效 ...
- MFC画笔作用域的问题
今天发现了程序中的一个BUG.功能是在鼠标经过图形时,对图形进行加粗重绘.默认使用白色画刷.为防止白色背景下看不清,在白色背景下改用黑色画刷.代码如下 CPen* pOldPen;if (pDC-&g ...
- Unity 3D Framework Designing(2)——使用中介者模式解耦ViewModel之间通信
当你开发一个客户端应用程序的时候,往往一个单页会包含很多子模块,在不同的平台下,这些子模块又被叫成子View(视图),或者子Component(组件).越是复杂的页面,被切割出来的子模块就越多,子模块 ...
- Tcl与Design Compiler (八)——DC的逻辑综合与优化
本文属于原创手打(有参考文献),如果有错,欢迎留言更正:此外,转载请标明出处 http://www.cnblogs.com/IClearner/ ,作者:IC_learner 对进行时序路径.工作环 ...
- Appium 解决手势密码 java
if(driver.getPageSource().contains("绘制解锁图案")){//检测是否是有手势密码出现 List<AndroidElement> el ...
- NPOI扩展--判断指定单元格是否为合并单元格和输出该单元格的行列跨度(维度)
因工作需要用到跨合并单元格获取数据,所以写了个NPOI扩展类. 主要方法如下: 1.判断指定行/列索引(单元格)是否为合并单元格. 2.获取指定列索引的实际含有数据的单元格. 3.返回指定行/列索引的 ...
- CSS3学习笔记(3)-CSS3边框
p{ font-size: 15px; } .alexrootdiv>div{ background: #eeeeee; border: 1px solid #aaa; width: 99%; ...
- [转]android4.0.3 修改启动动画和开机声音
本文转自:http://www.cnblogs.com/jqyp/archive/2012/03/07/2383973.html 1. Linux 系统启动,出现Linux小企鹅画面(reboot)( ...
- Win10专业版下图片拖到PS无法打开的解决技巧
PS这个软件是用户最常用的软件之一,其强大的图形处理能力毋庸置疑.有用户表示在Win10专业版系统中使用PS发现图片不能直接拖动到PS中打开,这个问题本身不是特别大的问题,但这一小小的毛病会打破用户习 ...
- Ubuntu常用软件安装(附带地址和卸载自带软件)
跨平台系列汇总:http://www.cnblogs.com/dunitian/p/4822808.html#linux 上次说了安装VSCode(http://www.cnblogs.com/dun ...