2.1 摄像头V4L2驱动框架分析
学习目标:学习V4L2(V4L2:vidio for linux version 2)摄像头驱动框架,分析vivi.c(虚拟视频硬件相关)驱动源码程序,总结V4L2硬件相关的驱动的步骤;
一、V4L2架构
1. 字符类驱动
V4L2(V4L2:vidio for linux version 2)摄像头驱动属于字符类驱动,
对于一般的字符类驱动程序,其编写步骤一般分为:
1)构造一个file_operations: 编写open=drv_open .read=drv_read
2)注册设备,告诉内核:register_chrdev(主设备号,名字,&file_operations)
3)入口函数:调用register_chrdev
4)出口函数:卸载
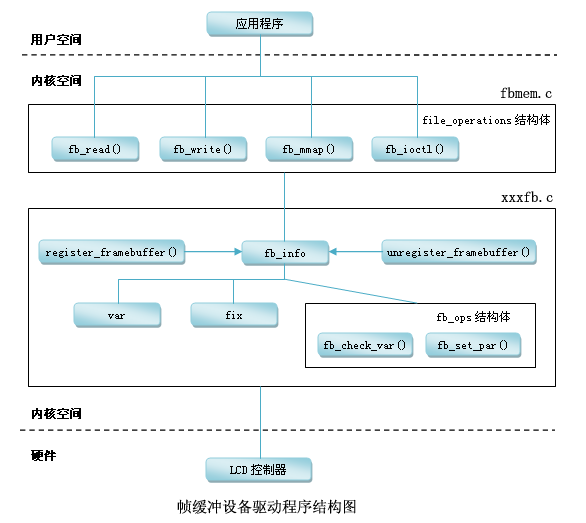
对于复杂的字符类驱动程序,其程序是一种分层结构。例如LCD驱动程序。如下图所示。
--> 上层为核心层(内核已经做好的),在fbmem.c中 ,主要的作用为:
1)构造file_operations(open read write 函数);2)注册;3)入口、出口。
--> 硬件相关层(用户需要做的),供核心层的file_operations调用,主要完成:
1) 分配一个fb_info 结构体;2) 设置fb_info 结构体等;3) 注册;4) 硬件相关的操作。
2. V4L2驱动架构
由以上字符类设备驱动架构可知,摄像头驱动也是分层结构的。
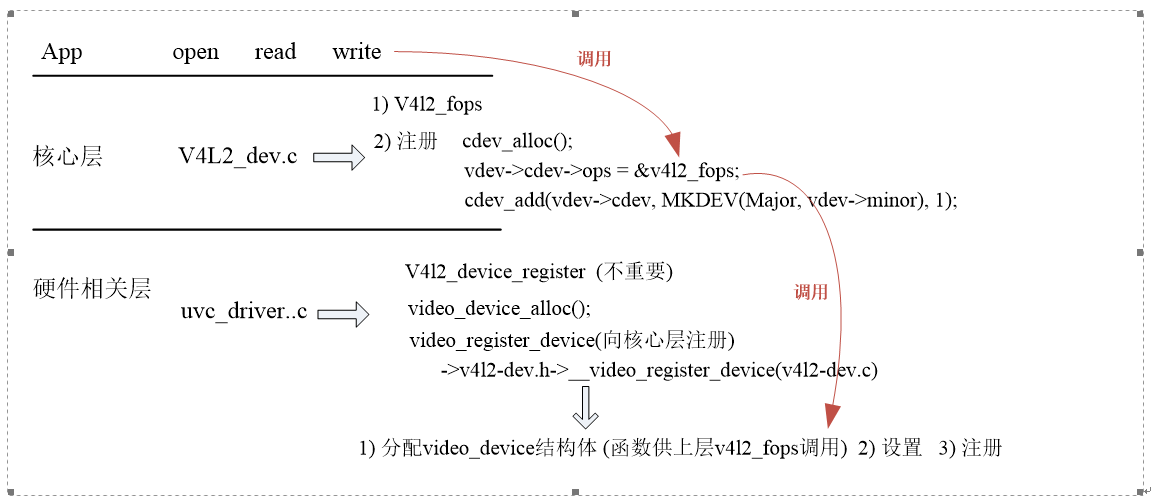
其中,ucv_driver.c中,定义了uvc_driver结构体,根据ucv_ids查找匹配的设备,如果支持,则会进入probe函数
 struct uvc_driver uvc_driver = {

     .driver = {

         .name        = "uvcvideo",

         .probe        = uvc_probe,

         .disconnect    = uvc_disconnect,

         .suspend    = uvc_suspend,

         .resume        = uvc_resume,

         .reset_resume    = uvc_reset_resume,

         .id_table    = uvc_ids,

         .supports_autosuspend = ,

     },

 };
二. vivi.c虚拟视频驱动程序架构
由于V4L2驱动程序是一种分层架构,用户只需要完成硬件相关驱动程序即可。这里主要以vivi虚拟视频驱动程序为例分析源码的调用过程和框架。
1. 进入入口的vivi_init(void)函数:
 static int __init vivi_create_instance(int inst)

 {

     struct vivi_dev *dev;

     struct video_device *vfd; //video_device结构体定义

     struct v4l2_ctrl_handler *hdl;

     struct vb2_queue *q;

     int ret;

     dev = kzalloc(sizeof(*dev), GFP_KERNEL);

     if (!dev)

         return -ENOMEM;

     snprintf(dev->v4l2_dev.name, sizeof(dev->v4l2_dev.name),

             "%s-%03d", VIVI_MODULE_NAME, inst);

     ret = v4l2_device_register(NULL, &dev->v4l2_dev);

     if (ret)

         goto free_dev;

    //摄像头相关属性设置

     dev->fmt = &formats[];

     dev->width = ;

     dev->height = ;

     hdl = &dev->ctrl_handler;

     v4l2_ctrl_handler_init(hdl, );

     dev->volume = v4l2_ctrl_new_std(hdl, &vivi_ctrl_ops,

             V4L2_CID_AUDIO_VOLUME, , , , );

     dev->brightness = v4l2_ctrl_new_std(hdl, &vivi_ctrl_ops,

             V4L2_CID_BRIGHTNESS, , , , );

     dev->contrast = v4l2_ctrl_new_std(hdl, &vivi_ctrl_ops,

             V4L2_CID_CONTRAST, , , , );

     dev->saturation = v4l2_ctrl_new_std(hdl, &vivi_ctrl_ops,

             V4L2_CID_SATURATION, , , , );

     dev->hue = v4l2_ctrl_new_std(hdl, &vivi_ctrl_ops,

             V4L2_CID_HUE, -, , , );

     dev->autogain = v4l2_ctrl_new_std(hdl, &vivi_ctrl_ops,

             V4L2_CID_AUTOGAIN, , , , );

     dev->gain = v4l2_ctrl_new_std(hdl, &vivi_ctrl_ops,

             V4L2_CID_GAIN, , , , );

     /* initialize queue */

     q = &dev->vb_vidq;

     memset(q, , sizeof(dev->vb_vidq));

     q->type = V4L2_BUF_TYPE_VIDEO_CAPTURE;

     q->io_modes = VB2_MMAP | VB2_USERPTR | VB2_READ;

     q->drv_priv = dev;

     q->buf_struct_size = sizeof(struct vivi_buffer);

     q->ops = &vivi_video_qops;

     q->mem_ops = &vb2_vmalloc_memops;

     vb2_queue_init(q);

     mutex_init(&dev->mutex);

     /* init video dma queues */

     INIT_LIST_HEAD(&dev->vidq.active);

     init_waitqueue_head(&dev->vidq.wq);

     ret = -ENOMEM;
     //分配video_device结构体

     vfd = video_device_alloc();

     if (!vfd)

         goto unreg_dev;

     //设置

     *vfd = vivi_template;
  /******************************************************************
    其中,以赋值的方式进行设置vfd,进入vivi_template:
.name = "vivi",
.fops = &vivi_fops,
.ioctl_ops = &vivi_ioctl_ops,
.release = video_device_release,
.current_norm = V4L2_STD_NTSC_M,
};
  *******************************************************************//

     vfd->debug = debug;

     vfd->v4l2_dev = &dev->v4l2_dev;

     set_bit(V4L2_FL_USE_FH_PRIO, &vfd->flags);

     /*

      * Provide a mutex to v4l2 core. It will be used to protect

      * all fops and v4l2 ioctls.

      */

     vfd->lock = &dev->mutex;

     //注册

     ret = video_register_device(vfd, VFL_TYPE_GRABBER, video_nr);

     video_set_drvdata(vfd, dev);

     /* Now that everything is fine, let's add it to device list */

     list_add_tail(&dev->vivi_devlist, &vivi_devlist);

     dev->vfd = vfd;

     v4l2_info(&dev->v4l2_dev, "V4L2 device registered as %s\n",

           video_device_node_name(vfd));

     return ;
     video_device_release(vfd);     v4l2_device_unregister(&dev->v4l2_dev); }
vivi_init函数的调用结构如下:
vivi_init
-->vivi_create_instance
-->v4l2_device_register // 不是主要, 只是用于初始化一些东西,比如自旋锁、引用计数
vfd = video_device_alloc(); //分配video_device结构体
1. *vfd = vivi_template; // 设置
.fops = &vivi_fops,
.ioctl_ops = &vivi_ioctl_ops,
.release = video_device_release,
2. vfd->v4l2_dev = &dev->v4l2_dev;
3. 设置"ctrl属性"(用于APP的ioctl):
v4l2_ctrl_handler_init(hdl, 11);
dev->volume = v4l2_ctrl_new_std(hdl, &vivi_ctrl_ops,
V4L2_CID_AUDIO_VOLUME, 0, 255, 1, 200);
dev->brightness = v4l2_ctrl_new_std(hdl, &vivi_ctrl_ops,
V4L2_CID_BRIGHTNESS, 0, 255, 1, 127);
dev->contrast = v4l2_ctrl_new_std(hdl, &vivi_ctrl_ops,
V4L2_CID_CONTRAST, 0, 255, 1, 16);
4. video_register_device(vfd, VFL_TYPE_GRABBER, video_nr); //注册
--> __video_register_device(vdev, type, nr, 1, vdev->fops->owner);
-->vdev->cdev = cdev_alloc(); (v4l2.dev.c程序中)
vdev->cdev->ops = &v4l2_fops;
cdev_add(vdev->cdev, MKDEV(VIDEO_MAJOR, vdev->minor), 1);
2. vivi.c的open,read,write,ioctl过程
 static const struct v4l2_file_operations vivi_fops = {

     .owner        = THIS_MODULE,

     .open           = v4l2_fh_open,

     .release        = vivi_close,

     .read           = vivi_read,

     .poll         = vivi_poll,

     .unlocked_ioctl = video_ioctl2, /* V4L2 ioctl handler */

     .mmap           = vivi_mmap,

 };
1)open
app: open("/dev/video0",....)向下层调用
-------------------------------------------------------------------
drv: v4l2_fops.v4l2_open
vdev = video_devdata(filp); // 根据次设备号从数组中得到video_device
return video_device[iminor(file->f_path.dentry->d_inode)];
if (vdev->fops->open) //如果有open函数
if (video_is_registered(vdev))
ret = vdev->fops->open(filp);//调用open 函数
调用vivi.c 里的v4l2_fh_open函数
2)read
app: read("/dev/video0",....)向下层调用
-------------------------------------------------------------------
drv: v4l2_fops.v4l2_read
struct video_device *vdev = video_devdata(filp);
if (video_is_registered(vdev))
ret = vdev->fops->read(filp, buf, sz, off);
调用vivi.c 里的vivi_read
app: ioctl
----------------------------------------------------
drv: v4l2_fops.unlocked_ioctl => v4l2_ioctl
struct video_device *vdev = video_devdata(filp);
if (video_is_registered(vdev))
ret = vdev->fops->unlocked_ioctl(filp, cmd, arg);
调用vivi.c 里的video_ioctl2
video_usercopy(file, cmd, arg, __video_do_ioctl); //从用户空间把用户的命令cmd复制进来,调用__video_do_ioctl
__video_do_ioctl
struct video_device *vfd = video_devdata(file); //根据次设备号从数组中得到video_device
switch (cmd) { ..... // 根据APP传入的cmd来获得、设置"某些属性"
{
struct v4l2_queryctrl *p = arg;
if (vfh && vfh->ctrl_handler)
ret = v4l2_queryctrl(vfh->ctrl_handler, p);
else if (vfd->ctrl_handler) // 在video_register_device设置 vivi_create_instance-->hdl = &dev->ctrl_handler; v4l2_ctrl_handler_init(hdl, 11);
ret = v4l2_queryctrl(vfd->ctrl_handler, p); // 根据ID在ctrl_handler里找到v4l2_ctrl,返回它的值
 1 hdl = &dev->ctrl_handler;

 2     v4l2_ctrl_handler_init(hdl, 11);

     dev->volume = v4l2_ctrl_new_std(hdl, &vivi_ctrl_ops,

             V4L2_CID_AUDIO_VOLUME, , , , );

     dev->brightness = v4l2_ctrl_new_std(hdl, &vivi_ctrl_ops,

             V4L2_CID_BRIGHTNESS, , , , );

     dev->contrast = v4l2_ctrl_new_std(hdl, &vivi_ctrl_ops,

             V4L2_CID_CONTRAST, , , , );

     dev->saturation = v4l2_ctrl_new_std(hdl, &vivi_ctrl_ops,

             V4L2_CID_SATURATION, , , , );

     dev->hue = v4l2_ctrl_new_std(hdl, &vivi_ctrl_ops,

             V4L2_CID_HUE, -, , , );

     dev->autogain = v4l2_ctrl_new_std(hdl, &vivi_ctrl_ops,

             V4L2_CID_AUTOGAIN, , , , );

     dev->gain = v4l2_ctrl_new_std(hdl, &vivi_ctrl_ops,

             V4L2_CID_GAIN, , , , );
三、怎么写v4l2驱动?
1. 分配、设置、注册:v4l2_device --》 v4l2_device_register()(辅助作用,提供自旋锁、引用计数等功能)
2. 分配一个video_device:video_device_alloc()
3. 设置
1)vfd->v4l2_dev
2) .fops 设置vfd的fops 里的open、read、write 被上层调用
.ioctl_ops 设置属性被上层调用
3)注册:video_register_device()
4. 接下来,应用层App可以通过ioctl来设置(获得)亮度等某些属性,在驱动程序里,谁来接收、存储、设置到硬件(提供这些信息)?
在驱动程序中抽象出来一个结构体v4l2_ctrl,每个Ctrl对应其中的一项(音量、亮度等等);
v4l2_ctrl_handler来管理他们,在vivi.c的vivi_create_instance函数中:
1.初始化
v4l2_ctrl_handler_init
2.设置
v4l2_ctrl_new_std
v4l2_ctrl_new_custom
这些函数就是创建各个属性,并且放入v4l2_ctrl_handler的链表
3.跟vdev关联
dev->v4l2_dev.ctrl_handler = hdl;
 static int __init vivi_create_instance(int inst)

 {

     struct vivi_dev *dev;

     struct video_device *vfd;

     struct v4l2_ctrl_handler *hdl; //定义v4l2_ctrl_handler结构体

     struct vb2_queue *q;

     int ret;

     dev = kzalloc(sizeof(*dev), GFP_KERNEL);

     if (!dev)

         return -ENOMEM;

     snprintf(dev->v4l2_dev.name, sizeof(dev->v4l2_dev.name),

             "%s-%03d", VIVI_MODULE_NAME, inst);

     ret = v4l2_device_register(NULL, &dev->v4l2_dev);

     if (ret)

         goto free_dev;

     dev->fmt = &formats[];

     dev->width = ;

     dev->height = ;

     hdl = &dev->ctrl_handler;

     v4l2_ctrl_handler_init(hdl, ); //初始化

     dev->volume = v4l2_ctrl_new_std(hdl, &vivi_ctrl_ops, //创建一个属性设置其值,并且放入v4l2_ctrl_handler的链表

             V4L2_CID_AUDIO_VOLUME, , , , );

     dev->brightness = v4l2_ctrl_new_std(hdl, &vivi_ctrl_ops,

             V4L2_CID_BRIGHTNESS, , , , );

     dev->contrast = v4l2_ctrl_new_std(hdl, &vivi_ctrl_ops,

             V4L2_CID_CONTRAST, , , , );

     dev->saturation = v4l2_ctrl_new_std(hdl, &vivi_ctrl_ops,

             V4L2_CID_SATURATION, , , , );

     dev->hue = v4l2_ctrl_new_std(hdl, &vivi_ctrl_ops,

             V4L2_CID_HUE, -, , , );

     dev->autogain = v4l2_ctrl_new_std(hdl, &vivi_ctrl_ops,

             V4L2_CID_AUTOGAIN, , , , );

     dev->gain = v4l2_ctrl_new_std(hdl, &vivi_ctrl_ops,

             V4L2_CID_GAIN, , , , );

     dev->button = v4l2_ctrl_new_custom(hdl, &vivi_ctrl_button, NULL);

     dev->int32 = v4l2_ctrl_new_custom(hdl, &vivi_ctrl_int32, NULL);

     dev->int64 = v4l2_ctrl_new_custom(hdl, &vivi_ctrl_int64, NULL);

     dev->boolean = v4l2_ctrl_new_custom(hdl, &vivi_ctrl_boolean, NULL);

     dev->menu = v4l2_ctrl_new_custom(hdl, &vivi_ctrl_menu, NULL);

     dev->v4l2_dev.ctrl_handler = hdl;
    .........
  }
2.1 摄像头V4L2驱动框架分析的更多相关文章
- Linux USB驱动框架分析(2)【转】
转自:http://blog.chinaunix.net/uid-23046336-id-3243543.html 看了http://blog.chinaunix.net/uid-11848011 ...
- Linux USB驱动框架分析 【转】
转自:http://blog.chinaunix.net/uid-11848011-id-96188.html 初次接触与OS相关的设备驱动编写,感觉还挺有意思的,为了不至于忘掉看过的东西,笔记跟总结 ...
- linux驱动基础系列--linux spi驱动框架分析
前言 主要是想对Linux 下spi驱动框架有一个整体的把控,因此会忽略某些细节,同时里面涉及到的一些驱动基础,比如平台驱动.设备模型等也不进行详细说明原理.如果有任何错误地方,请指出,谢谢! spi ...
- linux驱动基础系列--linux spi驱动框架分析(续)
前言 这篇文章是对linux驱动基础系列--linux spi驱动框架分析的补充,主要是添加了最新的linux内核里设备树相关内容. spi设备树相关信息 如之前的文章里所述,控制器的device和s ...
- Linux USB驱动框架分析【转】
转自:http://blog.csdn.net/jeffade/article/details/7701431 Linux USB驱动框架分析(一) 初次接触和OS相关的设备驱动编写,感觉还挺有意思的 ...
- uart驱动框架分析(二)uart_add_one_port
作者:lizuobin (百问网论坛答疑助手) 原文: https://blog.csdn.net/lizuobin2/article/details/51801183 (所用开发板:mini2440 ...
- 【原创】Linux PCI驱动框架分析(二)
背 景 Read the fucking source code! --By 鲁迅 A picture is worth a thousand words. --By 高尔基 说明: Kernel版本 ...
- 【原创】Linux PCI驱动框架分析(三)
背 景 Read the fucking source code! --By 鲁迅 A picture is worth a thousand words. --By 高尔基 说明: Kernel版本 ...
- USB摄像头驱动框架分析(五)
一.USB摄像头驱动框架如下所示:1.构造一个usb_driver2.设置 probe: 2.1. 分配video_device:video_device_alloc ...
随机推荐
- css中attribute selector及pseudo class
https://developer.mozilla.org/en-US/docs/Web/CSS/Reference#Selectors 在css3规范中,定义了以下几种类型的selector: Ba ...
- 使用UIWebView中html标签显示富文本
使用UIWebView中html标签显示富文本 用UIWebView来渲染文本并期望达到富文本的效果开销很大哦! Work 本人此处直接加载自定义字体"新蒂小丸子体",源码不公开, ...
- Python学习---重点模块之json
注意:JSON不能转换类,不能转换函数 重点方法示例 json.dumps():实现文件写入,字符串转换[写入文件当然是JSON字符串楼] 实际上,json.dumps()只是帮我们做了一个字符串的转 ...
- July 18th 2017 Week 29th Tuesday
My heart is stronger now that you are in it. 我的心里有了你,从此变得更强大. You will no longer feel lonely if ther ...
- SAP Cloud for Customer Sales Order Requested Date的业务含义和实现
我们在创建Sales order销售订单时,需要指定一个RequestedDate: 这个字段绑定到了BO字段:CustomerQuote.RequestedFulfillmentPeriod.Tim ...
- 阿里云免费ssl,https证书的申请和校验
其实写这个之前一直在考虑要不要写出来 ,真的官方文档实在太强大了,连视频都给你录好了,配不好的,是不是可以考虑不用写程序了, 忽然想到第一次使用微信测试号,进行域名认证的时候,因为后台返回“echar ...
- IBM websphere MQ远程队列的简单配置
原理: 1.远程队列分发送方和接收方 2.接收方配置: 接收方配置要先拿到对方的发送通道配置,接收方的队列名称必须和远程发送方的队列名称一致,告诉远程发送方,你的地址,队列管理器名称等信息,在通道中建 ...
- 折腾apt源的时候发生的错误
在折腾Ubuntu源的时候,把新的源替换进去,然后 sudo apt-get update 之后报错: W: Unknown Multi-Arch type 'no' for package 'com ...
- 【[USACO12DEC]第一!First!】
一个串不能成为第一的情况有两种 另外一个单词是它的前缀 在分配字母表大小关系的时候出现了矛盾的情况 第一种很好判断,一旦我们在一个单词没有匹配完之前遇到一个结束标志,那么就说明另外一个单词是它的前缀 ...
- 备份&添加无线网络配置
netsh wlan export profile key=clear folder=c:\ #备份 (ls c:\*.xml).FullName|%{netsh wlan add profile f ...