spring通知的注解
1、代理类接口Person.java
 package com.xiaostudy;

 /**

  * @desc 被代理类接口

  *

  * @author xiaostudy

  *

  */

 public interface Person {

     public void add();

     public void update();

     public void delete();

 }
2、代理类PersonImple.java
 package com.xiaostudy;

 import org.springframework.stereotype.Component;

 /**

  * @desc 被代理类

  *

  * @author xiaostudy

  *

  */

 @Component("person")//类注解

 public class PersonImple implements Person {

     /**

      * @desc 实现接口方法

      */

     public void add() {

         System.out.println("add().....");

     }

     @Override

     public void update() {

         System.out.println("update().....");

 //        int i = 1/0;

     }

     @Override

     public void delete() {

         System.out.println("delete().....");

     }

 }
3、通知类MyAspectJ.java
 package com.xiaostudy;

 import org.aspectj.lang.JoinPoint;

 import org.aspectj.lang.ProceedingJoinPoint;

 import org.aspectj.lang.annotation.After;

 import org.aspectj.lang.annotation.AfterReturning;

 import org.aspectj.lang.annotation.AfterThrowing;

 import org.aspectj.lang.annotation.Around;

 import org.aspectj.lang.annotation.Aspect;

 import org.aspectj.lang.annotation.Before;

 import org.aspectj.lang.annotation.Pointcut;

 import org.springframework.stereotype.Component;

 /**

  * @desc 通知类

  *

  * @author xiaostudy

  *

  */

 @Component//类注解

 @Aspect//AspectJ注解

 public class MyAspectJ {

     //声明公共切入点

     @Pointcut("execution(* com.xiaostudy.PersonImple.*(..))")

     public void myPointcut() {

     }

     //前置通知注解,只有一个参数时,value可以省略不写

     @Before("execution(* com.xiaostudy.PersonImple.*(..))")

     public void myBefort(JoinPoint joinPoint) {

         System.out.println("前置通知>>>>>>>>>joinPoint: " + joinPoint.getSignature().getName());

     }

     //后置通知注解,当参数大于1时,value必须写

     @AfterReturning(value="myPointcut()", returning="ret")

     public void myAfterReturning(JoinPoint joinPoint, Object ret) {

         System.out.println("后置通知>>>>>>>>>joinPoint: " + joinPoint.getSignature().getName()

                 + ", ret: " + ret);

     }

     //环绕通知注解

     @Around("myPointcut()")

     public Object myAround(ProceedingJoinPoint joinPoint) throws Throwable {

         System.out.println("环绕通知====前>>>>>>>>>>>");

         Object obj = joinPoint.proceed();

         System.out.println("环绕通知====后<<<<<<<<<<<");

         return obj;

     }

     //异常通知注解

     @AfterThrowing(value="myPointcut()", throwing="e")

     public void myThrowint(JoinPoint joinPoint, Throwable e) {

         System.out.println("异常通知>>>>>>>>>joinPoint: " + joinPoint.getSignature().getName()

                 + ", e: " + e.getMessage());

         System.exit(0);

     }

     //最终通知注解

     @After("myPointcut()")

     public void myAfter(JoinPoint joinPoint) {

         System.out.println("最终通知>>>>>>>>>joinPoint: " + joinPoint.getSignature().getName());

     }

 }
4、spring配置文件applicationContext.xml
 <?xml version="1.0" encoding="UTF-8"?>

 <beans xmlns="http://www.springframework.org/schema/beans"

        xmlns:xsi="http://www.w3.org/2001/XMLSchema-instance"

        xmlns:aop="http://www.springframework.org/schema/aop"

        xmlns:context="http://www.springframework.org/schema/context"

        xsi:schemaLocation="http://www.springframework.org/schema/beans

                               http://www.springframework.org/schema/beans/spring-beans.xsd

                               http://www.springframework.org/schema/aop

                               http://www.springframework.org/schema/aop/spring-aop.xsd

                               http://www.springframework.org/schema/context

                               http://www.springframework.org/schema/context/spring-context.xsd">

     <!-- 扫描注解类 -->

     <context:component-scan base-package="com.xiaostudy"></context:component-scan>

     <!-- 确定 AOP注解生效 -->

     <aop:aspectj-autoproxy></aop:aspectj-autoproxy>

 </beans>
5、测试类Test.java
package com.xiaostudy; import org.springframework.context.ApplicationContext;
import org.springframework.context.support.ClassPathXmlApplicationContext; /**
* @desc 测试类
*
* @author xiaostudy
*
*/
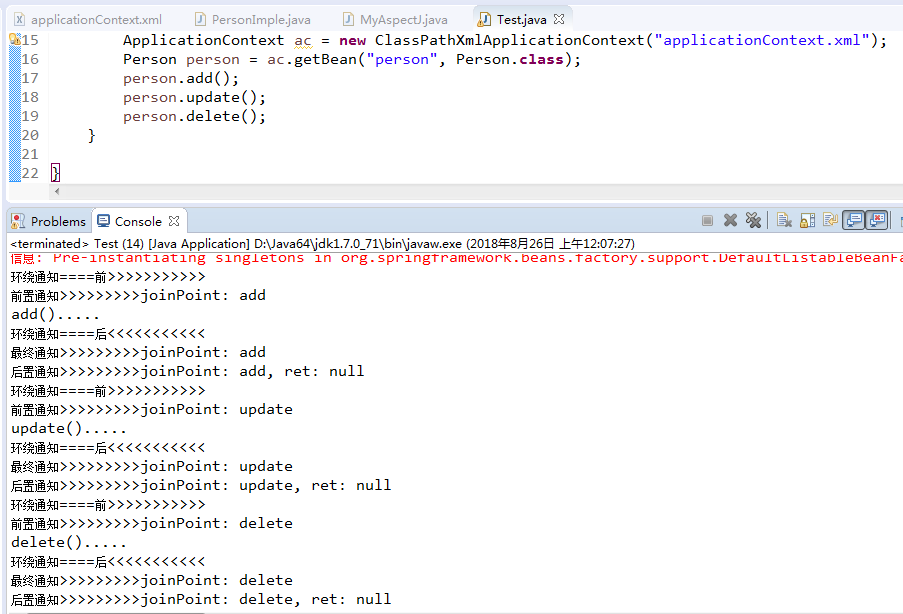
public class Test { public static void main(String[] args) {
ApplicationContext ac = new ClassPathXmlApplicationContext("applicationContext.xml");
Person person = ac.getBean("person", Person.class);
person.add();
person.update();
person.delete();
} }
spring通知的注解的更多相关文章
- spring aop 使用注解方式总结
spring aop的注解方式:和xml的配置方式略有区别,详细如下: 1.首先还是建立需要的切面类:切面类里面定义好切点配置,以及所有的需要实现的通知方法. /** * */ package com ...
- 利用Spring AOP自定义注解解决日志和签名校验
转载:http://www.cnblogs.com/shipengzhi/articles/2716004.html 一.需解决的问题 部分API有签名参数(signature),Passport首先 ...
- Spring笔记04_AOP注解开发_模板_事务
目录 1. Spring基于AspectJ的注解的AOP开发 1. 1 SpringAOP的注解入门 1.2 Spring的AOP的注解通知类型 1.2.1 @Before:前置通知 1.2.2 @A ...
- spring 、spring boot 常用注解
@Profile 1.用户配置文件注解. 2.使用范围: @Configration 和 @Component 注解的类及其方法, 其中包括继承了 @Component 的注解: @Service. ...
- spring AOP自定义注解方式实现日志管理
今天继续实现AOP,到这里我个人认为是最灵活,可扩展的方式了,就拿日志管理来说,用Spring AOP 自定义注解形式实现日志管理.废话不多说,直接开始!!! 关于配置我还是的再说一遍. 在appli ...
- Spring基于纯注解方式的使用
经过上篇xml与注解混合方式,对注解有了简单额了解,上篇的配置方式极大地简化了xml中配置,但仍有部分配置在xml中进行,接下来我们就通过注解的方式将xml中的配置用注解的方式实现,并最终去掉xml配 ...
- spring AOP自定义注解 实现日志管理
今天继续实现AOP,到这里我个人认为是最灵活,可扩展的方式了,就拿日志管理来说,用Spring AOP 自定义注解形式实现日志管理.废话不多说,直接开始!!! 关于配置我还是的再说一遍. 在appli ...
- Spring AOP的注解方式实现
spring也支持注解方式实现AOP,相对于配置文件方式,注解配置更加的轻量级,配置.修改更加方便. 1.开启AOP的注解配置方式 <!-- 开启aop属性注解 --> <aop:a ...
- (转)利用Spring AOP自定义注解解决日志和签名校验
一.需解决的问题 部分API有签名参数(signature),Passport首先对签名进行校验,校验通过才会执行实现方法. 第一种实现方式(Origin):在需要签名校验的接口里写校验的代码,例如: ...
随机推荐
- 用 Stellar.js 制作视差滚动效果
参考 http://doc.bropaul.com/Stellar.js/docs/ https://github.com/markdalgleish/stellar.js#download http ...
- 160719、Spring + Dubbo + zookeeper (linux) 框架搭建
转载一篇博客,写得不错(至少我参考一下搭建成功了) 转载地址:http://my.oschina.net/wangt10/blog/522799 dubbo简介 节点角色说明: Provider: 暴 ...
- Create a Group Policy Central Store
一.How to create a Group Policy Central Store You have downloaded or created your own Group Policy Ad ...
- 【我的Android进阶之旅】如何在浏览器上使用Octotree插件树形地展示Github项目代码?
前言 最近有个同事看到我打开Github项目时,浏览器上的展示效果是树形的,于是他问我这个是什么浏览器插件,我告诉他是Octotree插件.现在我就来介绍介绍这款Octotree插件. 效果对比 1. ...
- TI C66x DSP 系统events及其应用 - 5.7(IST)
当CPU開始处理一个中断(INT4~15)时,它将引用中断服务表(IST).IST是一个获取包括中断服务代码的包的表. IST包括16个连续的获取包.每个中断服务获取包(ISFP)包括最多14条指令( ...
- 基于视觉反馈的步进电机X-Y平台控制
关键词:步进电机.XY平台.视觉反馈 用途:工业自动化 文章类型:原理介绍.随笔纪念 @Author:VShawn(singlex@foxmail.com) @Date:2017-05-01 @Lab ...
- C#设置当前程序通过IE代理服务器上网
注意:以下设置只在当前程序中有效,对IE浏览器无效,且关闭程序后,自动释放代码. using System; using System.Collections.Generic; using Syste ...
- window下安装php的imagick和imagemagick扩展教程
最近的PHP项目中,需要用到切图和缩图的效果,在linux测试服务器上很轻松的就安装好php imagick扩展.但是在本地windows开发环境,安装过程遇到好多问题,在此与大家分享. 1. 下载 ...
- python16_day07【Socket网络编程】
一.简介 1.理解C/S,B/S 2.IOS七层模型(http://www.cnblogs.com/linhaifeng/articles/5937962.html) 二.什么是Socket 我们看看 ...
- mysql的-F与master-data理解(一个小型的big-log恢复)
例子: 使用mysqlbin-log恢复,有两种情况,一个是停数据库,一个是不停 在不停数据库的情况下,为了防止新的写入,需要将bin-log切割,然后新的数据会保存在新的bin-log里面 在此之前 ...