
nginx+tomcat负载均衡实验
导言:
本次实验,tomcat就直接使用录原生的主页,只是简单修改主页识别主机,nginx也是直接在欢迎页上面修改的,直接实现负载均衡。
主机1:192.168.100.156 nginx+tomcat
主机2:192.168.100.157 tomcat
安装启动tomcat
主机1
下载安装包
#打开下载目录

cd /home/download

#下载tar包

wget http://mirrors.hust.edu.cn/apache/tomcat/tomcat-8/v8.5.24/bin/apache-tomcat-8.5.24.tar.gz
Tomcat7官网下载地址:https://tomcat.apache.org/download-70.cgi
Tomcat8官网下载地址:https://tomcat.apache.org/download-80.cgi
配置目录
# 创建tomcat目录

sudo mkdir /usr/tomcat

#解压到指定目录

sudo tar -zvxf apache-tomcat-8.5..tar.gz -C /usr/tomcat

#改名目录名为tomcat8

mv /usr/tomcat/apache-tomcat-8.5. /usr/tomcat/tomcat8
修改默认主页
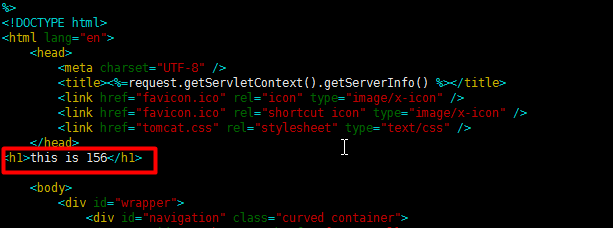
在<head>与<body>之间插入一行
<h1>this is 156</h1>
vim /usr/tomcat/tomcat8/webapps/ROOT/index.jsp

%>

<!DOCTYPE html>

<html lang="en">

    <head>

        <meta charset="UTF-8" />

        <title><%=request.getServletContext().getServerInfo() %></title>

        <link href="favicon.ico" rel="icon" type="image/x-icon" />

        <link href="favicon.ico" rel="shortcut icon" type="image/x-icon" />

        <link href="tomcat.css" rel="stylesheet" type="text/css" />

    </head>

<h1>this is </h1>

    <body>
启动tomcat
#启动

cd /usr/tomcat/tomcat8/bin && sh startup.sh
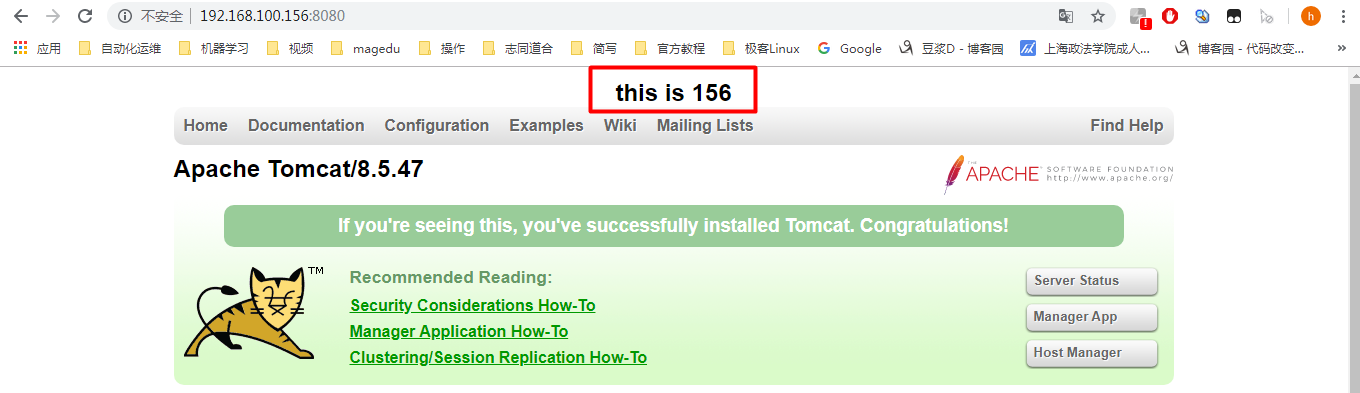
访问测试(测试环境注意关闭防火墙)
192.168.100.156:8080
主机2配置与主机一样

配置nginx
配置nginx的yum源
rpm -Uvh http://nginx.org/packages/centos/7/noarch/RPMS/nginx-release-centos-7-0.el7.ngx.noarch.rpm
安装nginx
yum install nginx -y
启动
systemctl start nginx
配置负载均衡
 vim /etc/nginx/conf.d/default.conf

 配置好的文件如下 即增加了5-8行内容,21行内容

 upstream tomcat {

                 server 192.168.100.156:;

                 server 192.168.100.157:;

                  }

 server {

     listen       ;

     server_name  localhost;

     #charset koi8-r;

     #access_log  /var/log/nginx/host.access.log  main;

     location / {

         root   /usr/share/nginx/html;

         index  index.html index.htm;

         proxy_pass http://tomcat;

     }

     #error_page                /.html;

     # redirect server error pages to the static page /50x.html

     #

     error_page        /50x.html;

     location = /50x.html {

         root   /usr/share/nginx/html;

     }

     # proxy the PHP scripts to Apache listening on 127.0.0.1:

     #

     #location ~ \.php$ {

     #    proxy_pass   http://127.0.0.1;

     #}

     # pass the PHP scripts to FastCGI server listening on 127.0.0.1:

     #

     #location ~ \.php$ {

     #    root           html;

     #    fastcgi_pass   127.0.0.1:;

     #    fastcgi_index  index.php;

     #    fastcgi_param  SCRIPT_FILENAME  /scripts$fastcgi_script_name;

     #    include        fastcgi_params;

     #}

     # deny access to .htaccess files, if Apache's document root

     # concurs with nginx's one

     #

     #location ~ /\.ht {

     #    deny  all;

     #}

 }
重启nginx
systemctl restart nginx
浏览器输入192.168.100.156查看效果
刷新一次为156,再刷新一次157
百度脑图:

nginx+tomcat负载均衡实验的更多相关文章
- nginx+tomcat负载均衡
最近练习nginx+tomcat负载均衡.根据一些资料整理了大体思路,最终实现了1个nginx+2个tomcat负载均衡. 安装JDK 1>进入安装目录,给所有用户添加可执行的权限 #chmod ...
- linux+nginx+tomcat负载均衡,实现session同步
linux+nginx+tomcat负载均衡,实现session同步 花了一个上午的时间研究nginx+tomcat的负载均衡测试,集群环境搭建比较顺利,但是session同步的问题折腾了几个小时才搞 ...
- Nginx + Tomcat 负载均衡配置详解
Nginx常用操作指南一.Nginx 与 Tomcat 安装.配置及优化1. 检查和安装依赖项 yum -y install gcc pcre pcre-devel zlib zlib-devel o ...
- Nginx+Tomcat负载均衡、动静分离群集
Nginx+Tomcat负载均衡.动静分离群集 目录 Nginx+Tomcat负载均衡.动静分离群集 一.Tomcat 1. Tomcat简介 2. Tomcat重要目录 二.Nginx负载均衡原理 ...
- Linux下Nginx+Tomcat负载均衡和动静分离配置要点
本文使用的Linux发行版:CentOS6.7 下载地址:https://wiki.centos.org/Download 一.安装Nginx 下载源:wget http://nginx.org/pa ...
- Nginx+tomcat负载均衡时静态页面报404
百度到的问题解决BLOG http://os.51cto.com/art/201204/326843.htm nginx+2台tomcat负载均衡,应用程序已部署,单独访问tomcat时,可以访问到所 ...
- nginx+tomcat负载均衡策略
測试环境均为本地,測试软件为: nginx-1.6.0,apache-tomcat-7.0.42-1.apache-tomcat-7.0.42-2.apache-tomcat-7.0.42-3 利用n ...
- nginx+tomcat负载均衡和session复制
本文介绍下传统的tomcat负载均衡和session复制. session复制是基于JVM内存的,当然在当今的互联网大数据时代,有更好的替代方案,如将session数据保存在Redis中. 1.安装n ...
- Nginx+tomcat负载均衡配置
Nginx+tomcat是目前主流的java web架构,如何让nginx+tomcat同时工作呢,也可以说如何使用nginx来反向代理tomcat后端均衡呢?直接安装配置如下: 1.JAVA JDK ...
随机推荐
- flink-training-course
目录 flink-training-course 大数据领域顶级盛会 Flink Forward Asia 2019 详情
- RECT,AngularJS学习网址
RECT 1.http://www.cnblogs.com/y unfeifei/p/4486125.html 2.http://www.ruanyifeng.com/blog/2015/03/rea ...
- Robot Framework +钉钉通知(Dingding[钉钉] Plugin)构建通知
1.点击钉钉个人头像进入[机器人管理] 2.添加自定义机器人 3.创建机器人,选择通知群 4.完善机器人信息 5.复制机器人token(只需要连接access_token后面token) 6.进入je ...
- fieldset与legend,label
<!DOCTYPE html> <html lang="en"> <head> <meta charset="UTF-8&quo ...
- 第四节 RabbitMQ在C#端的应用-客户端连接
原文:第四节 RabbitMQ在C#端的应用-客户端连接 版权声明:未经本人同意,不得转载该文章,谢谢 https://blog.csdn.net/phocus1/article/details/87 ...
- 一、spring的基本认识
Spring的认识 Spring是一个开放源代码的设计层面框架,它解决的是业务逻辑层和其他各层的松耦合问题,因此它将面向接口的编程思想贯穿整个系统应用 Spring是于2003 年兴起的一个轻量级的J ...
- 理解 TCP/IP 三次握手与四次挥手
TCP建立连接为什么是三次握手,而不是两次或四次? TCP,名为传输控制协议,是一种可靠的传输层协议,IP协议号为6. 顺便说一句,原则上任何数据传输都无法确保绝对可靠,三次握手只是确保可靠的基本需要 ...
- Vue-cli使用prerender-spa-plugin插件预渲染和配置cdn
参考:https://www.jianshu.com/p/6a4c0b281e7f 使用vue-cli打包项目一般为spa项目,众所周知单页面应用不利于SEO,有ssr和预渲染两种解决方案,这里我们只 ...
- element el-table 合计在横拉滚动条的下面,正确展示应该是滚动条在合计下面
<style lang="less"> .el-table{ overflow: auto; } .el-table .el-table__body-wrapper, ...
- java延迟队列
大多数用到定时执行的功能都是用任务调度来做的,单身当碰到类似订餐业务/购物等这种业务就不好处理了,比如购物的订单功能,在你的订单管理中有N个订单,当订单超过十分钟未支付的时候自动释放购物车中的商品,订 ...