iptables指南
在了解iptables之前我们先了解一下 防火墙 的概念
防火墙是由Check Point创立者Gil Shwed于1993年发明并引入国际互联网,防火墙也是一种位于内部网络与外部网络之间的网络安全系统,能有效地保护系统的安全。
在Windows系统中有一个我们熟悉的防火墙,在控制面板里,但一般情况下我们会把它给关闭了,使用第三方的杀毒软件自带的防火墙功能,在Linux中也有类似杀毒软件的防火墙的东西,而且是系统自带过来的,那就是iptables,很多在初学Linux的时候对它很陌生,所以为了实验的顺利进行都是会先关掉防火墙。

简单理解就是当其他用户想要发送数据包给服务器,就必须经过防火墙才能到达主机,如果没有这一层防火墙保护,那可想而知服务器直接暴露在公网上是多么危险的,当然防火墙也是包含有硬件防火墙和软件防火墙两种,其实有很多硬件防火墙也是利用Linux最小化使用iptables再去加上图形化web界面集成硬件,就成了硬件防火墙。
在Linux系统中其实有两个防火墙,一个是四层防火墙:iptables,另外一个是七层防火墙(tcp-wrapper)
 应用层-----------------tcp-wrapper  (七层防火墙)

 表示层

 会话层

 传输层-----------------iptables     (四层防火墙)

 网络层

 数据链路层

 物理层
iptables近期历史版本:
2.0.X内核:ipfwadm
2.2.X内核:ipchains
2.4.X内核:iptables
iptables结构
在RHEL7+的系统中除了有iptables,还有一个firewall
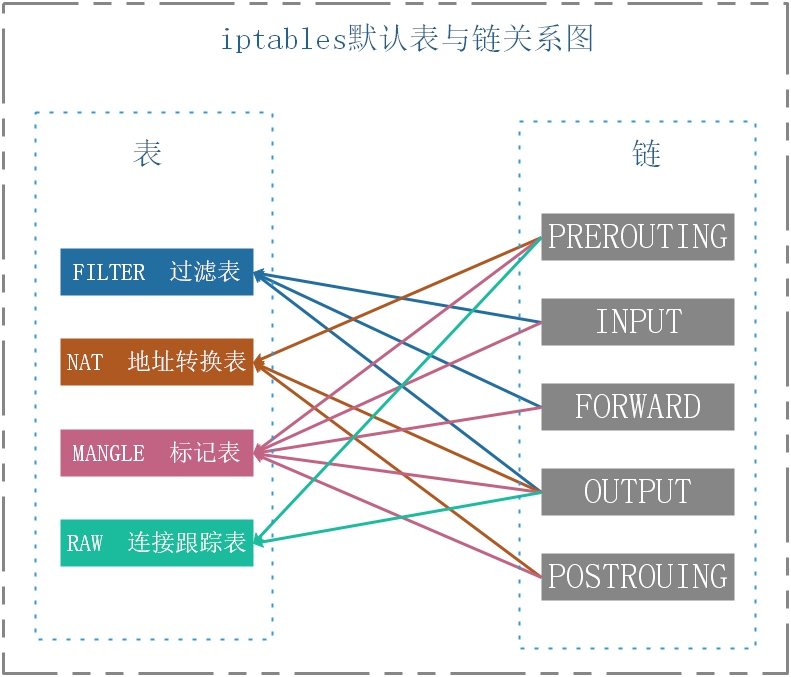
iptable 默认的表、链结构示意图

结合上图的表结构,我们可以单独将每个表里的链结合下面这张图知道数据包在iptable中的具体流向

以上就是iptables的结构
iptables 语法及选项
 iptables -t [表名:raw、mangle、nat、filter,默认不加为filter] -<A/I/D/R> [链名] [规则号] -<i/o> [网卡名称] -p [协议] -s [源IP/掩码] --sport [源端口] -d [目标IP/掩码]  --dport [目标端口] -j [动作]

 # 选项表

 -t<表>       :指定操作的表

 -A           :向规则中添加

 -D           :从规则中删除

 -i           :向规则中插入

 -R           :替换规则

 -L           :显示表中的规则

 -F           :清空表中规则

 -Z           :清空表中规则及数据包计算器和字节计数器

 -N           :创建新的用户自定义规则链

 -P           :自定义规则链中的默认目标

 -h           :帮助

 -p           :指定匹配的数据包协议类型

 -s           :指定匹配的数据包源ip地址

 -j<动作>      :指定要操作的动作(见下面动作表)

 -i<网卡名称>  :指定数据包进入本机的入口网卡

 -o<网卡名称>  :指定数据包离开本机的出口网卡

 # 表名称

 raw        :连接跟踪表

 mangle     :标记表

 net        :地址转换表

 filter     :过滤表

 # 规则链名

 INPUT       :处理输入的数据包

 OUTPUT      :处理输出的数据包

 PORWARD     :处理转发的数据包

 PREROUTING  :目标地址转换

 POSTOUTING  :源地址转换

 # 动作

 accept      :接收数据包

 DROP        :丢弃数据包

 REDIRECT    :重定向

 SNAT        :源地址转换

 DNAT        :目标地址转换

 MASQUERADE  :IP伪装

 LOG         :日志
启动/停止/重启/配置永久生效
启动iptables
systemctl start iptables
停止iptables
systemctl stop iptables
重启iptables
systemctl restart iptables
将规则写入配置文件永久生效
service iptables save
(注意在RHEL7+无法使用systemctl将规则写入配置文件,无需做软链,直接使用下面的命令写入配置文件即可)
实例:
注意:在写入规则的时候如果不加-t指定某张表时,默认是写到filter表里
查看iptables已有规则(参数:-t、-L、—line-numbers、-n)
 # 参数

 -t:指定表

 -L:查看所有规则

 --line-numbers:查看规则编号

 -n:取消IP解析成主机名称
iptables -t <表名> -L
 # iptables -L 没有指定查看某张表时,默认会显示filter表

 [root@Server ~]# iptables -L

 Chain INPUT (policy ACCEPT)

 target     prot opt source               destination

 ACCEPT     all  --  anywhere             anywhere

 ACCEPT     all  --  anywhere             anywhere             state RELATED,ESTABLISHED

 ACCEPT     tcp  --  anywhere             anywhere             tcp dpt:ssh

 ACCEPT     tcp  --  anywhere             anywhere             tcp dpt:http

 ACCEPT     tcp  --  anywhere             anywhere             tcp dpt:https

 DROP       tcp  --  anywhere             anywhere             tcp dpt:mysql

 ACCEPT     icmp --  anywhere             anywhere             icmp echo-request

 Chain FORWARD (policy ACCEPT)

 target     prot opt source               destination

 Chain OUTPUT (policy ACCEPT)

 target     prot opt source               destination

 # 如果想查看其他表,则使用-t参数指定表

 [root@Server ~]# iptables -t nat -L

 Chain PREROUTING (policy ACCEPT)

 target     prot opt source               destination

 Chain INPUT (policy ACCEPT)

 target     prot opt source               destination

 Chain OUTPUT (policy ACCEPT)

 target     prot opt source               destination

 Chain POSTROUTING (policy ACCEPT)

 target     prot opt source               destination

 # 查看规则编号

 [root@Server ~]# iptables -L --line-numbers

 Chain INPUT (policy ACCEPT)

 num  target     prot opt source               destination

 1    ACCEPT     all  --  anywhere             anywhere

 2    ACCEPT     all  --  anywhere             anywhere             state RELATED,ESTABLISHED

 3    ACCEPT     tcp  --  anywhere             anywhere             tcp dpt:ssh

 4    ACCEPT     tcp  --  anywhere             anywhere             tcp dpt:http

 5    ACCEPT     tcp  --  anywhere             anywhere             tcp dpt:https

 6    DROP       tcp  --  anywhere             anywhere             tcp dpt:mysql

 7    ACCEPT     icmp --  anywhere             anywhere             icmp echo-request

 8    ACCEPT     all  --  anywhere             anywhere

 Chain FORWARD (policy ACCEPT)

 num  target     prot opt source               destination

 Chain OUTPUT (policy ACCEPT)

 num  target     prot opt source               destination

 # 当规则多的时候查看规则很慢时,是因为iptables要将规则里的IP从hosts文件里解析成主机名称所以会慢,可以加-n参数取消解析

 iptables -L -n
添加规则(参数:-A、-j、-I、-N)
 -A:添加

 -j:动作

 -I:插入

 -N:添加用户自定义规则链
 # 用法

 iptables -t <表> -A <链> -j <动作>

 # 再次强调没有加-t参数默认是filter表(四表见上面结构说明)

 # 指定表添加规则:iptables -t filter -A INPUT -j ACCEPT

 ACCEPT  :接受

 DROP    :拒绝
 # 添加允许所有人访问

 [root@Server ~]# iptables -A INPUT -j ACCEPT

 # 查看规则

 [root@Server ~]# iptables -L

 Chain INPUT (policy ACCEPT)

 target     prot opt source               destination

 ACCEPT     all  --  anywhere             anywhere        # 刚刚添加的规则

 Chain FORWARD (policy ACCEPT)

 target     prot opt source               destination

 Chain OUTPUT (policy ACCEPT)

 target     prot opt source               destination

 # 在filter表中的INPUT链第5行中插入规则

 [root@Server ~]# iptables -I INPUT 5 -j ACCEPT

 # 添加用户自定义规则链

 [root@Server ~]# iptables -N userflood
顺序匹配(权重)
在原有规则里再添加规则时,第一条规则权重比第二条高
注意:这里ACCEPT权重优先级比DROP高,所以DROP不生效,如果反过来则DROP生效而ACCEPT不生效
 [root@Server ~]# iptables -A INPUT -j ACCEPT

 [root@Server ~]# iptables -A INPUT -j DROP

 [root@Server ~]# iptables -L

 Chain INPUT (policy ACCEPT)

 target     prot opt source               destination

 ACCEPT     all  --  anywhere             anywhere

 DROP       all  --  anywhere             anywhere

 Chain FORWARD (policy ACCEPT)

 target     prot opt source               destination

 Chain OUTPUT (policy ACCEPT)

 target     prot opt source               destination
清除规则(参数:-F、-D、-X、-Z)
清除所有规则(参数:-F)
 # 清空指定表所有链的规则

 [root@Server ~]# iptables -F

 # 清空指定表指定链的规则

 [root@Server ~]# iptables -F OUTPUT
再次强调,-t指定表
删除指定规则(参数:-D)
 # 删除filter表中INPUT链的第8行(行编号上面有讲)

 [root@Server ~]# iptables -t filter -D INPUT 8
删除用户自定义链
[root@Server ~]# iptables -X userflood
清除链的计数器(参数:-Z)
[root@Server ~]# iptables -Z
修改规则/链名(参数:-R、-E)
 # 修改filter表中的INPUT链第6条改为ACCEPT

 # 如规则多的话修改某条规则还不如删掉重新添加

 [root@Server ~]# iptables -t filter -R INPUT 6 -j ACCEPT

 # 重命名用户自定义链名

 [root@Server ~]# iptables -E userflood floodname
默认规则
 Chain INPUT (policy ACCEPT)  # 其中的polucy是默认规则

 ACCEPT  允许

 DROP    拒绝

 修改指定表指定链默认规则

 [root@Server ~]# iptables -t filter -P OUTPUT DROP
匹配规则条件(参数:-p、-d、-s、-i、-o、—dport、time、state、connlimit、mac、iprang)
 -p:指定协议

 -d:指定原IP

 -s:指定目标IP

 -i:指定入口网卡

 -o:指定出口网卡

 -m:指定模块

 --dport:指定端口

 time:时间段

 state:

 connlimit:

 mac:

 iprang:
 # 指定协议指定IP指定端口拒绝访问

 iptables -t filter -A INPUT -p tcp  -d 202.96.146.12/24 --dport 22 -j DROP

 # 只允许访问本机80端口(其他端口都禁止访问)

 [root@Server ~]# iptables -A INPUT -p tcp ! --dport 80 -j DROP

 # 拒绝所有人访问80端口

 [root@Server- ~]# iptables -A INPUT -p tcp --dport 80 -j DROP

 # 单独允许访问指定端口,其他端口拒绝连接(主动模式)

 [root@Server ~]# iptables -A INPUT -p tcp --dport 22 -j ACCEPT

 [root@Server ~]# iptables -A INPUT -j DROP
被动模式:当发现某一端口被攻击时才去禁止相应的端口链接
 # 根据协议禁止访问

 [root@Server ~]# iptables -A INPUT --dport -j DROP
 # 根据网卡禁止访问

 # 入口网卡

 [root@Server ~]# iptables -A INPUT -i eth0 -j DROP

 # 出口网卡

 [root@Server ~]# iptables -A INPUT -o eth0 -j DROP
-m 加载模块
 # multiport 匹配多个端口

 # 匹配多个端口

 [root@Server-188 ~]# iptables -A INPUT -p tcp -m multiport --dport 22,80 -j ACCEPT

 # 匹配端口范围

 [root@Server-188 ~]# iptables -A INPUT -p tcp -m multiport --dport 1024:2048 -j ACCEPT

 # iprange 匹配IP地址

 # 匹配IP范围 # --src-range来源IP

 [root@Server-188 ~]# iptables -A INPUT -p tcp -m iprange --src-range 10.0.8.100-10.0.8.200 -j ACCEPT

 # 匹配整个网段 # --dst-range目标IP

 [root@Server-188 ~]# iptables -A INPUT -p tcp -m iprange --dst-range 10.0.8.0 -j ACCEPT

 # string 匹配字符串

 # 匹配算法:kmp、bm

 [root@Server-188 ~]# iptables -A OUTPUT -p tcp -m string --algo kmp --string "baidu" -j DROP

 # 备注:“baidu”为匹配的对象

 # connlimit 单个IP并发链接数限制

 [root@Server-188 ~]# iptables -A INPUT -p tcp --dport 80 -m connlimit ! --connlimit-above 3 -j ACCEPT

 # limit 限速
iptables指南的更多相关文章
- Iptables 指南 1.1.19
Iptables 指南 1.1.19 Oskar Andreasson oan@frozentux.net Copyright © 2001-2003 by Oskar Andreasson 本文在符 ...
- iptables 指南
iptables 是 Linux 内核集成的防火墙系统, 几乎所有 Linux 发行版都会内置 iptables. iptables 对进出的 IP 数据报进行处理和过滤, 过滤规则(rule)存储在 ...
- Iptables指南教程收集
iptables对于任何Linux基本都适用,虽然在最新版的CentOS 7和Ubuntu上已经有代替的工具来简化iptables,但是最终还是会把规则写入iptables中. 读教程前先阅读ipta ...
- iptables rule
和H3C中的acl很像,或者就是一会事,这就是不知道底层的缺陷,形式一变,所有的积累都浮云了 参考准确的说copy from http://www.ibm.com/developerworks/cn/ ...
- linux之iptables总结
netfilter/iptables概述: netfilter/iptables是Linux内核防火墙架构,由netfilter实现功能,由iptables提供接口. iptables ...
- iptables及其在路由器上的应用 (待完善)
1. iptables基本定义 Table (表名) Explanation (注释) nat nat表的主要用处是网络地址转换,即Network Address Translation,缩写为NAT ...
- Linux iptables 备忘
iptables主要通过存储在linux内核中的一个个表来控制IP包的.可以想象成excel表格.你可以自定义所需的iptables表.不过已经内置了三张队列表. filter 这是默认的表,包含了内 ...
- iptables关键学习总结
iptables技术推荐参考这位仁兄的博客:http://www.zsythink.net/archives/category/%E8%BF%90%E7%BB%B4%E7%9B%B8%E5%85%B3 ...
- centos Linux系统日常管理2 tcpdump,tshark,selinux,strings命令, iptables ,crontab,TCP,UDP,ICMP,FTP网络知识 第十五节课
centos Linux系统日常管理2 tcpdump,tshark,selinux,strings命令, iptables ,crontab,TCP,UDP,ICMP,FTP网络知识 第十五节课 ...
随机推荐
- BootStrap学习(一)——BootStrap入门
1.环境搭建 中文官网下载地址:http://www.bootcss.com/ 右击选中的WEB项目,点击导入,选择文件系统,然后下一步,选择BootStrap文件目录路径,如下: 完成后,WEB项目 ...
- .NET深入解析LINQ框架1
1.LINQ简述 2.LINQ优雅前奏的音符 2.1.隐式类型 (由编辑器自动根据表达式推断出对象的最终类型) 2.2.对象初始化器 (简化了对象的创建及初始化的过程) 2.3.Lambda表达式 ( ...
- 【原创】apache虚拟主机配置
1.取消httpd.conf中以下行的注释 Include conf/extra/httpd-vhosts.conf 2.增加虚拟主机的目录,代表该目录作为一个网站的虚拟目录,配置权限,允许访问: & ...
- jsp表单验证格式
- windows py-faster-rcnn配置
[原创帖!转载请注明] windows faster-rcnn安装一直会出现各种错误,本人在实验室电脑成功安装后,在自己电脑上同样的安装步骤也成功.所以做个总结,希望对大家有帮助. 一:安装环境 1. ...
- 使用3ds Max制作卡通狗教程
使用软件::3ds Max 软件下载:http://www.xy3dsmax.com/xiazai.html 全教程完,学完记得交作业.如果本教程对您有所帮助,请推荐给你的朋友. 全教程完,学完记得交 ...
- 如何使用 Open Live Writer 插入原图
博客园的指南里写了使用 Open Live Writer 插入原图.去掉阴影并设置为默认设置的步骤,但是我还是找了好久,最后通过别的文章加上摸索才知道了如何设置为原图.这里给出详细地图片: 首先,插入 ...
- css兼容性问题总结
DIV+CSS设计IE6.IE7.FF 兼容性 DIV+CSS网页布局这是一种趋势,我也开始顺应这股趋势了,不过在使用DIV+CSS网站设计的时候,应该注意css样式兼容不同浏览器问题,特别是对完全使 ...
- (2016北京集训十二)【xsy1542】疯狂求导
题解: 这题看起来很难...但是实际上并没有想象中的那么难 第一眼看上去不会求导公式怎么办?不要紧,题目背景非常良心的给出了题目中的导数计算公式 求完导合并同类项很恶心怎么办?不要紧,样例解释说明了不 ...
- (2016北京集训十)【xsy1530】小Q与内存
一道很有意思的神题~ 暴力平衡树的复杂度很对(并不),但是$2^{30}$的空间一脸屎 这题的正解是一个类似线段树的数据结构,我觉得很有创新性Orz 首先可以想到一种暴力就是用一个点代表一个区间,然后 ...