Eclipse配置Maven私服
Eclipse配置Maven私服
前言:
搭建Maven私有仓库的主要目的,是为了在团队多人开发时,只要内网的私有仓库有下载过依赖的jar包,就直接从私有仓库获取,不再通过外网的中央仓库。如果私服上面没有,就通过私服上面的索引到中央仓库中缓存到私服中。
配置方式:
Eclipse配置Maven私服有两种,一种是在pom.xml里面配置,只针对pom所在的工程;另一种是在Eclipse安装目录中的setting.xml中配置,这是针对Eclipse中所有工程;
一、配置私服的位置(从私服中下载jar);
1、 pom.xml中配置:
在pom.xml中的<project>中加入如下配置
1.    <repositories>

2.         <repository>

3.              <id>nexus</id>

4.              <name>nexus</name>

5.              <url>http://192.168.100.52:8081/nexus/content/groups/public/</url>

6.              <releases>

7.                   <enabled>true</enabled>

8.              </releases>

9.              <snapshots>

10.                   <enabled>true</enabled>

11.              </snapshots>

12.            </repository>

13.        </repositories>
url指向本地私服的仓库组,并启用了releases库(稳定版本库)以及snapshots(开发版本库);其实我们的仓库组中除了包含了这两个库之外还包含了第三方库(3rd parth)以及中央库(central);
2、setting.xml中配置:
setting中配置要比pom麻烦多一点,不过毕竟人家是针对eclipse中的所有工程:
先在<servers>标签中添加私服的权限
14.    <server>

15.         <id>nexus-releases</id>

16.         <username>admin</username>

17.         <password>admin123</password>

18.    </server>

19.    <server>

20.         <id>nexus-snapshots</id>

21.         <username>admin</username>

22.         <password>admin123</password>

23.    </server>
这里的权限是用于上传jar到私服的;
接下来继续在setting.xml找到<mirrors>标签,我们来配置一下私服的镜像:
24.    <mirror>

25.         <id>nexus-releases</id>

26.         <mirrorOf>*</mirrorOf>

27.         <url>http://192.168.100.52:8081/nexus/content/groups/public/</url>

28.    </mirror>

29.    <mirror>

30.         <id>nexus-snapshots</id>

31.         <mirrorOf>*</mirrorOf>

32.         <url>http://192.168.100.52:8081/nexus/content/repositories/snapshots/</url>

33.    </mirror>
这里的id与前面的权限的id其实……没什么关系。
接下来继续找到<profiles>标签,开始配置私服:
34.    <profile>

35.         <id>nexus</id>

36.         <repositories>

37.             <repository>

38.                 <id>nexus-releases</id>

39.                 <name>Nexus</name>

40.                 <url>http://nexus-releases</url> <!—这里要引入上面的镜像-->

41.                 <releases>

42.               <enabled>true</enabled>

43.               <updatePolicy>never</updatePolicy>

44.               <checksumPolicy>warn</checksumPolicy>

45.              </releases>

46.              <snapshots>

47.               <enabled>true</enabled>

48.              </snapshots>

49.                 </repository>

50.              <repository>

51.                  <id>nexus-snapshots</id>

52.               <name>Nexus</name>

53.               <url>http://nexus-snapshots</url> <!—同样引入上面的镜像-->

54.               <releases>

55.                 <enabled>true</enabled>

56.                 <updatePolicy>never</updatePolicy>

57.                 <checksumPolicy>warn</checksumPolicy>

58.               </releases>

59.               <snapshots>

60.                 <enabled>true</enabled>

61.               </snapshots>

62.             </repository>

63.           </repositories>

64.           <pluginRepositories>     <!—同样是插件的配置-->

65.            <pluginRepository>

66.              <id>nexus-releases</id>

67.              <name>Nexus</name>

68.              <url>http://nexus-releases</url> <!—同样引入上面的镜像-->

69.              <snapshots>

70.                 <enabled>true</enabled>

71.                 <updatePolicy>never</updatePolicy>

72.                 <checksumPolicy>warn</checksumPolicy>

73.                     </snapshots>

74.              <releases>

75.                <enabled>true</enabled>

76.              </releases>

77.             </pluginRepository>

78.                <pluginRepository>

79.               <id>nexus-snapshots</id>

80.               <name>Nexus</name>

81.               <url>http://nexus-snapshots</url> <!—同样引入上面的镜像-->

82.               <snapshots>

83.                    <enabled>true</enabled>

84.                 <updatePolicy>never</updatePolicy>

85.                 <checksumPolicy>warn</checksumPolicy>

86.               </snapshots>

87.               <releases>

88.                 <enabled>true</enabled>

89.               </releases>

90.          </pluginRepository>

91.         </pluginRepositories>

92.    </profile>
最后,根据配置id激活这些配置,
93.     <activeProfiles>

94.           <activeProfile>nexus</activeProfile>

95.      </activeProfiles>
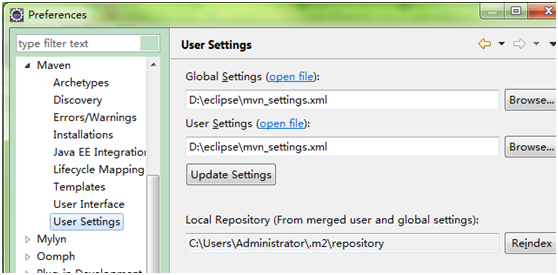
当然,如果你是新建一个setting.xml的话,要在eclipse里面更改setting.xml的路径,指向你新建的setting.xml
Window->Prederences ->Maven -> User Settings
二、上传jar到私服:
如果工程编译出的jar包要上传到私服,那就要在要上传的工程的pom.xml中的<project>下,增加
1.    <distributionManagement>

2.         <repository>

3.              <id>nexus-releases</id>

4.              <name>Nexus</name>

5.              <url>http://192.168.100.52:8081/nexus/content/repositories/releases/</url>

6.          </repository>

7.          <snapshotRepository>

8.              <id>nexus-snapshot</id>

9.              <name>Nexus</name>

10.              <url>http://192.168.100.52:8081/nexus/content/repositories/snapshots/</url>

11.            </snapshotRepository>

12.        </distributionManagement>
上传时,右键项目Run As->Run Configurations->Maven Build
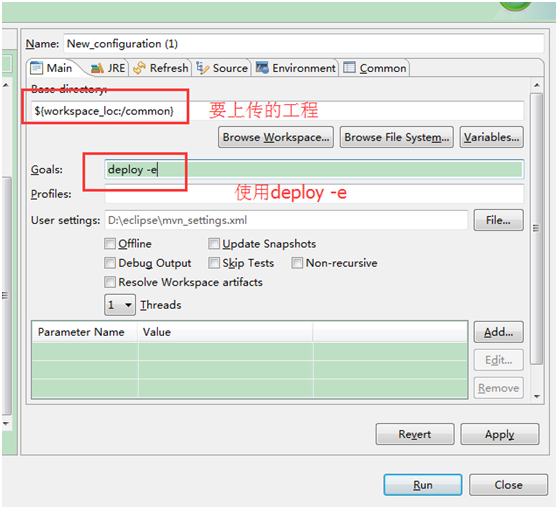
注:deploy后面的-e可以省略
扩展:
1、设置Maven的本地缓存:
Maven的本地缓存一般默认都是在C盘,这就有点让人难以接受了,不过还好,可以在setting.xml中配置一下缓存的位置:
<localRepository>D:\maven</localRepository>
2、配置在eclipse中配置jdk:
可以在setting.xml中的可以配置一下默认的jdk版本,这样就不用每个项目都去指定jdk的版本了
14.    <profile>

15.         <id>jdk-1.8</id>

16.         <activation>

17.              <activeByDefault>true</activeByDefault>

18.              <jdk>1.8</jdk>

19.         </activation>

20.           <properties>

21.            <maven.compiler.source>1.8</maven.compiler.source>

22.            <maven.compiler.target>1.8</maven.compiler.target>

23.            <maven.compiler.compilerVersion>1.8</maven.compiler.compilerVersion>

24.          </properties>

25.    </profile>
Eclipse配置Maven私服的更多相关文章
- 【项目管理和构建】十分钟教程,eclipse配置maven + 创建maven项目(三)
[项目管理和构建]十分钟教程,eclipse配置maven + 创建maven项目(三) 上篇博文中我们介绍了maven下载.安装和配置(二),这篇博文我们配置一下eclipse,将它和maven结合 ...
- eclipse配置maven + 创建maven项目(三)
上篇博文中我们介绍了maven下载.安装和配置(二),这篇博文我们配置一下eclipse,将它和maven结合,并我们创建一个maven的项目. 准备工作 在eclipse配置maven之前需要我们做 ...
- Eclipse配置maven环境
一.什么是maven? Maven是一个项目管理工具,它包含了一个项目对象模型 (Project Object Model),一组标准集合,一个项目生命周期(Project Lifecycle),一个 ...
- Eclipse配置maven环境1
一.什么是maven? Maven是一个项目管理工具,它包含了一个项目对象模型 (Project Object Model),一组标准集合,一个项目生命周期(Project Lifecycle),一个 ...
- Eclipse 配置Maven
Eclipse 配置Maven 下载Maven 首先在官网下载Maven:http://maven.apache.org/download.cgi 下载后将其解压到相应的位置 配置Maven环境变量 ...
- Mac中Eclipse配置Maven开发环境
1.下载Maven tar.gz包 http://maven.apache.org/download.cgi 2.解压tar包 随便一个路径都行 3.配置环境变量 bash设置~/.bash_prof ...
- eclipse配置maven + 创建maven项目
登录|注册 努力+坚持,而且还很年轻 目录(?)[+] 在现实的企业中,以低成本.高效率.高质量的完成项目,不仅仅需要技术大牛,企业更加需要管理大牛,管理者只懂技术是远远不够的.当 ...
- Eclipse配置Maven开发环境
前言: 现在Eclipse版本越来越高.高版本的Eclipse甚至已经集成了Maven像是SpringSource的哪个版本.用习惯了Eclipse.在开发中还是不想更换掉自己的IDE.如此一来就又了 ...
- Eclipse 安装Maven以及Eclipse配置Maven
安装Maven 1 下载 Downloading Apache Maven 3.5.0 选择 2 解压 3 配置环境变量 新建变量名:MAVEN_HOME 变量值:D:\SoftwareInstal ...
随机推荐
- NYOJ 298
利用矩阵来做变换,参考Max大神的思想的,虽然不是同一道题. ----------- 给定n个点,m个操作,构造O(m+n)的算法输出m个操作后各点的位置.操作有平移.缩放.翻转和旋转 这里的操 ...
- 看云-git类的书籍写作
看云-git类的书籍写作 https://www.kancloud.cn/explore 测试一本:https://www.kancloud.cn/stono/b001/501901
- HBase读取代码
HBase读取代码 需要的jar包: activation-1.1.jar aopalliance-1.0.jar apacheds-i18n-2.0.0-M15.jar apacheds-kerbe ...
- 剑指Offer读书笔记(持续更新中)
(1)定义一个空的类型,里面没有不论什么成员变量和成员函数,对该类型求sizeof,得到的结果是多少? 答案是1.空类型的实例中不包括不论什么信息,本来求sizeof应该是0,可是当我们声明该类型实例 ...
- 使用fatjar来实现将包括第三方jar包的项目到处成一个jar包供其它程序使用
一.在线安装fat jar 在线安装步骤: eclipse菜单条 help >software updates >Search for new features to install> ...
- UFLDL教程笔记及练习答案五(自编码线性解码器与处理大型图像**卷积与池化)
自己主动编码线性解码器 自己主动编码线性解码器主要是考虑到稀疏自己主动编码器最后一层输出假设用sigmoid函数.因为稀疏自己主动编码器学习是的输出等于输入.simoid函数的值域在[0,1]之间,这 ...
- UESTC--1271--Search gold(贪心)
Search gold Time Limit: 1000MS Memory Limit: 65535KB 64bit IO Format: %lld & %llu Submit Sta ...
- 最大似然估计的缺陷 —— 方差和均值的 bias
0. 均匀分布期望的最大似然估计 首先我们来看,如何通过最大似然估计的形式估计均匀分布的期望.均匀分布的概率密度函数为:f(x|θ)=1θ,0≤x≤θ.不失一般性地,将 x1,x2,-,xn 排序为顺 ...
- 剑指offer——02替换空格(Python3)
思路:Python列表中实现字符串的替换,涉及到频繁的插入操作,在数据结构中线性表分为顺序表和链表,顺序表的适合频繁的查询,链表适合频繁的插入和删除.综上所述,本题使用链表来实现. 我们从字符串的后面 ...
- linux下关于IPC(进程间通信)
linux下进程间通信的主要几种方式 管道(Pipe)及有名管道(named pipe):管道可用于具有亲缘关系进程间的通信,有名管道克服了管道没有名字的限制,因此,除具有管道所具有的功能外,它还允许 ...