Elasticsearch官方安装
Installationedit
Elasticsearch requires at least Java 8. Specifically as of this writing, it is recommended that you use the Oracle JDK version 1.8.0_131. Java installation varies from platform to platform so we won’t go into those details here. Oracle’s recommended installation documentation can be found on Oracle’s website. Suffice to say, before you install Elasticsearch, please check your Java version first by running (and then install/upgrade accordingly if needed):
java -version

echo $JAVA_HOME
Once we have Java set up, we can then download and run Elasticsearch. The binaries are available from www.elastic.co/downloads along with all the releases that have been made in the past. For each release, you have a choice among a zip or tar archive, a DEB or RPM package, or a Windows MSI installation package.
Installation example with taredit
For simplicity, let’s use the tar file.
Let’s download the Elasticsearch 5.6.4 tar as follows:
curl -L -O https://artifacts.elastic.co/downloads/elasticsearch/elasticsearch-5.6.4.tar.gz
Then extract it as follows:
tar -xvf elasticsearch-5.6.4.tar.gz
It will then create a bunch of files and folders in your current directory. We then go into the bin directory as follows:
cd elasticsearch-5.6.4/bin
And now we are ready to start our node and single cluster:
./elasticsearch
Installation with Homebrewedit
On macOS, Elasticsearch can also be installed via Homebrew:
brew install elasticsearch
Installation example with MSI Windows Installeredit
For Windows users, we recommend using the MSI Installer package. The package contains a graphical user interface (GUI) that guides you through the installation process.
First, download the Elasticsearch 5.6.4 MSI fromhttps://artifacts.elastic.co/downloads/elasticsearch/elasticsearch-5.6.4.msi.
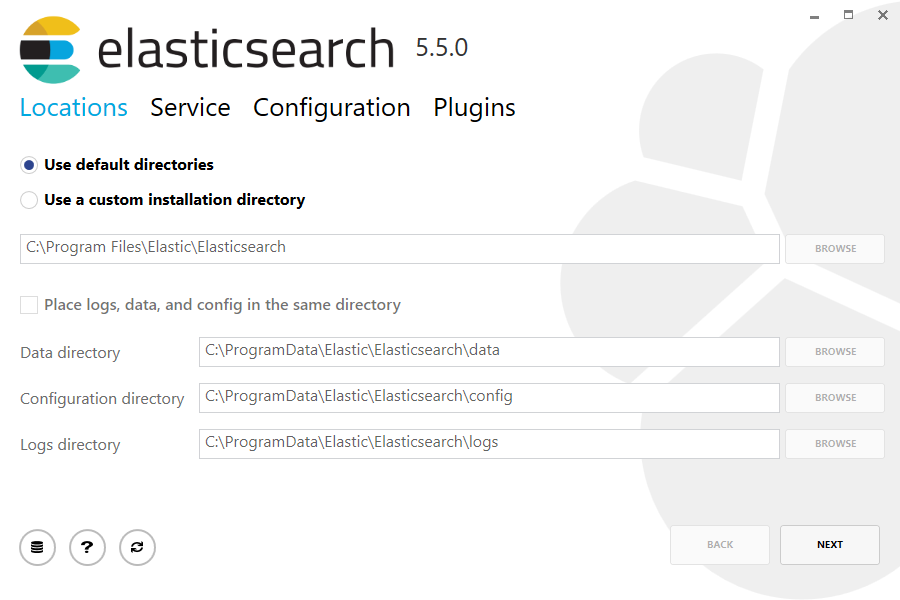
Then double-click the downloaded file to launch the GUI. Within the first screen, select the deployment directories:
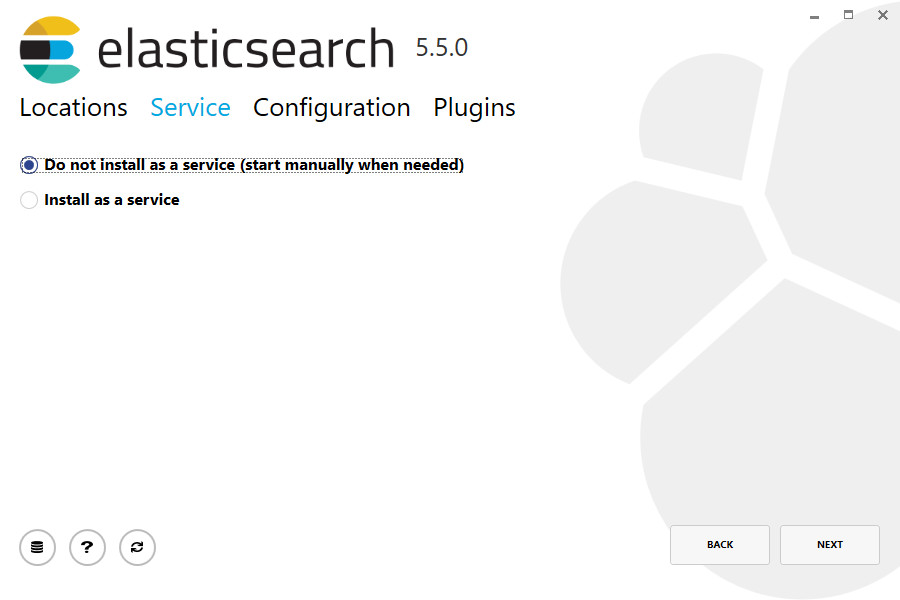
Then select whether to install as a service or start Elasticsearch manually as needed. To align with the tar example, choose not to install as a service:
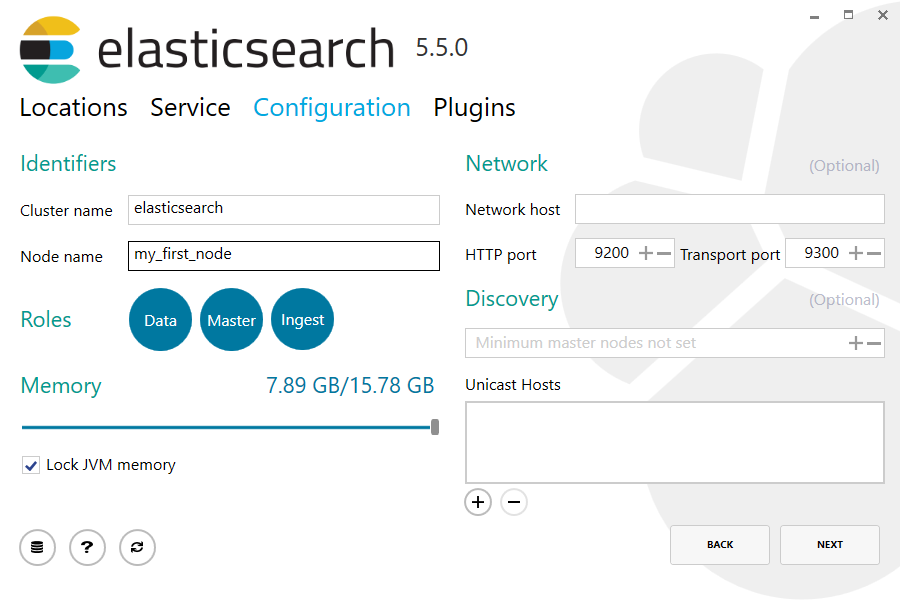
For configuration, simply leave the default values:
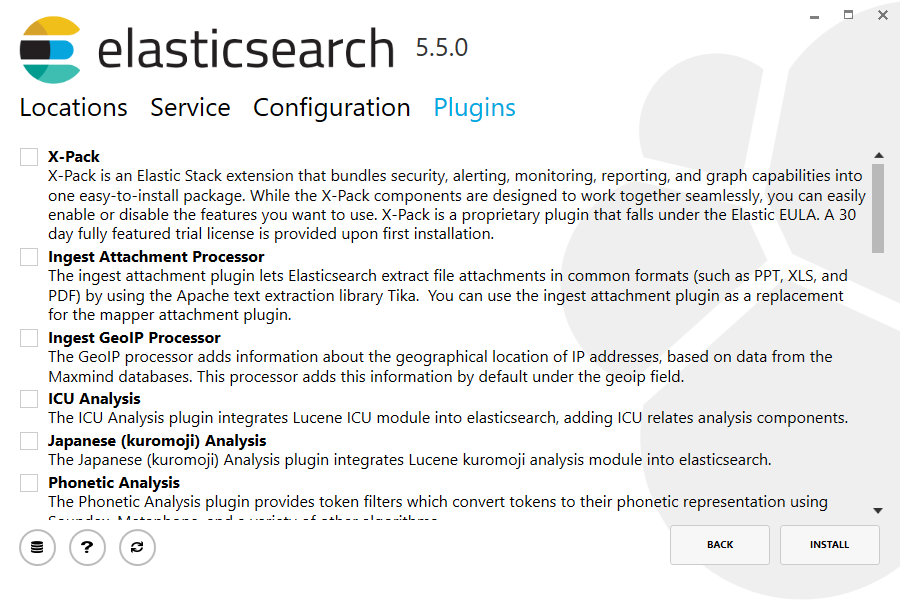
Again, to align with the tar example, uncheck all plugins to not install any plugins:
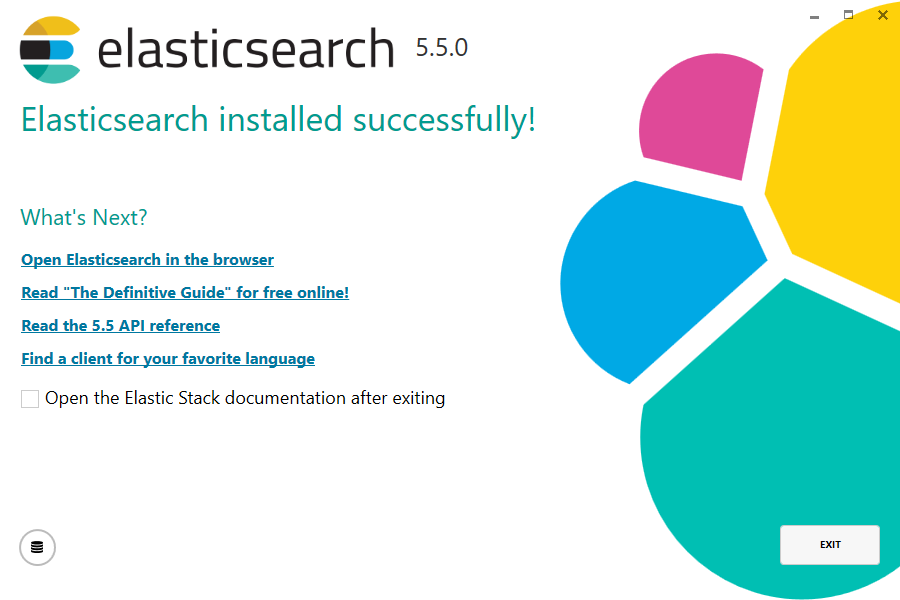
After clicking the install button, Elasticsearch will be installed:
By default, Elasticsearch will be installed at %PROGRAMFILES%\Elastic\Elasticsearch. Navigate here and go into the bin directory as follows:
with Command Prompt:
cd %PROGRAMFILES%\Elastic\Elasticsearch\bin
with PowerShell:
cd $env:PROGRAMFILES\Elastic\Elasticsearch\bin
And now we are ready to start our node and single cluster:
.\elasticsearch.exe
Successfully running nodeedit
If everything goes well with installation, you should see a bunch of messages that look like below:
[2016-09-16T14:17:51,251][INFO ][o.e.n.Node               ] [] initializing ...

[2016-09-16T14:17:51,329][INFO ][o.e.e.NodeEnvironment    ] [6-bjhwl] using [1] data paths, mounts [[/ (/dev/sda1)]], net usable_space [317.7gb], net total_space [453.6gb], spins? [no], types [ext4]

[2016-09-16T14:17:51,330][INFO ][o.e.e.NodeEnvironment    ] [6-bjhwl] heap size [1.9gb], compressed ordinary object pointers [true]

[2016-09-16T14:17:51,333][INFO ][o.e.n.Node               ] [6-bjhwl] node name [6-bjhwl] derived from node ID; set [node.name] to override

[2016-09-16T14:17:51,334][INFO ][o.e.n.Node               ] [6-bjhwl] version[5.6.4], pid[21261], build[f5daa16/2016-09-16T09:12:24.346Z], OS[Linux/4.4.0-36-generic/amd64], JVM[Oracle Corporation/Java HotSpot(TM) 64-Bit Server VM/1.8.0_60/25.60-b23]

[2016-09-16T14:17:51,967][INFO ][o.e.p.PluginsService     ] [6-bjhwl] loaded module [aggs-matrix-stats]

[2016-09-16T14:17:51,967][INFO ][o.e.p.PluginsService     ] [6-bjhwl] loaded module [ingest-common]

[2016-09-16T14:17:51,967][INFO ][o.e.p.PluginsService     ] [6-bjhwl] loaded module [lang-expression]

[2016-09-16T14:17:51,967][INFO ][o.e.p.PluginsService     ] [6-bjhwl] loaded module [lang-groovy]

[2016-09-16T14:17:51,967][INFO ][o.e.p.PluginsService     ] [6-bjhwl] loaded module [lang-mustache]

[2016-09-16T14:17:51,967][INFO ][o.e.p.PluginsService     ] [6-bjhwl] loaded module [lang-painless]

[2016-09-16T14:17:51,967][INFO ][o.e.p.PluginsService     ] [6-bjhwl] loaded module [percolator]

[2016-09-16T14:17:51,968][INFO ][o.e.p.PluginsService     ] [6-bjhwl] loaded module [reindex]

[2016-09-16T14:17:51,968][INFO ][o.e.p.PluginsService     ] [6-bjhwl] loaded module [transport-netty3]

[2016-09-16T14:17:51,968][INFO ][o.e.p.PluginsService     ] [6-bjhwl] loaded module [transport-netty4]

[2016-09-16T14:17:51,968][INFO ][o.e.p.PluginsService     ] [6-bjhwl] loaded plugin [mapper-murmur3]

[2016-09-16T14:17:53,521][INFO ][o.e.n.Node               ] [6-bjhwl] initialized

[2016-09-16T14:17:53,521][INFO ][o.e.n.Node               ] [6-bjhwl] starting ...

[2016-09-16T14:17:53,671][INFO ][o.e.t.TransportService   ] [6-bjhwl] publish_address {192.168.8.112:9300}, bound_addresses {{192.168.8.112:9300}

[2016-09-16T14:17:53,676][WARN ][o.e.b.BootstrapCheck     ] [6-bjhwl] max virtual memory areas vm.max_map_count [65530] likely too low, increase to at least [262144]

[2016-09-16T14:17:56,731][INFO ][o.e.h.HttpServer         ] [6-bjhwl] publish_address {192.168.8.112:9200}, bound_addresses {[::1]:9200}, {192.168.8.112:9200}

[2016-09-16T14:17:56,732][INFO ][o.e.g.GatewayService     ] [6-bjhwl] recovered [0] indices into cluster_state

[2016-09-16T14:17:56,748][INFO ][o.e.n.Node               ] [6-bjhwl] started
Without going too much into detail, we can see that our node named "6-bjhwl" (which will be a different set of characters in your case) has started and elected itself as a master in a single cluster. Don’t worry yet at the moment what master means. The main thing that is important here is that we have started one node within one cluster.
As mentioned previously, we can override either the cluster or node name. This can be done from the command line when starting Elasticsearch as follows:
./elasticsearch -Ecluster.name=my_cluster_name -Enode.name=my_node_name
Also note the line marked http with information about the HTTP address (192.168.8.112) and port (9200) that our node is reachable from. By default, Elasticsearch uses port 9200 to provide access to its REST API. This port is configurable if necessary.
Elasticsearch官方安装的更多相关文章
- ElasticSearch的安装
一.安装javaSE环境(已配java环境变量的请直接跳过) 1.从Java JDK 官网下载适合自己的jdk版本.(我自己用的jdk1.7) 2.安装jdk后,配置java环境变量(ps:比较喜欢简 ...
- elasticsearch 的安装配置与spring boot的整合应用
linux上的elasticsearch安装 一.下载elasticsearch 直接进入elasticsearch的官网,下载最新的安装包:https://www.elastic.co/downlo ...
- Elasticsearch 使用-安装
Elasticsearch 使用-安装 官方网站 https://www.elastic.co/cn/elasticsearch/ 什么是 Elasticsearch? Elasticsearch 是 ...
- 如何在Elasticsearch中安装中文分词器(IK+pinyin)
如果直接使用Elasticsearch的朋友在处理中文内容的搜索时,肯定会遇到很尴尬的问题--中文词语被分成了一个一个的汉字,当用Kibana作图的时候,按照term来分组,结果一个汉字被分成了一组. ...
- elasticsearch rpm 安装
参考:http://www.elasticsearch.org/guide/en/elasticsearch/reference/current/setup-repositories.html Dow ...
- Linux初学 - Elasticsearch环境安装
下载 https://www.elastic.co/downloads/elasticsearch 安装 rpm -ivh 也可以双击rpm包安装 修改elastaticsearch host配置 修 ...
- centos 6.7下 elasticsearch的安装
1.下载elasticsearch的安装包,用ftp上传到linux系统下目录中,如在当前用户root的目录下新建目录elasticsearch,放入安装包 不要忘了添加执行权限 chmod +x * ...
- Windows 7 SP1 x64 旗舰版 微软官方安装U盘的制作
[ 本主题由 中山艹泥喵 于 2013-08-20 23:14:33 设为精华1,原因:不错~ ] 最后由 风中枯萎 于 2015-12-15 17:44:15 修改 安装Windows 7操作系统主 ...
- 转:ElasticSearch的安装和相关插件的安装
原文来自于:http://blog.csdn.net/whxaing2011/article/details/18237733 本文主要介绍如下内容: 1.ElasticSearch ...
随机推荐
- HTML5之Canvas绘图(二) ——应用篇之七巧板
1.canvas绘制七巧板-- <!DOCTYPE html> <html> <head> <meta charset="UTF-8"&g ...
- U-Boot中关于TEXT_BASE,代码重定位,链接地址相关说明
都知道U-BOOT分为两个阶段,第一阶段是(~/cpu/arm920t/start.S中)在FLASH上运行(一般情况 下),完成对硬件的初始化,包括看门狗,中断缓存等,并且负责把代码搬移到SDRAM ...
- Visual Studio Code v1.17
Visual Studio Code v1.17发布 欢迎来到2017年9月发行的Visual Studio代码.在这个版本中有一些重要的更新,我们希望你会喜欢,一些关键的亮点包括: macOS To ...
- ios美颜 调研 GPUImage GPUImageBeautifyFilter BeautifyFaceDemo
最近需要给直播项目中添加美颜的功能,调研了很多SDK和开源代码(视决,涂图,七牛,金山云,videoCore等),综合成本/效果/对项目侵入性,最后决定使用一款基于GPUImage实现的 Beauti ...
- Ubuntu下安装Oracle JRE运行环境
安装Oracle JDK -linux-i586.tar.gz安装参见在Ubuntu下利用Eclipse调试FFmpeg Linux x64:链接:http://pan.baidu.com/s/1gd ...
- PHP与js之间的交互
<?php//在php中药想使用jquery,首先需要导入jquery类库 echo "<script src='".base_url('static')." ...
- dm层 集市层 四层 Build a multi-level data strategy
集市层 四层模型 ODS(临时存储层) MID(中间层) DM(数据集市层) APP(应用层) http://www.datamartist.com/data-warehouse-vs-data-ma ...
- 我的Android进阶之旅------>Android使用正则表达式匹配扫描指定目录下的所有媒体文件(音乐、图像、视频文件)
今天使用正则表达式匹配指定目录下的所有媒体文件,下面将这份代码简化了,可以收藏下来,当作工具类. package match; import java.io.File; import java.uti ...
- SAP RFC 的介绍
第一部分 RFC技术 什么是RFC? RFC是SAP系统和其他(SAP或非SAP)系统间的一个重要而常用的双向接口技术,也被视为SAP与外部通信的基本协议.简单地说,RFC过程就是系统调用当前系统外的 ...
- 采集练习(十一) php 获得电视节目预告---数据来自电视猫
昨天写了个采集搜视网的电视节目预告,刚好今天有心情,想采下其他网站提供的节目预告,发现 电视猫wap版 的提供的节目预告也蛮好采(需要正则)....感谢移动互联网! 电视猫的 wap版地址是 htt ...