vue tabBar导航栏设计实现5-最终版本
系列导航
二、vue tabBar导航栏设计实现2-抽取tab-bar
三、vue tabBar导航栏设计实现3-进一步抽取tab-item
四、vue tabBar导航栏设计实现4-再次抽取MainTabBar
tabBar导航栏设计5-最终版本
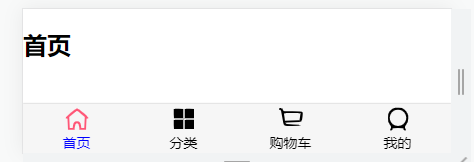
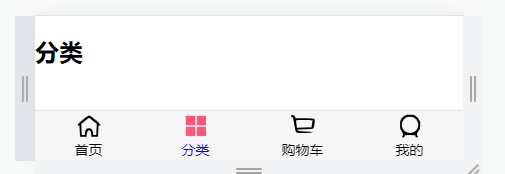
一、 本节目标效果
导航栏选中哪个哪个用红色图标,并且字体的颜色可以随意设置(这里为了醒目用蓝色)
二、代码结构
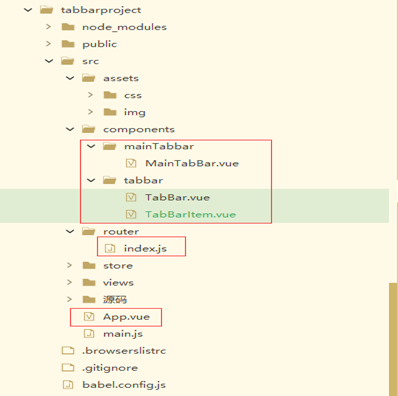
注:主要是标红的几个文件
三、代码
App.vue
<template>

	<div id="app">

		<main-tab-bar></main-tab-bar>

		<router-view></router-view>

	</div>

</template>

<script>

	import {

		defineComponent

	} from 'vue'

	import MainTabBar from './components/mainTabbar/MainTabBar'

	export default defineComponent({

		//组件名称

		name: 'App',

		//接收父组件的数据

		props: {},

		components: {

			MainTabBar

		},

		setup(props, ctx) {

			return {}

		}

	})

</script>

<style lang="scss">

	@import "./assets/css/base.css";

</style>
TabBar.vue
<template>

  <div id="tab-bar">

	  <slot></slot>

  </div>

</template>

<script>

import {defineComponent} from 'vue'

export default defineComponent({

    //组件名称

    name:'TabBar',

    //接收父组件的数据

    props:{

    },

	components: {

	},

    setup(props,ctx){

        return{

        }

    }

})

</script>

<style lang="scss">

  #tab-bar {

    display: flex;

    background-color: #f6f6f6;

    position: fixed;

    left: 0;

    right: 0;

    bottom: 0;

    box-shadow: 0 -1px 1px rgba(100,100,100,.2);

  }

</style>
TabBarItem.vue
<template>

  <div class="tab-bar-item" @click="itemClick">

	<div v-if="isActive"><slot name="item-icon-active"></slot></div>

	<div v-else><slot name="item-icon"></slot></div>

	<div :style="activeStyle"><slot name="item-text"></slot></div>

  </div>

</template>

<script>

 import { createRouter, createWebHistory } from 'vue-router'

 import {defineComponent} from 'vue'

  export default defineComponent({

      //组件名称

      name:'TabBarItem',

      //接收父组件的数据

      props:{

		  path: String,

		  activeColor: {

		    type: String,

		    default: 'red'

		  }

      },

  	components: {

  	},

	computed: {

	  isActive() {

		  //不等于-1就是找到了

	    return this.$route.path.indexOf(this.path) !== -1

	  },

	  activeStyle() {

	    return this.isActive ? {color: this.activeColor} : {}

	  }

	},

	methods: {

	  itemClick() {

	    this.$router.push(this.path)

	  }

	},

      setup(props,ctx){

          return{

          }

      }

  })

</script>

<style lang="scss">

  .tab-bar-item {

    flex: 1;

    text-align: center;

    height: 49px;

    font-size: 14px;

  }

  .tab-bar-item img {

    width: 24px;

    height: 24px;

    margin-top: 3px;

    vertical-align: middle;

    margin-bottom: 2px;

  }

</style>
MainTabBar.vue
<template>

  <tab-bar>

  	<tab-bar-item  path="/home"  activeColor="blue">

  		<template v-slot:item-icon>

  			<img :src="require('../../assets/img/tabbar/home.svg')">

  		</template>

		<template v-slot:item-icon-active>

			<img :src="require('../../assets/img/tabbar/home_active.svg')">

		</template>

  		<template v-slot:item-text>

  			 <div slot="item-text">首页</div>

  		</template>

  	</tab-bar-item>

  	<tab-bar-item path="/category" activeColor="blue">

  		<template v-slot:item-icon>

  			 <img :src="require('../../assets/img/tabbar/category.svg')">

  		</template>

		<template v-slot:item-icon-active>

			<img :src="require('../../assets/img/tabbar/category_active.svg')">

		</template>

  		<template v-slot:item-text>

  			 <div slot="item-text">分类</div>

  		</template>

  	</tab-bar-item>

  	<tab-bar-item path="/cart" activeColor="blue">

  		<template v-slot:item-icon>

  			<img :src="require('../../assets/img/tabbar/shopcart.svg')">

  		</template>

		<template v-slot:item-icon-active>

			<img :src="require('../../assets/img/tabbar/shopcart_active.svg')">

		</template>

  		<template v-slot:item-text>

  			<div slot="item-text">购物车</div>

  		</template>

  	</tab-bar-item>

  	<tab-bar-item path="/profile" activeColor="blue">

  		<template v-slot:item-icon>

  			<img :src="require('../../assets/img/tabbar/profile.svg')">

  		</template>

  		<template v-slot:item-icon-active>

  			<img :src="require('../../assets/img/tabbar/profile_active.svg')">

  		</template>

  		<template v-slot:item-text>

  			<div slot="item-text">我的</div>

  		</template>

  	</tab-bar-item>

  </tab-bar>

</template>

<script>

  import TabBar from '../tabbar/TabBar'

  import TabBarItem from '../tabbar/TabBarItem'

  export default {

    name: "MainTabBar",

    components: {

      TabBar,

      TabBarItem

    }

  }

</script>

<style scoped>

</style>
index.js
import { createRouter, createWebHistory } from 'vue-router'

import Home from '../views/Home.vue'

import Category from '../views/Category.vue'

import Cart from '../views/Cart.vue'

import Profile from '../views/Profile.vue'

const routes = [

  {

    path: '/home',

    name: 'Home',

    component: Home

  } ,

  {

    path: '/category',

    component: Category

  },

  {

    path: '/cart',

    component: Cart

  },

  {

    path: '/profile',

    component: Profile

  }

]

const router = createRouter({

  history: createWebHistory(process.env.BASE_URL),

  routes

})

export default router
其他一些代码不很简单看之前的博客内容
四、代码按照步骤解释
1、 抽取MainTabBar.vue组件
MainTabBar.vue组件里<tab-bar-item>标签上增加了activeColor="blue"这属性,这里的颜色可以根据需求随意换。
2、 TabBarItem.vue组件里增加isActive和activeStyle计算属性用来控制,哪个按钮选中就用红色的图标和字体颜色动态设置。
this.$route.path.indexOf(this.path) !== -1 //当前路径是哪个判断,不等于-1就是找到了
vue tabBar导航栏设计实现5-最终版本的更多相关文章
- 微信小程序------导航栏样式、tabBar导航栏
一:导航栏样式设置 小程序的导航栏样式在app.json中定义. 这里设置导航,背景黑色,文字白色,文字内容测试小程序 app.json内容: { "pages":[ " ...
- 微信小程序入门四: 导航栏样式、tabBar导航栏
实例内容 导航栏样式设置 tabBar导航栏 实例一:导航栏样式设置 小程序的导航栏样式在app.json中定义. 这里设置导航,背景黑色,文字白色,文字内容测试小程序 app.json内容: { & ...
- 超详细Vue实现导航栏绑定内容锚点+滚动动画+vue-router(hash模式可用)
超详细Vue实现导航栏绑定内容锚点+滚动动画+vue-router(hash模式可用) 转载自:https://www.jianshu.com/p/2ad8c8b5bf75 亲测有效~ <tem ...
- Nuxt/Vue自定义导航栏Topbar+标签栏Tabbar组件
基于Vue.js实现自定义Topbar+Tabbar组件|仿咸鱼底部凸起导航 最近一直在倒腾Nuxt项目,由于Nuxt.js是基于Vue.js的服务端渲染框架,只要是会vue,基本能很快上手了. 一般 ...
- 记一次Vue跨导航栏问题解决方案
简述 这篇文章是我项目中,遇到的一个issue,我将解决过程和方法记录下来. 本篇文章基于Vue.js进行的前端页面构建,由于仅涉及前端,将不做数据来源及其他部分的叙述.使用的CSS框架是 Boots ...
- 使用vue给导航栏添加链接
如下面的导航栏,使用vue技术给该导航栏增加链接: js代码为: navigation:function(){ new Vue({ el: '#navUl', data: { menuData:{ ' ...
- Flutter - TabBar导航栏切换后,状态丢失
上一篇讲到了 Flutter - BottomNavigationBar底部导航栏切换后,状态丢失 里面提到了TabBar,这儿专门再写一下吧,具体怎么操作,来不让TabBar的状态丢失.毕竟大家99 ...
- Vue设置导航栏为公共模块并在登录页不显示
1.公共模块的内容可以放在App.vue中但是通常登录页面是不需要导航的,那么就需要规避登录页这时,就可以采用keep-alive结合$route.meta来实现这个功能.keep-alive 是 V ...
- 新浪微博客户端(1)-实现Tabbar导航栏效果
- (BOOL)application:(UIApplication *)application didFinishLaunchingWithOptions:(NSDictionary *)launc ...
- vue 侧边导航栏递归显示
import axios from "axios"; import tabs1 from "../tab_content/tab1.vue"; import m ...
随机推荐
- HarmonyOS第一课_构建更加丰富的页面
管理组件状态 概述 组件内的状态管理:@State 从父组件单向同步状态:@Prop 与父组件双向同步状态:@Link 跨组件层级双向同步状态:@Provide 和@Consume 概述 在应用中,界 ...
- 火眼金睛破局ES伪慢查询
一.问题现象 服务现象 服务接口的TP99性能降低 ES现象 YGC:耗时极其不正常, 峰值200+次,耗时7s+ FULL GC:不正常,次数为1但是频繁,STW 5s 慢查询:存在慢查询5+ 二 ...
- 如何通过port-forward命令在本地访问 k8s 集群服务
公众号「架构成长指南」,专注于生产实践.云原生.分布式系统.大数据技术分享 概述 在我们访问k8s中的pod服务时,一般通过node port映射pod端口进行访问,还有一种是通过ingress或者i ...
- Ubuntu基线指导手册
Ubuntu基线指导手册 1. 身份鉴别策略组检测 准备: 安装一个PAM模块来启用cracklib支持,这可以提供额外的密码检查功能. 在Debian,Ubuntu或者Linux Mint使用命 ...
- 9.mysql的数据迁移到es中
背景 从开发的角度说,就是老板叫我用es了,没那么多为什么,爸爸说了算 从业务角度,mysql已经不能满足我对全文检索的需求了.我需要检索某一个字段包含"圣诞节刚刚过去"这一字符串 ...
- 一个小巧、快速、轻量级的 .NET NoSQL 嵌入式数据库
前言 今天给大家分享一个小巧.快速.轻量级的 .NET NoSQL 嵌入式数据库:LiteDB.本篇文章主要是介绍LiteDB和在.NET中如何使用. LiteDB介绍 LiteDB 是一个小巧.快速 ...
- 花了1块钱体验一把最近很火的ChatGPT
前言 最近 OpenAI 发布了 ChatGPT,一经发布就在科技圈火得不行. ChatGPT是什么呢? 简单得说,ChatGPT,是一种基于对话的 AI 聊天工具.我们来看看ChatGPT自己得回答 ...
- 案例展示自定义C函数的实现过程
摘要:用户在使用数据库过程中,受限于内置函数的功能,部分业务不易实现时,可以使用自定义C函数实现特殊功能.本文通过两个示例展示自定义C函数的实现过程. 前言 用户在使用数据库过程中,常常受限于内置函数 ...
- 六一儿童节,看我用ModelArts让8090梦回童年
[本期推荐] 8岁小朋友的儿童节,有点硬核,一起来认识这些小小程序员,看他们如何coding出一个与众不同的童年. 摘要: 如果还能再过一次儿童节-- 本文分享自华为云社区<"梦回童年 ...
- openGauss内核:简单查询的执行
摘要:本文主要分析简单查询语句在业务处理线程Postgres上的执行流程,并介绍如何利用gdb梳理代码逻辑. 本文分享自华为云社区<openGauss内核分析(二):简单查询的执行>,作者 ...