SSM + Freemarker 开发框架快速搭建
1.项目骨架建立
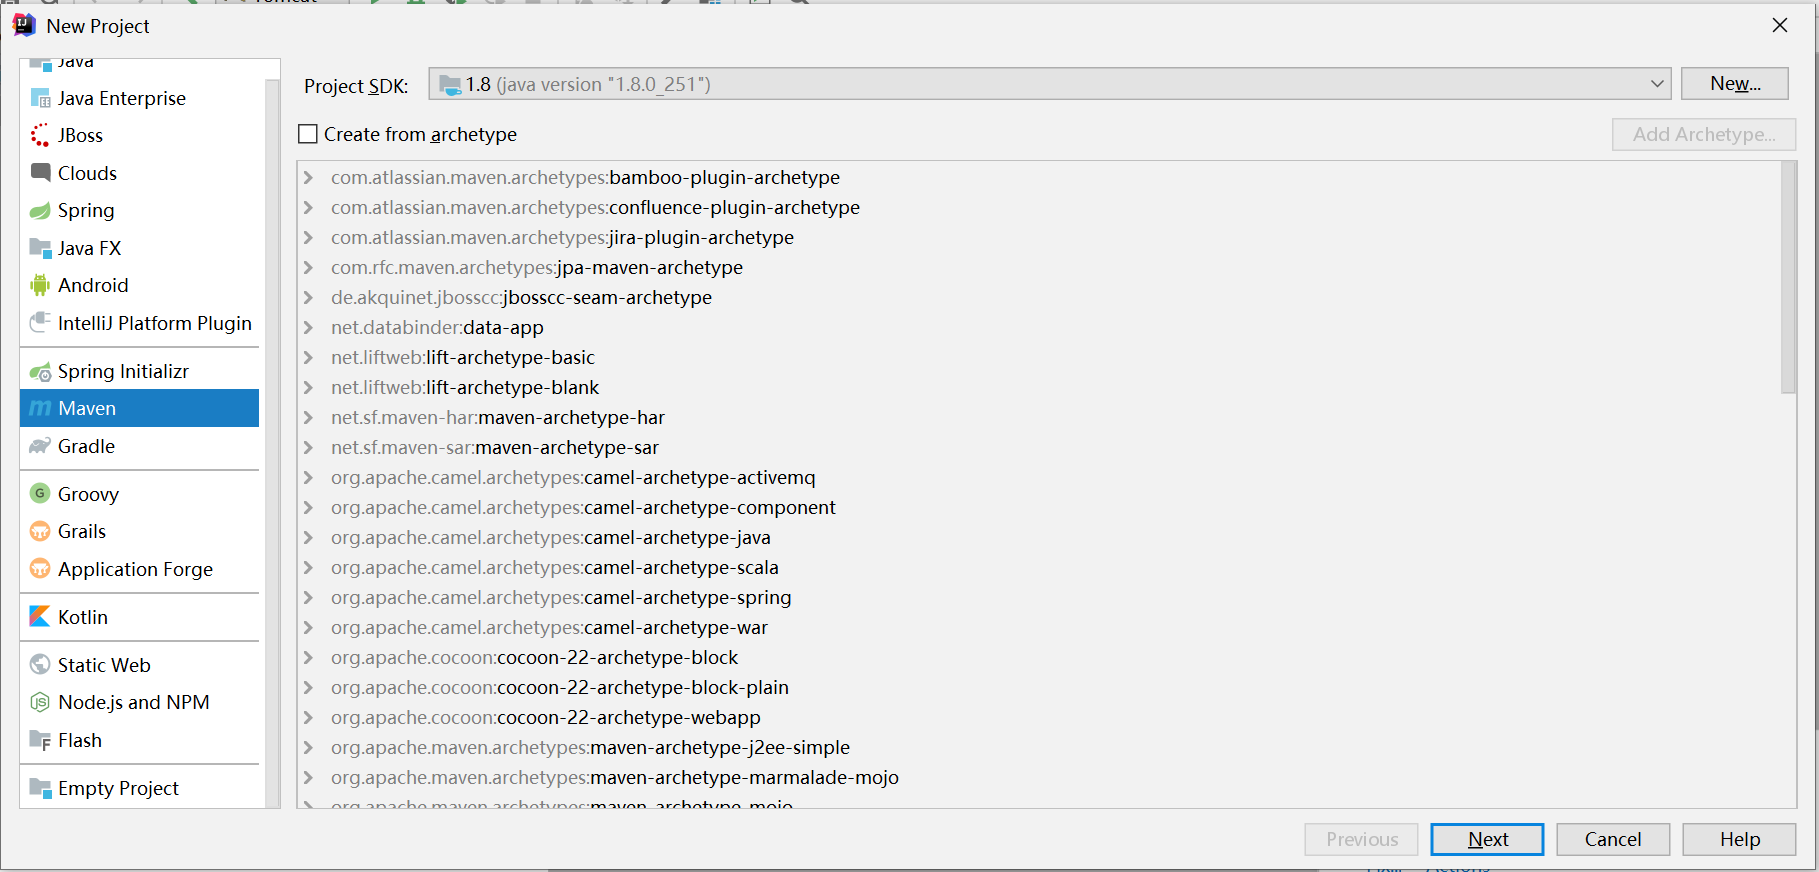
一、使用开发工具IDEA,构建Maven项目,然后调整Maven项目结构,使其成为一个标准的web项目:
此处不选择Maven骨架,直接Next:
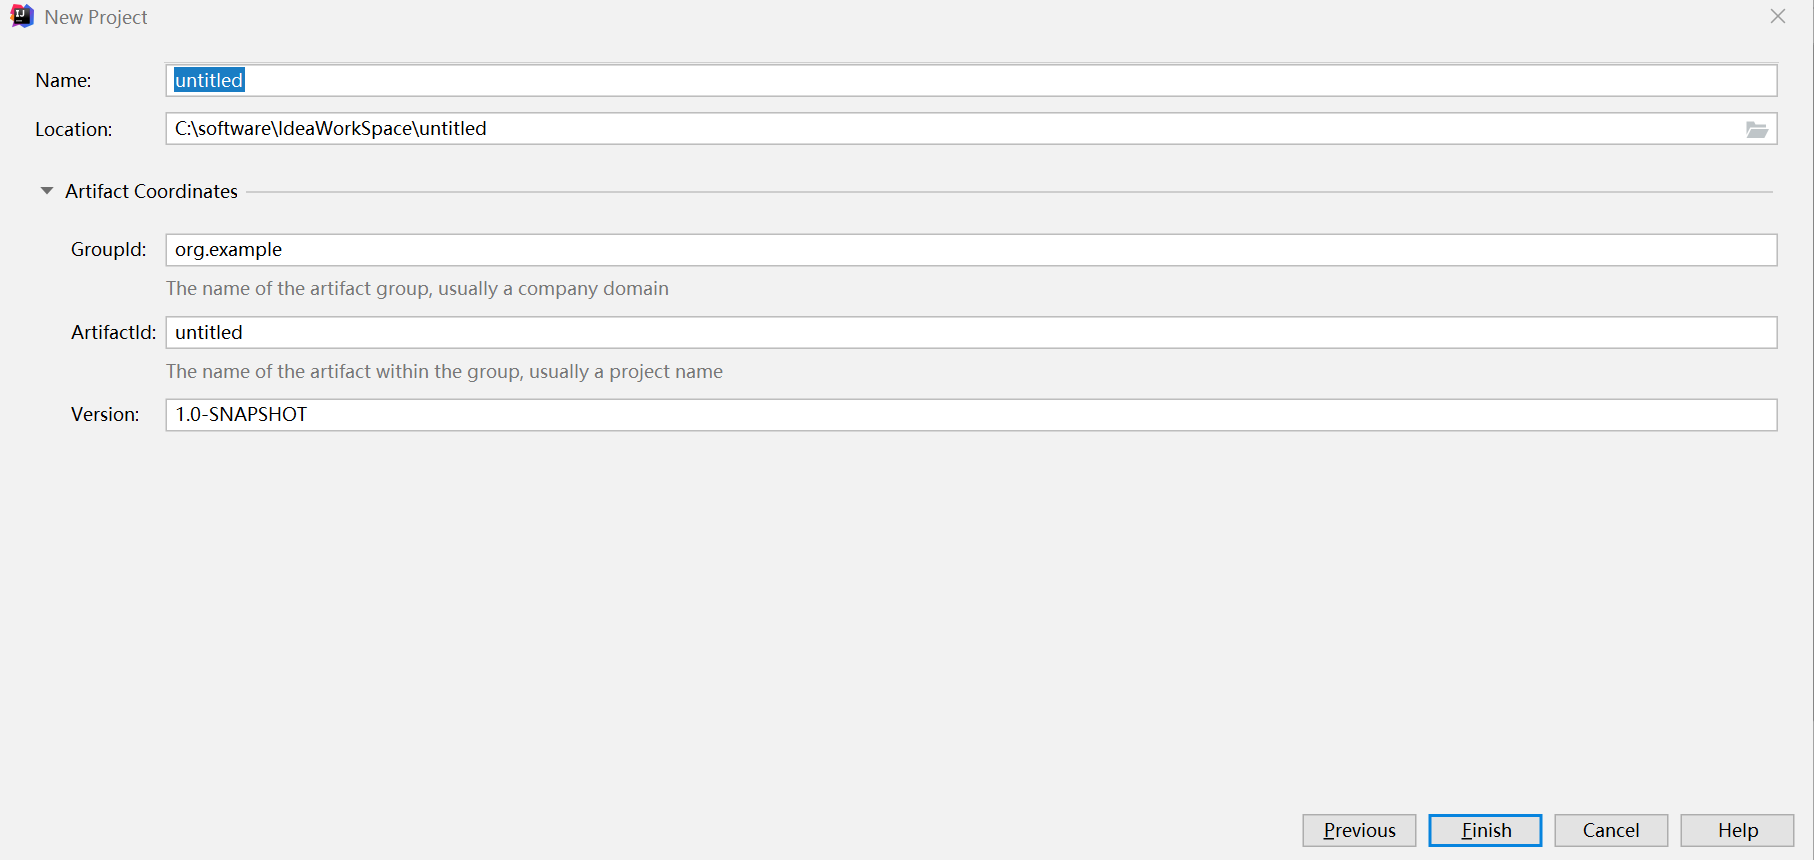
输入项目的相关信息,直接Finish
项目构建完成后,选择pom.xml 打包方式为 war
<packaging>war</packaging>

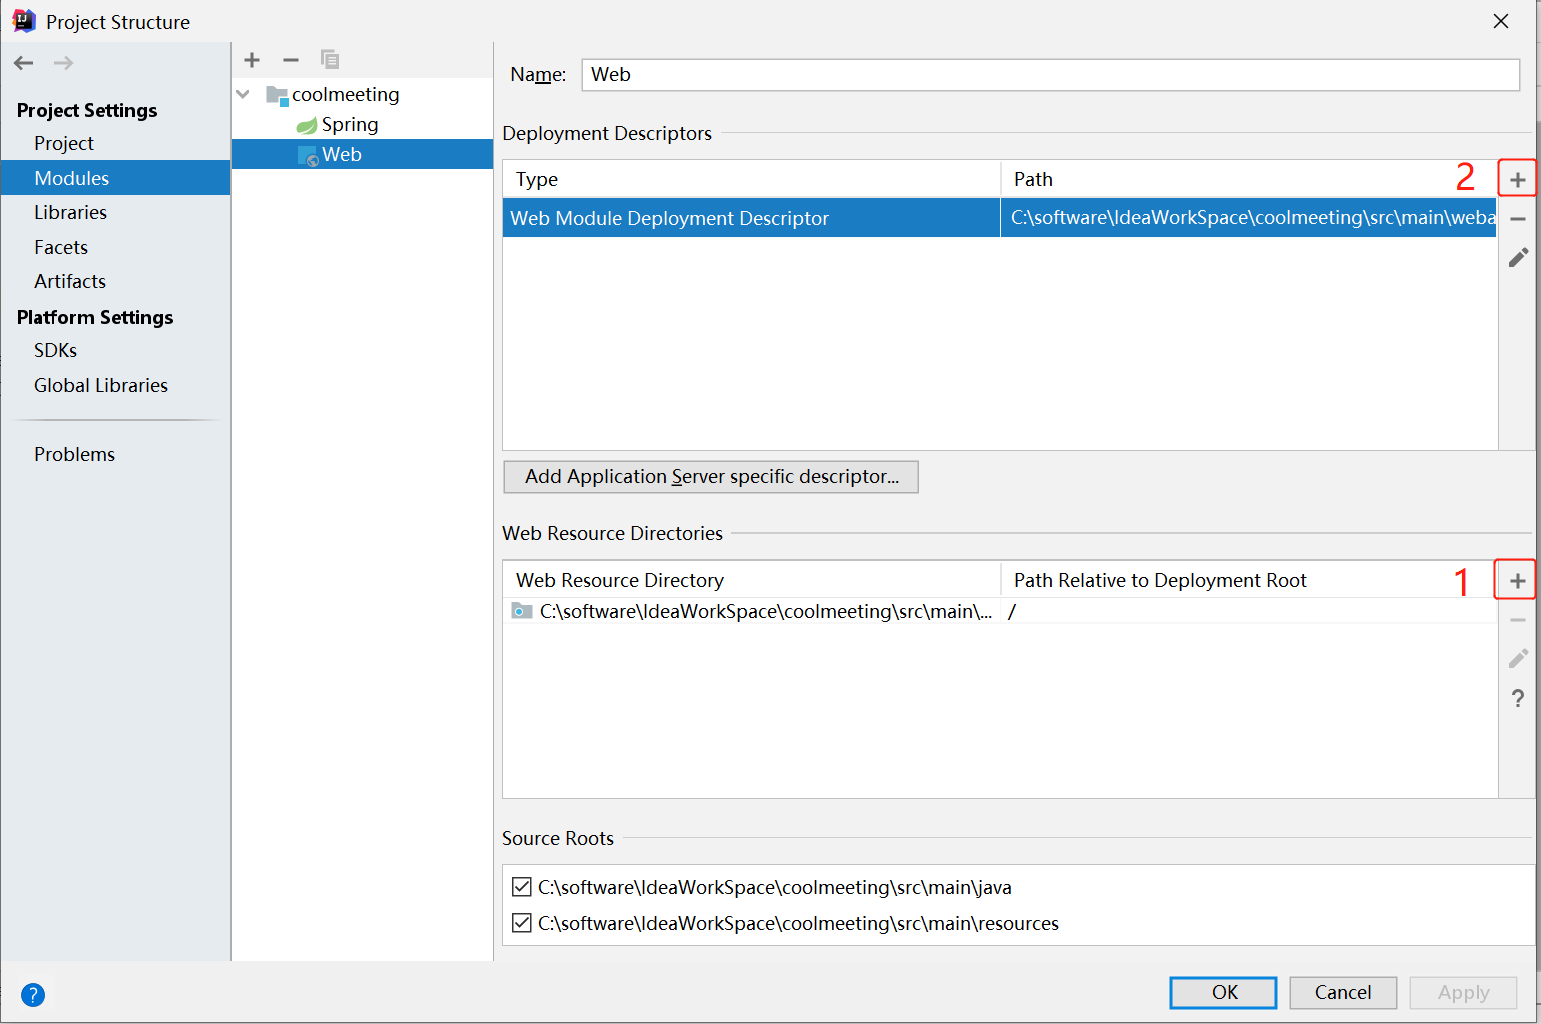
选择1,建立项目的webapp目录,选择2,在指定目录的WEB-INF下建立web.xml文件:
项目最终构建完成结构层次图:
2.整合SSM + FreeMarker:
一、数据库资源文件配置:
# 数据库配置文件 db.properties

db.username=root

db.password=root

db.url=jdbc:mysql:///meeting?useUnicode=true&characterEncoding=UTF-8&serverTimezone=Asia/Shanghai
二、Spring配置:
<?xml version="1.0" encoding="UTF-8"?>

<beans xmlns="http://www.springframework.org/schema/beans"

       xmlns:xsi="http://www.w3.org/2001/XMLSchema-instance"

       xmlns:context="http://www.springframework.org/schema/context" xmlns:tx="http://www.springframework.org/schema/tx"

       xmlns:aop="http://www.springframework.org/schema/aop"

       xsi:schemaLocation="http://www.springframework.org/schema/beans http://www.springframework.org/schema/beans/spring-beans.xsd http://www.springframework.org/schema/context https://www.springframework.org/schema/context/spring-context.xsd http://www.springframework.org/schema/tx http://www.springframework.org/schema/tx/spring-tx.xsd http://www.springframework.org/schema/aop https://www.springframework.org/schema/aop/spring-aop.xsd">

    <!--Spring配置文件,配置注解扫描,使用过滤器不扫描Controller注解-->

    <context:component-scan base-package="org.taoguoguo.meeting" use-default-filters="true">

        <context:exclude-filter type="annotation" expression="org.springframework.stereotype.Controller"/>

    </context:component-scan>

    <!--加载外部资源-->

    <context:property-placeholder location="classpath:db.properties" />

    <!--数据源配置-->

    <bean class="com.alibaba.druid.pool.DruidDataSource" id="dataSource">

        <property name="username" value="${db.username}" />

        <property name="password" value="${db.password}" />

        <property name="url" value="${db.url}" />

    </bean>

    <!--mybatis配置-->

    <bean class="org.mybatis.spring.SqlSessionFactoryBean" id="sqlSessionFactoryBean">

        <property name="dataSource" ref="dataSource" />

        <property name="typeAliasesPackage" value="org.taoguoguo.meeting.model" />

        <!--mapper资源加载多路径配置-->

        <property name="mapperLocations">

            <array>

                <value>classpath:mapper/*Mapper.xml</value>

                <value>classpath:org/taoguoguo/meeting/mapper/*Mapper.xml</value>

            </array>

        </property>

    </bean>

    <bean class="org.mybatis.spring.mapper.MapperScannerConfigurer" id="mapperScannerConfigurer">

        <property name="sqlSessionFactoryBeanName" value="sqlSessionFactoryBean" />

        <property name="basePackage" value="org.taoguoguo.meeting.mapper" />

    </bean>

    <!--事务配置-->

    <!-- 配置事务管理器 -->

    <bean class="org.springframework.jdbc.datasource.DataSourceTransactionManager" id="transactionManager">

        <property name="dataSource" ref="dataSource" />

    </bean>

    <!--定义属性,声明事务规则 -->

    <tx:advice id="txAdvice" transaction-manager="transactionManager">

        <tx:attributes>

            <tx:method name="add*" propagation="REQUIRED"/>

            <tx:method name="insert*" propagation="REQUIRED"/>

            <tx:method name="update*" propagation="REQUIRED"/>

            <tx:method name="delete*" propagation="REQUIRED"/>

        </tx:attributes>

    </tx:advice>

    <!--定义切面-->

    <aop:config>

        <aop:pointcut id="pc1" expression="execution(* org.taoguoguo.meeting.service.*.*(..))"/>

        <!-- 将事务增强与切入点组合(织入事务切面) -->

        <aop:advisor advice-ref="txAdvice" pointcut-ref="pc1" />

    </aop:config>

    <!--注解方式配置事务

    <tx:annotation-driven transaction-manager="transactionManager" />

    -->

</beans>
三、SpringMVC配置:
<?xml version="1.0" encoding="UTF-8"?>

<beans xmlns="http://www.springframework.org/schema/beans"

       xmlns:xsi="http://www.w3.org/2001/XMLSchema-instance"

       xmlns:context="http://www.springframework.org/schema/context"

       xmlns:mvc="http://www.springframework.org/schema/mvc"

       xsi:schemaLocation="http://www.springframework.org/schema/beans http://www.springframework.org/schema/beans/spring-beans.xsd http://www.springframework.org/schema/context https://www.springframework.org/schema/context/spring-context.xsd http://www.springframework.org/schema/mvc https://www.springframework.org/schema/mvc/spring-mvc.xsd">

    <!--Springmvc配置文件 只扫描Controller注解-->

    <context:component-scan base-package="org.taoguoguo.meeting" use-default-filters="true">

        <context:include-filter type="annotation" expression="org.springframework.stereotype.Controller"/>

    </context:component-scan>

    <!--注解驱动 HandlereMapping & HandlerAdapter-->

    <mvc:annotation-driven />

    <!--静态资源放行-->

    <mvc:resources mapping="/**" location="/" />

    <!--加载外部资源文件-->

    <bean class="org.springframework.beans.factory.config.PropertyPlaceholderConfigurer">

        <property name="locations">

            <list>

                <value>classpath:freemarker-var.properties</value>

            </list>

        </property>

    </bean>

    <!--配置模板基本属性-->

    <bean class="org.springframework.web.servlet.view.freemarker.FreeMarkerConfigurer" id="freeMarkerConfigurer">

        <!--模板文件位置-->

        <property name="templateLoaderPath" value="/WEB-INF/ftl/"/>

        <!--默认编码格式-->

        <property name="defaultEncoding" value="UTF-8" />

        <!--全局变量设置-->

        <property name="freemarkerVariables">

            <map>

                <entry key="root" value="${root}" />

            </map>

        </property>

        <!--基本格式配置:时间格式、数字格式-->

        <property name="freemarkerSettings">

            <props>

                <!--模版的缓存时间,单位是s,超过缓存时间则从磁盘加载最新的模版-->

                <prop key="template_update_delay">10</prop>

                <!--设置默认地区,主要影响数字、日期输出格式,request中没有指定地区时模板查找的值-->

                <prop key="locale">zh_CN</prop>

                <!--设置日期时间的输出格式。-->

                <prop key="datetime_format">yyyy-MM-dd HH:mm:ss </prop>

                <!--设置日期的输出格式-->

                <prop key="date_format">yyyy-MM-dd</prop>

                <!--设置时间的输出格式-->

                <prop key="time_format">HH:mm:ss</prop>

                <!--设置数字的输出格式-->

                <prop key="number_format">#.####</prop>

            </props>

        </property>

    </bean>

    <!--freemarker视图解析器配置-->

    <bean class="org.springframework.web.servlet.view.freemarker.FreeMarkerViewResolver">

        <!--视图解析器类-->

        <property name="viewClass" value="org.springframework.web.servlet.view.freemarker.FreeMarkerView" />

        <!--后缀配置-->

        <property name="suffix" value=".ftl"/>

        <!--设置各种属性覆盖-->

        <!--允许重写Request属性-->

        <property name="allowRequestOverride" value="true"/>

        <!--允许重写Session属性-->

        <property name="allowSessionOverride" value="true"/>

        <!--设置request Attribute添加到模型-->

        <property name="exposeRequestAttributes" value="true"/>

        <!--设置session Attribute添加到模型-->

        <property name="exposeSessionAttributes" value="true"/>

        <!--页面内容类型-->

        <property name="contentType" value="text/html;charset=utf-8"/>

    </bean>

</beans>
四、FreeMarker配置:
##freemarker-var.properties 也可以在mvc配置文件中直接写死

root=/
web.xml配置
<?xml version="1.0" encoding="UTF-8"?>

<web-app xmlns="http://xmlns.jcp.org/xml/ns/javaee"

         xmlns:xsi="http://www.w3.org/2001/XMLSchema-instance"

         xsi:schemaLocation="http://xmlns.jcp.org/xml/ns/javaee http://xmlns.jcp.org/xml/ns/javaee/web-app_4_0.xsd"

         version="4.0">

    <!--spring配置-->

    <context-param>

        <param-name>contextConfigLocation</param-name>

        <param-value>classpath:applicationContext.xml</param-value>

    </context-param>

    <listener>

        <listener-class>org.springframework.web.context.ContextLoaderListener</listener-class>

    </listener>

    <!--springmvc配置-->

    <servlet>

        <servlet-name>springmvc</servlet-name>

        <servlet-class>org.springframework.web.servlet.DispatcherServlet</servlet-class>

        <init-param>

            <param-name>contextConfigLocation</param-name>

            <param-value>classpath:spring-servlet.xml</param-value>

        </init-param>

    </servlet>

    <servlet-mapping>

        <servlet-name>springmvc</servlet-name>

        <url-pattern>/</url-pattern>

    </servlet-mapping>

    <!--乱码过滤器配置-->

    <filter>

        <filter-name>encodingFilter</filter-name>

        <filter-class>org.springframework.web.filter.CharacterEncodingFilter</filter-class>

        <init-param>

            <param-name>encoding</param-name>

            <param-value>UTF-8</param-value>

        </init-param>

        <init-param>

            <param-name>forceRequestEncoding</param-name>

            <param-value>true</param-value>

        </init-param>

        <init-param>

            <param-name>forceResponseEncoding</param-name>

            <param-value>true</param-value>

        </init-param>

    </filter>

    <filter-mapping>

        <filter-name>encodingFilter</filter-name>

        <url-pattern>/*</url-pattern>

    </filter-mapping>

</web-app>
最后在指定目录下创建html文件,将后缀改为ftl,然后写一个Controller 请求访问即可。
SSM + Freemarker 开发框架快速搭建的更多相关文章
- SSM项目环境快速搭建
SSM项目的环境搭建 环境搭建的目标 工程创建 创建父工程 创建空 maven工程 xxx-parent 作为父工程 修改父工程中的 pom.xml <!--?xml version=" ...
- (转载) android快速搭建项目积累
android快速搭建项目积累 2016-04-05 20:07 519人阅读 评论(0) 收藏 举报 分类: android优化(8) Rx技术(5) 版权声明:本文为博主原创文章,未经博主 ...
- 快速搭建一个SSM框架demo
我之所以写一个快速搭建的demo,主要想做一些容器的demo,所以为了方便大家,所以一切从简,简单的3层架构 先用mysql的ddl,后期不上oracle的ddl ; -- ------------- ...
- windows下如何快速搭建web.py开发框架
在windows下如何快速搭建web.py开发框架 用Python进行web开发的话有很多框架供选择,比如最出名的Django,tornado等,除了这些框架之外,有一个轻量级的框架使用起来也是非常方 ...
- 快速搭建ssm框架
快速搭建SSM框架 因为最近有很多朋友问我自己的项目搭建的不够完善,并且经常出现一些小问题,那么今天我又整理了一下文档教大家如何快速搭建SSM框架我是用 eclipse搭建的,如果想用idear的话我 ...
- 在windows下如何快速搭建web.py开发框架
在windows下如何快速搭建web.py开发框架 用Python进行web开发的话有很多框架供选择,比如最出名的Django,tornado等,除了这些框架之外,有一个轻量级的框架使用起来也是非常方 ...
- 使用Springboot快速搭建SSM框架
Spring Boot设计目的是用来简化Spring应用的初始搭建以及开发过程.该框架使用了特定的方式来进行配置,从而使开发人员不再需要定义样板化的配置. 一.环境准备 Idea 2017 或 201 ...
- 快速搭建springboot框架以及整合ssm+shiro+安装Rabbitmq和Erlang、Mysql下载与配置
1.快速搭建springboot框架(在idea中): file–>new project–>Spring Initializr–>next–>然后一直下一步. 然后复制一下代 ...
- EpiiAdmin 开源的php交互性管理后台框架, 让复杂的交互变得更简单!Phper快速搭建交互性平台的开发框架,基于Thinkphp5.1+Adminlte3.0+Require.js。
EpiiAdmin EpiiAdmin php开源交互性管理后台框架,基于Thinkphp5.1+Adminlte3.0+Require.js, 让复杂的交互变得更简单!Phper快速搭建交互性平台的 ...
- SSM(SpringMVC+Spring+MyBatis)三大框架使用Maven快速搭建整合(实现数据库数据到页面进行展示)
本文介绍使用SpringMVC+Spring+MyBatis三大框架使用Maven快速搭建一个demo,实现数据从数据库中查询返回到页面进行展示的过程. 技术选型:SpringMVC+Spring+M ...
随机推荐
- 【资料分享】Xilinx Zynq-7010/7020工业评估板规格书(双核ARM Cortex-A9 + FPGA,主频766MHz)
1 评估板简介 创龙科技TLZ7x-EasyEVM是一款基于Xilinx Zynq-7000系列XC7Z010/XC7Z020高性能低功耗处理器设计的异构多核SoC评估板,处理器集成PS端双核ARM ...
- python3 模型日记
说明 作为一种 python 框架模型的记录吧,用于个人总结,不定时更新. 正文 1. 主进程退出后,子进程也跟着退出 之前遇到过一种情况,用 flet 写了一个页面,然后又同时开了一个 tcp se ...
- css 选择器优先级?
!important > 行内样式(比重1000)> ID 选择器(比重100) > 类选择器(比重10) > 标签(比重1) > 通配符 > 继承 > 浏览 ...
- Java 核心基础之static静态代码块和静态方法
static静态代码块和静态方法 static关键字 static修饰的方法或变量,优先于对象执行,所以内存会先有static修饰的内容,后有对象的内容 可以用来修饰类的成员方法.类的成员变量,还可以 ...
- yb课堂 课程总结
- mac电脑好用的工具总结
制作gif:https://gfycat.com/gifbrewery 制作gif(超级好用,制作速度快,压缩图片小):https://www.cockos.com/licecap/ 解压工具:htt ...
- Java-JSTL标签简化和替换jsp页面上的java代码
概念:JavaServer Pages Tag Library JSP标准标签库 作用:用于简化和替换jsp页面上的java代码 使用标签: 导入jstl相关jar包 引入标签库:taglib指令:& ...
- 解决方案 | 1分钟快速解决 win10 任务管理器性能不显示GPU?
1 问题 环境:win10 22h2 2 解决方法 win+r输入dxdiag回车,查看下面信息: (1)确认你的Windows10版本号大于1909,如果确认,在任务管理器进程页右键名称一栏,将GP ...
- Django日期字段默认值default=timezone.now
如果你确实希望默认值是当前日期和时间,Django 提供了一个方便的函数 django.utils.timezone.now 来实现这一目的. 你可以这样调整你的模型,以使用当前日期和时间作为默认值: ...
- 二分查找 | C++
以此题为例:P2249 [深基13.例1]查找 二分查找 对于一个单调不降的序列 \(S\),传统查找的复杂度是 \(O(|S|)\),即 \(O(n)\). 有时候序列 \(S\) 中的元素特别多, ...