
使用 UICollectionView 实现日历签到功能
概述
在 App 中,日历通常与签到功能结合使用。是提高用户活跃度的一种方式,同时,签到数据中蕴含了丰富的极其有价值的信息。下面我们就来看看如何在 App 中实现日历签到功能。
效果图
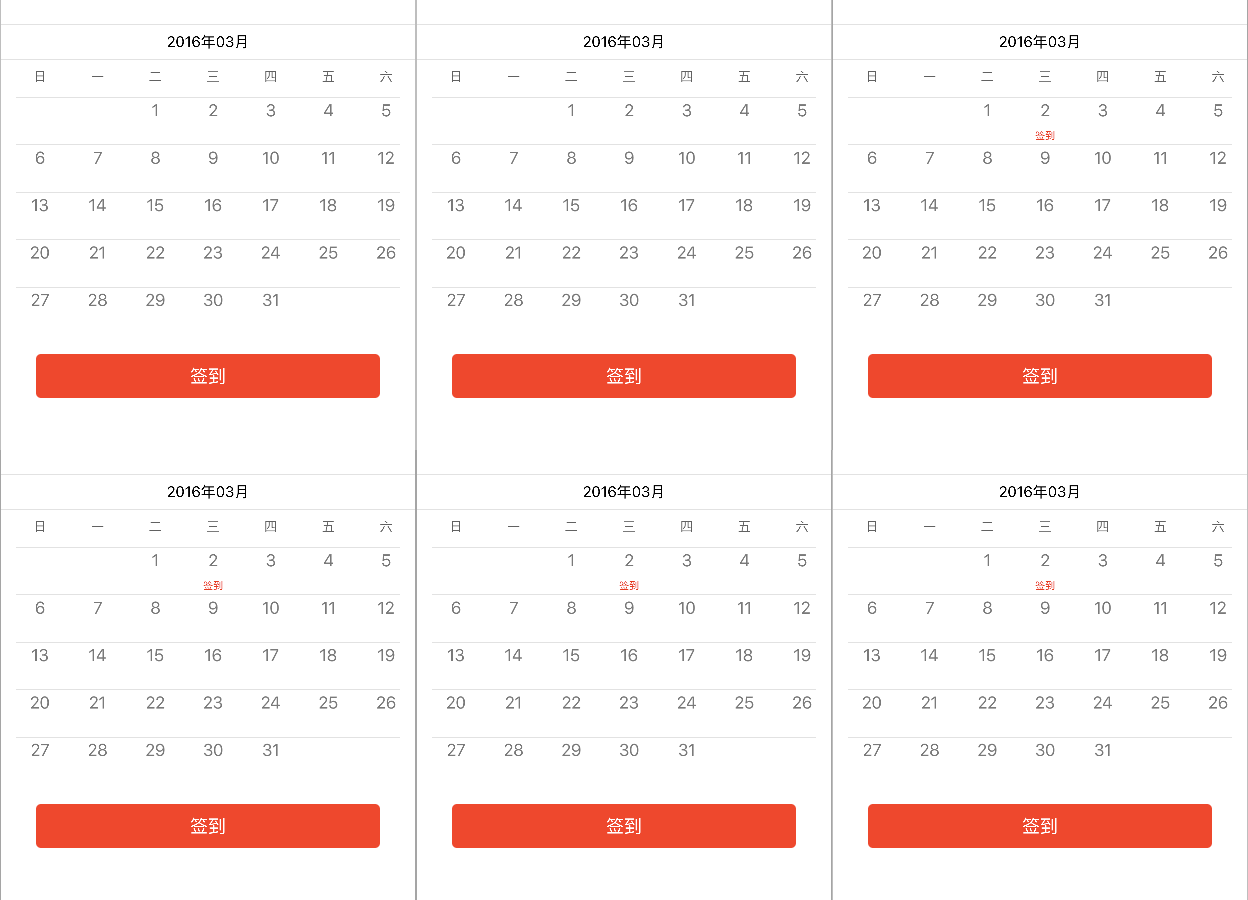
。。。。。
思路分析
实现日历签到功能的思路有很多种,这里我们就使用 UICollectionView 来实现具备签到功能的日历
- 基础知识
关于瀑布流(若你对 UICollectionView 及 UICollectionViewLayout 的知识不太了解,请参照以下文章)
关于布局(使用 CocoaPods 集成第三方框架 Masonry 进行界面布局,若你对 CocoaPods 的使用不太了解,请参照以下文章)
关于 pch 文件的配置方法,请参照以下文章
关于项目的文件结构
在应用开发过程中,我们通常会指定一定的文件结构,便于项目的开发和维护。该博客中的文件结构如图:
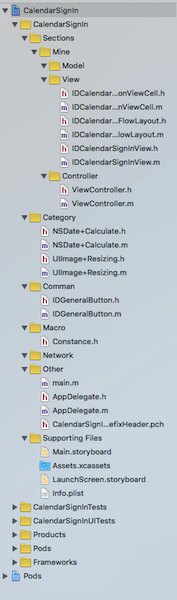
- 图中一级文件结构的的划分是按照应用的业务模块划分,如:
- Sections:应用的功能模块
- Network:应用的网络请求模块
- Common:应用中通用的文件,通常是自定义控件
- Macro:应用中的宏
- Category:应用中的分类
- Other:其他,如:Appdelegate,main,pch 等文件
- 图中二级文件结构的的划分是按照应用的功能模块划分,如:
- Mine:是一个项目中,通常具备的功能模块
- 图中三级级文件结构的的划分是按照 MVC 架构模式划分,如:
- Model
- View
- Controller
- 图中一级文件结构的的划分是按照应用的业务模块划分,如:
- 思路
- 显示“日历”所需要的数据(使用 NSDate 的分类提供)
- 当前月总共有多少天,即:“日历” CollectionView 中 Item 的数量
- 当前月中共有多少周,即:“日历” CollectionView 的行数
- 当前月中第一天在一周内的索引,即:实现“日历”中的每一天与周几信息对应
- 当天在当月中的索引(第几天),即:点击“签到”按钮时,通过索引找到“日历” CollectionView 中的 Item 更新 “签到”标签的状态
- “日历”布局(使用 IDCalendarCollectionViewFlowLayout 定义)
- 在这里使用自定义流水布局来设置 “日历” CollectionView 的布局(使用 frame 布局 每一个 Item)
- “日历” 控件
- 整个日历控件(IDCalendarSignInView)中封装了以下控件
- calendarDateView:显示日期,如:2016年03月
- calendarWeekdayView:显示周几信息,如:日 一 二 …… 六
- calendarCollectionView:显示日历
- seperatorView:分割线
- 子控件的布局
- 在这里,统一在 layoutSubviews 方法中布局子控件(此时获取到的 IDCalendarSignInView 控件的 frame 才是最终确定的)。这一个规范,尽量遵守,可以避免很多难以调试的 bug
- 整个日历控件(IDCalendarSignInView)中封装了以下控件
- 显示“日历”所需要的数据(使用 NSDate 的分类提供)
具体实现
声明
此部分主要阐述代码实现,代码中有详细的注释,若对以上思路不太理解,可以结合代码整理自己的思路由于篇幅限制,在这里,不再贴出应用实现的全部代码。若有需要的朋友,请联系我,我将提供完整的工程文件。感谢您的理解和支持,您的支持是我坚持下去最大的动力,真心的谢谢你们。以下是我的 Blog 地址:
提供显示“日历”所需要的数据( NSDate+Calculate 文件 )
获取当前月总共有多少天
+ (NSInteger)numberOfDaysInCurrentMonth {

    // 初始化日历

    NSCalendar *calendar = [[NSCalendar alloc] initWithCalendarIdentifier:NSCalendarIdentifierGregorian];

    // 获取系统当前日期

    NSDate *currentDate = [NSDate date];

    // 获取当前日期中当前月中天的范围

    NSRange range = [calendar rangeOfUnit:NSCalendarUnitDay inUnit:NSCalendarUnitMonth forDate:currentDate];

    // 得到当前月中总共有多少天(即范围的长度)

    NSInteger numberOfDaysInCurrentMonth = range.length;

    return numberOfDaysInCurrentMonth;

}
获取当前月中共有多少周
+ (NSInteger)numberOfWeeksInCurrentMonth {

    // 初始化日历

    NSCalendar *calendar = [[NSCalendar alloc] initWithCalendarIdentifier:NSCalendarIdentifierGregorian];

    // 获取系统当前日期

    NSDate *currentDate = [NSDate date];

    // 获取当前日期中当前月中周的范围

    NSRange range = [calendar rangeOfUnit:NSCalendarUnitWeekOfMonth inUnit:NSCalendarUnitMonth forDate:currentDate];

    // 得到当前月中总共有多少周(即范围的长度)

    NSInteger numberOfWeeksInCurrentMonth = range.length;

    return numberOfWeeksInCurrentMonth;

}
自定义流水布局( IDCalendarCollectionViewFlowLayout 文件 )
设置每一个 Item 的布局
/** 设置 indexPath 位置的 Item 的布局属性 */

- (UICollectionViewLayoutAttributes *)layoutAttributesForItemAtIndexPath:(NSIndexPath *)indexPath {

    // 获取 indexPath 位置的布局属性

    UICollectionViewLayoutAttributes *layoutAttributes = [UICollectionViewLayoutAttributes layoutAttributesForCellWithIndexPath:indexPath];

    // 计算每一个 Item 的 frame

    CGFloat collectionViewLeftPadding = self.collectionView.contentInset.left;

    CGFloat collectionViewRightPadding = self.collectionView.contentInset.right;

    // size

    CGFloat itemWidth = (self.collectionView.bounds.size.width - collectionViewLeftPadding - collectionViewRightPadding - 5*IDCalendarCollectionViewCellHerizontalMargin) / 7.0;

    CGFloat itemHeigh = self.collectionView.bounds.size.height / [NSDate numberOfWeeksInCurrentMonth];

    // origin

    CGFloat itemX = ((self.indexOfWeekForFirstDayInCurrentMonth + indexPath.item) % 7) * (itemWidth + IDCalendarCollectionViewCellHerizontalMargin);

    CGFloat itemY = ((self.indexOfWeekForFirstDayInCurrentMonth + indexPath.item) / 7) * itemHeigh;

    layoutAttributes.frame = CGRectMake(itemX, itemY, itemWidth, itemHeigh);

    // 返回 indexPath 位置的 Item 的布局属性

    return layoutAttributes;

}
自定义“日历” CollectionView 的 Cell( IDCalendarCollectionViewCell 文件 )
提供接口,用于控制签到标签的状态
/** 是否已经签到 */

@property (nonatomic, assign) BOOL haveSignedIn;

/** 重写 set 方法,用于更新 “签到” 标签的状态 */

- (void)setHaveSignedIn:(BOOL)haveSignedIn {

    _haveSignedIn = haveSignedIn;

    if (_haveSignedIn) {

        self.signInLabel.hidden = NO;

    } else {

        self.signInLabel.hidden = YES;

    }

}
添加子控件
- (instancetype)initWithFrame:(CGRect)frame {

    if (self = [super initWithFrame:frame]) {

        // 初始化 “日期数字” label,并添加到 cell 中

        self.dateLabel = [[UILabel alloc] init];

        self.dateLabel.textColor = [UIColor colorWithRed:122/255.0 green:122/255.0 blue:122/255.0 alpha:1.0];

        [self.contentView addSubview:self.dateLabel];

        // 初始化 “签到” label,并添加到 cell 中

        self.signInLabel = [[UILabel alloc] init];

        self.signInLabel.hidden = YES; // 默认隐藏“签到”标签

        self.signInLabel.textColor = [UIColor colorWithRed:228/255.0 green:49/255.0 blue:42/255.0 alpha:1.0];

        self.signInLabel.font = [UIFont systemFontOfSize:10];

        self.signInLabel.text = @"签到";

        [self.contentView addSubview:self.signInLabel];

    }

    return self;

}
自定义“日历签到”控件( IDCalendarSignInView 文件)
添加子控件
/** 设置 “日期” 部分 */

- (void)setupCalendarDateView {

    // 初始化 “日期” View,并添加到 IDCalendarSignInView

    self.calendarDateView = [[UIView alloc] init];

    [self addSubview:self.calendarDateView];

    // 初始化分割线 并添加到 “日期” View

    self.dateSeperatorView = [[UIView alloc] init];

    self.dateSeperatorView.backgroundColor = [UIColor colorWithRed:226/255.0 green:226/255.0 blue:226/255.0 alpha:1.0];

    [self.calendarDateView addSubview:self.dateSeperatorView];

    // 初始化日期 label 并添加到 “日期” View

    self.calendarDateLabel = [[UILabel alloc] init];

    self.calendarDateLabel.font = [UIFont systemFontOfSize:15];

    NSDate *currentDate = [NSDate date];

    NSDateFormatter *dateFormatter = [[NSDateFormatter alloc] init];

    dateFormatter.dateFormat = @"yyyy年MM月";

    NSString *dateString = [dateFormatter stringFromDate:currentDate];

    self.calendarDateLabel.text = dateString;

    [self.calendarDateView addSubview:self.calendarDateLabel];

}

/** 设置 “周几” 部分 */

- (void)setupCalendarWeekdayView {

    // 初始化 “日期” View,并添加到 IDCalendarSignInView

    self.calendarWeekdayView = [[UIView alloc] init];

    [self addSubview:self.calendarWeekdayView];

    // 初始化分割线 并添加到 “周几” View

    self.weekdaySeperatorView = [[UIView alloc] init];

    self.weekdaySeperatorView.backgroundColor = [UIColor colorWithRed:226/255.0 green:226/255.0 blue:226/255.0 alpha:1.0];

    [self.calendarWeekdayView addSubview:self.weekdaySeperatorView];

    // 初始化 “周几” label 并添加到 “周几” View

    NSArray *weekday = @[@"日", @"一", @"二", @"三", @"四", @"五", @"六"];

    for (NSInteger i = 0; i < 7; i++) {

        UILabel *weekDayLabel = [[UILabel alloc] initWithFrame:CGRectZero];

        weekDayLabel.textAlignment = NSTextAlignmentCenter;

        weekDayLabel.font = [UIFont systemFontOfSize:13];

        weekDayLabel.textColor = [UIColor colorWithRed:97/255.0 green:97/255.0 blue:97/255.0 alpha:1.0];

        weekDayLabel.text = weekday[i];

        // 将 “周几” 信息保存在成员变量中

        [self.weekdayLabelArray addObject:weekDayLabel];

        [self.calendarWeekdayView addSubview:weekDayLabel];

    }

}

/** 设置 “日历” 部分 */

- (void)setupCalendarCollectionView {

    // 设置 "日历" 的布局

    IDCalendarCollectionViewFlowLayout *flowLayout = [[IDCalendarCollectionViewFlowLayout alloc] init];

    flowLayout.headerReferenceSize = CGSizeMake(self.bounds.size.width, 20);

    // 初始化 “日历” CollectionView,设置相关属性,并添加到 IDCalendarSignInView

    self.calendarCollectionView = [[UICollectionView alloc] initWithFrame:CGRectZero collectionViewLayout:flowLayout];

    self.calendarCollectionView.backgroundColor = [UIColor whiteColor];

    self.calendarCollectionView.scrollEnabled = NO;

    self.calendarCollectionView.dataSource = self;

    self.calendarCollectionView.delegate = self;

    [self.calendarCollectionView registerClass:[IDCalendarCollectionViewCell class] forCellWithReuseIdentifier:IDCalendarCollectionViewCellIdentifier];

    [self addSubview:self.calendarCollectionView];

    // 初始化分割线 并添加到 “日历” View

    self.collectionViewSeperatorArray = [NSMutableArray array];

    for (NSInteger i = 0; i < [NSDate numberOfWeeksInCurrentMonth]; i++) {

        UIView *collectionViewSeperator = [[UIView alloc] initWithFrame:CGRectZero];

        collectionViewSeperator.backgroundColor = [UIColor colorWithRed:226/255.0 green:226/255.0 blue:226/255.0 alpha:1.0];

        [self.collectionViewSeperatorArray addObject:collectionViewSeperator];

        [self.calendarCollectionView addSubview:collectionViewSeperator];

    }

    // 设置“日历” View 的内边距

    self.calendarCollectionView.contentInset = UIEdgeInsetsMake(0, 15, 0, 15);

}
布局子控件
- (void)layoutSubviews {

    [super layoutSubviews];

    // “日期”

    [self.calendarDateView mas_makeConstraints:^(MASConstraintMaker *make) {

        make.leading.trailing.equalTo(self);

        make.top.equalTo(self.mas_top);

        make.height.offset(35);

    }];

    // “周几”

    [self.calendarWeekdayView mas_makeConstraints:^(MASConstraintMaker *make) {

        make.leading.trailing.equalTo(self);

        make.top.equalTo(self.calendarDateView.mas_bottom);

        make.height.offset(38);

    }];

    // “日历”

    [self.calendarCollectionView mas_makeConstraints:^(MASConstraintMaker *make) {

        make.top.equalTo(self.calendarWeekdayView.mas_bottom);

        make.leading.trailing.bottom.equalTo(self);

    }];

    // “日期” 部分的分割线

    [self.dateSeperatorView mas_makeConstraints:^(MASConstraintMaker *make) {

        make.leading.trailing.top.equalTo(self.calendarDateView);

        make.height.offset(1);

    }];

    // 周几信息

    for (NSInteger i = 0; i < 7; i++) {

        self.weekdayLabelArray[i].frame = CGRectMake(i * (self.calendarCollectionViewItemSize.width + 10) + 15, 0, self.calendarCollectionViewItemSize.width, 35);

    }

    // “周几” 部分的分割线

    [self.weekdaySeperatorView mas_makeConstraints:^(MASConstraintMaker *make) {

        make.leading.top.trailing.equalTo(self.calendarWeekdayView);

        make.height.offset(1);

    }];

    // “日历” 显示日期的 label

    [self.calendarDateLabel mas_makeConstraints:^(MASConstraintMaker *make) {

        make.centerX.centerY.equalTo(self.calendarDateView);

    }];

    // “日历” 部分的分割线

    for (NSInteger i = 0; i < [NSDate numberOfWeeksInCurrentMonth]; i++) {

        self.collectionViewSeperatorArray[i].frame = CGRectMake(0, i * self.calendarCollectionViewItemSize.height, [UIScreen mainScreen].bounds.size.width - 30, 1);

    }

}
提供“日历” CollectionView 的数据源
- (NSInteger)collectionView:(UICollectionView *)collectionView numberOfItemsInSection:(NSInteger)section {

    return [NSDate numberOfDaysInCurrentMonth];

}

- (UICollectionViewCell *)collectionView:(UICollectionView *)collectionView cellForItemAtIndexPath:(NSIndexPath *)indexPath {

    IDCalendarCollectionViewCell *cell = [collectionView dequeueReusableCellWithReuseIdentifier:IDCalendarCollectionViewCellIdentifier forIndexPath:indexPath];

    cell.numberTextInDateLabel = indexPath.item + 1;

    return cell;

}
“签到”按钮( IDConfirmButton 文件)
类似于“签到”按钮这样外观的按钮,是应用中比较常见的按钮,如:“确定”、“取消”按钮通常也是这种外观,通常我们将这样的按钮写成一个通用的空间,放到 Common 文件中
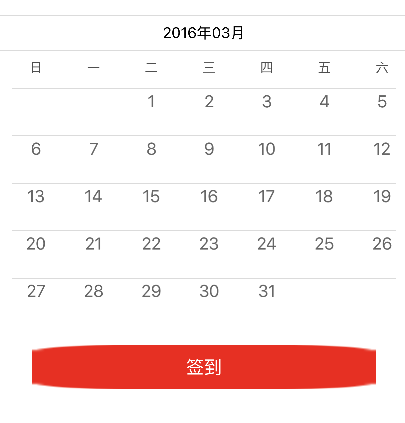
未指定拉伸区域时的效果
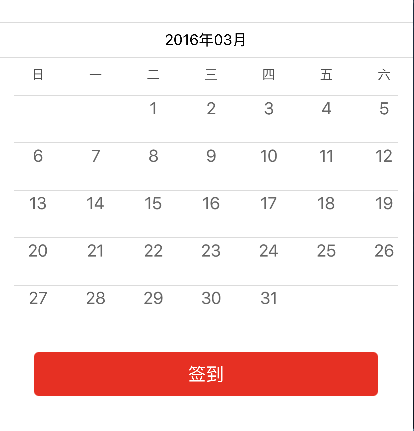
指定拉伸区域后的效果
自定义 IDConfirmButton
- (instancetype)initWithFrame:(CGRect)frame {

    if (self = [super initWithFrame:frame]) {

        [self setTitleColor:[UIColor whiteColor] forState:UIControlStateNormal];

        [self setBackgroundImage:[UIImage resizedImageWithName:@"btn_normal"] forState:UIControlStateNormal];

        [self setBackgroundImage:[UIImage resizedImageWithName:@"btn_highlight"] forState:UIControlStateHighlighted];

        [self setBackgroundImage:[UIImage resizedImageWithName:@"btn_disable"] forState:UIControlStateDisabled];

        self.layer.cornerRadius = 5.0;

        self.layer.masksToBounds = YES;

    }

    return self;

}
IDConfirmButton 的图片,若提供的图片的尺寸,不等于按钮的尺寸,图片就会被拉伸。当图片具有圆角是,拉伸后的图片通常不复合需求,所以我们需要指定图片的拉伸区域(UIImage+Resizing)
/** 返回一张图片,按指定方式拉伸的图片:width * 0.5 : height * 0.5 */

+ (UIImage *)resizedImageWithName:(NSString *)name {

    UIImage *image = [UIImage imageNamed:name];

    return [image stretchableImageWithLeftCapWidth:image.size.width * 0.5 topCapHeight:image.size.height * 0.5];

}
添加“日历签到”控件
将“日历签到”控件添加到控制器的 view 上
- (void)viewDidLoad {

    [super viewDidLoad];

    // 添加“日历签到”视图

    self.calendarSignInView = [[IDCalendarSignInView alloc] init];

    [self.view addSubview:self.calendarSignInView];

    // 添加“签到”按钮

    self.signInButton = [[IDConfirmButton alloc] init];

    [self.signInButton setTitle:@"签到" forState:UIControlStateNormal];

    [self.signInButton addTarget:self action:@selector(signInButtonClick:) forControlEvents:UIControlEventTouchUpInside];

    [self.view addSubview:self.signInButton];

}
点击“签到”按钮,更新签到标签的状态
- (void)signInButtonClick:(UIButton *)button {

    self.calendarSignInView.isSignInForToday = YES;

}
使用 UICollectionView 实现日历签到功能的更多相关文章
- PHP实现日历签到,并实现累计积分功能
在网站开发过程中我们会经常用到签到功能来奖励用户积分,或者做一些其他活动.这次项目开发过程中做了日历签到,因为没有经验所有走了很多弯路,再次记录过程和步骤. 1.日历签到样式:使用的是calendar ...
- Redis位图实现用户签到功能
场景需求 适用场景如签到送积分.签到领取奖励等,大致需求如下: 签到1天送1积分,连续签到2天送2积分,3天送3积分,3天以上均送3积分等. 如果连续签到中断,则重置计数,每月初重置计数. 当月签到满 ...
- 基于Redis位图实现用户签到功能
场景需求 适用场景如签到送积分.签到领取奖励等,大致需求如下: 签到1天送1积分,连续签到2天送2积分,3天送3积分,3天以上均送3积分等. 如果连续签到中断,则重置计数,每月初重置计数. 当月签到满 ...
- php+mysql+jquery日历签到
在网站开发过程中我们会经常用到签到功能来奖励用户积分,或者做一些其他活动.这次项目开发过程中做了日历签到,因为没有经验所有走了很多弯路,再次记录过程和步骤. 1.日历签到样式: 2.本次签到只记录本月 ...
- Redis实战篇(二)基于Bitmap实现用户签到功能
很多应用上都有用户签到的功能,尤其是配合积分系统一起使用.现在有以下需求: 签到1天得1积分,连续签到2天得2积分,3天得3积分,3天以上均得3积分等. 如果连续签到中断,则重置计数,每月重置计数. ...
- SharePoint 2013 日历重叠功能简介
之前做了一个“SharePoint 2013 日历根据Category显示不同颜色”,然后大家留言说为什么不用SharePoint自带的日历重叠功能,所以自己尝试一下这个功能,和之前的博客进行一下对比 ...
- (三)开始在OJ上添加签到功能
在了解完OJ文件下的各个文件夹的主要作用后,我们开始往里面添加东西(其实只要知道各文件夹是干什么的后,添加东西也变得非常简单了) 一 在数据库中添加对应功能的字段. 我们这个学期才刚开数据库这门课,所 ...
- TP5实现签到功能
基于tp5 模型的一个签到功能: 由于存储所有的签到日期数据库会非常庞大,所以签到日期只存储近三个月的. 具体功能: 1.记录最近一次的签到时间 2.每次签到都会添加15积分 3.有连续签到的记录 C ...
- 使用flask搭建微信公众号:实现签到功能
终于到了实战阶段.用微信公众号实现一个简单的签到功能. 前情提要: 微信公众号token验证失败 使用flask搭建微信公众号:完成token的验证 使用flask搭建微信公众号:接收与回复消息 程序 ...
随机推荐
- 读《linux内核完全注释》的FAQ
以下只是个人看了<linux内核完全注释>的一点理解,如果有错误,欢迎指正! 1 eip中保存的地址是逻辑地址.线性地址还是物理地址? 这个应该要分情况.eip保存的是下一条要执行的指令地 ...
- 安装ClouderaManager以及使用ClouderaManager安装分布式集群的若干细节
目录 前言 整体介绍 分步安装介绍 总结 一.前言 周末干了近四十个小时中间只休息了五个小时终于成功安装了ClouderaManager以及分布式集群,其中各种辛酸无以言表,唯有泪两行. ...
- 项目总结---- imageLoder 的2个Bug解决方法、1.9.4如何选择性删除disk缓存和其它一些错误。
我们不说废话,直接入主题,抓紧时间写完,好继续找bug... (PS:imageLoder的bug 百度不到的哦,不过我坚信我的观点没错) 版本1.9.2,1.9.4我没测试 1,imageLoder ...
- 1Z0-053 争议题目解析134
1Z0-053 争议题目解析134 考试科目:1Z0-053 题库版本:V13.02 题库中原题为: 134.You are managing an Oracle Database 11g datab ...
- MVC发布后项目存在于根目录中的子目录中时的css与js、图片路径问题
加载固定资源js与css <script src="@Url.Content("~/Scripts/js/jquery.min.js")" type=&q ...
- JavaScriptSerializer 序列化json 时间格式
利用JavaScriptSerializer 序列化json 时间格式,得到的DateTime值值显示为“/Date(700000+0500)/”形式的JSON字符串,显然要进行转换 1.利用字符串直 ...
- JavaScript的三种工业化调试方法
JavaScript的三种工业化玩法 软件工程中任何的语言如果想要写出健壮的代码都需要锋利的工具,当然JavaScript也不例外,很多朋友刚入门的时候往往因为工具选的不对而事半功倍,JavaScri ...
- jQuery-1.9.1源码分析系列(十六)ajax——响应数据处理和api整理
ajax在得到请求响应后主要会做两个处理:获取响应数据和使用类型转化器转化数据 a.获取响应数据 获取响应数据是调用ajaxHandleResponses函数来处理. ajaxHandleRespon ...
- linux下命令行操作快捷键及技巧
历史相关命令 !!:执行上一条命令 !num:执行历史命令中第num条命令 !-num:执行历史命令中倒数第num条命令 !?string?:执行最近一条包含有string字符串的命令 Ctrl+ ...
- LINQ to SQL语句(11)之Update
说明:更新操作,先获取对象,进行修改操作之后,直接调用SubmitChanges()方法即可提交.注意,这里是在同一个DataContext中,对于不同的DataContex看下面的讲解. 1.简单形 ...