
GITlab安装、使用及新项目推送到gitlab
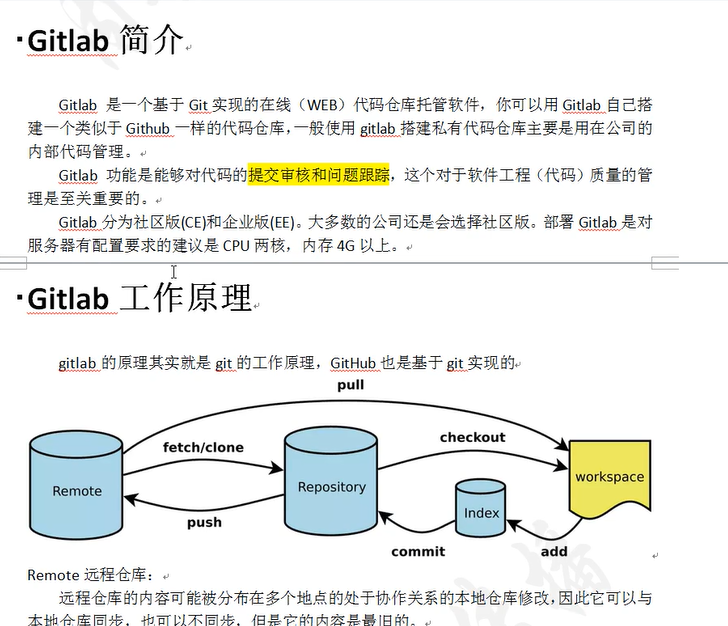
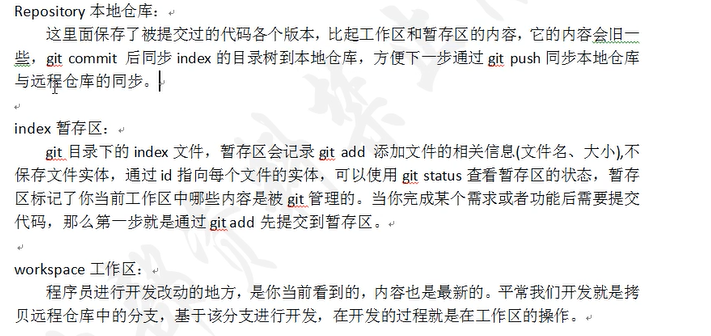


====================================================================================================
GITlab环境部署
| 角色 | IP | 内存 |
| gitlab01 | 192.168.200.112 | 4G |
| git-client | 192.168.200.113 | 1G |
关闭防火墙和selinux
[root@localhost ~]# hostname gitlab01
[root@localhost ~]# bash
[root@gitlab01 ~]# systemctl stop firewalld
[root@gitlab01 ~]# iptables -F
[root@gitlab01 ~]# setenforce 0
安装依赖包并设置开机自启
[root@gitlab01 ~]# yum install curl openssh-server openssh-client postfix cronie policycoreutils-python -y
[root@gitlab01 ~]# systemctl start postfix
[root@gitlab01 ~]# systemctl enable postfix
上传并解压gitlab源码包
[root@gitlab01 ~]# ls
gitlab-ce-11.11.3-ce.0.el7.x86_64.rpm
[root@gitlab01 ~]# rpm -ivh gitlab-ce-11.11.3-ce.0.el7.x86_64.rpm
_______ __ __ __
/ ____(_) /_/ / ____ _/ /_
/ / __/ / __/ / / __ `/ __ \
/ /_/ / / /_/ /___/ /_/ / /_/ /
\____/_/\__/_____/\__,_/_.___/
Thank you for installing GitLab!
GitLab was unable to detect a valid hostname for your instance.
Please configure a URL for your GitLab instance by setting `external_url`
configuration in /etc/gitlab/gitlab.rb file.
修改配置文件/etc/gitlab/gitlab.rb 生产环境可以跟据需求修改
[root@gitlab01 ~]# vim /etc/gitlab/gitlab.rb
修改13行: external_url 'http://192.168.200.112'
重新加载配置文件
[root@gitlab01 ~]# gitlab-ctl reconfigure
[root@gitlab01 ~]# gitlab-ctl restart
[root@gitlab01 ~]# netstat -lnpt | grep 80
tcp 0 0 0.0.0.0:80 0.0.0.0:* LISTEN 13077/nginx: master
tcp 0 0 0.0.0.0:8060 0.0.0.0:* LISTEN 13077/nginx: master
测试:浏览器输入192.168.200.112进入网站
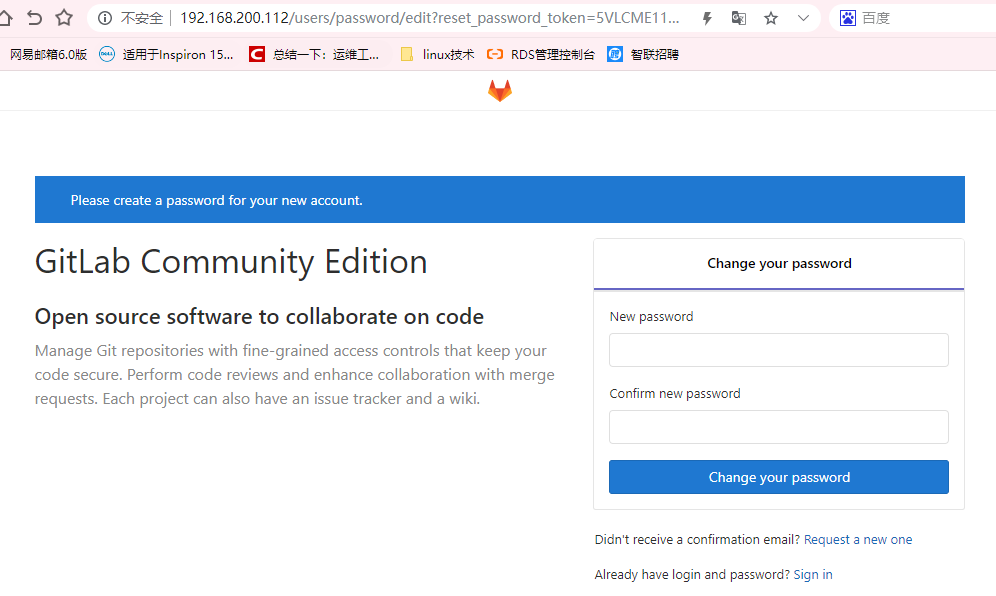
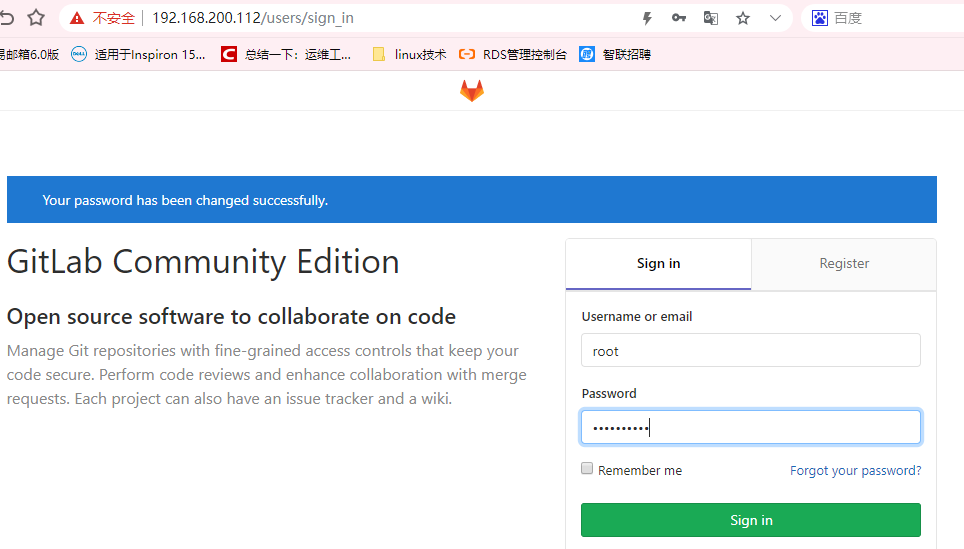

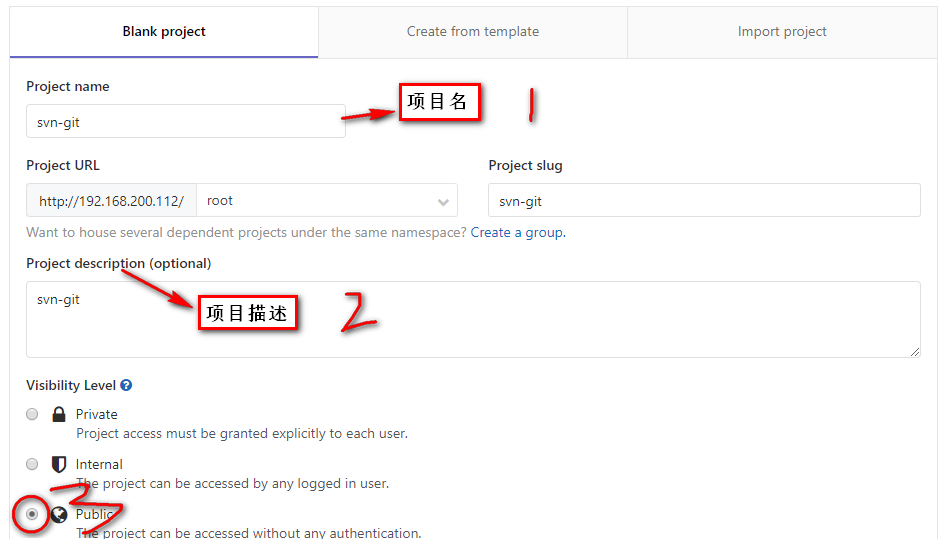
- Private 私有项目,只有自己或者项目组内的人才能访问
- Internal 所有登录的用户都能访问
- Public 公开的,任何人都能访问
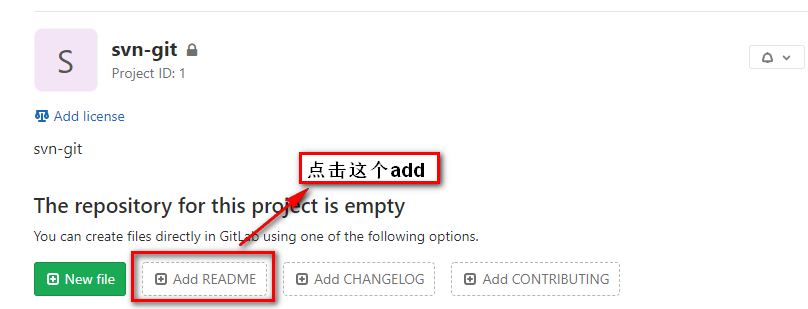


113客户端操作:
[root@svn ~]# hostname git-client
[root@svn ~]# bash
[root@git-client ~]# systemctl stop firewalld
[root@git-client ~]# iptables -F
[root@git-client ~]# setenforce 0
[root@git-client ~]# rz
[root@git-client ~]# ls
git-2.22.0.tar.gz
[root@git-client ~]#yum install curl-devel expat-devel gettext-devel openssl-devel zlib-devel autoconf gcc gcc-c++ make -y
[root@git-client ~]# tar xf git-2.22.0.tar.gz -C /usr/src
[root@git-client ~]# cd /usr/src/git-2.22.0/
[root@git-client git-2.22.0]# make configure
[root@git-client git-2.22.0]# ./configure --prefix=/usr/local/git && make && make install
[root@git-client git-2.22.0]# ln -sf /usr/local/git/bin/git /usr/bin
[root@git-client git-2.22.0]# git --version
git version 2.22.0
[root@git-client git-2.22.0]# git config --global user.name "crushlinux"
[root@git-client git-2.22.0]# git config --global user.email "crushlinux@163.com"
[root@git-client git-2.22.0]# git config --global color.ui true
[root@git-client git-2.22.0]# git config --list
user.name=crushlinux

user.email=crushlinux@.com

color.ui=true
将112中gitlab的代码进行克隆到113gitlab上:
[root@gitclient ~]# git clone http://192.168.200.111/root/svn-git.git
正克隆到 'svn-git'...
remote: Enumerating objects: 3, done.
remote: Counting objects: 100% (3/3), done.
remote: Total 3 (delta 0), reused 0 (delta 0)
展开对象中: 100% (3/3), 完成.
[root@gitclient ~]# ls
svn-git
git-2.22.0.tar.gz
[root@gitclient git_data]# cd
[root@gitclient ~]# cd svn-git/
[root@gitclient svn-git]# ls
README.md
[root@gitclient svn-git]# cat README.md
svn git file [root@gitclient svn-git]#
===================================================================================================
新项目推送到gitlab实践
gitlab前面已经搭建好了,如果我们想用把代码上传到gitlab仓库上的话,先要新建一个项目仓库。然后本地安装git环境,就可以提交了。
新建一个新项目仓库

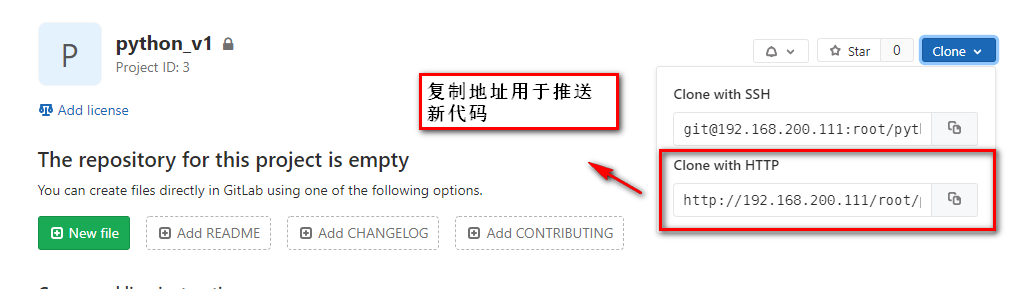
新建一个本地文件夹,cd进去,然后 init建仓
[root@jenkins ~]# cd git_data/
[root@jenkins git_data]# git init
已初始化空的 Git 仓库于 /root/git_data/.git/
[root@jenkins git_data]# pwd
/root/git_data
新建项目文件名
[root@jenkins git_data]# vim one.py
#这是一个pyhton开发的文件代码

#:wq保存退出

print('hello world!')
[root@jenkins git_data]# ls
one.py
提交代码到本地仓库git add * (*是提交当前文件夹下全部的,也可以指定提交一个文件如:one.py)
[root@jenkins git_data]# git add one.py
查看仓库状态 git status
[root@jenkins git_data]# git status
位于分支 master
尚无提交
要提交的变更:
(使用 "git rm --cached <文件>..." 以取消暂存)
新文件: one.py
代码提交到缓存区 git commit -m "描述"
[root@jenkins git_data]# git commit -m '这是python代码' one.py
[master(根提交) 0a28aca] 这是python代码
1 file changed, 4 insertions(+)
create mode 100644 one.py
提交到远程仓库
[root@jenkins git_data]# git remote add origin http://192.168.200.111/root/python.git
最后一步push推送过去,push的时候,会让你输入账号和密码,这里的用户名和密码就是gitlab上注册的用户了
[root@jenkins git_data]# git push -u origin master
Username for 'http://192.168.200.111': root
Password for 'http://root@192.168.200.111':
remote: HTTP Basic: Access denied
fatal: 'http://192.168.200.111/root/python.git/' 鉴权失败
[root@jenkins git_data]# git push -u origin master
Username for 'http://192.168.200.111': root
Password for 'http://root@192.168.200.111':
枚举对象: 3, 完成.
对象计数中: 100% (3/3), 完成.
压缩对象中: 100% (2/2), 完成.
写入对象中: 100% (3/3), 304 bytes | 304.00 KiB/s, 完成.
总共 3 (差异 0),复用 0 (差异 0)
To http://192.168.200.111/root/python.git
* [new branch] master -> master
分支 'master' 设置为跟踪来自 'origin' 的远程分支 'master'。
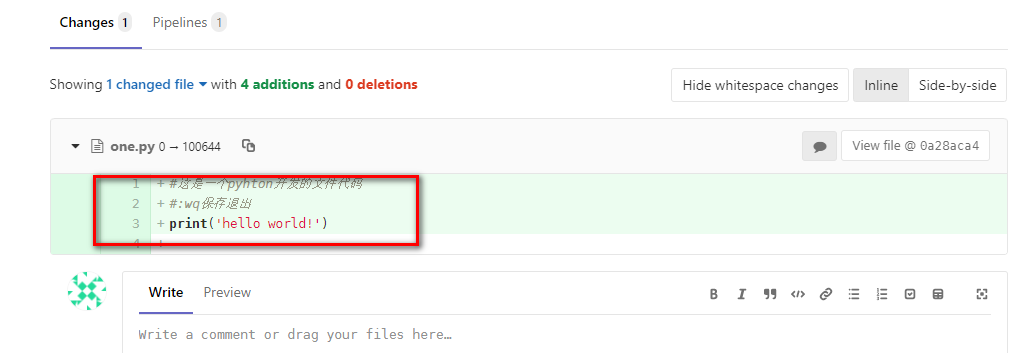
gitlab查看推送结果

GITlab安装、使用及新项目推送到gitlab的更多相关文章
- git使用:本地项目推送到gitlab
背景:目前公司用gitlab管理我们的项目,经常遇到的问题是,我会在其他已有项目上直接进行修改,然后用于新项目的自动化测试,但是本地推送到gitlab的时候每次都要重新查询一遍怎么操作,特意写下这篇文 ...
- 将本地项目推送至gitee或者github
将本地项目推送到Git github上的版本和本地版本冲突的解决方法 初始化项目时,在git中新建项目. 在Github中创建了一个Repository之后,会给你列出如何将自己本地项目Push到Gi ...
- 如何将git本地创建的项目推送到github仓库
除了集中式的版本控制系统CVS和SVN外,还有目前世界上最先进的分布式版本控制系统Git,它的创始人是创建了linux的大神 - linus.GitHub网站与2008年开始服役,为开源项目免费提供G ...
- 使用tortoise git将一个现有项目推送到远程仓库
一.安装文件: 1.git https://git-scm.com/downloads 2.tortoise git https://tortoisegit.org/download/ 二.将一个现有 ...
- 如何将本地项目推送到码云仓库或者GitHub仓库
将本地项目推送到码云仓库. 前提: git 和码云 1.在码云上先创建一个仓库. 2.在要被上传的项目的目录右键, 选择 Git Bash Here. 3.在窗口输入命令: git init 这时 ...
- Django项目: 项目环境搭建 ---- 三、在码云平台创建项目&推送到码云上
三.在码云平台创建项目 git服务平台: 主要使用github(最主流) 国内访问速度慢 托管私有项目收费 国内一般使用码云gitee 国内访问速度快 托管私有项目免费(限制开发人数) 公司中使用gi ...
- 如何将本地项目推送到Github
如何将本地项目推送到Github Tip:在本地要安装好Git,官网:https://git-scm.com/ 一个学习Git的好地方:https://try.github.io/ 在线闯关实战,边练 ...
- 将本地的项目推送到github上
好像还是不能用git在本地直接建一个repository,然后推送到github,这是把本地项目推送到github上已经建好的裤 …or create a new repository on the ...
- TortoiseGit学习系列之TortoiseGit基本操作将提交到本地的项目推送到在线仓库(图文详解)
前面博客 TortoiseGit学习系列之TortoiseGit基本操作克隆项目(图文详解) TortoiseGit学习系列之TortoiseGit基本操作修改提交项目(图文详解) TortoiseG ...
随机推荐
- linux - redis-trib.rb 命令详解
参考网站 http://www.cnblogs.com/ivictor/p/9768010.html 简介 redis-trib.rb是官方提供的Redis Cluster的管理工具,无需额外下载,默 ...
- Linux C/C++ 字符串逆序
/*字符串逆序*/ #include <stdio.h> #include <string.h> void nixu(char *str) { ; char tmp; for( ...
- 杭电oj 2072————统计单词数(java)
problem:统计单词数 思路:利用HashMap的特性——不能反复存储同一个键得数据,所以可以保证map里边儿的元素都是不重复的,存储完毕之后直接输出size就好了 注意事项: 1.利用strin ...
- java简单学生成绩管理系统
题目要求: 一. 数据结构要求:(5 分) 1.定义 ScoreInformation 类,其中包括七个私有变量(stunumber, name, mathematicsscore, englishi ...
- 2017-12-08 违法数据筛选.sql
SELECT R. ID, R.LKBH, R.CDBH, R.FXBH, R.ZJBH, R.SBBH, R.CPHM, R.CPYSBH, R.CPYS, R.CSYSBH, R.CSYS, R. ...
- lvm磁盘扩容
LVM实现新挂载磁盘扩容到原有目录 #查看磁盘 fdisk -l #创建pv pvcreate /dev/sdb [root@VM-67-49 ~]# pvcreate /dev/sdb Physic ...
- MyBatis 逆向工程——根据数据表自动生成model、xml映射文件、mapper接口
MyBatis Generator(MBG)的使用 MBG可以根据数据表生成对应的model.xml映射文件.mapper接口,只是简单的生成,还需要根据需求修改. 1.下载jar包 https:// ...
- 《CSS揭秘》》
1,透明边框 默认状态下,背景会延伸到边框区域的下层.这样就在半透明的黑色边框中透出了这个容器自己的纯白色背景. 谢天谢地,从w3c的背景与边框第三版开始,我们可以通过 background-clip ...
- foreach中如何取全部长度的值
foreach($data as $num=>$key ){ return $num; } 关键就是这个$num;
- JavaScript 开胃菜
注释 单行注释:// 快捷键: CTRL + / 多行注释: /* 内容 */ 快捷键: ctrl + shift + / 变量 申明变量 var name; 赋值 name = 'peach'; 初 ...