python_进程与线程的补充
进程与线程的标识
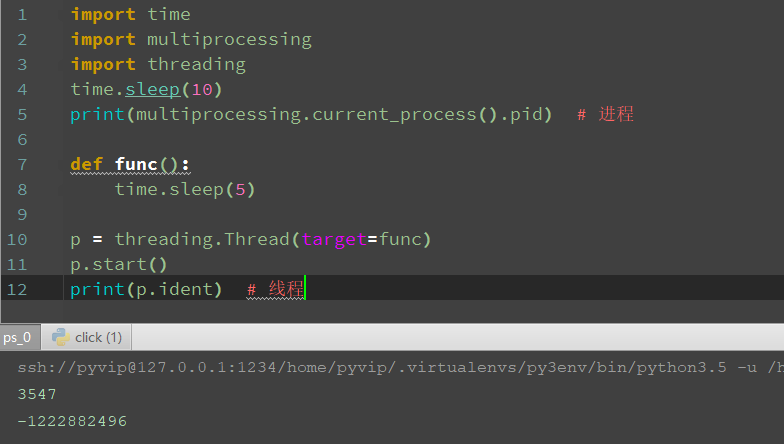
知识点一:进程id 与 线程ident
import time

import multiprocessing

import threading

time.sleep(10)

print(multiprocessing.current_process().pid)  # 进程

def func():

    time.sleep(5)

p = threading.Thread(target=func)

p.start()

print(p.ident)  # 线程
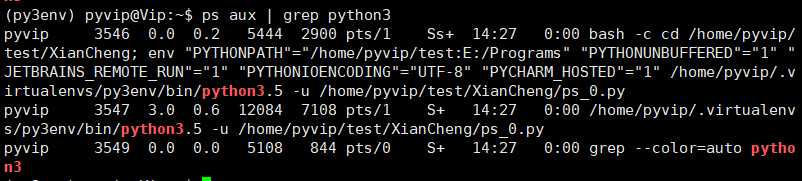
xshell
ps aux | grep python3
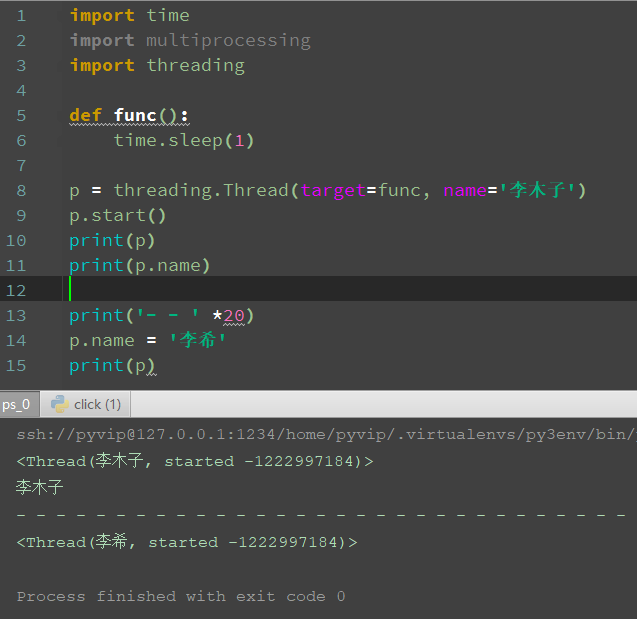
知识点二:进程名 与 线程名
import time

import multiprocessing

import threading

def func():

    time.sleep(1)

p = threading.Thread(target=func, name='李木子')

p.start()

print(p)

print(p.name)

print('- - ' *20)

p.name = '李希'

print(p)
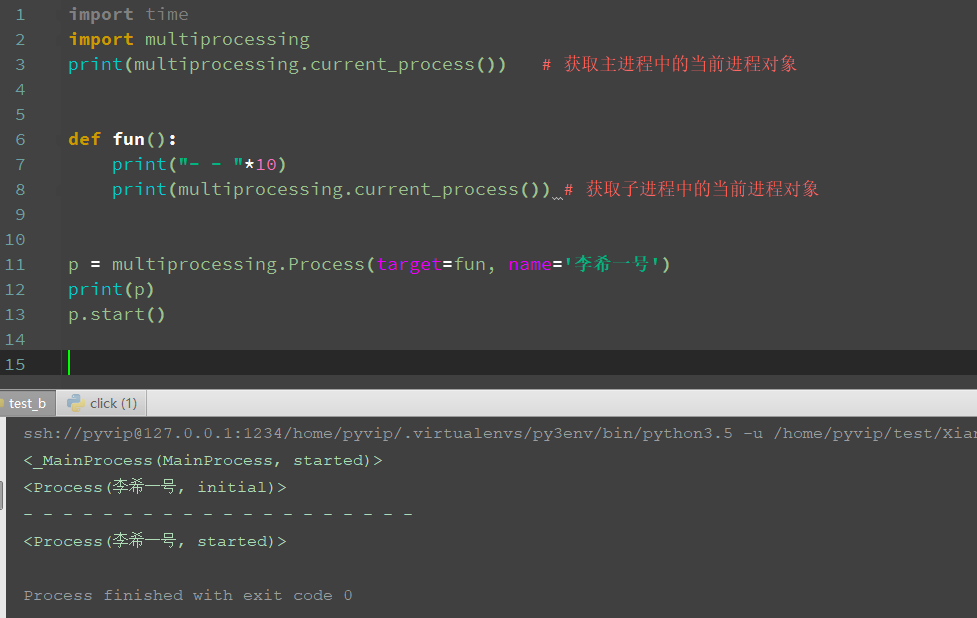
知识点三:获取当前线程/进程信息
提示!
可以在任何一个进程或者线程里搞清楚自己是谁
import time

import multiprocessing

print(multiprocessing.current_process())   # 获取主进程中的当前进程对象

def fun():

    print("- - "*10)

    print(multiprocessing.current_process()) # 获取子进程中的当前进程对象

p = multiprocessing.Process(target=fun, name='李希一号')

print(p)

p.start()
进程与线程的其余相关操作
知识点一:等待结束
等待进程或线程结束
提示!进程和线程是一样的同学们课后自己尝试
import time

import multiprocessing

print("外层start", time.asctime())

def func():

    print("里层start", time.asctime())

    time.sleep(5)

    print("里层end", time.asctime())

p = multiprocessing.Process(target=func)

p.start()

time.sleep(5)

print("外层end", time.asctime())
可以看到,并行结果,主子同时进行

加上join,等待子进程结束,再执行主进程
import time

import multiprocessing

print("外层start", time.asctime())

def func():

    print("里层start", time.asctime())

    time.sleep(5)

    print("里层end", time.asctime())

p = multiprocessing.Process(target=func)

p.start()

p.join()  # 主进程 等待子进程结束

time.sleep(5)

print("外层end", time.asctime())

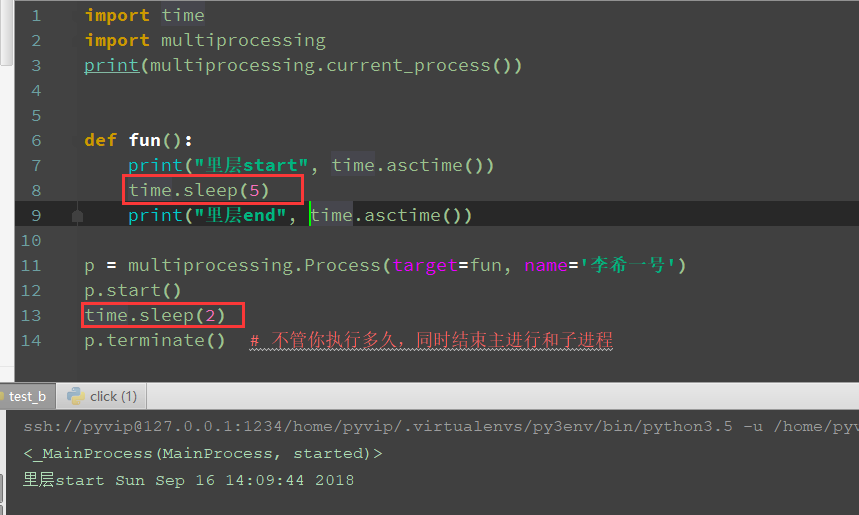
中止进程
注意!线程并不能被中途中止只能等待其运行结束
import time

import multiprocessing

print(multiprocessing.current_process())

def fun():

    print("里层start", time.asctime())

    time.sleep(5)

    print("里层end", time.asctime())

p = multiprocessing.Process(target=fun, name='李希一号')

p.start()

time.sleep(2)

p.terminate()  # 不管你执行多久,同时结束主进行和子进程
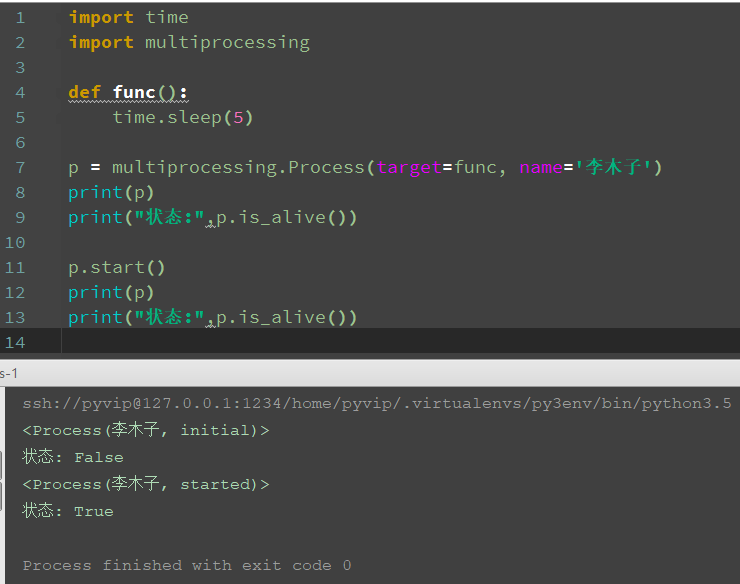
进程与线程的生存与状态
import time

import multiprocessing

def func():

    time.sleep(5)

p = multiprocessing.Process(target=func, name='李木子')

print(p)

print("状态:",p.is_alive())

p.start()

print(p)

print("状态:",p.is_alive())
守护模式
提示!多线程中的守护线程与守护进程类似
通俗的讲,皇帝死后(主进程),妃子陪葬(子进程)
import time

import multiprocessing

def func():

    print('start')

    time.sleep(5)

    print('end')

p = multiprocessing.Process(target=func, daemon=True)  # 设置守护进程

p.start()

time.sleep(2)

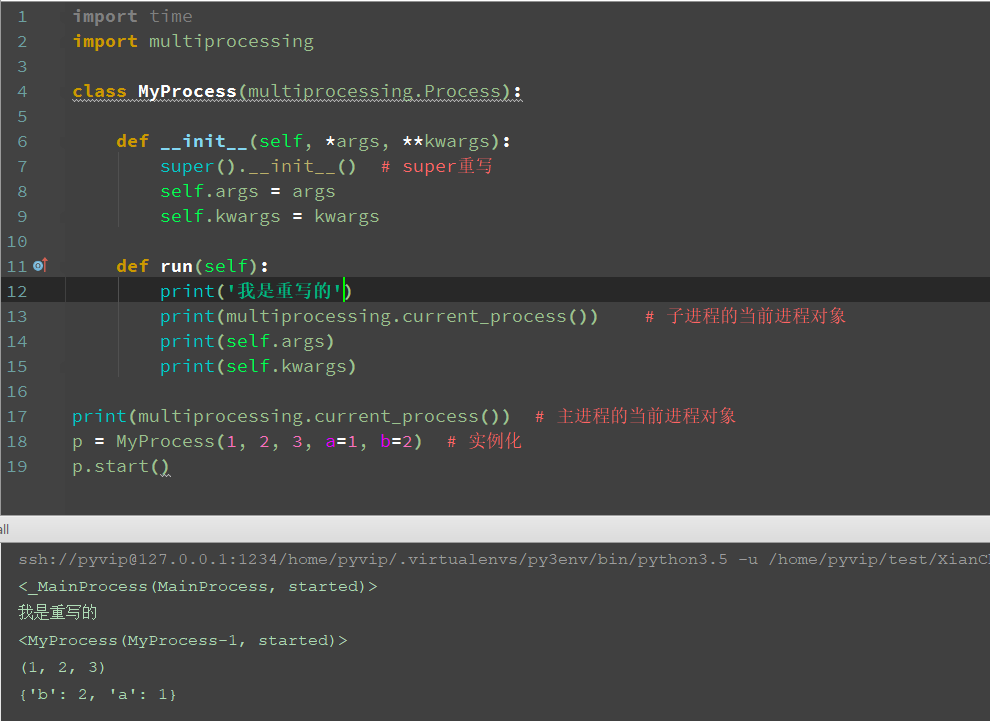
以面向对象的形式使用进程与线程
面向对象使用线程/进程
步骤一: 继承 Process或Thread 类
步骤二: 重写 __init__方法
步骤三: 重写 run方法
import time

import multiprocessing

class MyProcess(multiprocessing.Process):

    def __init__(self, *args, **kwargs):

        super().__init__()  # super重写

        self.args = args

        self.kwargs = kwargs

    def run(self):

        print('我是重写的')

        print(multiprocessing.current_process())    # 子进程的当前进程对象

        print(self.args)

        print(self.kwargs)

print(multiprocessing.current_process())  # 主进程的当前进程对象

p = MyProcess(1, 2, 3, a=1, b=2)  # 实例化

p.start()
面向对象使用的思路

用面向对象的方式来实现多线程并发服务器
import time

import socket

import threading

server = socket.socket()

server.bind(('0.0.0.0', 8888))

server.listen()

class MyThread(threading.Thread):

    def __init__(self, conn):

        super().__init__()  # super重写

        self.conn = conn

        print(self.conn)

    def run(self):

        while True:

            data = self.conn.recv(1024)

            if data == b'':

                self.conn.close()

                break

            else:

                print("接收到的消息: {}".format(data.decode()))

                self.conn.send(data)

while True:

    conn, addr = server.accept()

    print("{}正在连接".format(addr))

    p = MyThread(conn)  # 实例化

    p.start()
客户端:
import socket

click = socket.socket()

click.connect(('127.0.0.1', 8888))

while True:

     data = input("请输入你要发送的数据:")

     click.send(data.encode())

     print("接收到的消息: {}".format(click.recv(1024).decode()))
总结完毕!
作者:含笑半步颠√
博客链接:https://www.cnblogs.com/lixy-88428977
声明:本文为博主学习感悟总结,水平有限,如果不当,欢迎指正。如果您认为还不错,欢迎转载。转载与引用请注明作者及出处。
python_进程与线程的补充的更多相关文章
- Python_进程、线程及协程
一.Python进程 IO密集型----多线程 计算密集型----多进程 1.单进程 from multiprocessing import Process def foo(i): print('你好 ...
- Python_进程process 与 线程thread
进程process 与 线程thread 的区别 各个进程独立使用内存空间,(默认)不可互相访问,线程共享内存 进程的子进程是复制一份父进程,线程没有
- java并发编程:进程和线程
java并发编程涉及到很多内容,当然也包括多线程,再次补充点相关概念 原文地址:http://www.cnblogs.com/dolphin0520/p/3910667.html 一.操作系统中为什么 ...
- Python-Cpython解释器支持的进程与线程-Day9
Cpython解释器支持的进程与线程 阅读目录 一 python并发编程之多进程 1.1 multiprocessing模块介绍 1.2 Process类的介绍 1.3 Process类的使用 1.4 ...
- concurrent.futures模块(进程池/线程池)
需要注意一下不能无限的开进程,不能无限的开线程最常用的就是开进程池,开线程池.其中回调函数非常重要回调函数其实可以作为一种编程思想,谁好了谁就去掉 只要你用并发,就会有锁的问题,但是你不能一直去自己加 ...
- top命令查看进程下线程信息以及jstack的使用
转自:https://www.cnblogs.com/shengulong/p/8513652.html top -Hp pid可以查看某个进程的线程信息 -H 显示线程信息,-p指定pid jsta ...
- python---基础知识回顾(十)进程和线程(进程)
前戏:进程和线程的概念 若是学过linux下的进程,线程,信号...会有更加深刻的了解.所以推荐去学习下,包括网络编程都可以去了解,尤其是对select,poll,epoll都会有更多的认识. 进程就 ...
- Python之路【第十一篇】: 进程与线程
阅读目录 一. cpython并发编程之多进程1.1 multiprocessing模块介绍1.2 Process类的介绍1.3 Process类的使用1.4 进程间通信(IPC)方式一:队列1.5 ...
- windows中的进程和线程
今天咱们就聊聊windows中的进程和线程 2016-09-30 在讨论windows下的进程和线程时,我们先回顾下通用操作系统的进程和线程.之所以称之为通用是因为一贯的本科或者其他教材都是这么说的: ...
随机推荐
- gethostname、gethostbyname
gethostname():返回本地主机的标准主机名 原型: #include<unistd.h> int gethostname(char *name, size_t len); 参数说 ...
- java自动化配置工具 - autoconfig 简介
对于java程序员来说各种各样的配置文件是司空见惯的,比如spring的bean配置,struts的action配置等等.有些配置会随着运行环境的变化而各不相同,最典型的就是jdbc驱动的配置,在开发 ...
- Gamma阶段第四次scrum meeting
每日任务内容 队员 昨日完成任务 明日要完成的任务 张圆宁 #91 用户体验与优化https://github.com/rRetr0Git/rateMyCourse/issues/91(持续完成) # ...
- OpenStack创建网络和虚拟机、dhcp设备、虚拟路由器、虚拟机访问外网原理分析
创建网络和虚拟机流程: 1.创建网络和子网 背后发生了什么: Neutron让控制节点上针对此子网的dhcp(虚拟设备)启动,用于给该子网下的实例分配ip 2.生成虚拟机 背后发生了什么: 用户通过G ...
- DNS基本操作详解
在很多人看来,DNS只是为外部提供DNS解析服务(我以前也是这么认为的,直到膝盖中了一箭),但作为互联网的基础设施,DNS远没有想象的那么简单.如果你没有听说过DNS查询.反向解析.zone传输.动态 ...
- CandyCrush 糖果传奇源码+素材+教程
在这里你将深入学习C#语言和Unity开发游戏的技术.在游戏项目开发中深入学习并掌握Unity开发中的刚体,模型等等 共14讲,TS格式,大小395MB 共14讲,TS格式,大小395MB 扫码时备注 ...
- linux 下nc 命令的使用
linux 下nc 命令的使用 https://blog.51cto.com/samyubw/555247
- thymeleaf和freemarker比较
http://freemarker.cn/archives/168.html https://www.zhihu.com/question/64039553/answer/215942472 http ...
- 【PHP】php实现二进制、八进制、十进制、十六进制之间各自转换的函数
<?php /* 常见的进制: 二进制 binary -----> bin 八进制 octal -----> oct 十进制 decimal -----> dec 十六进制 h ...
- 【Swoole】计一次swoole_server配合laravel5启动报错:Address already in use[98]
[2019-11-11 11:42:25 @21371.0] WARNING swSocket_bind(:434): bind(0.0.0.0:9501) failed, Error: Addre ...