全栈项目|小书架|微信小程序-书籍详情功能实现
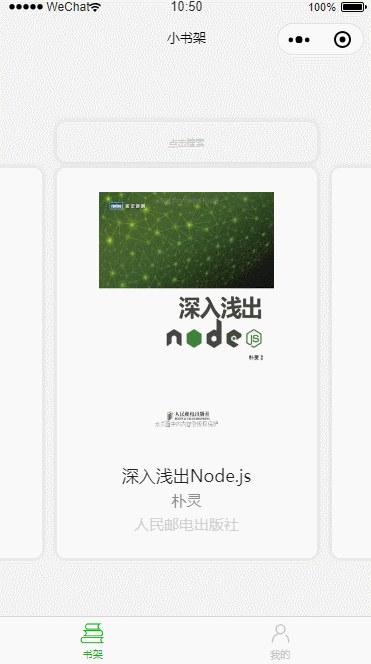
效果图
实现分析
从效果图上分析,书籍详情是通过点击首页的
item后进入。
进入详情页之后页面顶部显示书籍的相关信息,同时判断用户是否登录,未登录则弹出一个授权登录窗口。
点击登录之后即可加载出用户评论信息。
通过上图我们可以分析出静态页面的主要结构如下:
- 书籍信息
- 左侧布局是图书图片
- 中间布局从上到下是:名称、作者、出版社
- 右侧布局是收藏
icon
- 登录提示弹窗
- 上部分是提示文本
- 下部分是登录按钮
- 评论列表
- 左侧是评论人头像
- 右侧上部分是评论人名字
- 右侧中间部分是评论信息
- 右侧下部分是评论时间
- 评论按钮
- 固定在底部的一个按钮
ps:如果不想看代码可直接跳过了,下面都是具体的代码实现了
具体实现
具体实现主要从
wxml,wxss,js这三个文件去介绍。
wxml实现了页面的绘制,然后通过wxss美化页面的样式,最后通过js文件获取数据并将数据填充wxml。
顶部书籍信息实现
wxml规定了各个组件的摆放顺序。
<view class="book-container bg-white">

    <view class="book-info">

    // 书籍图片

      <image class="book-image" mode="scaleToFill" src="{{bookInfo.bkcover}}"></image>

	// 书籍文字信息

      <view class="book-desc">

        <text class="book-main-text">{{bookInfo.bkname}}</text>

        <text class="book-text">{{bookInfo.bkauthor}}</text>

        <text class="book-text">{{bookInfo.bkpublisher}}</text>

      </view>

    </view>

	// 收藏 icon

    <view class="button-area" catchtap="onLikeClick">

      <block wx:if="{{isLike}}">

        <l-icon name="like" color="#FFE57F" size="50" />

      </block>

      <block wx:else>

        <l-icon name="like" color="#34BFA3" size="50" />

      </block>

    </view>

  </view>
wxss样式美化了图书封面,图书名称,作者信息等内容
.book-container {

  /*border: 1px solid black;*/

  display: flex;

  flex-direction: row;

  justify-content: space-between;

  align-items: center;

  padding: 50rpx 30rpx;

}

.book-info {

  /*border: 1px solid red;*/

  display: flex;

  flex-direction: row;

  align-items: flex-start;

  justify-content: space-between;

}

.book-image {

  width: 200rpx;

  height: 300rpx;

  box-shadow: 0 0 10rpx #cdcdcd;

}

.book-desc {

  /*border: 1px solid yellow;*/

  display: flex;

  flex-direction: column;

  justify-content: space-between;

  align-items: flex-start;

  padding-left: 30rpx;

}

.book-main-text {

  color: #1e1e1e;

  font-size: 35rpx;

}

.book-text {

  color: #8a8a8a;

  font-size: 30rpx;

}

.button-area {

  /*border: 1px solid blue;*/

  display: flex;

  flex-direction: row;

  align-items: center;

}
js文件伪代码如下:获取了书籍信息、用户是否收藏图书的信息
// 获取书籍信息

_getBookInfo(bk_id) {

    bookModel.getBookInfo(bk_id)

      .then(res => {

        this.data.bookInfo = res

        this.setData({

          bookInfo: this.data.bookInfo

        });

      })

  },

// 获取用户是否收藏该书籍

_getUserLikeIt(bk_id) {

  bookModel.getLikeStatus(bk_id)

      .then(res => {

        this.data.bookIsLike = res

        this.setData({

          isLike: this.data.bookIsLike

        });

      })

  },
登录弹窗实现
弹窗使用了lin-ui中的l-popup组件,具体的组件使用可查看 官方文档。
wxml文件实现了组件的摆放顺序。
<!-- 弹出登录弹窗 -->

<l-popup show="{{unLogin}}" content-align="center" showMask="true" bind:lintap="onPopupTap" locked="{{true}}">

  <view class='center'>

    <text>收藏功能需要</text>

    <text>登录之后才能使用呢~</text>

    <l-button bind:getuserinfo="getUserInfo" open-type="getUserInfo">允许登录</l-button>

  </view>

</l-popup>
wxss文件控制了弹窗居中显示,已经窗口大小、字体大小等内容。
.center {

  height: 250rpx;

  width: 500rpx;

  line-height: 100rpx;

  background: #fff;

  text-align: center;

  align-items: center;

  justify-content: center;

  align-content: center;

  color: #555;

  border-radius: 8rpx;

  font-size: 28rpx;

}
js文件中判断了用户是否登录,根据不同的登录状态控制弹窗是否显示
if (app.globalData.userInfo != null) {

      that.setData({

        unLogin: false

      })

      // 评论需要登录

      this._getCommentData(that.data.bk_id)

    } else {

      that.setData({

        unLogin: true

      })

    }
评论列表实现
进入评论列表,首先会加载loading进度条,如果没有评论列表会显示暂无评论的提示,如果有评论数据会显示评论数据。
评论列表的wxml如下:
<view class="comment-container">

    <view class="comment-title">

      <text>--------- 评论 ---------</text>

    </view>

	// 加载中进度条

    <view class="comment-loading" wx:if="{{commentLoading}}">

      <view class="donut"></view>

    </view>

	// 评论布局列表

    <view class="comment-area" wx:else>

		// 有评论数据

      <block wx:if="{{commentList.length > 0}}">

        <view class="comment-item" wx:for="{{commentList}}" wx:key="index">

        	// 头像

          <view class="avatar-container">

            <image mode="scaleToFill" src="{{item.uavatar}}" class="user-avatar"></image>

          </view>

			// 用户名、内容、评论时间

          <view class="comment-content">

            <text class="user-name">{{item.uname}}</text>

            <text class="user-comment">{{item.ucontent}}</text>

            <text class="comment-time">{{item.created_at}}</text>

          </view>

        </view>

      </block>

		// 没有评论提示布局

      <block wx:else>

        <view class="comment-placeholder">来当第一个评论的人吧~</view>

      </block>

    </view>

  </view>
评论列表的wxss如下:
.comment-container {

  padding-top: 30rpx;

}

.comment-title {

  /*border: 1px solid black;*/

  display: flex;

  justify-content: center;

  align-items: center;

  margin-bottom: 30rpx;

}

.comment-title > text {

  font-size: 30rpx;

  color: #cdcdcd;

}

.comment-area {

  /*border: 1px solid black;*/

  padding: 20rpx 30rpx;

}

.comment-item {

  display: flex;

  flex-direction: row;

  justify-content: flex-start;

  align-items: flex-start;

  margin-bottom: 20rpx;

}

.comment-placeholder {

  display: flex;

  justify-content: center;

  align-items: center;

  color: #dcdcdc;

}

.comment-item:last-child {

  margin-bottom: 180rpx;

}

.avatar-container {

  width: 80rpx;

  height: 80rpx;

  margin-right: 20rpx;

}

.user-avatar {

  width: 80rpx;

  height: 80rpx;

  /*border: 1px solid red;*/

}

.comment-content {

  display: flex;

  max-width: 590rpx;

  flex-direction: column;

  justify-content: flex-start;

  align-items: flex-start;

}

.user-name {

  color: #8a8a8a;

  font-size: 30rpx;

}

.user-comment {

  display: inline-block;

  margin-top: 10rpx;

  color: #1e1e1e;

  font-size: 35rpx;

}

.comment-time {

  display: inline-block;

  margin-top: 10rpx;

  color: #cdcdcd;

  font-size: 20rpx;

}

.comment-loading {

  display: flex;

  justify-content: center;

  align-items: center;

}
评论列表的js如下:调用接口获取数据库中的评论数据。
_getCommentData(bk_id) {

    let that = this

    bookModel.getPageData(bk_id)

      .then(res => {

        console.log(res)

        if (res.length > 0) {

          // 关闭进度条

          that._commentSetTimeOut(res, false)

        } else if (res.error_code == 10006) {

          // token 不合法,需要登录

          app.showInfo('token不合法,请去登录');

          // 关闭进度条

          that._commentSetTimeOut([], false)

        } else {

          // 关闭进度条

          that._commentSetTimeOut([], false)

        }

      })

      .catch(err => {

        console.log('错误信息:' + err);

        // 关闭进度条

        that._commentSetTimeOut([], false)

      })

  },
底部固定的评论按钮实现
主要就是如何使按钮底部固定,同时不会遮挡住评论列表
wxml如下:有意思的是class中也能直接写样式,新发现!
  <view class="fixed-bottom block-full-width flex-container bg-white">

    <button class="full-button" type="primary" open-type="getUserInfo" catchtap="goComment" data-id="{{bookInfo.id}}" data-name="{{bookInfo.name}}"> 写评论 </button>

  </view>
以上就是本次的介绍。
扫码关注公众号,轻撩即可。
全栈项目|小书架|微信小程序-书籍详情功能实现的更多相关文章
- 全栈项目|小书架|微信小程序-登录及token鉴权
小程序登录 之前也写过微信小程序登录的相关文章: 微信小程序~新版授权用户登录例子 微信小程序-携带Token无感知登录的网络请求方案 微信小程序开通云开发并利用云函数获取Openid 也可以通过官方 ...
- 全栈项目|小书架|微信小程序-项目结构设计分包
前面的文章 介绍了服务端的基础搭建以及用户模块的设计,接下来就是在服务端和客户端实现具体的业务了. 本篇文章先来介绍微信小程序开发的项目结构设计,也就是项目分包情况. 由于项目是在<极客时间-9 ...
- 全栈项目|小书架|微信小程序-点赞功能实现
微信小程序端的点赞功能其实没什么好介绍的,无非就是调用接口改变点赞状态和点赞数量.需要注意的是取消点赞时的处理,我这里为了减少服务器接口的调用,直接本地存一个变量,修改这里的变量值即可. 由于源码都相 ...
- 全栈项目|小书架|微信小程序-首页水平轮播实现
首页效果 首页功能主要有 搜索(下篇文章介绍) 图书列表 图书列表 分析一波: 列表是水平滑动 点击列表会有按压效果:布局整体缩小 每个布局的信息从上到下排列分别是:图片.书名.作者.出版社 每个布局 ...
- 全栈项目|小书架|微信小程序-实现搜索功能
效果图 上图是小程序端实现的搜索功能效果图. 从图中可以看出点击首页搜索按钮即可进入搜索页面. 布局样式是:搜索框 + 热搜内容 + 搜索列表. 搜索框使用 lin-ui 中的 Searchbar组件 ...
- 全栈项目|小书架|微信小程序-登录回调及获取点赞列表功能
效果图 这一节介绍,登录回调 以及 喜欢列表 的实现. 登录回调:这里是指在获取登录完成之后,再进行下一步的操作. 比如效果图中我的页面,默认是未登录状态,积分和喜欢列表的数量都没有获取到. 而登录成 ...
- 全栈项目|小书架|服务器端-NodeJS+Koa2 实现书籍详情接口
通过上篇文章 全栈项目|小书架|微信小程序-首页水平轮播实现 我们实现了前端(小程序)效果图的展示,这篇文章来介绍服务器端的实现. 书籍详情分析 书籍详情页面如下: 从上图可以分析出详情页面大概有以下 ...
- 全栈项目|小书架|服务器端-NodeJS+Koa2实现首页图书列表接口
通过上篇文章 全栈项目|小书架|微信小程序-首页水平轮播实现 我们实现了前端(小程序)效果图的展示,这篇文章来介绍服务器端的实现. 首页书籍信息 先来回顾一下首页书籍都有哪些信息: 从下面的图片可以看 ...
- 全栈项目|小书架|服务器开发-NodeJS 使用 JWT 实现登录认证
通过这篇 全栈项目|小书架|服务器开发-JWT 详解 文章我们对JWT有了深入的了解,那么接下来介绍JWT如何在项目中使用. 安装 $ npm install jsonwebtoken 生成 Toke ...
随机推荐
- Linux:搭建GitLab
0.写在前面 GitLab官方明确要求最低配置2核4G,如果配置过低,会出现502错误. 1.安装SSH #安装ssh sudo yum install -y curl policycoreutils ...
- 调用Fluent进行多工况计算总结
算例来源:https://confluence.cornell.edu/display/SIMULATION/FLUENT+-+Turbulent+Pipe+Flow 有时候我们对同一模型进行多工况计 ...
- opencv 图像resize
这是文档中的函数原型 cv2.resize(src, dsize[, dst[, fx[, fy[, interpolation]]]]) 参数说明src:要resize的原图,应该是一个矩阵 dsi ...
- JDBC 线程安全 数据库连接池
jdbc 是线程安全的,但是,推荐一个线程用一个链接 JDBC is thread safe: It is quite OK to pass the various JDBC objects betw ...
- Java学习-057-Jsoup爬虫获取中国所有的三级行政区划数据(二),并生成数据库 SQL 脚本插入语句
多不废话,直接上马,小主您稳着... package com.fanfengping.zeus.uitl; import com.alibaba.fastjson.JSONObject; import ...
- 【SpringBoot】SpringBoot配置文件及YAML简介(三)
SpringBoot配置文件 SpringBoot使用一个全局的配置文件,配置文件名是固定的; application.properties application.yml 配置文件的作用:修改Spr ...
- mysql查看连接情况
1.使用navicat进入命令行或者命令行进入mysql 2.看所有进程 show full processlist; 3.看所有连接show status like 'Threads%';
- 设置驱动的方法(Chrome 亲测ok)
驱动下载地址 http://selenium-release.storage.googleapis.com/index.html package com.selenium.java.webdriver ...
- (原)关于音频onset detection算法的阅读
Orgin:Using Audio Onset Detection Algorithms 本文档只记录了部分的内容,主要以aubio相关内容为主,并非整个文档的完整内容,记录人:lihaiping16 ...
- ubuntu下编译C++程序
1.CMake 定义:CMake是一个跨平台编译工具,可以用来自动输出makefile文件: 用法:(1)想要自动生成makefile,还需要编写对应的CMakeLists.txt文件: (2)在CM ...